The humidity and temperature of the air, comfort and benefits for the body depend on the stove in the bathhouse. A sauna stove must be equipped with a tank for heating water, a chimney and a heater pocket for stones.
If you have a great desire to build a sauna stove with your own hands, and not to hire specialists, be sure to read this article several times, you can even print it out on a piece of paper and use it directly as a cheat sheet. At the same time, you will save significantly and gain invaluable experience, which will allow you to build similar structures for money in the future. External decoration plays an important role, because a bathhouse is a place of relaxation, both physical and moral, and the appearance of the stove plays an important role in this! After external finishing, the stove in your bath should become its “highlight”, an exclusive decoration that is simply pleasant to look at, like a painting.
The sauna stove is placed either with a combustion door into the adjacent room, or directly into the steam room, where firewood is stored. Naturally, it is better for the firewood to be supplied from the next room; if the size allows you, do just that.
Water tanks are mounted either behind the stove body on supports (floor or wall mounting), or they are mounted directly above the stove firebox. At the same time, a stationary floor mounting of the tank is safer than a wall mounting.
Features of choosing the type of stove for a bath
This allows you to make the necessary design, which can fit perfectly into the right place with its dimensions. A sauna stove requires several of the most important components. So, a sauna stove must have a large tank for heating water, a chimney and a receptacle for stones.
It should be understood that installing a sauna stove is a very costly and expensive pleasure, so now many owners of country or country houses independently install a self-made sauna stove in their bathhouse.
Of course, if you make a sauna stove yourself, you can save a very significant amount of money, but you will lose in time. If you decide to make a sauna stove with your own hands, you will have to be patient.
The fact is that the process is long and in some cases complicated. At the same time, you need to understand that the final result should be exactly as you originally planned.
- As a rule, a sauna stove is installed in such a way that the combustion door is located in another room.
- Or here is the second option, where the furnace room is located in the steam room itself and this is where firewood is placed in the firebox.
- Many craftsmen advise installing the firebox in the next room, but if the room itself is very small, then you will have to use the second method of installing the firebox.
- As for water tanks, there are also nuances here. As a rule, tanks are mounted immediately behind the body of the stove itself, in some cases they are fixed above the firebox.
- In this case, professionals advise installing the water tank behind the stove body, since wall mounting is not very safe.
Next, you need to determine the volume of the water tank and the firebox of the stove.
Useful video
Not just diagrams, but also a description of the advantages and disadvantages of vertical and horizontal structures (not necessarily made of pipes). Plus interesting life hacks.
Even more diagrams, even more explanations about them. However, the main concern of the author of the video is that you get a stove for a real Russian bath. So sauna lovers don’t have to watch it).
+++
We hope that you have received some kind of holistic understanding of what a sauna stove is. Other things can only be learned from practice and experiment. Good luck to you!
Calculation of the volume of the steam room and furnace firebox
Here it is necessary to measure the dimensions of the room, and it is necessary to take into account the surface (what material it is made of).
If there are windows, a glass door, concrete surfaces, brick or tile, it is necessary to measure their area.
Therefore, for 1 m2 of such surface you can additionally add 1.5 cubic meters to the volume of the room. All these indicators will be taken into account when calculating the size of the furnace.
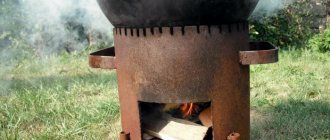
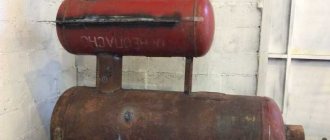
Horizontal model
The body is positioned horizontally. In such models, the open heater is welded on the sides to the body. The outlet for combustion products is located on the side.
Note!
- DIY birdhouse: step-by-step diagrams and drawings for making it yourself. Types of birdhouses and materials + design ideas
- Do-it-yourself landscape design: planning and zoning of the site, selection of decorative elements. New products and design ideas (photo + video)
- Do-it-yourself sliding gates at the dacha: options for construction materials, preparation of the territory + step-by-step instructions for doing it yourself
The advantage of the horizontal model is that the door to the firebox can be moved into the rest room, so you don’t have to carry firewood into a humid room with steam.
In addition, such models heat the dressing room better - this is important if the bathhouse is spacious enough. The tank is usually hung from the end of the stove.
Oven requirements
Perhaps the most important and basic requirement for such stoves is safety. The stove must meet all safety requirements; it must not be a fire hazard or cause burns to humans.
In addition, there should be no smoke entering the room, and the temperature regime should be recorded on working devices.
Recommendations from specialists for installing an iron sauna stove
The main point is the presence of a high-quality foundation. Afterwards, it is necessary to take a number of measures aimed at fire safety, which are as follows:
- A metal stove should be installed at a distance of at least 100 cm from the wall.
- To avoid fire in the room, it is necessary to cover the walls located in the immediate vicinity of the structure with foil and heat-insulating material, which will enable wooden walls to avoid ignition.
- An iron stove requires chimney insulation. You can resort to sandwich pipes.
- It is imperative to build a brick sarcophagus on top of an iron stove. Its appearance will improve, and safety from possible burns when touching the hot metal walls of the oven will increase.
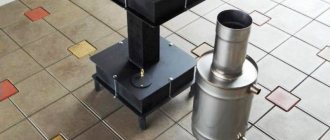
Step-by-step instructions for creating a heater oven
A heater stove is one of the simplest metal stove designs. It consists of a water tank, firebox and chimney. This is perhaps the simplest design that you can make yourself.
Attached to the water tank are a drain valve, the firebox itself and the heater, and a smoke exhaust pipe. Therefore, first, it is necessary to make the frame of the stove and firebox from sheet steel 8-10mm thick, and then make the heater and chimney.
- First of all, we make the base of the firebox frame from corners and pieces of sheet metal using welding. It is necessary to lay fireclay bricks inside the stove, this is important. Next, a heater is made where the stones will be placed.
- Then you can start making the chimney. The hole for the chimney is installed directly above the heater. Well, finally, you need to start manufacturing and installing the water tank.
- As a rule, in such stove models, the water tank is installed on the back of the stove. There must be a drain valve at the bottom of the tank to drain the water. After manufacturing the finished structure, it must be checked for the presence of smoke in the room and the presence of draft.
Another popular option for making a sauna stove is a brick stove. However, it should be understood that the cost of such a stove will be very high if you use the services of qualified stove makers.
But you can, of course, make your own brick sauna stove with your own hands. Only in this case you will have to spend a lot of effort and time, but at the same time, you can save a decent amount of money. Although, if you carefully understand and read a lot of literature on similar topics, then it is quite possible to make such a stove.
- Therefore, if you still decide to make a sauna stove with your own hands, you can follow the pictures below with a detailed description. But remember, this process is long and painstaking, and sometimes complicated, so you will have to have a lot of patience and endurance to achieve the desired result.
- Of course, at certain stages of the construction of the furnace, some incomprehensible nuances or difficulties may arise. In this case, our colorful and illustrated photos will help you, where all the main stages of construction will be indicated step by step.
- It is also necessary to remember that you need to make the oven carefully and slowly, so that there are no mistakes. Otherwise, it will be difficult to correct your “jambs” or miscalculations later, if at all possible.
Thus, you can make a stove for a bathhouse with your own hands, but the question is how well it will be done.
Difficulties when installing a homemade heater
Failure to comply with construction rules leads to mistakes. In such cases, the stoves become short-lived
To avoid disappointment, it is important to keep the following instructions in mind:
- remember about waterproofing the stove foundation;
- prepare the correct sand-clay solution (1:2);
- choose quality material;
- follow standards when choosing stove sizes.
Construction without compliance with the diagram, installation of non-standard fittings, uneven masonry can lead to a lack of draft and to smoke in the bathhouse.
Possible problems:
- No proper heating. This happens when the wrong valve closes - they are different for the “summer” and “winter” heating of the bathhouse.
- Smoke comes out in different parts of the chimney - it is necessary to expand the chimney and eliminate right angles.
- The stove is smoking - the cracks and cleaning holes are poorly sealed with solution. Or raw firewood is used.
- Slow heating - there is a lot of soot on the inner walls of the oven. It needs to be cleaned.
Photos of drawings of a stove for a bath
Foundation structure
The location for a stove made by hand from metal is determined during the design process - a foundation must be poured under the stove. Under a light wooden bathhouse there may not be a strip foundation - only a columnar one.
Therefore, the foundation for the stove is often poured separately from the foundation of the house. The best option is to pour a concrete foundation with reinforcement. The minimum dimensions are 1x1m or 1x1.5 for a horizontal oven.
The top of the concrete is covered with two layers of fire-resistant solid red brick in a mortar of clay and sand (the cement mortar will crack from the heat). The foundation should be raised 300 mm above the floor. The top is covered with steel sheet.
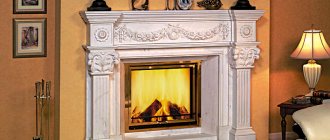
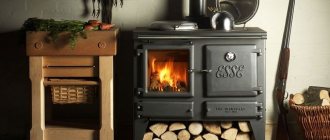
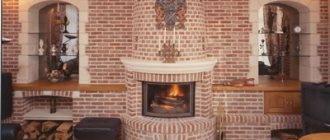
How to finish the stove depending on its type
External decoration will help to give the sauna stove individuality. It can be done in various ways - from simple jointing of brickwork to cladding with marble or granite slabs. It all depends on the taste and financial capabilities of the owner.
Photo gallery: examples of finishing stone and iron stoves of different sizes
The stove, lined with glossy slabs, looks like a fireplace
Finishing with natural stone can be very unusual The firebox part in the form of a fireplace portal looks unusual Granite is ideal for lining a sauna stove Flat stone can be used to decorate not only the stove itself, but also the adjacent wall A wooden fence, although not a complete finish, can protect against burns
A large structure can be built from facing bricks and simply unstitched seams
Suitable pipe sizes
Steel pipe as the main raw material for the furnace has a number of advantages. Among them:
- resistance to damage;
- good level of heat transfer;
- rapid heating of the room;
- minimal expansion when heated;
- use of any type of fuel;
- minimum number of welds.
The disadvantages of a metal stove are the same rapid cooling of the room as heating, uneven distribution of heat in the room. To eliminate them, the stove is often lined with bricks.
530 mm
For a steam room of standard sizes, a pipe measuring 530 millimeters is good. A stove made from it will be quite powerful; the wood will burn for a long time, providing good performance. Available in horizontal and vertical versions.
640 mm
A good material option for a large steam room in a bath complex. The large firebox allows you to place a lot of firewood at once, increasing the break between loads to 8 hours.
426 mm
This diameter is enough for a small steam room in a seasonal building, where bathing procedures are combined with washing or dousing with cold water in one room.
It is important to note that cast pipes without seams are an excellent option for small furnace parts; their diameter does not exceed 250 mm. To make the main part of the furnace, it is better to take pieces of spiral pipes - they are reliable and will cost the same as scrap metal. If you can’t find these, you should take straight-seam ones.
Commissioning
Before you are going to light the stove, you should let it dry thoroughly. To do this, open the doors, vent and vents open for 7 days, this way the oven will dry out faster. If the stove does not smoke when lighting, it means the draft is good.
You should not rush to light the stove. Otherwise, if there is insufficient drying, cracks may form in the masonry.
Masonry mortar
For laying fireclay bricks, a mortar prepared from white fireclay clay is used. You can also purchase a ready-made composition for laying fireclay. You cannot place the entire oven on this solution. Why? This solution is sintered into a monolith at a temperature of 700–800°C. There are no such temperatures in external masonry. Therefore, after a short time it will crack and spill out, which will lead to the destruction of the masonry.
For external masonry, a solution of quartz sand and clay is used in a ratio of 1 (clay) : 5 (sand). The sand must be of river origin or quarry. River sand is somewhat worse, since its grains of sand are round and round, and the solution itself will have worse characteristics. Therefore, preference is given to quarry sand. The sand is sifted through a mesh with cells of 2–2.5 mm. This will prevent large particles from getting into the solution.
As for clay, it can also be obtained from a quarry from a depth of at least two meters. The quality of the clay should be checked. To do this, soak 200 g of clay in water for a day. Then roll the clay into a “bun” and leave it to dry under a canopy in the open air. After 2 days, drop it onto a stone slab from a height of 170 cm. If the “bun” has crumbled into several large parts, then clay is suitable.
The selected clay must be soaked in water to a paste-like state and ground through a sieve. First through large cells, and again through small ones.
Masonry bricks
For laying a stove, it is important to purchase well-fired and high-quality bricks. It should not have chips or cracks. Its edges must be smooth. The quality of a brick can be checked very simply. If, when dropped, it falls apart into several large pieces, then the brick is suitable. If, when dropped, it crumbles into many small pieces, then such a batch of bricks is not suitable for a heater.
How to improve the performance of a metal stove
The consumer properties of the stove can be improved in two ways:
- heat treatment of the material;
- improvement of the furnace device.
Metal preparation
After cutting the material, it is subjected to heat treatment using the tempering method. The metal of the workpieces is heated to a dark red color. Next, they should be cooled slowly. If slight warping of the workpieces occurs during the tempering, they are straightened with a hammer. It is also necessary to check the dimensions and cut off excess if necessary. This treatment will eliminate warping of the finished product.
Design features of the firebox
To ensure long-term burning of wood without overheating of the stove, some experts suggest eliminating grate bars from the design and burning wood directly on the metal bottom of the firebox.
Metal oven with grate
Additionally, it is proposed to seal the firebox door with asbestos cord to slow down the flow of oxygen. A hole (or a series of holes) is made in the door itself, which is retractable with a damper. This damper regulates the air supply.