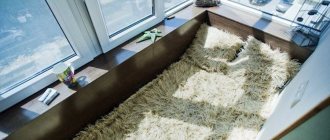
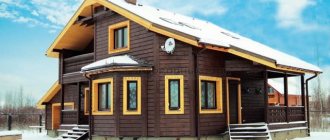
Installing plastic windows and insulating the floor on the balcony allows you to fully use the room in winter. For insulation, mineral and synthetic materials are used, placed under board flooring.
After laying the protective layer on the balcony, you can grow plants all year round or set up a recreation area or a small workshop.
Insulated loggia.
Insulation materials
To reduce heat losses, 2 types of insulating materials are used:
- reflective (for example, roll insulators with an external foil coating that returns heat flow to the room);
- preventing, forming a layer with reduced thermal conductivity (for example, foam or expanded clay).
Criterias of choice
When selecting material, take into account:
- thermal conductivity - when the thermal insulation coefficient drops, the protection of the room from cooling improves;
- vapor permeability, which determines the level of humidity - with a reduced parameter, installation of waterproofing and regular ventilation of the balcony is required;
- ease of installation and service life of the protective coating;
- price (the criterion is secondary, since the volume of insulation for a standard balcony does not exceed 0.3-0.5 m³).
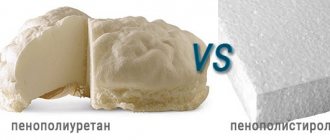
Penoplex
The material is based on foamed and compacted polystyrene foam, has a high density and is resistant to water and chemicals (with the exception of organic solvents).
The sheets have projections and grooves for joining into a monolithic slab, preventing the formation of cooling bridges.
For flooring, foam plastic with a thickness of 20 to 150 mm is used, intended for foundations or facades of houses. The disadvantage of the material is the increased price (for example, sheets 80 mm thick will cost 4.9 thousand rubles per 1 m³).
Penoplex for floor insulation.
Styrofoam
Sheet foam plastic has a reduced thermal conductivity coefficient and does not allow water vapor to pass through, and is destroyed under the influence of organic solvents.
It is not recommended to store the material under sunlight, which negatively affects the performance.
Additional additives have been introduced into construction foam to help reduce flammability and self-extinguishing when exposed to open fire. The material has a service life of 5-7 years and has low resistance to rodents, which bore passages inside the sheets.
Polystyrene foam on the balcony floor.
Expanded clay
Bulk material with a high thermal conductivity coefficient; protection requires a layer up to 200 mm thick, which leads to the rise of the floor covering.
It is allowed to fill expanded clay with a concrete solution that forms a screed (subject to the strength of the concrete slab). The material has good vapor permeability and makes it possible to create a combined type of thermal insulation (for example, after backfilling with gravel, fiber-reinforced gypsum slabs are laid on top).
Expanded clay for the balcony floor.
Mineral wool
Mineral wool is supplied in the form of sheets and rolls. The cut pieces are placed between wooden guides. The material is fireproof, but actively absorbs water with loss of initial characteristics.
Cotton wool contains glass, so installation work is carried out using protective equipment. During operation, the material begins to crumble, releasing fine dust.
There is basalt wool that does not contain glass and is characterized by an increased service life and a reduced thermal conductivity coefficient.
Mineral wool is laid in a wooden frame.
Floor surface waterproofing technology
If the base is of good quality, and there is another insulated balcony on the floor below, then priming will be sufficient for waterproofing. If the repair is carried out on a suspended balcony, and all the walls are exposed to frost and wind, then during the repair it is worth remembering the possible penetration of moisture. Excessive moisture can damage both the concrete floor itself and the thermal insulation materials over time.
To avoid possible waterlogging, properly waterproof the room. Experienced craftsmen do not recommend covering the walls, floor and roof with plastic film, since even if the film does not break through and the insulation itself does not get wet, moisture can accumulate between the foam blocks and the film. You need to use another method.
Penetrating waterproofing
There are specialized substances that can replace polyethylene or other coating. A penetrating waterproofing solution, for example, Penetron or Hydrotex, can be applied to the cleaned surface. They literally seep into the concrete, and the moisture has nowhere else to “hide” and spread.
Coating waterproofing
The range of coating waterproofing products is quite wide. Initially, they are divided into several types: bitumen and polymer based, used cold or hot. This method is considered one of the simplest, and therefore the most popular. When waterproofing concrete slabs, it is recommended to use similar products.
Balcony vapor barrier
After installing the sheathing (regardless of the method of assembly and fastening) and filling the voids with thermal insulation, it is necessary to lay a layer of film to prevent saturation of the protective layer with water vapor.
The material is rolled out over the surface and secured to the crossbars with staples for a construction stapler. The edges of the panels should overlap each other by 100-150 mm. Boards or plywood are placed on top of the insulation under linoleum or another type of finish.
Performing a vapor barrier on the balcony.
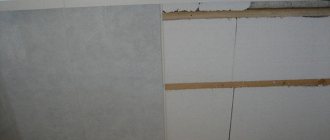
Leveling the floor with tiles
If the surface is in good condition and has the desired slope from the wall, but minor cracks and chips appear on it, then the floor can be leveled with floor tiles.
Small surface defects can be immediately smoothed out with ceramic tiles
- First you need to repair all the damage - this is done as follows:
— cracks and chips expand and are cleaned of dust and treated with a primer;
— then they are sealed with cement or special repair mortar and well leveled.
- The tiles are laid on an adhesive intended for outdoor work - it is resistant to temperature changes and moisture. It is kneaded into a homogeneous mass, taking into account the requirements of the instructions.
floor tile
- The glue is spread on the surface and spread with a notched trowel. Since the surface is uneven and needs to be perfected, a little more glue is often used than necessary. Then a tile is laid on it, the back surface of which should also be coated with glue and smoothed with a notched trowel. The direction of the furrows when laying should be perpendicular. Calibration crosses or other special devices are installed between the tiles to maintain the thickness of the seams and the direction of laying.
Convenient modern devices for maintaining the thickness of the joints and the level of the tile surface
- If excess glue comes out between the tiles, it must be removed. The seams must be hollow, since after the glue has dried, they must be sealed with moisture-resistant grout - fugue.
Before grouting, the leveling elements are removed - they are carefully knocked down with a rubber hammer or simply with your foot.
Required tools and materials
The minimum set for work includes:
- thermal insulation material (the volume depends on the area of the balcony and the thickness of the layer, it is recommended to buy with a margin of 5-7%);
- material for vapor barrier (used when laying soft insulation);
- waterproofing;
- primer with antibacterial additives;
- wooden beam of rectangular or square cross-section (volume and dimensions depend on the dimensions of the balcony and the thickness of the layer of insulating materials);
- fastenings for the frame (special supports or studs);
- mounting foam and application gun;
- screws for fixing the frame supports to the concrete base;
- screws and angles for additional connection of timber;
- masking tape for gluing connection lines of insulation sheets;
- sheets of plywood or particle board to cover the base;
- material for finishing (linoleum, laminated or piece parquet or tongue and groove board).
To install thermal insulation on a balcony, you need the following tools:
- hammer drill and drill for drilling concrete;
- an angle grinder and a set of discs for concrete;
- electric drill or cordless screwdriver;
- hacksaw or jigsaw for cutting workpieces;
- hydraulic level;
- drawing and measuring tools.
One of the necessary tools.
Floor leveling methods
You can level the floor surface in different ways, which will depend on what functions the balcony will perform in the future:
— ceramic tiles;
- garden parquet;
- using logs and plywood covering;
- dry or wet screed.
In some cases, insulation for a room is simply necessary, and sometimes it will be unnecessary. But in any case, before you start leveling the base, it is necessary to carry out preparatory measures.
Preparing for insulation
At the preparation stage it is necessary:
- Clean the room of furniture and remnants of old flooring.
- Assess the condition of the base and then remove the loosened cement.
- Restore the screed and ensure waterproofing of the future insulated floor.
Assessing the condition of the balcony slab
The apartment owner can visually assess the condition of the balcony slab and remove the layer of loose coating using an electric or manual tool.
If damage to the edges or deep cracks is detected, then it is necessary to carry out an examination of the base by a specialized organization. Operating a balcony with a damaged slab is not allowed; additional load leads to the collapse of the base and injury to people.
Carrying out repair work
Algorithm for preparing the base:
- Clean the cracks from loose cement and dust.
- Apply a layer of primer to ensure improved adhesion of finishing materials.
- Fill the gaps between the slabs with foam and install an insulation bead.
- Deepen small cracks with an abrasive tool, then clean off dust and fill with soil. If the faults are long, then it is necessary to cut transverse grooves for laying reinforcing elements (for example, galvanized screws or pieces of steel reinforcement).
- Seal the cracks with a cement composition that is resistant to temperature changes.
- If there are potholes on the surface, then it is necessary to install beacons at a level and fill the floor with cement mortar. Further work can be carried out after 10-15 days (after the moisture has evaporated).
Sealing cracks in the floor.
Surface waterproofing
To protect the insulator from condensation, sheets of roofing felt are used, which are laid with an overlap. The joints are sealed with bitumen mastic and the material is heated with a blowtorch.
Refusal of waterproofing leads to accelerated rotting of wooden logs and destruction of thermal insulation. When using synthetic roll insulation material with a metal backing, moisture protection is not required.
Waterproofing the floor.
How to insulate a balcony floor from the street
Insulation of a balcony slab is carried out according to the following instructions:
- Initially, inspection work is carried out on the outer part of the balcony slab, eliminating defects, chips, and cracks. There are many of these if the screed is old. Be sure to strengthen the edges of the structure with cement mortar. It is unacceptable for the reinforcement to be visible and for the concrete to crumble in these places.
- Afterwards, cobwebs, dust and debris are removed from the outer surface. For this purpose it is better to use a special soft brush.
- Then the structure is measured and determined with a sufficient amount of external insulation. It is cut in accordance with the specified dimensions and shapes of the concrete slab. Be sure to make fragments 10-20 cm wide. They will be necessary to reach the lower part of the walls.
- Then the concrete base is primed, then glue is applied to the heat-insulating layer and attached to the balcony base. An assistant will be required for this manipulation, since it is necessary to hold each edge of the insulation pressed against the concrete screed for several minutes. Gluing the insulation begins from the wall of the house. Finally, the parapet is edged using pre-cut fragments of thermal insulation and placed on the same glue.
- The entire surface is sealed in the same way, and after complete drying, the seams are coated with Tilit or special mounting tape that is suitable for the selected thermal insulation material.
- Upon completion of the insulation work, the heat insulator is hidden under the finishing coating. This can be a special plaster with waterproofing.
On a note! It is better to entrust the work of gluing the balcony base from the outside to specialists, especially if it is at a sufficient height. Also, in case of high climate humidity, before attaching the insulation, it is recommended to cover the concrete slab with a liquid waterproofing agent.
Balcony slab that needs external repairs and thermal insulation Source troitsk.okna-servise.com
Instructions for insulating the floor on a balcony with lathing
Before starting the manufacture of the sheathing you must:
- Correctly and accurately determine the height of the flooring relative to the horizontal level in the adjacent room (the balcony should be located 20-30 mm lower). When determining the cross-section of the beam, it is necessary to take into account the thickness of the finishing coating (for example, tongue-and-groove boards or plywood with a layer of laminate).
- Check the slope of the balcony slab with a hydraulic level, which will allow you to clarify the method of fastening the wooden sheathing.
- Carry out a preliminary calculation of construction and finishing materials (taking into account a reserve of up to 10% in case of defects). When arranging the sheathing, it is recommended to place longitudinal beams along the load-bearing wall of the house and near the external partition of the balcony, and then mount the beam in the center. The number of cross ties depends on the length of the room and the width of the insulation used. When installing the timber, a gap from the partitions is maintained within 50-70 mm, which should be kept in mind when calculating the required amount of building materials.
- Impregnate wooden blanks with antibacterial primer and dry naturally (do not expose the material to direct sunlight).
- Mark the axes of symmetry of the longitudinal and transverse beams on the floor and walls of the balcony.
Installation of wooden sheathing at level.
Use of U-shaped parts
The sequence of actions when assembling the sheathing on the racks:
- Install metal brackets on the floor in accordance with the markings (support spacing is at least 500 mm) and attach to the base with anchor screws or dowels. The supports must have sufficient strength and not sag under the weight of the sheathing and additional load on the floor. A separate bracket must be provided for each crossbar.
- Remove debris and dust from the floor surface, and then lay thermal insulation material (for example, mineral wool), in which windows for supports must first be cut.
- Attach the wooden sheathing blanks with screws or bolts, checking the position with a building level.
- Install cross braces that are secured to the longitudinal beams with metal angles and screws.
- Fill the resulting voids in the sheathing cells with thermal insulation.
Installing the sheathing on the U-shaped rack.
Using studs
Sequencing:
- Install metal or plastic bushings into the drilled holes.
- Screw in the studs with special nuts, and then put the sheathing parts on the bolts. It is necessary to provide a niche in the beam for the hidden installation of a fixing element.
- Adjust the position of the frame horizontally using the previously installed nuts with an extended reference plane.
- Secure the frame with the top nuts, and then cut off the excess stud with an abrasive tool.
The correct assembly algorithm allows you to obtain a durable sheathing that can withstand increased loads.
Installing the frame on studs.
Board construction
If the balcony or loggia has a horizontal screed with a flat surface, then you can install a frame around the perimeter of the slab (at a distance of 50 mm from the walls).
To make the frame, use a pine board 30-40 mm thick. The structure is secured to the floor surface with steel angles and anchor bolts.
Then the lintels and central beam are installed, and the cells are filled with cotton wool or synthetic material. The resulting cracks are treated with polyurethane foam, eliminating the formation of cold bridges.
Fastening and assembling the frame to the floor.
Lathing made of bars
In rooms with a flat floor, you can assemble a sheathing from timber; longitudinal beams are attached to vertical surfaces with anchor bolts.
The internal elements are connected to the frame and to each other with angles and screws, the sheathing is additionally secured to the floor with polyurethane foam or liquid nails. The technology is not suitable for balconies with an uneven base, since it is difficult to set the position of each element.
Installing the frame on a flat floor.
Construction of two layers of timber
If it is necessary to raise the floor to a height of more than 200 mm, then use double lathing assembly technology:
- Lay the bottom row of beams and secure with screws or U-shaped angles.
- Fill the cells with thermal insulation material.
- Install the top row of sheathing, positioning the pieces at a 90° angle to the elements below.
- Connect the layers of sheathing with plates and screws.
- Lay the top row of thermal insulation.
Insulation options
Materials for thermal insulation differ not only in their ability to maintain the desired temperature, but also in weight and installation method. Therefore, when choosing insulation, the following factors must be taken into account.
Possibility of using the material
The use of insulation on the floor somewhat limits the choice of options. So, heat insulators are applicable:
- bulk (expanded clay, perlite, vermiculite, foam chips, sawdust, ecowool);
- rolled (mineral wool, glass wool, polyethylene foam, flax or cotton wool);
- slab (foam plastic, expanded polystyrene);
- in the form of screed or masonry (foam concrete, aerated concrete, expanded clay concrete).
For ease of comparison, we present a table with data on the most popular insulation for floors on balconies/loggias.
| Type of material | Thermal conductivity, W/m*S | Weight, kg/m3 | Fire hazard and toxicity | Estimated service life, years |
| Styrofoam | 0,035…0,045 | 25…35 | Toxic when burned, release harmful substances | 5…15 |
| Expanded polystyrene (penoplex) | 0,035…0,047 | 15…40 | 5…25 | |
| Mineral wool | 0,038…0,047 | 30…150 | Non-toxic, non-flammable | 10…50 |
| Ecowool (cotton, wool, cellulose, flax, wood fiber, recycled paper) | 0,035…0,045 | 30…70 | It burns, fumes, cakes, and when humidity increases, it loses its heat-insulating properties. | 2…15, depending on conditions of use |
| Expanded clay | 0,1…0,18 | 250..800 | Does not burn, does not emit toxic substances | Depending on operating conditions, 20…50 or more |
| Perlite | 0,04…0,05 | 60…100 | ||
| Vermiculite | 0,048…0,06 | 65…150 | ||
| Sawdust | 0,07…0,08 | 110…290 depending on humidity | They burn, it is better to use them in a mixture with clay or concrete | Depends on operating conditions |
| Lightweight concrete | 0,14…0,35 | 900…1300 | Does not burn, does not emit toxic substances | 10…50 or more |
As can be seen from the comparative data, the optimal materials are polystyrene foam, expanded polystyrene, similar synthetic materials, as well as bulk insulation materials perlite and vermisculite. If you focus on price, then the cheapest option, of course, can be considered expanded clay and sawdust (sometimes they are even free), followed by polystyrene foam.
A good option is to insulate the floor on the balcony with penoplex and use the same material to protect the external wall (fence) from temperature changes.
Load-bearing capacity of the structure
To determine it, information is required about the structure of the building and specifically the base of the balcony, as well as a thorough examination of the load-bearing elements to determine the degree of their wear. In old houses, where the balcony is supported by metal and (even more so!) wooden beams, any finishing and insulation options should be made from the lightest materials. For so-called “emergency” balconies, insulation may be prohibited altogether; for others, the weight of the insulation is severely limited.
At the same time, do not forget about the difference between a loggia and a balcony. In the first case, the base is the floor slab (or beams) of the house itself, and the side fence is its walls. In the second, the base is carried out on separate beams or a slab (less often on the main floor structures), and the fence consists of separate elements, not the walls of the house. Accordingly, the permissible load, determined according to SNIP 2.01.07-85, can vary greatly.
You can find out exactly the mounting method and type of base of the balcony/loggia in the technical passport of the house (if this information is available). If not, you should rely on the standard design series or other design documentation, as well as external inspection data.
The diagram shows various options for pinching a balcony slab in the wall of a house and the possibilities of strengthening it - struts, modules, reinforcing screed with additional reinforcement of the slab along the perimeter and area
Usually the calculation is based on considerations of 200...250 kg per square meter. In this case, the main part of the load is distributed along the perimeter (fence) and represents the weight of the glazing and the fence itself. The permissible perimeter load is (depending on the type of house) up to 400 kg along the entire line. That is, for a loggia with dimensions of 1.5x3 m, fenced on both sides by the walls of the house, the permissible load of 400 kg falls on three linear meters of the external slab in front, that is, each linear meter of the fence can weigh approximately 134 kg. And for a balcony with the same dimensions, the load is distributed over 6 linear meters, that is, the permissible weight of a linear meter of fencing together with glazing will be approximately 72 kg.
Based on these considerations - the permissible load minus the weight of the fencing and glazing - an acceptable weight of materials for insulation and finishing is selected. In this case, it is also necessary to take into account the weight of the user, and up to three or four people can be on the loggia at the same time.
Calculation example
For a balcony of the specified dimensions (1.5x3 m) with conventional glazing with metal-plastic frames along the entire perimeter, the load from the glazing will be at least 25 kg per linear meter, that is, 150 kg for the entire structure. For panoramic glazing the load is 2…2.5 times greater. Also added here is the weight of the fence itself (except for cases with panoramic glazing), at least 150 kg for reinforced concrete slabs, 100...300 kg for other options. Thus, the total load on the balcony is about 67...80 or more kilograms per square meter.
If there is any furniture and furnishings, fencing decoration, appliances, their weight is added to the calculated load. This also includes the weight of at least one user, that is, 70…120 kg. Consequently, per square meter of balcony floor can account for from 100 to 180 kg.
Now you need to add the weight of the floor insulation and decking. With a layer thickness of 10 cm, the additional load will be (average values of the specific gravity of the material are taken) from:
- expanded polystyrene -4.5x0.1x25=11.25 kg;
- mineral wool – 4.5x0.1x75=33.75 kg;
- vermiculite – 4.5x0.1x80=36 kg;
- expanded clay – 4.5x0.1x400=180 kg.
Accordingly, the first three options are quite acceptable even with a relatively high load on the balcony, but expanded clay is absolutely not suitable.
Flooring material
This factor also plays a big role. Taking into account the installation technology, there is a very big difference, for example, with insulating the floor under tiles or under decking, under laminate or carpet.
When installing a floor made of boards, terraced or regular tongue-and-groove, the type of insulation does not really matter, since the flooring is still installed on joists. Therefore, there is no fundamental difference whether to pour granules into the cells between the lags or lay fragments of roll/slab material.
If the floor is supposed to be made of laminate, engineered wood, or flexible coatings, it is better to install a continuous flooring of OSB, chipboard or plywood on top of the joists. Any insulation is also suitable for them.
But it is better to lay the tiles on a surface insulated with a relatively rigid slab material and leveled with plywood/slab flooring.
Instructions for insulating the floor on a balcony without sheathing
To insulate the floor on a balcony using dry insulation without installing a wooden frame, you must:
- Prepare and clean the base from dust, and then lay a layer of thick plastic film extending onto the vertical planes. Individual strips must be laid with edges overlapping by 150-200 mm, and then connected with tape.
- Attach the material to the surface of the walls with adhesive 2-sided tape that compensates for temperature deformations of the film.
- Install metal beacons on the side surfaces, setting the position of the elements according to the level.
- Fill in expanded clay and level the surface with a rule that must be moved along the beacons.
- Lay gypsum panels equipped with connecting locks on top of the expanded clay. To increase strength, the joints should be coated with a special mastic.
- Install a finishing covering (for example, tongue and groove boards or sheets of waterproof plywood).
We lay the panels on expanded clay.
Types of adhesive for attaching thermal insulation
To lay external thermal insulation material, especially on a horizontal surface, it is necessary to use reliable compounds. These include:
- MV-40 or T-Avangard-K. These products are moisture-resistant, so they reliably glue any heat insulator, and over time it will not come off even when used in outdoor conditions;
- assembly glue or liquid nails. These adhesive base options are ideal for insulating a concrete floor on a balcony outside. They are distinguished by reliable fixation and are moisture resistant. They perform well when installing complex structures. One of the best branded options is “Moment Montage”;
- glue titanium. It is considered an excellent product for concrete bases. It thickens quickly after application and adheres to the surface. Requires preliminary priming of the coating;
- Neoprene-2136. A convenient product sold in spray form. It is easily applied to the coating and creates reliable adhesion of the insulation to the concrete base. It is considered a convenient composition for attaching penoplex.
Ideally, the adhesive composition is chosen together with the purchase of insulation. Usually, construction stores recommend a special adhesive that is compatible with the thermal insulation material.
Mixing glue for attaching thermal insulation of a balcony from the outside Source materik-m.ru
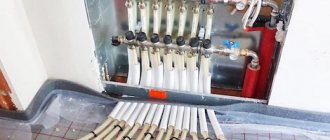
Installation of heated floors on the balcony
If the balcony already has waterproofing and screed, the owner can install electric heating of the surface:
- Cut the workpieces and place the sheathing of their timber with a cross-section of 50x50 mm on the floor surface. The elements must be laid in increments of 500 mm; if the room has a complex configuration (for example, a bend), then additional beams should be provided.
- Lay longitudinal logs on top, located at a distance of 50-60 mm from the vertical surfaces.
- Connect the elements with screws, and then drill holes through the beams and flooring (there should be 2 attachment points on each cross beam).
- Insert anchors into the holes and tighten the sheathing to the balcony floor.
- Place pre-cut foam sheets into the cells and fill the cracks with polyurethane foam.
- Wait until the foam hardens and cut off the excess with a knife.
- Lay a layer of plywood 20 mm thick on top and secure with screws in increments of 150-180 mm (the screw heads should be recessed into the surface to a depth of 1 mm).
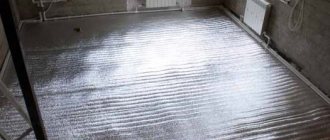
- Lay down metal-coated backing and secure edges with 2-sided tape.
- Lay infrared film heaters on top and lay cables with a temperature sensor.
- Connect the wiring to the control unit, which is mounted in an accessible place.
- Lay a layer of film to protect the heaters from moisture and secure the finishing coating.
Warm floor on the balcony with infrared film heaters.
Why level the floor?
Many apartment owners reduce leveling the floor to a banal struggle with bumps and holes on the balcony slab. But there are other, more compelling reasons:
- The slab is inclined, and this is dangerous - you can slip and get serious injuries. In addition, it is difficult to install furniture and household appliances on a sloping floor;
- It is planned to lay a finishing coating of laminate or tiles. They need a level base;
- Without a leveling screed it is impossible to install a “warm floor”.
Finishing the floor
After installing the sheathing and filling the cells with heat-insulating material, it is necessary to install the finishing:
- tongue and groove boards followed by impregnation with special liquids or installation of carpeting;
- parquet boards that do not require further processing;
- elastic coating;
- ceramic or stone tiles;
- laminated or piece parquet.
Laying the finishing coating.
Laying wooden floorboards
To install decorative trim you need:
- Select the laying direction, which determines the size of the floorboards and the amount of material.
- Cut the pieces and lay them tightly on the base, attach each floorboard with nails or countersunk screws.
- Install decorative wall trim and attach skirting boards to cover gaps around the perimeter of the floor and improve thermal insulation.
Wooden floorboards on the balcony.
Why is thermal insulation necessary?
When thinking about the functionality of a balcony room, you need to understand that finishing work will clearly not be enough to turn it into a full-fledged room. Even high-quality glazing will not save the situation. It is necessary to close the space from the street, but this is very little. Temperature changes will leave no chance for new design and will make staying on the balcony as uncomfortable as possible.
Therefore, the first thing to do after glazing is effective thermal insulation. It will be required for all surfaces: ceiling, walls and floor. This is the only way to prevent heat leakage and, accordingly, make the heating devices operate more efficiently.
If the room will not be heated, the use of insulating materials will significantly smooth out temperature changes and make its use more comfortable.
Instagram balkony_vkazani
The latter option is especially relevant for areas with warm winters, where sub-zero temperatures are rare. But in any case, high-quality thermal insulation will be necessary.
- Balconies and loggias
How to insulate a balcony from the inside with your own hands: a detailed guide
Installation of screed using ready-made polymer-cement mixtures
Nowadays there are several types of floor levelers on sale. In terms of composition, scope and method of application, similar products are approximately similar, regardless of who produced them. Taking into account the small area of the balcony room, here the use of ready-made mixtures with a small thickness of the screed is preferable. It turns out to be only a little more expensive, but levelers are much more convenient to use due to the following features:
- the solution is prepared using a construction mixer, the mixture/water proportions are always indicated by the manufacturer on the packaging;
- the resulting solution is plastic, which greatly simplifies the leveling process (the filler does not settle, so there is no need to rush);
- it is possible to form a thin layer (from 1 cm) if necessary;
- the finished surface gains operational strength faster (7-10 days);
- there is no need to maintain humidity during the maturation period of the solution.
The technology for using ready-made mixtures to level the floor is practically no different from that for cement-sand mixtures prepared by yourself. The difference is that with a small fill thickness, it is enough to treat the base with a primer and not waterproof it, even in Khrushchev-era buildings.
Tools and materials for self-leveling mixture
To fill the self-leveling mixture you will need:
- Ready mixture in the right quantity,
- Deep penetration primer,
- A metal or plastic needle roller for rolling out the mixture and removing air bubbles,
- Mixer for mixing the mixture,
- Brush and roller for applying primer,
- Damper tape is glued around the perimeter of the room to compensate for the expansion of the self-leveling layer when drying,
- Spatula for preliminary leveling of the solution.
Important. Before applying the self-leveling mixture, it is strongly recommended to coat the surface with a waterproofing primer in several layers. The primer will prevent the cement screed from absorbing moisture from the filling mortar and ensure uniform drying.
Dry screed
The recently developed technology of laying a subfloor using gypsum fiber boards is increasingly becoming the choice when it is necessary to level the surface for laying finishing flooring materials. The essence of the technique is as follows:
- along the exposed horizontal guides, a flat surface is arranged from fine (fraction 1-5 mm) expanded clay;
- the guides are removed, gypsum fiber boards are laid on the bedding, joining with specially made grooves;
- joining occurs using glue, after which the locks are additionally tightened with self-tapping screws.
The result is a dry, even base suitable for laying most floor materials (carpet, laminate, linoleum). The advantages of the technology are:
- the work is done quickly, it is easy to do it yourself;
- the surface is durable, ready for further installation of finishing materials immediately after assembly;
- The use of expanded clay as a bedding gives a good soundproofing effect and insulation.
However, gypsum fiber board is not resistant to moisture, which imposes restrictions on the installation of dry screed in some rooms, such as:
- bathroom;
- kitchen;
- loggias, terraces, balconies insufficiently isolated from external influences.
Tools and materials for dry screed
To lay dry screed on the balcony you will need:
- Dry mixture for screed (slag or expanded clay),
- Edge tape for installation around the perimeter of the room,
- Film to ensure waterproofing of the screed from the bottom,
- U-shaped profiles as beacons,
- Rule for leveling the mixture along the beacons.
It is recommended to use CBPB, plywood or OSB as a finishing coating. Some recommend laying additional waterproofing film over the screed before installing the base slabs.
Video: laying dry screed on the floor
The final choice of the appropriate flooring technology will depend on specific conditions and individual preferences.
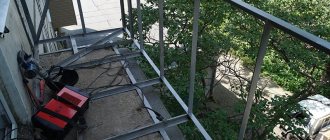
Assembling the sheathing
First, we fasten the beam under the window sill, leaving a gap of 1-1.5 cm at the top. We cut the beam 1.5-2 cm shorter than the length of the parapet, place the beam against the wall and drill holes with a diameter of 8 mm with a hammer drill for dowel nails in increments of 50-70 cm.
Having previously unscrewed the nails, we hammer the dowels into the timber so that they fit into the holes in the wall. We tighten the nails with a screwdriver. The beam is fixed.
After we have secured the upper and lower beams, we proceed to fastening the cross beams using the same method. The distance between the transverse bars should be 60 cm. If the balcony is often exposed to wind loads, reduce the step of fastening the transverse bars to 40 cm.
After all the cross bars are secured, we move on to the side walls of the balcony. How to understand which walls to insulate and which not? Everything is very simple, if the wall is load-bearing, it does not need to be insulated. But to achieve an ideal result, you will have to insulate both side walls, the ceiling and the floor. The wall adjacent to the room is usually not insulated. That's what we'll do!
Features and Benefits
It is important to decide for what purposes the loggia is insulated. For those who do not plan to constantly be on the balcony, an option is to simply isolate the room from drafts and frost
But to get a full-fledged living room, more comprehensive insulation should be carried out.
Balcony insulation is often done when there is not enough living space in the apartment. If the windows overlook a noisy courtyard or road, the advantage of insulating the loggia will be sound insulation. Plus, a warm loggia will reduce the penetration of cold into the apartment. This is a rather complex process that requires certain skills and knowledge. It is necessary to select the right material, prepare all surfaces for repair work and correctly perform all stages of insulation. It’s not enough just to glaze the windows, you need to properly insulate the floor, walls and ceiling.
Methods for determining floor level
Before leveling the floor, it is necessary to determine in advance its future level and affix the appropriate marks. There are three main measurement methods that are most popular.
Water level. Two people are required to use this level. To begin with, we visually determine the future floor level minus the finishing coating and make a mark on the wall. We apply one water level flask to this mark so that the water level is approximately in the middle of the flask and is clearly aligned with the mark. Then the second person with the second flask goes to the opposite side of the balcony and places the second flask against the wall. Next, the second person adjusts the height of the flask so that the level in the first flask coincides with the preliminary mark on the wall. When the marks in the first flask coincide with the mark on the wall, the second person draws a mark on the opposite wall according to the level in the second flask. It is important that at this moment both flasks are open to air and that there are no air bubbles in the hose itself.
Laser level. The laser device is much simpler and more accurate; it is installed at the highest point on the floor surface, the laser is turned on, and marks are made on the wall with a pencil according to the readings of the laser beam. If the floor needs to be raised, then first draw a mark on the wall for the future floor level by eye. Then we install a laser level in the center of the room and adjust its height so that the beam coincides with the mark on the wall. Next, along the beam, we mark the height of the floor along the entire perimeter of the room.
A bubble level is rarely used to measure floor level due to its large error. For this level, you will additionally need a long and even rule. The rule is laid diagonally across the balcony and a level is placed on it. According to the indications of the bubble, one of the sides of the rule is raised or lowered until the bubble shows the horizon. You can go along the wall, applying the level with one end to the starting point. In this case, the error depends on the length of the level; the longer the device, the smaller the error.
Insulation with penofol and expanded polystyrene
With combined insulation, the procedure is slightly different:
- unwind a roll of penofol and cut a piece along the length of the balcony + 40 cm;
- lay the material on a clean and dry base, placing the edges on the walls of the balcony;
- the joints are sealed with aluminum tape;
Laying penofol - sawing timber along the width of the balcony;
- install the outermost logs at a distance of 5 cm from the walls; Laying lag on penofol
Laying logs on penofol Logs are laid on top of a layer of penofol - having retreated 50 cm from the first log, fasten the second one, and so on to the opposite wall;
- The location of the beams is checked with a level and screwed to the floor;
- the openings between the logs are filled with polystyrene foam boards to the thickness of the timber, the joints are foamed;
Laying polystyrene foam Laying polystyrene foam between lag cells - cut off the penofol again and lay it on the insulation with the foil facing up, sealing the joints.
At this point the insulation process ends and the installation of the finished floor begins. If everything is done according to the rules, the balcony room will remain dry and warm even in severe frost. But the appearance of condensation will indicate an incorrectly selected insulation thickness or poorly executed waterproofing.
| Insulation | Thermal conductivity coefficient of insulation (W/m 0C) |
| Mineral (basalt) wool | 0,034-0,040 |
| Polyurethane foam slab | 0,022-0,026 |
| Sprayed polyurethane foam | 0,019-0,030 |
| Expanded polystyrene (foam) | 0,038-0,042 |
| Penofol | 0,047-0,050 |
Preparatory work
The first thing you need to do before insulating the floor on a loggia or balcony is to check whether the ceiling is well reinforced. For example, if the balcony is not reinforced with a lower support, then this deficiency will have to be compensated for, for which support brackets are used. Unfortunately, it is not always possible to install them, since this requires the consent of the neighbors below.
You can strengthen the balcony using a metal frame, which is mounted on top of a concrete slab and attached to the wall of the building. Installing such a frame allows you to reduce the load on the floor. However, in most cases, the balcony slab is initially laid on concrete supports, and problems do not arise with such a design.
The next important point is the material from which the outer wall of the balcony is made. Often, a metal lattice covered with sheets of thin material is used to make the outer wall.
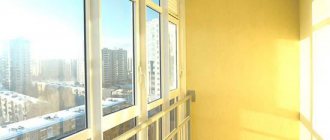
If the floor slab rests on a reliable support, then the outer wall will need to be laid with foam concrete. True, such work will require coordination with architectural services so that problems do not arise in the future. The situation will be much better if the outer balcony wall is made of concrete - such a structure will not have to be changed or remodeled.
Next, the balcony needs to be glazed with high quality. The meaning of this stage is clear: in the absence of high-quality window frames or their poor-quality installation, all the heat will escape from the balcony to the street. The choice of suitable frames is completely individual: most often apartment owners choose reliable double-glazed windows with low thermal conductivity, but sometimes good wooden frames are chosen for balconies, which, if properly processed, can also retain heat well.
This is important: any leaky joint can cause dampness, which will significantly worsen the performance of the insulation. After some time, mold will appear and all building materials will begin to deteriorate, and sealing the cracks is needed precisely to prevent such effects. Wide gaps in the slabs are best eliminated using special rollers, for the manufacture of which foamed polyethylene is used
By placing such rollers in the gaps and sealing them with sealant, you can achieve good tightness.
Wide gaps in slabs are best eliminated using special rollers made from polyethylene foam. By placing such rollers in the gaps and sealing them with sealant, you can achieve good tightness.
Often, insulation rollers are used instead of polyurethane foam to save money. This is done like this: first, a little foam is applied to the required place, and a roller is placed on top of it. When the foam expands, it will fill all the free space and provide a good connection to the seal. Small gaps can be eliminated using conventional sealant.
Having dealt with the problems at the joints and walls of the balcony, you need to start eliminating similar flaws in the floor. All cracks are cleaned of dust and various debris, after which the floor surface must be treated with a primer. After this, each crack is filled with a sealant or cement-based adhesive mixture.
Having noticed deep and narrow cracks, you need to widen them with a drill or grinder, and then fill them with sealant: in this case, the composition will penetrate well into the surface and fill the entire space.