New times have allowed even the owners of small-sized Khrushchev-era apartment buildings to look at their balconies differently. Using them to store unnecessary things has begun to seem like a great luxury, because you can beautifully decorate this room and make it a full-fledged part of the living space of the apartment. True, in order to achieve the required level of comfort, you need to carefully carry out all the finishing work, including insulation. Especially if you live in a fairly cold region and minus readings on your thermometer are a common occurrence. We will understand all the features of insulating a balcony in a Khrushchev-era building with our own hands using specific examples from life.
Repair
To make global changes, a special work permit will be required. The corresponding paper can be obtained from the housing inspectorate at the address of the property. To obtain a permit, you must submit the following package of documents to this authority:
- application for transformation;
- a copy of the certificate that confirms the ownership of the premises - such a document is certified by a notary;
- registration certificate for residential premises;
- balcony reconstruction project.
You can start work only after you have the permit in hand.
Preparatory work
- dismantle old window frames and coverings from all surfaces;
- building foundations are tapped with a hammer to detect and remove unstable fragments;
- metal parts are cleaned of rust and treated with an anti-corrosion agent.
If the floor reinforcement is thoroughly rusted, it is recommended to fix new material on top. It is best to lay a mesh with cell sides of 150-170 mm, connected from class A-III reinforcement, with a diameter of 3 mm.
Slab restoration
Do-it-yourself slab restoration can only be done if the building base has minimal damage or simply needs leveling. If the floor is destroyed to a significant extent, it is recommended to invite professionals.
The help of specialists will be required in the following cases:
- a piece of cement has collapsed, resulting in through defects or a significant part of the reinforcement being exposed;
- a deep crack has formed at the junction of the slab with the house;
- the concrete base has collapsed or the material has peeled off.
Self-leveling of the slab is carried out as follows:
- the building base is primed, the primer is applied in two layers and after each treatment a break is taken so that the product hardens;
- Cement plaster is laid, the material is leveled over the surface using the rule;
- install the formwork using a board 15-17 cm wide;
- Concrete is poured, the material is leveled, and activity is stopped until the composition hardens.
Replacing the fence
At the very beginning of the work, the old fence is dismantled along with the glazing and coverings. After this, a new structure is installed. To do this, it is recommended to invite professionals. Specialists will take the necessary measurements, after which they will manufacture and install the fence. Usually the structure is made of metal, but you can order the parapet from glass or other material, depending on personal preferences.
You can also do the fencing yourself. For this, a rectangular profile pipe is used. This material has the following advantages:
- strength;
- ease of use;
- external attractiveness.
To manufacture the fence, measurements of the balcony are taken and a diagram of the parapet and its installation are developed. After this, the material is prepared, and the pipe parts are welded together according to the plan. The fence is then installed on a concrete base using anchors.
To make a parapet, you can also use foam blocks. The material is laid on a concrete base using a repair mortar. If you do not have a welding machine and experience in drawing up diagrams, it is best to use this particular method of arranging a parapet.
Design ideas
- Balcony bar. The thicker window sill serves as a tabletop.
- Dinner Zone. This solution is appropriate if the kitchen is adjacent to the balcony.
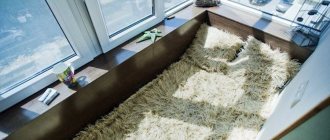
- A place to relax. Comfortable armchairs, wicker chairs, a sofa or a bed are suitable for arrangement; you can also put a small table.
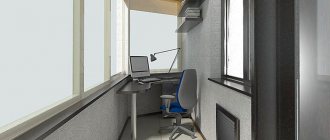
- Cabinet. You can work in such a room if you need privacy.
- Game room. For children's leisure, a playground is often organized in the balcony space. The interior style should correspond to the purpose of the room; it is better to choose a cheerful color scheme.
- Flower garden.
- Boudoir. To decorate the interior you will need a dressing table and a comfortable chair. It is worth giving preference to furniture with carved decor and thick fabrics.
- Creative workshop.
- Wardrobe. A competent layout will free up a lot of space in the main part of the apartment. For the effect of visually enlarging the space, you can install a mirror.
- Gym. Filling the space with inventory and equipment directly depends on personal preferences and the availability of free space.
Living room and bar in one space.
Dining area on the loggia in Khrushchev.
Interesting room design ideas in the photo.
Corner for relaxing and reading books. Wood paneling.
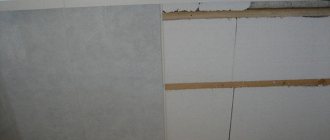
Finishing materials: lining, painted white, decorative plaster.
Compact wardrobe.
A place to work on a computer.
Playroom for children.
Flower garden and warehouse on the same territory.
Mini greenhouse.
Creative workshop
A warm loggia opens up new possibilities for use by the family. One use case is to create a creative lab. A place where you can “pick up your soul” and give free rein to your creative impulse.
Set up an easel and paint, or set up a special table with additional lighting for cutting and sewing. Even on a small balcony you can place a cutting table and a sewing machine.
Restroom
A common solution when decorating a balcony in a Khrushchev building is to create a rest room. There are many design options from classic style to country and Provence.
Place a few chairs to create a seating area. It is better to choose light wicker furniture or small wrought iron chairs. Also place a coffee table. It can be made sliding or folding, which will free up more space.
Instead of chairs, you can place a bench, a small ottoman or a sofa. A recreation area in an oriental style will look no less organic. Draw lots of soft pillows instead of furniture. Make a folding table, but at a lower level so that it can be easily reached while sitting on the floor.
Now you will have a place to sit with a cup of coffee or chat with friends in a small company. The same design option is suitable for a place where you can smoke a hookah on a pleasant summer evening.
Dinner Zone
Sometimes it's nice to drink tea in the fresh air. Especially if the view is impressive and the climate is pleasant. You will need:
- table;
- a couple of chairs (if you live alone, you can have one).
The table can be folded to save space.
By the way, dining rooms on balconies are often combined with mini-greenhouses. This is no coincidence: the proximity of plants contributes to excellent relaxation.
Rest zone
The main problem in choosing furniture for a loggia is the selection of furniture. Finished furniture has large dimensions, and choosing options from the catalog is almost impossible. The only way out is to make custom furniture. Go to a wood supply store or make your own furniture.
Custom furniture has many advantages. For example, you can create secret or hidden shelves to store small items and choose materials and mechanisms to suit your budget. The convertible chair will become the bed of your choice. Near the seats, consider a hinged lid for storing useful items. Oriental style lovers can come up with a floor and throw pillows on the floor.
It doesn't matter if you live in an apartment or with children, you can always relax and enjoy a cup of coffee or knitting. For a comfortable stay on the balcony, place rattan or wicker furniture. It is lightweight and quite mobile. And upon order, you will receive furniture according to your dimensions.
A simpler option is almost “oriental”. Place pillows on the floor and relax.
Instead of a pouf, you can assemble a small bench. Fold down the seat and you get a storage box for all sorts of things. To make the seat softer, we wrap the back and seat with soft material.
Don't forget about design techniques for visually expanding space. Light colors are used in the decoration, enlivening the design with bright splashes of color. Don't really like the view from the window? We make the side walls into blanks and glue beautiful wallpaper onto one of them.
Mini office
A great idea would be to place a workplace on the loggia. The area will be turned into a secluded office of modest size. Pros: Lots of natural light. At the renovation stage, you can get sockets in the right places and lamps. All that remains is to place a table and shelves for storing necessary documents and small items. If the office is no longer needed, move the shelves to a filing area. There will still be room on the balcony to create a relaxation corner.
Game room
It is also possible to equip a small balcony for children in the Khrushchev-era building. Place soft shelves and toy boxes here. Install an interesting chair with an unusual shape or color.
It is better to decorate the balcony in light colors, perhaps with unusual or fabulous elements. But don't overload the space. The child should feel comfortable and have enough space to play.
Greenhouse
For flower lovers, we transform the renovated balcony into a charming greenhouse. Arrange with a glazing company to install a large window sill. We also ask you to make inserts from timber into the side blind plastic panels. Then you can hang pots and pot shelves with plants and all sorts of cute hangings on the side walls. The photo below shows an interesting idea for placing shelves at 45°.
Curtains will protect your pets from direct sunlight.
Tired of white plastic panels? Look at the options for finishing with plastic panels and natural stone. Moss grows on old walls too! And the load on the balcony slab practically does not increase. Today on the market you can buy finishing materials that will change your idea of the possibilities of the same plastic in room design.
That part of the external wall of the house, which turned out to be “internal” in relation to the glazed balcony, was finished according to the general design of the greenhouse. In this case, you don’t have to worry about the weight of the wall covering (tiles, stone, decorative plaster.
Add a sofa or chair to enjoy flowers and relax at the same time. For example, with a hookah.
Even a simple chair with a blanket and pillows, located in the middle of greenery, seems like a real heavenly place to relax.
Gym
The morning begins with a pleasant awakening. A series of your favorite outdoor exercises will give you energy. To do this, you don’t have to go outside at all - if you build a balcony under the gym. Of course, you won't be able to fit full-fledged exercise equipment into such a limited space, but an ab bench, mat or compact elliptical machine will do just fine. This idea is rarely seen in practice, but as an option - why not?
As you can see, even modest and absurd balconies in Khrushchev can become your personal outlet and place of ideal relaxation - if you approach their design correctly and deviate from the usual design canons. First of all, think about what you really want: drinking coffee in the fresh air or a cozy workspace without strangers?
Principles of landscaping and original design solutions
The space between the roof and the floor can be filled with flowers that do not interfere with the main activity. A portable planter block can hide an unsightly wall block or other imperfections. However, it is worth remembering that you cannot use bulky frying pans that will take up a lot of space. An original idea would be to grow climbing plants that will cover part of the wall. Outdoor annuals are beautiful in summer and can be used to decorate the floor when making a portable structure from pots. The higher the floor, the more light will fall on the plant, which is worth considering (fewer objects to create shadows). To have flowers on your balcony in winter, you can plant gazania and petunia.
Flowers can be placed:
- suspended from the ceiling;
- placed on the floor;
- on special stands or shelves;
- on the outer fence;
- on the inner windowsill.
An original way of arranging a balcony can be called installing sliding panoramic windows, which have a frame of minimal thickness. You can create a barbecue area. But it is important to remember that the barbecue area is created with the installation of gas grills, since their use does not violate fire safety rules. Recently, unique greenhouses have increasingly been organized where fruits and vegetables can be grown.
Curtains and decor
Thanks to modern curtains and designer fabric blinds, you can protect your glazed loggia from excessive sunlight and heat. To design balcony frames, shortened models of minimal size are often chosen. Roller blinds, Roman blinds or pleated blinds are suitable. Products that differ in installation inside the frame allow you to save as much space on the balcony as possible.
To make a small balcony in a Khrushchev-era building look cozy and comfortable, the room can be decorated with soft pillows or handmade accessories. Wall paintings, handmade decorations and open decor fill the atmosphere with special warmth. It is advisable to paint the surfaces of the walls using stencils or decorate the aircraft with special stickers. Such drawings will not only diversify the monochrome wall decor on the Khrushchev balcony, but will also become the main compositional center.
Lighting will help highlight the decorated loggia. LED strip with different color modes will make the atmosphere even more festive.
Storage space
If you only use the balcony for practical purposes, such as drying clothes or storing things, the design and decoration can be done easily and simply - make the renovation within your budget. After its completion, all that remains is to place a chest of drawers or a closet for everything you need.
Increase
In the case of planning to increase the balcony to 30 cm, permission and approval are not required if the house is not an architectural value, in other cases it is necessary to coordinate the work and obtain permits, but as with everything there are some nuances that you need to familiarize yourself with.
Approval and permits can be obtained from the following authorities: Ministry of Emergency Situations, BTI, City Expertise, design organization and others.
In what cases is approval necessary:
- If the expansion of the balcony is planned in a house that has architectural value, then the final appearance must be agreed upon;
- It is also necessary to obtain permission if you plan to expand the area of the balcony in the Khrushchev building by more than 30 cm;
- It is necessary to coordinate repair work if the weight of the structure being installed is large, which entails a high load on the walls of the house;
- Permission must be obtained for the installation of a concrete slab, regardless of the size by which the increase is planned;
- Before carrying out repair work, it is necessary to check the condition of the balcony slab and walls.
Extension along the window sill
This option is also called remote glazing. The method consists in installing the glazing frames outside the balcony parapet using special metal brackets.
To expand along the window sill up to 30 cm, permission is not required; however, the quality and condition of the balcony slab will be an important factor, since when installing a metal frame and double-glazed windows, the weight on the balcony slab will be significant.
The expansion of balconies is possible both frontally and on the sides.
It is not advisable to carry out on the windowsill in the following cases:
- if the balcony is located on the lower floors of a multi-story building, since precipitation and debris from the upper floors will fall on the expanded area;
- if the house is already old and its ceilings are in poor condition. In this case, additional costs will be required for repairs and strengthening of the balcony slab.
It may seem that such an expansion is insignificant and unnoticeable, but taking into account the initial small width of the balcony, it turns out that its dimensions will increase by about a third.
A wide window sill can be used as a place to grow plants, a countertop, or just like a bar counter.
Instructions for enlarging a balcony in a Khrushchev-era building along the window sill:
- Brackets are welded to the metal parapet in increments of 50-70 cm. If the parapet is made of concrete, then the brackets are secured with anchors.
- The frame from a metal corner is fixed to the brackets by welding.
- Next, the external cladding of the balcony or loggia is performed.
- The next step is to insulate the floor and walls of the new frame. For convenience, the same material is used for the walls, floor and ceiling. We recommend using penoplex or mineral wool.
- Next, the glazing is installed.
- The final stage is finishing the interior and setting up the balcony.
What are “Khrushchev buildings” and their design features
Traditionally, Khrushchev houses are called block or brick houses of the following series:
- K-7;
- 335;
- 438;
- 447;
- 464;
- 480.
The peak of construction of houses of these series occurred during the years when N.S. was at the head of the USSR. Khrushchov. In general, the houses of the indicated series were built in the period from 1959 to 1985. Later they were replaced by the 121 and p44t series.
Considering that the construction of some series of houses was initially intended as a temporary measure, their service life was calculated for 25 years. Later series - for 50 years with subsequent demolition. The quality of the building materials that were used in the construction of houses was low, and given that with the beginning of large-scale construction of cities with houses of these series, 402 reinforced concrete plants and about 200 sites - testing grounds where reinforced concrete products were produced in the open air - were built on the territory of the USSR, nor there was no question of any strict standards. Therefore, more than 90% of emergency incidents related to the collapse of houses, entrances, and balconies occur in Khrushchev-era buildings.
During the development of the projects, no one thought about such a refinement as glazing or insulating a balcony. The balcony was created for purely utilitarian purposes - for drying clothes, storing food in the winter, growing flowers and simply providing open access to fresh air without leaving the apartment.
Therefore, the balcony slabs were designed for a load sufficient to withstand the weight of several people who, given the crampedness of the balcony, could fit on it.
It is the fragility of the structure of balcony slabs that in most cases prevents their full insulation.
Exterior finishing
The cladding of a balcony in a Khrushchev-era building from the outside is carried out in several stages and is conventionally divided into cladding of the upper and lower horizontal chords, the design of corners and the installation of siding strips. Let's look at all the presented elements in more detail.
- Installation of sheathing
The presented work can be carried out on a pre-prepared balcony area. They provide for the installation of horizontal and vertical beams, to which siding sheets will later be attached. Initially, horizontal sheathing elements are installed, and then vertical ones.
Important! There must be gaps of about 5 mm at the joints of the panels to prevent deformation of the plates when the temperature changes. For the same purpose, it is better to turn the screws back a quarter turn, in case the material expands.
- Sheathing: installation of the lower horizontal chord
The horizontal lathing strips are mounted to the balcony slab using metal corner dowels. The beams are additionally fastened together with self-tapping screws. If the balcony grille is pressed tightly against the slab, you can attach the sheathing to the lower part of the fence.
- Sheathing: installation of the upper horizontal chord
Finishing the balcony with siding from the outside at this stage is carried out as follows:
- The installation height of the material is measured from the balcony slab.
- Using a building level, markings are created for installing the timber.
- The material of the required length is selected along the perimeter of the parapet.
- The timber is installed on the parapet using dowels and self-tapping screws.
After completing such work, the side sheathing strips are installed in half-meter increments. Two strips are placed at the joints to securely fix the material.
- Decoration of cladding corners
The corners are formed using special L-shaped profiles. They are inserted between two corner beams of the sheathing and fixed with self-tapping screws. This work begins when the sheathing has already been installed.
- Installation of siding strips
After finishing work on the sheathing, you can proceed to installing the siding itself. It should work like this:
- Attach the starting strip to the bottom trim with self-tapping screws.
- Measure siding panels. Trim them as necessary. When performing this part of the work, it must be taken into account that the outer cladding must have a gap of 4-5 mm in relation to the corner profile. This margin is given for thermal expansion of the material. If this is not done and the sheets are installed end to end, they may bend when exposed to strong heat.
- Start installing panels. They are placed over the sheathing and inserted into the corner profiles. The first panel is inserted into the starting strip and secured with self-tapping screws. The fasteners are clamped loosely so as not to deform the sheet. All subsequent panels are installed adjacent to the previous ones.
- Attach the finishing profile above the panels.
At this stage, the exterior finishing is considered complete.
Video instruction:
Roof replacement
When completely reconstructing a balcony, it is worth re-covering the roof with lathing for insulation. This step will subsequently protect you from leaks and damage to fresh repairs. The standard option is a roof made of metal tiles, rafters made of wood, or less often steel. All bases and guides must be securely attached to the wall. For better sound insulation, you can install foam sheets between the rafters and foam the seams with polyurethane foam.
Glazing
When it comes to how to make repairs on a balcony, first of all, the question of its glazing arises. To perform this type of work you can use the following materials:
- Metal-plastic. This is the best option for glazing your balcony yourself. The advantages of the material are a long service life and reasonable cost. In addition, it retains heat for a long time.
- Aluminum. This material can only be used if there are no plans to insulate the balcony.
- Tree. The main advantage of this material is environmental friendliness. Among the disadvantages, the following points are highlighted: high cost, short operational period, the need for regular restoration, lack of moisture resistance.
Material selection
Perhaps this is one of the key points that directly affects what your balcony will be like after all the insulation work has been carried out. The above-mentioned design nuances of Khrushchev’s balconies dictate their requirements in relation to the insulation materials used:
Mineral wool
The most common and inexpensive material that is convenient to use for insulating a balcony in all directions. However, it is highly hygroscopic, which can eventually lead to the appearance of mold and destruction of the layer. That is why mineral wool is most often combined with an additional layer of vapor barrier.
Polyurethane foam
It is used in liquid form and, unlike the material above, is not at all afraid of moisture. True, it costs significantly more, and requires professional equipment for installation.
Penofol
Affordable price tag and excellent thermal insulation qualities. This material has 2 different layers: inside there is foamed polyethylene, and on top there is foil for vapor barrier.
Expanded polystyrene
It is excellent for insulating balconies in Khrushchev-era buildings, as it is very light and does not put any pressure on the structure. Unlike mineral wool, it practically does not absorb moisture. However, it is fragile and easily breaks during installation, so it requires careful handling when laying.
Penoplex
An extruded type of polystyrene foam, which has gone through the remelting stage and significantly enhanced its performance qualities. It is stronger and can be easily installed with plastic nails.
Insulation
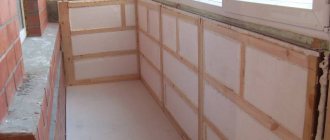
For insulation, special materials are used that are fixed to building foundations. The most commonly used materials are mineral wool or penoplex. Below you will find step-by-step instructions for insulating a balcony with penoplex.
Instructions for insulating a balcony in a Khrushchev-era building with your own hands:
- It is necessary to measure the width of the side walls of the balcony and use a construction knife to cut the foam boards to the required size.
- After cutting the required amount of insulation, we proceed to installation. Let's start with the walls. It is necessary to attach the penoplex to the wall, having previously applied polyurethane foam along the edges on the reverse side. There is no need for glue; dowels will be enough for reliable fastening.
- To securely attach penoplex to the wall before installing penofol and sheathing, it must be secured with dowels with caps. To do this, use a hammer drill to drill holes directly through the insulation boards into the wall, then insert the dowel and tighten it with a screwdriver.
- To install the second and subsequent sheets, apply polyurethane foam to the edge at the junction.
- When all the foam boards are installed, it is necessary to seal all the seams with polyurethane foam.
- Next we move on to installing the insulation to the ceiling. Usually, attaching foam boards to the ceiling is problematic. It is necessary to drill holes and secure the insulation with plastic dowels.
- Next, you need to seal the joints between the plates with foam. It is important to choose a polyurethane foam that does not react chemically with penoplex.
- Next, we move on to thermal insulation of the balcony with penofol. Penofol is secured using a construction stapler. The sheets are laid overlapping so that there are no gaps.
- Having completed the installation of penofol, we proceed to the installation of the sheathing to further secure the decorative material.
- For the sheathing, wooden blocks with a cross section of 3 by 3 cm are required.
Instructions for floor insulation:
- Let's start by installing a wooden sheathing made of 5 by 5 cm bars. We lay the bars crosswise so that after laying, an air layer is formed under the penoplex. The bars are fastened with dowel nails and to each other with self-tapping screws. An important point will be the treatment of wood with fire retardants and antiseptic compounds, this will increase the service life and ensure fire safety.
- Next, we cut the insulation into parts of the required size and arrange them between the longitudinal parts of the sheathing. We lay it in such a way that there are smaller seams between the insulation and the wood through which heat can escape and cold can penetrate.
- We blow out the joints with foam.
- Next, sheets of plywood are laid on the sheathing. And any floor covering can be laid on these sheets.
Video instructions for insulation:
Recommendations
- side window structures can be replaced with sandwich panels;
- exposed reinforcement must be insulated before laying insulation, otherwise this may lead to corrosion;
- It is not recommended to use foam blocks to insulate the subfloor. The building material is quite fragile
- regular walking will lead to its rapid abrasion;
- if the walls are insulated with thick heat-insulating material, then when constructing the sheathing it is necessary to use additional support blocks;
- ideal insulation sequence: floor, ceiling, walls.
Interior decoration
The renovation of the balcony inside will be unfinished if the interior decoration is not done. Most often the following materials are used for this:
- Wooden lining. This is an environmentally friendly product, so its use does not have a negative impact on health.
- PVC panels. This is the most popular material. It has the following advantages: environmental friendliness, affordable cost, long service life, ease of installation and maintenance.
- MDF panels. This is an environmentally friendly and visually attractive material. The disadvantage is the high cost.
Instructions for finishing the walls of a balcony in Khrushchev:
- Installation of sheathing. A beam of the required width is installed 5 cm from the ceiling. In this example, spot lighting will be installed, so the ceiling will be suspended. If there is no need for a suspended ceiling, then the timber must be attached directly to the ceiling. Fastening is done with dowels and nails. The timber must be treated with a colorless antiseptic.
- The next bars are located parallel with a step of 50 cm.
- On the opposite side, at the same level from the ceiling, a beam is installed.
- The next beams, as well as on the opposite wall, are installed in parallel with a step of 50 cm. The position of the beams is checked by a level.
- We proceed to installing the sheathing to the inner wall of the balcony. Subsequent beams are also arranged in parallel with a step of 50 cm.
- The part of the timber that overlaps the window block needs to be cut.
- We proceed to the installation of the sheathing on the balcony parapet. The beam is attached to the window sill with self-tapping screws. It is important to calculate the size of the screw so that it does not break through the window sill.
- Parallel to the beam on the window sill, the beam is attached to the floor.
- Between the fixed slats, beams are attached at right angles. Installation step 50 cm.
- Next, install the batten parallel to the sheathing frame. If you have a wide balcony, you will need to install a second rail. It is installed overlapping the first one and secured with a self-tapping screw.
- In the front parts of the balcony, the rail is fixed with a self-tapping screw at an angle.
- A U-bar is also placed at the window sill and secured with brackets.
How to insulate a balcony with mineral wool.
It is best to start insulating a balcony from the ceiling and move from top to bottom. If the ceiling of your loggia is the floor of your neighbors’ insulated balcony, then in this case you can save on insulation and install insulation of small thickness.
Before working with mineral wool, you need to take precautions. Protect your eyes with deaf glasses and your respiratory organs with a special mask.
To protect the balcony from the cold, it is recommended to perform work in the following sequence:
We lay out a vapor-permeable membrane on the ceiling, walls and floor of the balcony. This membrane will release excess steam from the insulation and will protect against water leaks from the street. We glue the individual parts of the vapor-permeable membrane with tape.
We attach wooden blocks on top of the vapor-permeable membrane. With their help we create a wooden lattice. The height of the bars should be equal to the thickness of the insulation.
We lay mineral wool mats between wooden blocks.
The wall is insulated with mineral wool.
We lay a vapor barrier film on top of the insulation. This film will prevent the penetration of water vapor from warm air into the insulation. Ordinary polyethylene can be used as a vapor barrier film
It is very important to connect the film well at its joints. Therefore, we use regular tape to glue the joints of the film.
We cover the insulation with decorative trim. This could be drywall followed by wallpapering, plastic panels or lining.
Design ideas
Below is a photo gallery of balcony design. If you wish, you can choose a suitable design option for your balcony in Khrushchev.