Our life never stops. Technical developments that were considered new yesterday are now becoming obsolete. Heating systems are no exception. Designs with liquid coolant, once considered the only option, have long no longer satisfied the demanding consumer.
They are being replaced by many promising developments. One of them is the PLEN heating system, which has proven to be an effective way to heat a home. But what is its peculiarity and can it justify the money spent on installing film heating?
Let's look at these issues together - in our article we looked at the design of the system, its pros and cons. We also paid attention to the issue of the benefits and harms of infrared heating and separately focused on the effectiveness of PLEN in domestic conditions.
Design of the PLEN system
The ideal source of radiant heating is a massive Russian stove. However, it cannot be installed in all rooms. Engineers have developed several types of different infrared heaters.
The most economical and effective option, perhaps, can be considered the PLEN system, which uses special film heaters for heating. It was developed by Chelyabinsk scientists relatively recently.
The name of the system stands for “film radiant electric heater.” It is this device that underlies the system. Its design is extremely simple. PLEN is a resistive radiating element laid on a foil substrate and laminated into a durable film.
The total thickness of such a heater is about 1.5 mm. Length and width may vary depending on the manufacturer.
The figure shows a diagram of the device of an infrared film heater
The device uses a multilayer resistor circuit as a resistive element. When the heater is turned on, the contacts of the resistors are supplied with the power necessary to heat them up. The device heats up to 45-40 °C.
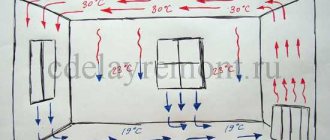
This is quite enough for the resistors to start emitting long-wave infrared radiation. It is dispersed throughout the room extremely evenly and is gradually absorbed by all opaque objects.
They, in turn, in the process of absorbing infrared waves heat up and begin to gradually release heat into the air. Practice shows that it will take 1-1.5 hours for the temperature in the room to rise by ten degrees.
Thermal insulation of the room and the correct installation of the film heater are important. If, when installing the latter, a substrate reflecting infrared waves was not placed under it, it will work less efficiently.
Once the room temperature has reached the set value, the thermostat is activated, turning off the heater. After the room has cooled down a little, it will work again and start the heater to work.
Thus, PLEN does not operate constantly, but only in periods, which makes it very economical. The quality of heating does not suffer at all: the room is maintained at the set temperature.
Infrared film heaters are available in the form of strips of various widths and lengths. For ease of installation, they are divided into fragments into which they can be cut with scissors
The devices are produced in the form of strips, the length of which is determined by the manufacturer. Most often it varies between 5-6 meters.
For ease of installation inside the strip, the equipment is divided into fragments that can be cut off without losing the functionality of the entire system. The width of the stripes also varies. Most often you can find models with a width of 0.5 or 1 meter.
One of the popular film systems is Zebra heating. We recommend that you familiarize yourself with its characteristics and operating principle in more detail.
Similarities and differences between electric heaters from foreign and domestic manufacturers
Similarities of low-temperature film electric heaters:
- radiating element – PET film;
- the operating principle is based on the Joule-Lenz law;
- main operating voltage 220 V, 50 Hz;
- scope of application – heating systems such as heated ceilings and/or heated floors;
- used in places for special purposes (wood drying, high-power heaters for heating, etc.);
- Manufacturers' warranty 10-15 years.
Differences between low-temperature film electric heaters:
- Material . The following heating elements are used: carbon (heating film TM), wire resistor (ZEBRA EVO-300), strip resistor.
- Manufacturing technology . Foreign manufacturers of film electric heaters have a fully automated production line. Domestic manufacturers use semi-automated production lines.
- Price policy . The cost of electric heaters from foreign manufacturers is 20-30% lower.
Advantages and disadvantages of the PLEN system
Anyone who would like to install PLEN in their home is interested in learning about the advantages and disadvantages of the system.
Let's start with the advantages of installing it:
- Economical. Compared to other types of electric heating, energy costs are on average one third less. There are no operating costs required.
- Reliability and durability . Conductors sealed in film can last indefinitely. There are no moving or wearing parts in the design.
- Compact placement . Film heaters can be installed under any covering. They don't take up a lot of free space.
- System automation. This makes it possible to regulate the temperature in heated rooms and save energy.
- Versatility. The breakdown of one of the PLEN fragments does not disable the entire heating coating.
- Favorable effect on the microclimate. When the system is operating, the amount of oxygen and air humidity in the room do not change. Heat is distributed in an optimal way for a person.
In addition, you need to know that PLEN operates absolutely silently, without convection currents from air and dust. The efficiency of the system reaches almost 100%, there is no heat loss. The service life of the equipment is calculated in decades.
Most manufacturers provide a 25-year warranty, emphasizing that the system has a service life of at least 50 years. During the entire service life, film heaters do not require maintenance.
One of the advantages of the PLEN system is its compact placement. It can be easily hidden under almost any type of floor or ceiling covering
The system also has disadvantages. First of all, its installation will require sufficient electrical power and fully functional electrical wiring. Which is not always possible, especially when it comes to old houses.
In this case, you will most likely need to install new wiring, which is an additional cost. When the network voltage drops, the amount of heat generated by the film heater decreases.
True, this will not affect the room temperature in any way, since the operating time of the equipment will automatically increase. But it will affect your electricity bills.
Sometimes film heaters are fixed to the ceiling or walls without any additional finishing. It is not right. The foil on which the resistive elements are attached has high reflectivity.
The foil with resistive elements attached to it shines, which causes visual discomfort. It is recommended to cover it with a decorative coating
This causes visual discomfort and is simply not aesthetically pleasing. Therefore, it is advisable to cover the PLEN with some kind of finishing. At the same time, you need to know that it will not work to hang wallpaper, for example, on top of a film heater.
It also cannot be painted or puttied. It is best to use any decorative covering that will need to be installed above the equipment.
Recommendations for installing a ceiling device and basic mistakes
To mount and hang the heater from the ceiling, it is advisable to use the fittings that come with the device.
To prevent cable routing from being noticeable, a U-shaped profile is used along the wall and ceiling.
Thermostat
When installing, owners often make the same mistake, forgetting that when installing several devices at once in one room, it is necessary to take into account the total power. This applies to units that are connected to one thermostat.
Failure to comply with this rule will result in device failure and electrical failures.
It is recommended to install the thermostat near a door or window.
How to connect to the network securely
To ensure safety, you can ensure that the device is grounded. To do this, the yellow-green cable is connected to the appropriate terminal.
Benefits or harms of infrared radiation
Most of those who are thinking about installing infrared equipment in their home have questions about the safety of such a system.
First, let's figure out what infrared radiation is. These are electromagnetic waves of a certain length. Their natural source is the Sun, which emits a large number of waves of different spectrums. The longest ones are the so-called red ones, because the human eye sees them as red.
However, scientists have proven that there are also infrared waves, the length of which is slightly longer. They belong to the waves of the spectrum invisible to humans. They get on the skin and are felt as a thermal effect. But not all infrared radiation is created equal.
Physicists distinguish three groups of such waves:
- Short , emitted by bodies with temperatures above 800 °C.
- Average _ They are emitted by objects heated to 600 °C.
- Long . Emitted by bodies with temperatures up to 300 °C.
Depending on the wavelength, infrared radiation affects living organisms differently. Short waves penetrate deep enough into the human body and can warm up the internal organs.
In areas of the skin that have been exposed to short infrared waves, redness, blisters and even burns form. Medium-length waves have a milder effect, but are still undesirable for the body.
Film heaters heat up to a temperature of 50C, accordingly they emit only long infrared waves, useful for humans
Long-wave infrared radiation is perceived by humans as pleasant warmth. It penetrates the upper layers of the skin and gently warms up the moisture in them. This is why all living organisms love to bask in the sun.
Long-wave infrared radiation not only warms, but also activates the immune system, triggers restoration and regeneration mechanisms for many systems and organs.
Considering that film equipment heats up to 45-50C, you can be sure that it emits long infrared waves. In the operating mode of maintaining the set temperature, the system operates on average from 6 to 10 minutes per hour.
Thus, it has a short-term effect on humans. The safety of PLEN is confirmed by many certificates. It is recommended for installation in medical and children's institutions.
Detailed information about the dangers of infrared heaters is discussed in our other article.
Specifications
Resistors in such a heating system are made of special alloys that provide good heat transfer and long service life. Their insulation is made of three layers of PET. Aluminum is used as the reflector material. Weight of a panel with an area of one square. meter is about 550 g, its thickness is from 0.4 to 1.0 mm.
Peak operating temperature 50 degrees Celsius. The power consumption of one panel is from 150 to 175 W. The efficiency is close to 98%, and the service life is more than half a century.
Heating panels are produced with different densities, and therefore power: from 100 to 150 W/m2. A film of higher density has a larger number of heating elements and is capable of heating rooms of a larger area, which in this case is determined by the height of the ceiling, since some of the radiation from the device, scattering in the space of the room, may not warm its entire area.
Efficient operation of film heating
The manufacturer claims that its products will work economically and efficiently. However, you need to understand that this is only true for certain conditions.
If, for example, the building is not insulated, it is at least pointless to expect effective operation from the PLEN film heating system. What requirements must be met to get the most out of infrared equipment?
One of the main ones is thorough thermal insulation of walls, doors and windows in the building. If everything is clear with the latter, then there are some nuances regarding the thermal insulation of walls.
Wall insulation should be done from the outside. For this, various materials can be used: thermal insulation followed by plastering, sandwich panels, etc. To get acquainted with the types of insulation for the walls of a house outside, follow this link.
If you insulate the walls from the inside, infrared heating will be useless.
For the most efficient operation of infrared heating, it is important that the walls of the building are insulated from the outside. Walls insulated from the inside will not be able to accumulate heat.
Walls covered with heat-insulating material will not accumulate or release heat, since the insulator will prevent this. To install an effective heating system, it is not necessary to completely cover the floor or ceiling with infrared film.
If it is assumed that such heating will be the main one, it is enough to cover 70-80% of the area of the ceiling or floor surface.
To arrange additional heating, it will be quite enough to cover 30-40% of the area. It is important to choose the correct mounting height for the thermostat. For the ceiling installation of the film, it should be at a height of about 1.7 m from the floor level.
For floor installation, it is raised 10-15 cm above the floor. If you make a mistake with the mounting height of the device, the system will not work correctly.
Another important point is to ensure sufficient current power for the full functioning of the system. This must be done, otherwise the efficiency of the plan will decrease significantly. To solve the problem, it will be enough to install a special load distribution unit.
The device allows you to alternately turn on different circuits of the heating system, thereby increasing the power supplied to each of them.
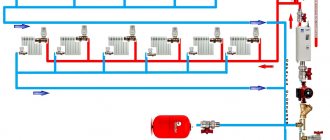
The figure shows the installation diagram of film heaters
The film heater should be installed only on a special substrate. It has reflective properties and does not allow the base on which the film is laid to absorb infrared radiation.
It is redirected in the opposite direction, which ensures the most efficient operation of the equipment. Without such a substrate, some of the infrared waves are absorbed by the base, which leads to unnecessary energy losses.
Installation of infrared film heaters must be carried out only on a special substrate, otherwise heat loss is inevitable
Another important point is the height of the heated room if the system is mounted on the ceiling. Standard models of film emitters are designed so that the infrared wave will travel a distance of no more than 3.5 m.
If it is larger, the radiation does not reach the floor. And, accordingly, the system will not work correctly.
Thus, if the room has high ceilings, you need to choose a floor mounting option or look for more powerful non-standard models of film heaters.
How to calculate the power of IR heaters
In this section we will mainly talk about ceiling heaters, which are planned to be used as the main heating of the room.
If the area of the room is large enough and the ceiling is not too high, as is often the case in unheated country houses, it makes sense to install several less powerful ones instead of one powerful heater. This will, firstly, make the heating more uniform, and secondly, eliminate the possibility of overheating a separate section of the floor.
The general recommendation for the total power of heaters is 80-100 watts per square meter of area. It is clear that this value is approximate; it can be influenced by many factors: ceiling height, wall insulation and much more. But as a starting point, such a value is quite suitable.
As for other types of heaters, calculating power does not make sense for them, because they are used only for additional heating.
Procedure for installing a warm ceiling
The warm ceiling is installed in the following stages:
Laying thermal insulation
Thermal insulation is laid on the profiles in order to eliminate the possibility of heat radiation upward. To prevent the heat-insulating mats from sliding off the wings of the profiles, throughout all spans, at certain intervals, it is worth sticking safety pieces of technical tape, as shown in the following photo. In the spans the mats are laid end to end. There should be a gap between the end of the mat and the wall.
Almost the entire surface of the suspended ceiling is laid with mats.
Laying electrical wiring
The central span is laid last with heat-insulating mats. Before laying it, electrical wiring is thrown onto the thermal insulation, which will provide power to the entire warm ceiling.
There should be a “window” in the suspended ceiling in the middle of the room through which the wire of the lighting fixture hanging from the ceiling will pass. Because of this "window", the heating film laid in the central span consists of two separate sections. This must be taken into account when organizing their power supply. Therefore, the power cable with two sockets must fit into this window. The rest of it is laid along the wall.
To power the ceiling electrical wiring, the supply cable can be laid down the wall in a groove or in a cable channel. The photo shows that a hole is drilled in the wall, and the cable is pushed through it to the apartment meter.
Installation of heating film and electrical connections
During work, the heating film can be secured to the ceiling using double-sided tape. To do this, tape is pasted at certain intervals throughout the room across the profiles.
Then the protective film is removed from the double-sided tape as the work is completed and the heating film begins to be fixed. Moreover, they glue it strictly BETWEEN the profiles. If the film gets on the profile, it can easily be damaged by screws when attaching drywall, and the system will not work.
In the central span, as mentioned above, the heating film is installed in two separate panels. This allows you to create a lighting fixture for installation.
Through the formed “window”, two central panels are connected to the power supply system. All wires are laid on top of heat-insulating mats. A lighting lamp is also released into the created “window”.
Then all the power wires hanging from the wall are connected to the sockets of the electrical wiring laid on top. In this case, all wires must remain above the profiles.
Checking the integrity of the warm ceiling system
Having completed all the connections, we go into the next room where the supply wiring was terminated. Taking the wires coming from the warm ceiling, we measure the value of its resistance. If it is expressed by a specific number, we can conclude that there is no damage to the system. As you can see in the photo, the resistance is about 45 ohms. Therefore, the system is working properly.
Upon completion of work, this measurement should be repeated to once again ensure that there is no damage.
Installation of vapor barrier film
A vapor barrier film is necessary to protect the electrical system of a warm ceiling from condensing moisture. Its installation is again done using double-sided tape, which this time is glued directly to the profiles.
The film itself is attached with tape across the profiles. Moreover, all adjacent panels must overlap to ensure the necessary tightness and moisture protection.
Fixing plasterboard sheets
To lift and support drywall sheets, it is very convenient to use a sheet lifter.
We recommend: The best stoves of 2022 for a Russian wood-burning bath
The sheets held by the sheet lifter are fixed, as usual, with self-tapping screws screwed into the profile.
Having secured the drywall along the edges, it is necessary to mark the location of the remaining profiles. With additional fixation, this will prevent you from accidentally damaging the heating film with a self-tapping screw.
Connecting the thermostat and checking the integrity of the “Warm ceiling” system
The diagram for connecting the wires to the thermostat is shown on the back of the device.
The wires coming from the warm ceiling are connected to the side terminals. It is on them that the system resistance is re-measured. If there are no faults in the system, then its value should be equal to that previously measured.
The indicator part is attached to the thermostat with latches.
The indicator is a rather multifaceted device. It displays not only the current temperature, but also the time. With its help, the desired temperature is set or programmed.
Tips for choosing
In order not to be disappointed in the IR heater, you should treat the purchase of this device responsibly and calculate everything in advance. Please evaluate the following criteria carefully.
- Possibility of heating using other, cheaper options. For example, it is not entirely reasonable to install an electric heater where there is gas. The latter option is still more economical. If gas is not available, then PLEN will be a good option.
- How much time do you plan to spend indoors? If you are considering the option of heating using a film heater in a country house where people do not live all year round, then you can make a choice in favor of decorative panels or IR paintings. Installing a full-fledged ceiling or floor system in such a room is impractical due to its high cost, as well as labor-intensive installation.
- PLEN shows itself most fully in concrete and brick houses, but in buildings made of other materials alternative options can compete with them.
- Before purchasing, you must check all certificates for the heaters you purchase. Unfortunately, not all sellers sell goods of adequate quality. Therefore, it makes sense to purchase products only from proven and reliable companies.
Guided by these tips, you can choose the best option for PLEN and save not only money, but also installation time.
Nuances of the installation process
It should be noted right away that the PLEN heating system is installed on foil insulation, which will not only create a thermal insulation layer, but also reflect emitted waves towards the room using foil. Therefore, the surface on which the heating film will be mounted must be covered, for example, with isolon.
Izolon must be placed under PLEN
Now, regarding the mounting of the heater itself. Everything will depend on what material it will be attached to.
- If it is wood, then the best option is metal staples and a stapler. In this case, you can use nails or wood screws.
- If it is concrete, then you will have to drill holes in it, insert plastic dowels into them, and screw screws into them through the film.
As for the principle of laying the film, first of all you need to decide in which direction the connection to the current supply will be located. The shorter the distance between the connection points, the less cables you will have to use for wiring. And this is savings.
Depending on the chosen model and size of the heater, its coverage area is determined. This indicator varies between 50÷100%, but 80% is considered optimal. A gap must be left between the film heater and the tension or suspended structures. The gap size is within 10÷15 cm. All work related to the connection is strictly carried out according to the electrical diagrams supplied with the PLEN.
Gap between PLEN and ceiling trim
Connection nuances
Depending on which voltage devices were selected, their own circuits are used:
- If films with a voltage of 220 V are selected, then they are connected to each other only in parallel.
- If 110 V devices are used with a connection to a 220 V network, then they are connected to each other in pairs. The latter are connected to each other in parallel.
- The same is with PLEN heaters with a voltage of 73 V. They are connected to each other in series, 3 pieces at a time.
That is, in any case, the output should be 220 V: 110 + 110 = 220; 73x3 = 219.
Correct connection of films to each other
Installing a thermostat
This device controls the indoor air temperature by turning the PLEN system off and on. There are three nuances to correctly installing a thermostat:
- It is embedded into the phase wire.
- The installation location is on the wall at a height of 150 cm. An important component is that the device must be installed on the internal wall, and not on the external one, which is in contact with the street. It is best to install it away from windows and doors so that the sun's rays do not fall on it.
- If the total load from the entire system exceeds 9 A, then the thermostat is connected through a special modular contactor. The latter simply reduces the load.
Attention! It is better to install the thermostat on a material with low thermal conductivity. For example, on a wooden plank that is attached to the wall.
Installing a thermostat
How to make a warm ceiling in a house with your own hands?
Installation of infrared film on the ceiling occurs in several stages:
- ceiling insulation;
- calculation of film area;
- installation of film, thermostat and sensor;
- connecting to the network and checking functionality.
Before installing the thermal film, it is necessary to complete all construction and finishing work on the ceiling, excluding finishing work. Also carry out all work on laying communications and lighting wires.
Now let's look at the stages of installing a warm ceiling in more detail.
Ceiling insulation
It is necessary in order not to heat the attic or neighbors on the floor above. A properly insulated ceiling will return all the heat to the room, thus increasing the efficiency of the device and reducing energy costs. Thermal insulation with a reflective layer is attached to the entire surface of the ceiling and extends a few centimeters onto the walls. This will prevent heat loss through the gaps between the ceiling and the wall. The joints in the thermal insulation material are sealed with tape. The material itself must have a thickness of at least 5 mm.
How to calculate the area of infrared film?
To correctly calculate the required area, you need to consider the following:
- how well the building itself is thermally insulated. For a brick house or a light frame building, these data will vary;
- whether you plan to live in the house in the winter, permanently or on short visits;
- volume of heated area. This can be either the entire room or part of it;
- whether infrared heating will be primary or additional.
If a warm ceiling is planned as the main type of heating, it should occupy at least 70% of the area of the entire ceiling. As an additional option, this figure can be reduced according to the power of the main heating system. The average film power is approximately 0.2 kW per 1 square meter. By dividing the power of the thermostat by this number, you can find out the area of the film that can be connected to it.
Installation of thermal equipment
Thermal film can only be cut along the special lines marked on it. Each type of film has its own maximum cut length. This information can be found in the attached documentation or asked from the seller. There should be no gaps or air gaps between the film and the ceiling insulation.
Next, you need to connect the copper contacts of the busbar with the electrical wires using contact clips. One half of the clip should be located on the copper busbar, and the other half should be located inside the heater. After this, the ends of the film are insulated on both sides with bitumen tape.
The sensor is attached to the cutout of the thermal insulation and connected to the regulator and heating elements.
Electrical connection
The thermal film should be connected to the network through the regulator in parallel. If the warm ceiling has more power, it is better to connect it through a separate circuit breaker.
When turned on, a correctly installed warm ceiling should emit comfortable, uniform heat, not overheat anywhere, and turn off in a timely manner when the set temperature is reached.
Finishing
Next, the final finishing of the ceilings is carried out. This can be a suspended ceiling with special micro-perforation. It transmits infrared waves perfectly. In this case, the suspended ceiling is mounted along the edges of the wall, without affecting the ceiling itself.
You can also cover the structure with a suspended ceiling: plasterboard sheets, clapboard or plastic panels. A small gap should be left between the suspended or suspended ceiling and the infrared heating system. For finishing the ceiling, you should choose waterproof materials with a thickness of no more than 16 mm.
The infrared heating system for ceilings is the most modern, safe and efficient of all electric heating options. If installed correctly, it will last a long time, filling the house with warmth and comfort while remaining completely invisible.