What is a Swedish stove and where is it used?
The design has many advantages. The operating principle allows you to install such a stove in any room, especially small ones. It gradually warms up the house and keeps it warm for a long time. But this is only possible with proper installation and operation. Anyone can do it. Without some knowledge, the process will be difficult, but if you follow the order and instructions, it is possible to complete it.
Operating principle and design of the Swedish oven
A Swedish stove, with a built-in oven and hob, is an economical option for heating a private home. The design has many advantages. The oven is located on the side. The principle of its operation is that the first heat warms up the massive brick well. This part conducts heat poorly.
The combustion part, in the form of a cap, performs one of the main functions - it burns the fuel. The fire does not apply to the metal part of the oven. This is not necessary, because it heats up due to the intense heat. If you open the doors, the room will quickly feel warmer. While preparing breakfast, you can warm up the house well.
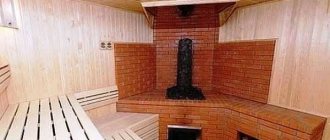
This stove is suitable for private and country houses. If the design is supplemented with a sun lounger, you can ensure healthy and restful sleep in the winter.
Upper niche
Compact and at the same time roomy part of the oven. Heats up at first and second heat. You can safely dry wet clothes. This is how the heat supply technology is thought out. Convenient to dry clothes. In winter and autumn it gets wet from rain and snow. The function is safe if fire safety regulations are taken into account.
Niche above the stove
Old samples of the stove had a wooden lid that covered the niche to preserve heat for a long time. This was convenient, because in the morning the room was warm, even from the evening kindling. This advantage allows you to save time in the morning. Especially if you don’t have enough time to fire it.
Smoke exhaust
During the development process, the masters decided to abandon the highlight. It was located between the chimney and the firebox. This construction method turned out to be complex and expensive. Therefore, they build a stove with their own hands without a heel. Instead, they make a crossflow under the oven. When the house is heated, it is necessary to close the view. Otherwise, the stove will cool down very quickly.
The structure is heated with a second heat, when massive parts of the fuel begin to burn out. In the standard scheme, vertical channels are installed. In this case, the device does not heat the room well. But there is no accumulation of soot, which allows the use of any type of firebox.
Initially, horizontal channels were installed. They were made in the houses of rich people. This saved time. Kindling did not require much effort. The lower part heated up well and quickly. But soot removal was carried out frequently. Now this process complicates operation. It is inconvenient to use, given the hustle and bustle of everyday life.
Much also depends on the type of firewood used for heating. It is recommended to choose firewood with a low resin content. For example, aspen or acacia. Pine tree species and birch are not suitable. It is these substances during the combustion process that contribute to the accumulation of soot and contamination of the chimney.
Additional items
The back of such a stove is an ideal place to create a stove bench or fireplace. In place of the sun lounger, you can create a Swedish bed. Long-lasting heating will allow you to sleep well in winter. They also additionally create drawers for linen, which is always dry and warm.
Similar designs or what we compare with
The classic “Dutch” is intended exclusively for heating the house. Its main advantages are its compactness and relatively low price.
But since the Dutch oven does not have a frying surface, people do not favor these stoves. In addition, the efficiency of the Dutch is about a third lower than that of the Swedes.
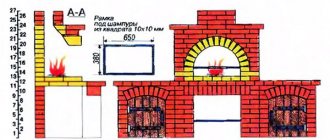
This model is considered an improved version of the Swede. With the same dimensions, it is more practical. On the left is a diagram of a Muscovite:
- Ash pit or “blower”;
- Soot cleaning hatch;
- Grate;
- Firebox;
- Hob;
- Closing doors under the hob (installed upon request);
- Ventilation ducts;
- Cleaning hatch;
- Water heating tank;
- Oven;
- “Winter” valve;
- “Summer” valve;
- Cleaning hatch;
- Central valve.
It is good in operation even for a small house, up to 50 m2 is perfect, but for an amateur it is almost impossible to fold a Muscovite with his own hands.
To some extent, this model can be called a lightweight version of the classic Russian stove, because a stove bench is not just a brick extension, but a plane with full-fledged gentle heating.
This Swedish stove is convenient to use, but the design has several serious disadvantages:
- Large mass;
- A stove with a stove bench requires a lot of space;
- For an amateur, the order is quite complicated.
Swedish stove with fireplace.
A very convenient option with high efficiency. Typically this design is built between the living room and kitchen.
Everything about this stove is good, but, as in the two previous options, putting it together yourself is quite problematic.
This heating and cooking stove can claim to be a classic option more than others.
With standard dimensions of 1020x770x2010 mm, it can produce up to 3600 kcal/hour, for example, for a Dutch oven a maximum of 2600 kcal/hour.
It is the stove K.Ya. Buslaeva and models close to her are best suited for amateurs.
Advantages and disadvantages of a Swedish woman
Advice from professionals! It is recommended to take into account all the good qualities before installing and building heating.
Advantages:
- Additional functions. You can make ovens with ovens and hobs. They install water heating tanks, sun beds, and fireplaces. Changes in the construction of the structure do not affect the combustion process.
- To add additional functions, it is necessary to calculate the circuit in detail so that the stove works correctly.
- Compact in use, small dimensions in area.
- A small stove will require a small amount of materials. Therefore the design is economical.
- Can be installed on any floor of the house, not just on the first floor.
- Efficiency does not depend on height. This advantage has been tested in practice.
- Mostly the structures are thin-walled, with optimal shapes. Resistant to thermal shocks and temperature changes. Thanks to this stability, the risk of thermal deformation is significantly reduced.
- To create the combustion part, high-strength, heat-resistant brick is used. Chimneys can be laid out in any position.
- The gas outlet pipe has a simple configuration. This promotes uniform temperature distribution. This feature allows you to install water heating tanks and other additional elements.
- The thin-walled device heats up quickly and cools down slowly. The heat in the room spreads gradually. You can fully load the stove and immediately start heating after the summer season.
It is worth thinking about making a Swedish oven with a hob yourself. The device is multifunctional, economical, and easy to use.
Main disadvantages:
- The action is constant and does not depend on the height of the device. But it is not large and amounts to a maximum of 55%, so Russian stoves have advantages here.
- The main mode of operation is smoldering, it does not burn out quickly. Any type of fuel is suitable for use, preferably those that burn slowly. For example: briquettes, brushwood.
- The channels located inside have the disadvantage that after heating they lead to instant cooling if the view is open. This leads to reverse thrust.
- Don't heat it too often. Slow smoldering reduces carbon monoxide content. In this case, classic national stoves will be safer.
- When used correctly, the device has more advantages than disadvantages. Anyone can build it with their own hands. In this case, it is necessary to strictly follow the drawings.
What mortar to use for masonry
The reliability and durability of the finished stove directly depends on the quality of the masonry mortar.
The masonry will be carried out using a sand-clay based mortar. There is nothing complicated in preparing the solution. Take clay, fill it with water and soak it. Sift the mixture through a sieve and then stir into “clay milk.” Finally, add some water to obtain a sufficiently viscous and plastic solution.
Remember, the reliability and strength of the stove directly depends on the correct preparation of the masonry mortar. If you do everything right, the stove will effectively heat your home for many years. Violate the technology or decide to save a lot on materials - the thermal unit is unlikely to be able to fully reveal its potential and stand for any length of time.
Mortar used for laying the stove
Calculation of the features of a Swedish oven
To make a Swedish stove with your own hands, you need to carefully think through the project and select the appropriate size for each element.
Use only reliable Swedish ovens with a hob and oven. This will guarantee a reliable structure. A separate calculation may be needed to determine the size of the chimney. They are calculated based on heat transfer.
You can autonomously determine the cross-sectional area of the tube. It is necessary to take into account the amount of heat and what kind of fuel will be used for heating. The first indicator is calculated taking into account the following pipe parameters: length, width, height.
Table: specific calorific value of firewood (kW/m3)
The table takes into account detailed data that will allow you to determine the correct calculation for maximum performance
To create brick stoves for your home, you need to draw up drawings with instructions. In this table we will consider detailed data for calculation, without which we cannot do when building such a furnace.
This takes into account the power and dimensions of the pipe.
What mortar should I use for masonry?
The reliability and durability of the finished stove directly depends on the quality of the masonry mortar. The masonry will be carried out using a sand-clay based mortar.
There is nothing complicated in preparing the solution. Take clay, fill it with water and soak it. Sift the mixture through a sieve and then stir into “clay milk.” Finally, add some water to obtain a sufficiently viscous and plastic solution.
Fireclay clay
Remember, the reliability and strength of the stove directly depends on the correct preparation of the masonry mortar. If you do everything right, the stove will effectively heat your home for many years. Violate the technology or decide to save a lot on materials - the thermal unit is unlikely to be able to fully reveal its potential and stand for any length of time.
Mortar used for laying the stove
Tips for choosing building materials
The construction process is not complicated. The Swedish stove is a simple design that requires strict adherence to the drawings and order. You need to mix the solution correctly and have minimal knowledge of how to do it.
Required tools:
- Master OK;
- rubber mallet;
- level;
- rail;
- roulette;
- hydraulics;
- pencil;
- shoulder blade;
- bucket.
When making the solution, take a small metal strainer. It must have a cell for sifting sand and clay. Ordinary clay is not suitable because it is not heat-resistant. For the construction of such a heating device, exclusively fireclay clay is chosen.
The solution must be soaked for several nights in a trough. Continue this process until the lumps disappear and excess water appears on the surface. After draining, the remaining mixture should have a thick texture. This can be checked using a trowel. A small amount of solution is applied to a dry vertical surface. If it does not drain, but hardens, then it can be used.
Advice from experts in choosing clay: the mixture should not have any foreign odor. Any aroma is a sign of organic impurities that will evaporate during combustion. This will lead to a decrease in the strength of the masonry. Choose your clay carefully.
List of materials that will be needed during construction:
- red solid brick;
- fireclay brick;
- fireclay clay;
- door for the combustion chamber and ash chamber;
- grate (ideally cast iron);
- iron angles and sheets;
- asbestos gasket in the form of a cord;
- asbestos sheet.
Must be of high quality, without manufacturing defects. You can weld the doors yourself.
Preliminary steps before assembling the oven
One of the main points in preparation is determining where the stove will be installed. After all, it should heat the entire room evenly. If the device is being built in a finished house, the chimney outlet must be taken into account. During the installation of the pipe, it is important not to damage the rigidity of the frame.
Preparatory work is best done in summer or autumn. It will take at least 30 days to dry the foundation. But experts recommend keeping it for up to six months. Holes in the ceilings are made before laying. The roof is assembled last.
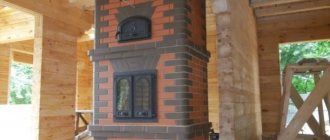
Determining the place where the Swede will be located.
The main function of the device is heating. Therefore, it is optimal to build the stove in the center of the room. The house must have a very good and strong foundation that is firmly established. The structure weighs approximately 3 tons. It is important that the foundation of the house can support its weight. In a residential building, it is usually installed near the interior partitions near the exit door.
Pouring the foundation: recommendations + video
The lifespan of this device, its performance and heat dissipation depend on the foundation.
The depth is determined taking into account the region and groundwater. It is important to calculate the depth of frost resistance in winter. If the top is installed above this level, horizontal extensions will appear. It is recommended to choose a depth of 0.8-1 m.
Linear values are determined by the dimensions of the furnace. The foundation is poured approximately 15 cm wider from these indicators. These are the main standards in the structure.
In the space between the ground and concrete it is necessary to create a gap from sand. Height - 20 cm. In the future, it will perform the function of separating water that comes from the ground.
After the sand cushion, you can use crushed stone, crumbs of brick or other materials. Craftsmen give preference to natural stone because it is highly durable.
The reinforcement is installed closer to the bottom layer. It is needed to strengthen and evenly distribute temperature effects. The metal mesh is placed horizontally.
The top surface must be flat. Use a wide spatula to help. After drying, apply roofing felt in several layers. It is used for waterproofing.
A hole is made in the floor, which must have the correct design. This is necessary for convenient laying. Then they install the flooring under the body of the structure and make skirting boards.
The advantage of a Swedish stove with a hob and oven is a strong flow of heat. Before masonry is carried out, the thermal insulation material is laid out. There should be several layers of it. A good material is basalt cardboard. It is inexpensive, has sufficient thickness - 5mm. An option is fireclay brick, used to build a furnace. The material is more expensive and has low thermal conductivity. It doesn't warm up the foundation.
Video that will be useful:
Creating a waterproofing layer
The picture below shows how to apply roofing felt layers. Craftsmen also choose materials for sheathing, for example, sheathing with foil on all sides. Waterproofing is a certain part of the stove design. For waterproofing, use a dense, stable material. An economical option is a substrate. It comes in different thicknesses.
Tools
- Shovels of bayonet and scoop types;
- Container for preparing the solution;
- Electric drill and mixing attachment;
- Mason's hammer and rubber mallet;
- Master OK;
- Joining;
- Construction level (preferably using magnets);
- Plaster rule measuring 1.5 meters in length;
- Plumb;
- Grinder for iron and stone;
- Yardstick;
- Construction stapler;
- electric tile cutter (it is possible to use a semi-professional device).
Building a Swedish stove with your own hands: order and technology
An inexperienced person must follow step-by-step instructions in building the structure. This type of oven is distinguished by its small dimensions. Can be installed in a small room up to 40 m2.
Laying out the oven
The instructions correspond to each row of the heating device:
- The first two rows are solid. During the laying process, you need to adhere to the displacement of the bricks. Also monitor whether the corners and horizontal surface are created correctly or not. The first two ranks are the basis of the entire structure, so mistakes should not be made.
- Then, in two rows, they harness the ash pit - a space for clearing soot. It is necessary to install special doors for the blower and 3 bolts for cleaning.
- For this purpose, fixing paws are used. Afterwards a gap of four to five millimeters is left. It serves to prevent the expansion of iron due to thermal effects.
- Rad 5 is needed for the combustion chamber. The laying is carried out with fireclay bricks. A grate is mounted at the bottom and a gap of five millimeters is left. For stability, they are covered with sand. Then the oven is installed, and fastening is done using a similar method.
- In the sixth row, the chimney and chambers are built.
- Rows seven to nine - this will be the masonry of the firebox - fireclay bricks are used here. A gap must be left between it and the red brick to prevent thermal expansion. The space is not filled with solution. This stage is also used to mount the fire door.
- The eighth row is covered with a vertical canal. So that processed gases pass through the chimney channels. Therefore, the 9th row should consist of bricks that are ground at an angle. You will need a grinder with discs for working on concrete.
- The tenth row provides coverage with a horizontal partition.
- Row 11 consists of a metal welding plate. It also lays the foundation for the continuation of the masonry.
- From twelfth to sixteenth - they create smoke ducts. The inside is being mopped. The 17th and 18th rows should be supported by iron stops to ensure rigidity and reliability. They are installed from strips and corners. The welding compartment is closed. To strengthen the bricks, they are fastened with wire at the corners. At this stage, the cooking chamber must be closed.
- At 19 and 20 - they lay the drying chamber, make special holes for cleaning
- From 21 to 28 they consist entirely of a drying chamber.
- In the twenty-seventh, they make a valve and maintain a gap of five millimeters. The asbestos cord is wound around the frame.
- Twenty-ninth - closes the channels and the entrance of the tube. The masonry is distributed to create a cornice. 30 in a row, the masonry expands by five centimeters.
- In the thirty-first, the initial values are returned.
Order in the structure of a do-it-yourself Swedish stove is the key to creating a properly functioning heating device.
Make a mixture of clay and sand for masonry
Here is a link to a useful video:
Pipe laying
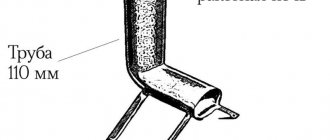
After laying out all the rows, the pipe is extended. Mostly straight, which has no changes in the dimensions of the cross-sectional area. On the technical floor or attic, the brick pipe will turn into a metal pipe. The size of the internal section should not be subject to change due to this. Taking into account fire safety rules, a fluff is installed where the chimney and the ceiling intersect.
Taking into account the operating conditions, the pipe is made at a certain elevation:
- the chimney is located at a distance of 1.5 from the cover, then the head is installed 0.5 m higher;
- the distance of the chimney from the ridge is within 1.5-3 m, then the chimney is raised to the highest point of the roof;
- the chimney distance is more than 3 m, its highest part should be under a conventional line that runs from the ridge at a ten-degree angle;
- if there is a steep roof, the head should be at least 0.5 m higher above it;
- in general terms, the span of the chimney channel from the grate to the cap cannot be less than 5 m.
Each period in the structure is shown to be important. It is strictly forbidden to make mistakes, since this completely affects the operation.
Drying the oven
When construction is completed, the furnace cannot be used. The optimal time for drying is 10-14 days. In the first 2 weeks, drying must be natural. If the weather prevents the solution from drying on its own, then a fan can help.
During the drying process, the cleaning doors must be covered with paper. This material will serve as an indicator. When the paper is no longer wet, the drying process is complete. Once completed, you can slowly start using this heating device.
It is necessary to add fuel in small portions, approximately several kg. When the first batch burns out, you can start laying a new batch or gradually adjusting several pieces of firewood. In this way, the stove will warm up continuously, gradually. Therefore, a certain air temperature is maintained in the home for a long time.
Aspen firewood is an excellent option. They dry the structure well from the inside. It is recommended to use before further commissioning. Firewood from birch or any type of pine should not be used. They are not intended for such purposes. Such firewood gives off a lot of thermal energy and causes the accumulation of a large amount of soot. This is due to the resin content. A clogged chimney accumulates carbon monoxide. The fumes are harmful to health. Timely cleaning is the key to long-term use.
Video: small-sized Swede for country housing
The video and photo describe a detailed memo. A detailed story is a way to build a reliable structure.
Operating the device
After the structure is laid out, it is dried. In summer it will take 2 weeks. If the masonry was carried out in the autumn-winter period, they begin to heat the stove with small wood chips for 30 minutes once or twice a day. For additional ventilation, all cleaning doors and latches are opened (if it rains, they are not opened).
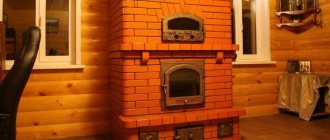
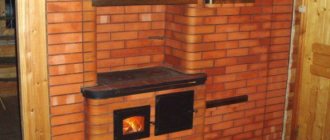
Photo 2. Finished 3 by 3 brick oven. The device is installed near the wall and has a very compact size.
When wet spots disappear from the surface and condensation stops falling on the metal elements, the structure is dry. After this, a control fire is carried out - the furnace is heated at full strength for several hours at maximum draft. If no cracks have formed in the masonry in the area of the firebox (small spiderweb cracks are acceptable), then the stove is ready for use.
Attention! You cannot immediately heat the stove too much - this will cause cracking of the masonry and render the structure unusable even before operation begins. As a result, the entire construction phase will take an average of 1 month:
As a result, the entire construction phase will take an average of 1 month:
- foundation preparation - 10 days;
- laying the stove and chimney - 1-2 days;
- drying of the structure - 14-21 days, depending on the time of year.
After this period, if no shortcomings have been identified, you can start heating the stove at full capacity.
A little about metal in masonry
Metal is generally undesirable in furnaces - its coefficient of thermal expansion does not coincide with the CTE of brick. In a furnace, of course, it is impossible to do without metal.
Therefore, it is important to follow a few simple rules that will help avoid unnecessary cracks in the masonry.
Cleaning hatches and blower doors are simply installed on a masonry mortar - clay-sand. Naturally, wire is inserted into the holes of the frames and its ends are run into the masonry between the rows.
The fire doors get very hot. Therefore, you cannot insert them tightly - they will tear the masonry or crack themselves. To prevent this from happening, a cord made of asbestos, basalt or kaolin, soaked in a clay solution, is wound around the perimeter of the frame - it will play the role of a thermal compensator and seal the connection.
The oven is installed in the same way. But such winding is required only in the door area. The oven drawer itself is not wrapped. Although it would be good to apply a layer of about 5-10 mm of masonry mortar on top of the cabinet - it will slightly even out the heating and protect it from direct exposure to heat. Of course, such a composition cannot be applied to the side walls - it will fly off during the first fire.
The grate is always placed freely in the firebox so that the gap is at least 5 mm on each side.
The cooking floor (more often referred to simply as a slab) is placed on a thin layer of mortar. To which you can add soaked asbestos or kaolin. Finnish-made slabs are installed a little differently - their flooring and frame are made as separate elements. Therefore, they are simply lined with kaolin wool.
On top of the masonry, along the upper outer corner of the slab, a frame is laid from a steel corner - earthenware. It serves to protect the masonry from destruction - it still happens that the corner is touched by pots or other utensils.
If you make a chamber to a stove with a shield above the cooking floor (add side walls and some kind of ceiling), then you will end up with a design better known as a Swede - a very popular kitchen stove among professionals and DIYers.