Warm floors are a practical, modern and efficient heating system that is gaining popularity and is actively used in new apartments. It is not very expensive and is accessible even to citizens with average incomes. In addition, unlike a water system, infrared heated floors under laminate are much easier to implement, which is another plus.
Principle of operation
Conventional heating systems operate using a direct heat exchange scheme. For example, batteries receive energy from hot water, which is heated at a nearby boiler house. This energy is then transferred to the air in the room, thereby spreading heat throughout the room. The same thing happens when using electric heaters, only the heating element is heated there.
In heated floors created on the basis of water or electric (not infrared) systems, the simplest heat exchange also occurs, only in this case the screed, under which the cable or pipes are located, is heated. The disadvantage of such systems is inertia. To preheat the floor, you need to spend a lot of resources, but the cooling of the floor when the power is turned off occurs slowly, since the pipes or cables under the screed do not cool down for some time.
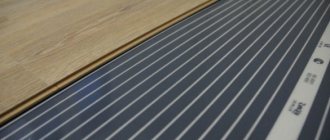
Film heated floors under linoleum or tiles work differently. Here, under the surface (tile, linoleum or laminate) there are transparent polyesters with carbon-coated strips (or paste). Each strip is connected to a copper bus—voltage is applied to it. When current passes through carbon paste, a radiation flux with waves 5–20 μm in length is created. The film itself and the tire heat up very little. The infrared energy flow created warms the surfaces it hits, and in this case it is the floor. Consequently, in infrared systems there are no intermediate surfaces through which heat is transferred; here the floor itself is heated - it is this that is the first and last “obstacle” to heat. An analogue is the sun, which is also a source of thermal infrared radiation. Its rays heat surfaces encountered along their path.
The operating principle of infrared systems has long been known and is successfully used in wall, ceiling or wall-mounted heaters. It has successfully proven its effectiveness over the years. With the development of technology, we have learned how to lay infrared heated floors under a laminate or other covering. This became possible due to the development of carbon-coated film heaters.
Materials and tools
What may be needed to install an IR floor system? These may be the following tools and materials:
- directly the IR heating film itself;
- heat reflector;
- temperature sensor and temperature controller;
- regular and double-sided tape;
- electric wires;
- clamps and material for wire insulation;
- waterproofing material (for example, polyethylene film);
- knife, scissors, pencil, ruler, tape measure.
Installation of IR system contacts
At the beginning of the article, a description of IR film was given, but in fact, it is not only carbon.
Table. Types of heating film.
| View | Characteristic |
| Carbon or carbon fiber | The optimal option for IR film used for arranging a floor heating system. Its description was given in the article above. The heater consists of two layers of film, between which there are strips of carbon elements, due to which heating occurs. The material is environmentally friendly, effective, reliable, economical, and does not have a negative impact on human health. Service life - decades. Heat transfer is 97%. The main producing countries of such flooring are the Netherlands and South Korea. |
| Bimetallic | Such a floor is also created from two layers of polyurethane film, between which a conductor made of copper and aluminum is laid. Installation of such a system is somewhat more complicated due to the lack of a grounding wire. The material can also be used under laminate (such heating systems cannot be used under ceramic tiles and porcelain stoneware). The system is functional, distributes heat well, and is suitable for use in Russian climate conditions. |
Heating film NAOS Heatflow
Heatflow film uses carbon fiber web as the heating element, which is a mixture of carbon fiber with carbon paste
Thanks to the bonding method using a special conductive polymer, NAOS Heatflow eliminates the occurrence of electric arcs
There is also another type of IR film. It appeared relatively recently, but has already become in great demand. These are films with a continuous carbon coating. Unlike standard carbon IR film, this material practically does not fail when damaged - that is, the floors will always be warm.
On a note! If you damage one or several strips of a regular infrared floor, then it will not warm up at their location. However, when using a film with a continuous strip of carbon fiber, the floor will warm up just as evenly, even if it has been damaged. It’s just that in the place of the cut or break the material will be a little cooler, but it will continue to heat.
IR carbon-based floor
Advantages
There are a number of advantages inherent to these systems:
- Film thickness - 0.5 mm. This allows you to hide it under any covering, even thin linoleum. This same advantage allows you to implement a film heated floor with your own hands, since the labor-intensive work of pouring and screeding is eliminated. Also, this solution does not involve raising the floor level by centimeters, which is often the reason for using such a system in apartments with low ceilings.
- Uniform floor heating and stable temperature. If the heating elements are located under the laminate, which is very sensitive to temperature changes, then in the case of electric (non-infrared) or water systems there is a possibility of its damage due to a breakdown of the thermostat. When heated above 40 degrees, it may swell or diverge the seams. When using film systems, heating above 40 degrees is impossible even with a faulty thermostat, so laminate or linoleum or tiles will not be damaged.
- In multi-storey buildings, the use of classic underfloor heating systems is sometimes impossible due to the need to fill, which can make the structure heavier. The only possible option is the use of film infrared systems.
- Flexibility - the system can be implemented in all rooms, even with high humidity. You can install infrared heated floors under tiles, laminate, linoleum, or parquet boards. That is, the system can be implemented even in a bathroom or toilet, but since these rooms have a high level of humidity, and water always gets on the floor, grounding or the presence of a protective shutdown device in the electrical circuit is mandatory.
- Energy transfer begins almost instantly when power is turned on. This allows you to quickly bring the room temperature to a comfortable one. Such a system works perfectly with fashionable “smart home” technology and is programmable. That is, you can set the exact time for turning the heating on and off or specify the required temperature - it will be maintained in the room all the time.
- Unlike conventional electric or water radiators, infrared heated floors under linoleum do not burn oxygen or dry out the air, which is especially pleasant for people suffering from chronic respiratory diseases.
- No vortex flows. Conventional radiators on the walls draw in cold air from below and release hot air from above, which moves to the top of the room, cools and sets. As a result, powerful streams are created that drive dust around the room. The infrared floor heats up evenly and slightly, which eliminates point turbulence.
Well, the last plus is the price. Installation of a film heated floor under linoleum will cost much less than the implementation of complex water cooling of the floor. We are talking about the cost of installation, not the film itself. However, depending on the manufacturer, the film itself may be cheaper than “outdated” floor heating systems.
Materials Basics
The quality of work and service life of a heated floor laid under laminated panels depends on the parameters of the purchased equipment and material, coupled with an understanding of the features of their combination.
To independently develop a layout for infrared stripes, it is necessary to take into account the physical features of such heating.
Parameters of infrared film floor
A film heater is a flexible, narrow sheet placed under the floor covering and containing a heating element. It converts electrical energy into infrared heat waves.
Heating of a laminate or other material occurs from below due to radiation hitting it. After heating the floor surface through its thickness, heat is released into the air of the heated room.
Image gallery
Photo from
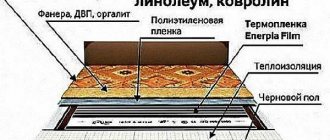
IR floor heating device for laminate flooring
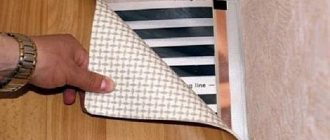
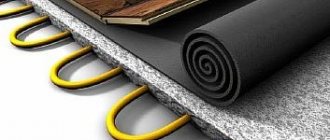
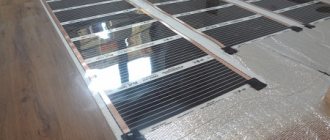
Laying infrared panels indoors
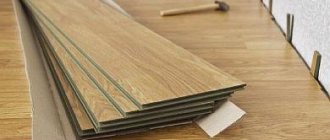
Components of a laminate floor with heating system
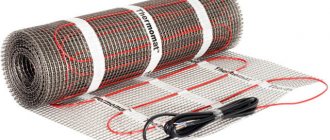
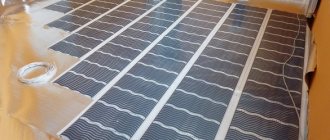
Easy to cut and install system
The heating element of IR systems is carbon continuous or striped coating, covered on both sides with lavsan or polyurethane film. Current-carrying bimetallic busbars are installed along the edges of the canvases, transmitting energy to the heating element.
The thickness of this design varies from 0.2 to 2 mm, most often panels with a thickness of 0.3 to 0.5 mm are available for sale. Standard width sizes for one strip are 50, 60, 80 and 100 cm.
The ability to purchase infrared heated floors of varying widths by the meter allows you to implement almost any arrangement of heating strips
Any film can be cut to length in places specially designated and marked for this purpose. The cutting step is approximately 20 cm, so you can easily obtain panels of the required length.
The maximum power of infrared film for laminate is from 120 to 230 W/sq.m. Devices with high heat generation are not used due to the limited heating temperature of the laminate. Sometimes, the manufacturer indicates power depending on the linear meter. In this case, dividing it by the bandwidth can calculate the desired value.
Requirements for laminate as a coating
An ordinary laminate may have three properties that prevent its use as a topcoat in combination with a heated floor:
- curvature of plate geometry under high temperature;
- pressing through the plates when exposed to heavy objects;
- high thermal insulation properties of the material.
Therefore, improved models have been developed for the joint use of laminate and the film heated floor located underneath. They are marked with special symbols placed on the packaging of the material or in the instructions for it.
There is no uniform marking standard, so when purchasing, you need to clarify this issue with the seller, since there are solutions only for water or electric cable heated floors.
A schematic representation of a heated floor shows the possibility of using laminated panels from this batch together with it. It is also recommended to use material of safety class E1 or E0 with a minimum content of free formaldehyde
The total value of the thermal resistance coefficient of the laminate and the substrate on which it is laid should not exceed 0.15 sq.m*K/W. Therefore, when choosing a material, it is necessary to ensure that this technical specification complies with regulatory requirements, otherwise there is a risk of overheating and breakdown of the heated floor system.
The connection of the lamellas can be made using glue or locks located at the ends of the plates. In combination with a heated floor, only a floating design of a laminated floor made from interlocking panels is allowed.
Those. The covering assembled from panels should not have a rigid adhesion to the base, and a gap must be left around the perimeter of the room, around architectural details and pipe penetrations as a reserve for linear expansion of the material.
Laminate is produced by pressing sawdust with the inclusion of resins containing formaldehyde. The manufacturer indicates the maximum permissible heating temperature, above which the toxic substance begins to evaporate. This usually happens when it reaches 28-30 degrees Celsius. When calculating heat release, this factor must be taken into account.
The arguments in favor of installing an infrared heating system under laminate and comparing the advantages of IR film with water-based options are detailed in the following article, which we recommend that you read.
Rules for placing underfloor heating strips
The area of a separate room that should be equipped with a warm floor is calculated based on the heating needs of this room.
In the absence of other heating systems, an average of 70% coverage of the total area is sufficient. In the presence of radiators and fireplaces, the need for heat from the floor is reduced, which leads to a decrease in the number of laid strips or less energy consumption for heating.
Due to the existence of restrictions on the maximum power supplied to a residential property, it is necessary to calculate the load on the network
The absence of the need to place an infrared heated floor under the laminate over the entire area of the room makes it possible, as a rule, to easily bypass the following restrictions when designing:
- Do not place heated floors under heavy objects such as cabinets or sofas with legs. They push through the laminate, which leads to an uneven fit and excess pressure on the film.
- Do not cover heated laminate flooring on top with heat-insulating material, such as carpets or furniture without legs. This leads to disruption of heat transfer to the air and overheating of the system.
- It is necessary to avoid heating the laminate simultaneously from the infrared film and another heat source. The size of the floor area under which film cannot be placed is determined individually for each type of heating device located nearby.
- It is necessary to retreat from walls and stationary objects by at least 3 - 10 cm, depending on the manufacturer's recommendations, since the heating zone in plan slightly extends beyond the boundaries of the film. Elevated temperatures can have a bad effect on baseboards and wallpaper.
When planning the placement of infrared film, they often retreat from the walls at a distance of 50-60 cm. This is due to possible redevelopment or rearrangement of furniture in the future.
A significant distance from the walls leaves a wider range of solutions for changing the design of the room. In addition, residents of the house use the space near the wall much less often than in the middle of the room.
In living rooms, infrared film is often placed in the middle. This placement closes areas where people are often present and allows you to change the arrangement of furniture along the walls.
If the heated floor area is rectangular, then it is better to plan the location of the film fragments along the long side. In this case, the number of strips and, as a result, the operations for their installation, insulation and connection are reduced.
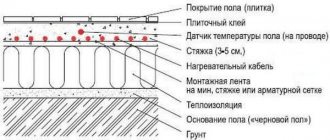
Additional information on the structure
In a vertical section, the heated floor device consists of five layers, each of which has certain requirements. The subfloor must be firm and as level as possible. For a concrete base, it is recommended to level it by pouring a leveling mixture, and for a wooden base, by laying plywood.
The insulation between the base and the heating elements is designed to prevent heat loss. Considering that the heated floor runs on electricity, the substrate should not conduct current.
Therefore, insulation with a reflective surface based on aluminum foil is not used. Most often, roll polyethylene foam insulation or cork backing is used, complete with a reflective layer.
The structure of an infrared floor under a laminate (in construction slang - “pie”) is quite simple. Laying any layer does not require specific knowledge or heavy physical labor
Before laying underfloor heating strips with electrical wiring and a temperature sensor, you must read the instructions included with the kit. The general principles of installation are the same, but there are some nuances regarding the distance between the elements being placed, as well as the method of connecting to the electrical network.
Polyethylene or vinyl film should be used as a substrate located between the heating elements and the laminate. It transmits heat well, but serves as a barrier to water and dust, which should not be allowed to enter the heating strips.
One of the typical representatives of film heating systems is PLEN brand products, the installation and operation features of which are described in detail in the article we recommend.
Alignment
The very first stage is leveling the floor. Naturally, the old coating must be completely removed, the surface washed and dust removed. If small holes remain in the floor slab itself (they can form during the construction of the house), then they can simply be filled with sand.
If the floor is flat, then it is necessary to lay a special material directly on it to reflect thermal radiation. The underlay for film heated floors is inexpensive and is laid over the entire area - close to the walls. To avoid shifting, this material can be attached to the floor with double-sided tape - just glue it around the perimeter. The presence of a heat-reflecting surface increases the efficiency of the heated floor and significantly reduces heat loss through the bottom. If the floor had holes, then this material will completely cover them.
Heating elements are the very “heart” of a warm floor.
- Heat-reflecting material - its purpose is to reduce heat loss. A prerequisite is that it must be non-conductive. Polyethylene foam insulation or cork backing with a reflective layer is suitable.
- The base of the floor is solid and level. To do this, the concrete base can be filled with a leveling compound, and plywood can be laid on the wooden base.
Placement of thermal film
Before placing the film itself, you need to plan its position in the room and draw up an approximate connection diagram for the film heated floor. To do this, you need to know in advance the future location of the furniture in the room, since infrared elements should not be located under a closet or sofa. If there is no clear plan, then it is advisable to place the film at a distance of 60–70 cm from the walls.
In residential premises, a standard arrangement of thermal film is often used: several strips in the center of the room along the long side. When the location has been decided, the film strips must be cut into pieces of the required size and laid on the floor with the copper film down or up (depending on how indicated in the instructions). Moreover, they should be positioned so that the eyeliner is on one side.
The distance of the stripes from each other is individual. One manufacturer allows them to be placed end-to-end (most often), another recommends leaving a space of 3-4 cm between the strips. But no one ever allows stripes to be placed overlapping - this is fraught with overheating and failure.
If the distance between two or three stripes is higher than permissible, this will lead to uneven heating of the floor - there will be less and warmer areas on it with a difference of 2-3 degrees, although they are not easy to notice.
Carbon solid floor installation
When installing a solid carbon floor, the master practically does not require any special skills, and all work can be done within one day:
- Markings are applied to the pre-prepared subfloor base according to the arrangement in the furniture room.
- The material is laid out on the floor.
- The markings are transferred to the solid carbon floor.
- The floor heating elements are cut in the right places.
- The equipment is connected to the network and tested in operating mode.
- After installing the mats, they are covered with a substrate and a finishing floor covering.
The effectiveness of the design will depend, for the most part, on the quality of the product itself supplied to the market.
Insulation
The thermofilm usually comes with a special insulating tape with special clamps that are used to connect the floor to the network. Also included are cables, a temperature sensor and a thermostat (not always). Cables usually have a cross-section designed to carry a current of a given power.
Use bitumen film to cover the cut areas of the tire. First of all, they are glued to areas of the side to which wires are not connected. Simply put, it closes “open” contacts. The film must be glued well, that is, without an air bubble. When voltage is first applied, the film heats up, melts slightly and takes the shape of the compound being protected.
On the reverse side of the strip there is an open contact. A clip is attached to each of them - it is included in the kit. You need to install it using pliers so that the special spikes pierce the film and reach the tire itself. The stripped ends of the cable are attached to the clips in accordance with the instructions (it clearly indicates where the phase, neutral, and ground are connected), the open contact is covered with bitumen films. The underfloor heating strips are connected to each other in series so that when voltage is applied they work simultaneously. It is also advisable to fasten them together with tape to prevent them from moving under linoleum or laminate or tiles.
Laying technology
The main advantage of infrared film flooring over other types is its simplicity and the possibility of self-installation.
And laying the finishing coating will not be difficult for home craftsmen without experience in this work.
Preparing the base and laying thermal insulation
Before installing an infrared heated floor, you need to carry out the following work: prepare the base and carry out waterproofing.
Important! The base must be level and solid, with a slope of no more than 2 mm per 1 meter.
It is necessary to carefully check the base for cracks and irregularities. If found, they should be puttied and allowed to dry. After this, the surface must be thoroughly cleaned of debris and dust (sweep or vacuum).
If there are significant differences in the concrete base, it is easier to fill the screed with a leveling compound.
The next stage is laying insulating and heat-insulating material. It is laid along the entire perimeter right up to the walls, even where the heating element will not be located.
The insulator can be polyethylene foam or cork with a reflective layer. Aluminum foil should not be used as it conducts current. The insulation is spread with the foil side up.
The substrate for the film should have a thickness of 3 - 4 mm, this is important, since grooves will be made in it for laying the cable. To ensure that it does not move during subsequent actions, you should secure it with a stapler and connect the strips with double metallized tape.
Next, a recess is cut into the insulating material for the temperature sensor.
Laying film infrared emitters
The heating film must be laid out in accordance with the existing diagram. Installation should be done carefully so as not to damage the integrity of the heating fabric. It is recommended to cut the film with scissors along the strips intended for this purpose.
The heating elements are located at a distance of at least 20 cm from the wall and furniture, and 1 meter from the heating devices. This is necessary to avoid overheating of the floor and its failure.
The film elements need to be placed with the copper busbars facing down, and then secured with tape. The permissible length of heating strips is no more than 8 meters.
You cannot lay the film on a whip, the distance between the strips is 50 mm. To minimize wiring costs, lay the film towards the thermostat, along a large wall.
Then you need to carry out actions to isolate the areas where the current-carrying bus was cut, in places not intended for cable communication. For these purposes, it is necessary to use bitumen tape; it is better to press it tightly on all sides for good sealing.
Connecting the temperature sensor
The temperature sensor should be placed in the center of the canvas, on the black carbon strip. In this place, in the substrate, at the time of laying it on the base, make a recess for it, as well as cable channels.
The housing should be fixed with bitumen tape. When the sensor is installed and the wires are routed to the thermostat, the film is put back and secured with tape. Now you can install the terminals.
Terminal Installation and Cable Connection
Terminals are installed at the points where the floor is connected to the power supply. To do this, the top should be inserted into a special slot, and the second plate should be left at the bottom of the film outside. Using pliers, gently but firmly compress the clip to ensure contact connection with the silver part of the copper bus bar.
There are some models of film floors that provide a different method of connecting the terminals - rivets, this is indicated in the instructions.
The next step is to connect the cable. The conductive wires must be stripped, inserted into the terminal and clamped with pliers. It is necessary to insulate the terminals; for this, strips of bitumen tape must be glued on top and bottom, and carefully connected. To ensure a good seal of the assembly, remove all air bubbles.
Note! The bitumen tape has the properties of heating up at the moment of first connection to the electrical network, and taking the shape of the protected unit, thereby creating maximum sealing.
Connecting the thermostat
The flooring is laminate and requires precision when adjusting the temperature, so it is better to take an electronic device rather than a mechanical one. The thermostat has a control unit, which is equipped with special connectors for connecting wires. The technology for installing underfloor heating means that all wires must converge at one point where the device is located.
To eliminate errors when connecting wires, the instructions have developed a pictogram that indicates areas with grounding, load and voltage.
Important! Twisting of the wires is not allowed, as this may cause overheating of the structure.
After connecting the cables, they are laid in specially prepared grooves. The thermostat is attached to a planned location that is convenient for use. Now you can begin testing the floor for functionality.
For your information! Electronic thermostats have two devices, one for determining the air temperature, and the second for determining the floor temperature.
There are the following options for underfloor heating:
- Using only the floor sensor readings. For example, heating is turned on at a temperature of less than 25 degrees, and shutdown is set when 29 degrees is reached.
- Using readings from two devices. It is planned that the heating will turn on at 23 degrees in the room, and turn off when the air reaches 26 degrees, or according to the readings of the floor device - 30 degrees.
If the floor sensor breaks down, it needs to be replaced; to do this, you will have to disassemble the floor covering. In order not to resort to such time-consuming processes, it is better to stock up on an additional device and attach it during installation, as a backup option, leading the wires to the thermostat.
In case of failure of the main sensor, simply disconnect the broken one from the thermostat and attach a spare one.
First system launch
Before laying laminate flooring, you need to make sure the floor is functioning correctly.
First, you need to check the integrity of the system and then start it. The test temperature may be low, since the main purpose of the test is to check the connections of the infrared floor. If there is no overheating of the elements and no sparking, we can say that the film is of high quality and the connections are made correctly. If any problems are identified, then after eliminating them you need to repeat the launch.
Then, the system is disconnected from the power supply, and the laminate can be laid.
How to lay laminate
Before installing the laminate, to prevent water from getting on the heating elements, they should be covered with insulating material. To do this, it is enough to put a 200 micron plastic film, it will protect from moisture, but will not block IR radiation. Since the waterproofing is not very thick, it will not change the surface topography.
Cut the material into strips of the required length, and place on top of the heating film, making a slight overlap. It should protrude 10 - 20 cm along the edges. Be sure to tape the seams with tape so that shifting does not occur when laying the laminate.
After the waterproofing has been laid out, you can begin laying the laminate. Installation of laminate flooring on a film floor must be done carefully, wearing soft shoes, so as not to accidentally damage the film.
Place laminated panels directly on polyethylene film; no additional backing is required. Each board has a locking mechanism, so you need to connect the panels at an angle, then lower them until they click. If a gap appears, just tap it with a rubber hammer. The boards are connected to each other with their narrow sides, and then the laid strips are fastened together. After complete installation of the tiles, a plinth is installed around the perimeter of the area, all wiring is hidden under it.
Important! When laying laminate flooring, it is necessary to make gaps at the walls, since the laminate will expand due to temperature changes.
Once you have finished laying the laminate, you can turn on and check how the infrared film floor works. However, to adapt the laminate to new conditions, you should not immediately turn on the heating at full strength.
First, it is worth setting the indicators in the range of 15 - 20 degrees, and adding 5 degrees every day until the system reaches full capacity.
Connection
The ends of the cables are connected to the thermostat, which should be mounted on the wall. It may not be included in the kit; sometimes the regulator needs to be purchased separately. In addition to “phase” and “zero”, you also need to connect the temperature control sensor cable to the thermostat. The sensor itself fits under the black stripes of the film - it measures the temperature on them, which allows the system to accurately control the heating. Since the sensor has some volume, it can create a bulge on the floor. To ensure the floor is level, a small hole is cut out in the insulating material for it.
The thermostat is installed on the wall - in a place to which residents have free access. Cables are connected to it: phase, neutral, grounding, from the temperature control sensor. The connection is carried out according to the instructions of the selected thermostat or the heated floor itself, but everything is intuitively clear to a person who at least has experience installing and connecting conventional sockets. If a film heated floor under carpet, laminate or tile is made of several elements, then you cannot twist the wires from them - there are certified terminal connections for this.
Before you connect an infrared heated floor to your home wiring, you need to know what load it is designed for. Most often, if the floor power exceeds 2.5 kW, then the wire from the regulator is led into the panel - to a separate machine. It would be stupid to “hang” such a powerful system on the home wiring. When everything is connected, the system is tested. If everything works fine, then you can proceed to the next step.
Preparing the foundation
The subfloor must be smooth and clean - litter and large debris are not allowed, it is also important to remove pebbles, sand, and dust. It is recommended to check the floor for strength, repair cracks and gaps, and level them to acceptable parameters.
Advice! To make the concrete base less dusty, it is recommended to treat it with a primer mixture, although this procedure is not necessary.
Also, thermal insulation material should be laid on the subfloors. It is recommended to use foil. The shiny side should be up. The strips are laid end to end. The thickness of the foil material should be about 2-3 mm. It is most convenient to secure the material using double-sided tape, and the gaps between the individual strips can be closed with ordinary tape. Then small recesses will be cut out of the material into which terminals, wires and other communications are placed. Then the base for the capricious laminate will be optimally smooth. It is also recommended to lay a layer of waterproofing material on the base of the floor.
Laying foil insulation
Laying waterproofing and laminate
To protect the floor elements from water ingress, a waterproofing film is placed on it. It has no relief and is very thin, so it does not affect the efficiency of the installation and freely transmits infrared radiation. The waterproofing layer is not applied over the entire floor area, but on the films themselves with protrusions along the edges. Well, then comes the laying of laminate, tiles, linoleum or parquet boards. This is how you install a film heated floor with your own hands. That is, everything here is intuitive even for the most inexperienced master.
As for laying the flooring, standard schemes are used here.
Installation of rod carbon floor
When installing a carbon rod heating element for a floor covering, it is necessary to take into account a number of nuances:
- Also, as in the previous case, a floor power regulator with a grounding cable is installed on the wall.
- It is recommended to lay the cable from the thermostat in a specially made pipe with a protective flexible corrugation.
- The second stage is to prepare the base - heat and waterproofing material is placed on top of the screed.
- Carbon rod heaters are supplied as a finished structure, where each electrical device is connected with distribution threads and cables, resulting in a complete mat.
- The equipment is carefully lined and smoothed over the entire heated floor plane.
- Unlike infrared mats, a concrete screed with a thickness of 30 mm or more must be placed on top of a carbon rod heated floor.
- Time is waited for the binding materials to set and gain strength.
- Upon completion of hardening and complete evaporation of moisture from the screed, the substrate is installed and the laminate is laid.
The durability and reliability of heating elements depends on the quality of installation, which requires strict adherence to the horizontal plane of each part during its installation.
Exploitation
After the film infrared heated floor is installed under the laminate, it is necessary to save a plan for its placement in the room, indicating the distances from the walls. This will allow you to rearrange the room correctly, moving the furniture elements to areas with infrared stripes. If you need to install any elements on the floor with fastening to the ceiling, then the layout of the heating elements will also come in handy.
When the connection of the infrared heated floor is completed and the floor covering is laid on top of it, it is not recommended to turn on the installation immediately at full power. Linoleum or laminate must “adapt”, so to begin with it is advisable to set the temperature to 15–20 degrees, adding 3–4 degrees every day. If tiles are laid on the floor, the adhesive (or mortar) on which it is fixed must first dry at natural temperature. And a slow increase in temperature will allow you to understand the full efficiency of the film heated floor under the tile or laminate and determine the optimal value.
Which laminate is better to use in conjunction with infrared heated floors?
For normal operation of IR heated floors, it is important to choose the type of coating. Otherwise, the lamellas will deform over time, conduct heat poorly, and the release of formaldehyde will exceed permissible standards.
Laminate for a warm film floor must meet the following requirements:
- have only a locking connection, since the use of glue is not allowed for laying the lamellas: the seam is too rigid and breaks due to temperature changes;
- have a high thermal conductivity (0.05-0.10);
- the thickness of the panel should be 8-9 mm; with a smaller height of the element, the locking connection is destroyed, with a larger height, heat is poorly transmitted;
- when heated, do not emit formaldehyde above the established norm - the coating must correspond to classes E0 or E1, as well as K1;
- have high wear resistance (not lower than class 3).
Laminate should be purchased based on the listed requirements. When purchasing, you must ensure that the instructions or packaging contain special markings indicating the possibility of using the coating in conjunction with heating elements.
Markings on laminate packaging for heated floors
Manufacturers
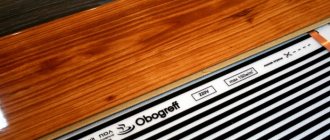
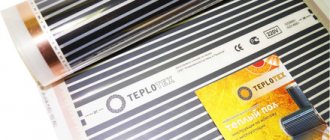
Speaking about which film heated floor is better, we can give examples of different manufacturers offering effective solutions. Today the most popular manufacturers are Daewoo, Caleo, Heat Plus
Caleo is considered the best brand - this is a South Korean company that offers cool modern solutions in the form of infrared heated floors for laminate, parquet boards, and tiles. Kaleo films are reliable and durable, very thin; if installed correctly, they will last for ten years, the only drawback is the fragility of the product. The thickness of the film is only 0.42 mm, so when laying infrared heated floors under laminate or linoleum it is necessary to do it very carefully, otherwise you can simply damage the film.
Heat Plus is a popular brand that produces premium films. If you need to install an infrared heated floor with your own hands under the tiles, then with a high probability you will have to choose films from this manufacturer, namely the “Silver” model. It has a high melting point, which makes it safe and effective when used with ceramic tiles.
Conclusions and useful video on the topic
Step-by-step work on installing an infrared floor under a laminate. Soldering wires to copper conductors instead of using clips:
Installing an infrared floor under laminate in a room with complex geometry. All stages of work are shown. Here is the breakdown of prices at the end of autumn 2016:
Installing infrared film under the laminate allows you to implement the most comfortable way for a person to heat a room “from the bottom up”.
Understanding the physical laws of the functioning of such a system and following the rules for its installation contributes to the correct choice of location and power of heating elements, as well as long-term and high-quality operation of the heated floor.
Would you like to tell us how you laid and connected an infrared film floor with your own hands? Do you have any questions while reading the information presented? Is there any useful information for us and site visitors? Please write comments in the block below.
Installation of cable floors
Installing a cable floor is a labor-intensive process that requires the involvement of professionals. If this is not possible, when doing the work yourself, you must follow the following algorithm:
- Insulation is laid over the rough screed to increase the energy efficiency of the floor, and also to ensure that heating energy does not leak into adjacent rooms.
- After installing the insulation, it is recommended to additionally glue the Izolon foam with a foil coating, which has a reflective effect.
- A damper layer of foam materials is installed around the perimeter of the room.
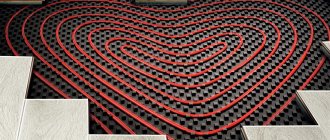
- The heating cable is carefully unwound and laid out in a zigzag across the entire floor plane.
- Considering that the bend radius should be 80 mm and above, the master has the opportunity to place the product anywhere, taking into account built-in furniture.
- The cable is fixed with a special fastening punched tape.
- The equipment is connected to the network via a thermostat.
- Upon successful testing and commissioning of the electrical device, the screed is poured.
- After polymerization of the preparation from the cement-sand mixture, a laminated floor covering is installed on a pre-laid vibration-proofing substrate.
- The damper tape completely cuts off the screed and laminate from the load-bearing and enclosing structures of the building, which prevents the spread of structural noise.
The uniformity of heating of the building structure depends on the depth of immersion of the cable, the power of the equipment, as well as on the uniform structure of the screed and its thermal conductivity.
Disadvantages of film flooring under laminate
The main disadvantages of this floor:
- Electricity consumption increases;
- The load on the wiring increases;
- Danger of short circuit;
- The system is ineffective during frequent power outages;
- Careful calculation of the location of the strips is required when installing furniture; dismantling is necessary when rearranging.
In terms of electricity consumption, it is easy to make calculations presented in table form:
| Calculation of the cost of heating infrared floors for an apartment | |
| Housing area, m2 | 78 |
| Film coverage area, m2 | 51 |
| Power consumption Wh | 200 |
| Utilization factor (automatic shutdown of the system when the required temperature is reached) | 0.6 |
| Electricity consumption per apartment per hour, kW/h | 612 |
| Daily energy consumption, kW/h | 4406 |
| Heating costs per month, rub | 15124.97 |
The data is correct at daily rates (3/4 days) equal to 3.61 rubles. and night (1/4 day) 2.09 rub.
Thus, the cost of continuous heating with such a system is quite high. This is the immediate and most important disadvantage of this system, which prevents its installation in many homes.
Another serious drawback is that the carbon strips begin to burn out if furniture is placed on top. High blood pressure leads to increased stress. Therefore, the system requires clear planning of the furniture arrangement, and when rearranging, it may be necessary to dismantle the flooring and heating system in order to rearrange it.