Attention! Advertising for infrared film heated floors contains false information and misleads buyers! We do not sell infrared film heated floors because we work honestly. Read more below.
If you need an electric heater, call us or choose from the catalog of electric convectors
Infrared electric film heated floor is an alternative to the already familiar water heated floor, which appeared relatively recently. An infrared heated floor can also be placed under laminate, linoleum or tiles, but without having to deal with the arrangement of a boiler room and the labor-intensive process of installing a water heated floor. But is such a heating system profitable? Let's figure out what infrared heated flooring is, how it works, how much it will cost to heat a house, and also look at some representatives of film flooring.
Infrared floor device
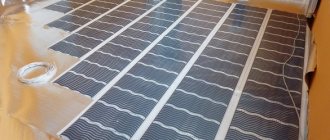
The device of an infrared film heated floor is described as follows: “These are two dense films, hermetically sealed together, with a layer of natural graphite between them. The thickness of the film is less than a millimeter and it is very flexible, which allows it to be installed under any surface, including walls and ceilings, without noticeably raising the floor level and reducing living space.”
How it really works
Basically, the point of infrared heating is that the heater creates and directs thermal radiation into the heating zone. Infrared rays hit surfaces - walls, floors, furniture - and heat them, and from them heat is transferred to the air. But for powerful heating by radiation, it is necessary to heat the floor to a high temperature, which is impossible - because then it will be hot and it will be uncomfortable. We will tell you more about this below.
In the case of infrared heated floors, heating of the room will occur not so much due to radiation as due to convection . Convection is a method of heat transfer in which the cold air located at the bottom of the room due to its high density is heated due to heat transfer from the floor, the air temperature rises, and consequently, as the temperature rises, the density decreases, thereby the heated air moves upward. All electric convectors work on the principle of convection , which will be even cheaper.
If you want a reliable electric heater , look no further than Nobo.
Reviews
“We made a warm film floor in the bedroom around the bed. The film was placed between the substrate and the laminate. Due to the joints between the sheets of film, the laminate turned out to be uneven. Warmth is only felt if you set the sensor to 28 degrees. In general, it can be adjusted from 0 to 60 degrees.” Alexandra, Samara
“We have warm Kaleo flooring under linoleum and carpet. We set the temperature to 23-24 degrees and walk only barefoot - it’s very comfortable. Costs about 1200 per square. Nothing is being done to the linoleum, but the pile of the carpet has turned red in the place where the sofa stood. I’m sure nothing can happen to the legs of the furniture - their area is too small.” Vladimir, Kazan
“We were afraid to install film flooring in the children’s room. What if there is a short circuit or fire. Therefore, we made a cable floor under the screed and laid linoleum. The floor is on all day, we turn it off at night or when we leave for a long time. Now we are sure that our child is warm and comfortable.” Svetlana, Tver
“The whole house has warm floors. We made cable because we heard that film can ruin the coating if you turn on a high temperature. For some friends, the film ruined all the tiles. The seams between the tiles burst and the tiles came off. The tiles are now rattling. It’s nice to walk, but in extreme cold it doesn’t help and you have to turn on additional heaters.” Yaroslav, Yakutsk
Disadvantages of infrared heated floors
Next, we will use examples to understand why infrared film heated floors are not the most suitable option for main heating in terms of efficiency, and also consider other disadvantages of infrared heated floors.
Film heated floor Green Life
The website for infrared heated floors Green Life talks about incredible savings and claims that this type of heating can be used as the main one.
Electricity consumption
Below is a screenshot of the Green Life website with an alleged calculation of the consumption of this heated floor:
Very tempting. The declared consumption is only 223.2 kW/month, with the cost of electricity being 4 rubles per 1 kW, this type of heating really seems economical.
But let's do the math. On the website, the power of 60 W/m2 (0.06 kW) immediately catches your eye. It is not clear where the manufacturer got it from and why he uses it for calculations - after all, a rough calculation for 1 m2 requires 100 W to cover the heat loss of the room, and not 60 . To heat the same house, no matter what appliances it is heated with and what fuel is used (electricity, gas, wood, etc.), the same power is required, which must compensate for the heat loss of the house.
Go ahead. The manufacturer indicates on its website that this type of heating can be used as the main one. The question arises: why, when calculating monthly energy consumption, does the manufacturer take the number of hours per day to be 10 hours? After all, the main heating system must operate around the clock. This is where the very “efficiency effect” that Green Life manufacturers write to us comes from - for their calculations they use greatly underestimated data on the system’s operating time and required power.
Let's calculate how much is really needed to heat 12 m2:
0.1 kW X (heated area = 12 m2) X (number of hours per day = 24 hours) X 31 days = 892.8 kW/month . Real energy consumption is 4 TIMES MORE than what the manufacturer assures us .
Now let’s calculate the real cost of heating: 892.8 kW x 4 rubles (cost of 1 kW according to the tariff) = 3571.2 rubles/month. Economical? Not at all. And these are the costs of heating a small room with an area of only 12 m2 .
Comments:
Nefedov
If it’s laminate, then I recommend only this floor to clients. No options, because it is the easiest to install, quite reliable and working with it is always clean, without dust and noise.
Konstantin
Nefedov, I agree, there is nothing better than film for electric floor heating for laminate and wood flooring, but if it is possible to connect to a gas boiler, then it is better to try and do the dirty work with the pipes in the screed. Then it will be cheaper.
Nikolai
Good article, true. They also tried to somehow prove to me that if all the floors in the apartment are covered with film, then there is no need for other heating. In general, it’s good that I didn’t fall for it. Now the floors are turned on according to a schedule and only in those places where they are needed, so money is saved and comfort remains.
Vladimir
During renovations on the balconies, I put Caleo Gold 170 W/m under the laminate, 10 years of operation - zero problems. They work every winter, the temperature on the floor is +30. Electricity costs add 100 rubles per month (subjectively). Very satisfied.
Leave a comment Cancel reply
Related Posts
Caleo warm floors are a very high-quality heating device.
Types of underfloor heating - which one to choose, pros and cons
What a Heat Plus heated floor can and cannot do. Advantages and disadvantages
Mats for electric heated floors make life easier for installers
Use for main heating
Now let’s figure out whether it’s possible to heat a house only with the help of infrared heated floors. To do this, let's calculate its heat flow and see if it is enough to cover heat loss - that is, to heat the room.
First, let's determine the temperature of the heated floor. According to SanPiN 2.1.2.2645-10: 4.3. The difference between the indoor air temperature and the temperature of the wall surfaces should not exceed 3 °C; the difference between the air temperature of the premises and the floor should not exceed 2 ° C.
Let's assume that the room temperature is 20 °C, which means the floor surface temperature should not exceed 23 °C.
The heat flow for an infrared floor will consist of two heat flows: radiant and convective. The floor surface for example is ceramic tiles (emissivity = 0.9).
Radiation:
T1 – floor temperature (23 °C);
T2 - room temperature (in a living room, a comfortable temperature for a person is assumed to be 20 ° C)
Qisl is the heat flux transferred by radiation.
Substitute the values into the formula:
Convection:
The heat flow transferred by convection is determined by the formula:
where α is the heat transfer coefficient by convection, which is determined by the formula:
It follows from this that thermal convection:
Qk = 3.46 * (23 - 20) = 10.38 W/m2.
We add up the heat flows and get:
Q = Qizl + Qk = 15.64 + 10.38 = 26.02 W/m2.
The manufacturer assures that this type of heating can be used as the main one. In a rough calculation, 100 W/m2 is required for main heating (i.e. to cover heat loss), which means that the heat flow value should be approximately 100 W/m2. And in this case, the heat flux is only 26.02, that is, three times less than what is necessary to ensure that the room does not freeze .
However, if we assume that the power of the infrared heated floor will be the required 100 W/m2, then its temperature will be higher - about 35 ° C , which is unacceptable according to the standards prescribed in SanPiN 2.1.2.2645-10, and is also uncomfortable for people.
Thus, a heating system consisting only of infrared heated floors will not be enough for normal heating.
Infrared heated floor Keeply
Consider the warm floor Keeply OPTIMAL 160:
This equipment has enough power to cover heat loss. The question arises: what will the floor temperature be at a given power? If the specified power is 160 W per 1 m2, then at this power the floor temperature will be above 35 ° C (the calculation is similar to the previous one).
Choosing the right one
Be sure to use the recommendations of experts to ensure that your heated floor lasts a long time and is easy to use. A few useful tips will help you choose the right infrared coating.
- A film that is already beginning to delaminate is not suitable for use. This is a sure sign of low quality.
- The material must be clean, free of debris, without foreign particles inside. There should also be no stains or any dirt. Be sure to unroll the roll and check.
- It is important to ensure uniformity: the printing of the carbon layer must be uniform.
- When purchasing, you will need to check the geometry of the material. A high-quality roll has straight edges and a smooth surface.
- The insulation of the wiring of a rod-heated floor plays a huge role: the safety of the entire system depends on it. Make sure the insulation is reliable and intact.
Important! It is necessary to distinguish materials by their types. Matte is optimal for a higher level of thermal insulation, while transparent is more suitable for successful gluing.
Consumption of infrared heated floor
On some websites selling infrared film, you can read about the economical energy consumption of infrared heated floors. For example, here is a screenshot of the website teplyypol.ru:
This is just a marketing ploy, because heating the same room requires the same amount of electricity. And energy consumption in the case of heating with electricity is equal to the energy released. That is, if you have a room of 30 m2, you will need 3 kW for its heating. Both cable heated floors and infrared heated floors will need to consume and output 3 kW to heat a given room.
Other disadvantages of infrared heated floors
Harmful to health. For each organ in the body there is a normal temperature that is important to observe. The lower extremities require a lower temperature than the abdomen or head - the low temperature of the feet maintains toned legs, normal blood circulation and adequate blood flow to the brain. When using heated floors, blood flows downwards, which can provoke an exacerbation of gynecological diseases and varicose veins.
Dependence on electrical energy. Infrared heated floors are completely dependent on electricity and with any interruptions in the supply or voltage drops there is a risk of freezing.
Placement of furniture. Furniture located in the infrared field slows down the heat transfer process. The floor in these areas heats up more than the average room. This can lead to overheating and breakage of the floor, as well as drying out furniture.
If you have not found the answer to your question, please leave it in the comments below the article - and we will definitely answer you.
Conclusion
If you study the reviews, you can draw the following conclusion. That film flooring has more advantages than cable flooring.
Film floor
In the near future, film flooring may displace all other types of similar devices. However, due to some of its shortcomings, recently an increasing number of consumers prefer cable.
You can study reviews, advantages and disadvantages of a certain type of system and make your choice.
It should also be based on the conditions under which it will be installed. For example, film is suitable if you do not want to spend money on electricity.
How is the film floor system installed?
Manufacturers in their video presentation explain in great detail how to prepare and install a heating system with film elements step by step. Various types of work are demonstrated in detail: marking and cutting elements, as well as subsequent connection and insulation of wires, the process of installing a thermostat and covering with various floor coverings.
How I want to get out of bed and walk barefoot on the warm and soft floor to wash and have breakfast. This is quite possible with a film floor system installed under carpet.
Step-by-step video instructions for installing an infrared film floor with a screed for ceramic tiles. How to lay the layers correctly and what tools to use when connecting to the wiring.
If you decide to install a film floor with your own hands, we recommend watching the video first. In it you will find a detailed description of each step of insulating and connecting wires and connecting elements. The process of working and heating the floor will become more clear. When working with electricity, follow safety precautions.
How profitable is this heating?
It is worth noting that infrared systems have many positive aspects.
- Firstly, they provide the most comfortable level of room heating when the temperature on the floor is 2-3 degrees higher than the temperature under the ceiling. In Europe, such heating is considered the most beneficial for the human body.
- Secondly, IR systems can be installed over the entire area of the room, even if bulky furniture is placed on top of them. Manufacturers guarantee that such heating does not damage the furniture. But more often heating is done locally, for certain areas. For example, under a computer desk to create comfort for the feet during sedentary work, in the children's play area, near the sofa, etc.
- Thirdly, these systems are not tied to the heating season and can operate all year round.
- Fourthly, they provide the fastest heating of the room, while the batteries need to work for about 3 hours to raise the air temperature to a comfortable one.
- Fifthly, they do not “steal” the height of the room, as they are mounted without multi-layer screeds and “pies”.
- Sixth, in emergency situations (failure of an expensive boiler, freezing of a pipeline, etc.), these particular floors can be installed in the shortest possible time and endured until the summer, until the main heating is repaired.
But infrared heating cannot be called cheap. When purchasing material, you will really get by with small amounts. Plus, you don’t have to spend money on preparing the base. But in winter, such a floor draws electricity in large volumes. This means that your electricity bills will be high.
Why does this happen:
- Electrical energy itself is more expensive than gas or solid fuel;
- The automation in infrared floors is designed in such a way that it reads the temperature not from the air, but from the surface of the film or mat. Those. as soon as the film has cooled slightly, the sensor is triggered and starts the system into operation. The room may still be quite warm, but the system is already turning on again. It is not without reason that consumer reviews often complain about the inconvenience of adjusting the automation. If you set the temperature higher, the house is too hot; if it is lower, the house instantly cools down. Therefore, professional teams devote a lot of effort to thermal insulation of the base so that not a single degree goes down.
There are companies that indicate in the instructions that the floor can only be heated up to 40 degrees. At the exit, only +25 enters the room. This is not enough to warm up the entire room.
For comparison: a heating radiator heats up to 80 degrees, and at the same time there is no obstacle in the form of a floor covering. This means that all the heat goes directly into the room without being lost along the way.
In addition to stationary models, a mobile infrared floor has been developed that can be moved from room to room and used, covering it with a carpet on top
Another important nuance is grounding. Infrared floors do not come with equipment that would remove the electromagnetic field. Unlike resistive two-core cables, which themselves dampen the electromagnetic field, single-core carbon cables cannot do this. Therefore, you need to additionally buy a grounding shield. However, there is no information anywhere that such floors are 100% safe.
And in wet rooms (bathroom, bathhouse) there is a risk of electric shock. This is especially true for Chinese equipment, which people buy without an official guarantee in foreign online stores.
Installation features
Installation of film ITP
The installation of carbon and carbon heated floors is similar in many ways, so we will provide general step-by-step instructions.
Preparing the base
The base for the film ITP must be level. It is not recommended to pour a concrete screed on top of a film heated floor, so the heated floor is laid directly on the finishing screed. There should be no debris, including dust, on the base. To prevent further dust from appearing from concrete abrasion, it is recommended to treat the screed with a soil solution, which will clog the pores of the concrete and create a film that prevents abrasion. In order to save money, you can do without a primer; it does not play a decisive role.
Laying insulating material
A substrate for an infrared heated floor is necessary to ensure that the system only transfers heat upward and not downward. Due to the special foil structure, the substrate reflects heat, preventing it from escaping. There are 2 types of insulating material:
- Specialized substrate for infrared heated floors. It consists of 3 layers: the top is a laminated, non-conductive layer that protects the substrate from the effects of current; medium - foam rubber, does not allow heat to escape downwards; the lower one is waterproofing, protects both the substrate and the ITP from the effects of moisture and dampness coming from below.
- Foil-coated, foamed polyethylene. A cheaper option consists of only one layer, which prevents heat from escaping downwards.
It is prohibited to use a substrate that contains metals. This may negatively affect the operation of the ITP. Moreover, when the insulation of a heated floor wears out, the conductive elements will interact with the substrate, which can lead to a short circuit.
The maximum insulation thickness is 4 millimeters. If possible, it is worth purchasing even thinner insulation. If the substrate is larger than 5 millimeters, a trampoline effect will be created on the floor. With each step, the floor, and with it the ITP, will sag. In this case, both elements will wear out much faster than expected. The effect of a trampoline is especially negative for laminate flooring; with each step, an additional load will be created on the locks, which will cause them to quickly break, which will lead to the separation of the boards.
I lay the substrate for infrared film floor heating joint-to-joint, without overlap. To prevent the insulation from rolling on the floor, it is glued together with tape. This is not necessary; gluing is needed only for ease of installation work.
Installation of heating film
Even before purchasing a heated floor, you need to visually imagine the layout of the film on the floor. It should be taken into account that it is highly not recommended to lay the film under low, massive furniture, which will not transmit infrared radiation, which will inevitably lead to overheating and damage to the floor covering. An exception is film marked PTC (Positive temperature coefficient). This is a self-regulating film; as the temperature rises, it increases its own resistance, which reduces heating.
When visualizing the layout, the main point is to ensure that the installation is as simple as possible in the future. Each cut plate must be connected to a thermostat; the fewer individual plates there are, the easier it will be to tie the heated floor with wires. Film ITP comes in rolls of different widths: 30 cm, 50 cm, 80 cm and 100 cm. The room must be planned so as to use rolls of maximum length. So, if an infrared heated floor is installed on a balcony, you need to calculate its length and width. The length of the rolls depends on the first parameter, and their width on the second. If the balcony is 4 meters long and 2 meters wide, it is recommended to purchase an 8 meter roll of film ITP, 1 meter wide.
To prevent overheating of the film and failure of the insulation, overlapping plates are prohibited. Only joint to joint is possible. Like the substrate, the plates can be glued to one another using tape. This way they will not ride on the floor, which will be convenient during further installation. The plates are laid with the copper strip (conductive plate) down. But in reality this is not important. Like an electric heated floor, an infrared film floor is reliably protected by insulation.
Heating film strapping
2 wires must be connected to each individual panel. The entire film is combined into a single system, therefore, in order not to get confused when tying, it is recommended to use 2 wires of different colors. The optimal section is 2 by 2.5.
To connect the wire to the heated floor, either clamps or levers are used. In the first case, one end of the clamp is inserted into the film over the copper strip (there will be a special cut in this place), the second end remains outside. To clamp the contact, you must use a special crimping device or regular pliers. It is important that the two halves of the clamp be sure to hold the copper plate between them.
To secure the levers, you need to make a hole in the copper strip and tighten the contact using pliers. A levers is more reliable than a regular clamp; it will not slip out under any circumstances, but manufacturers most often include clamps in the kit.
The next step is connecting the wires. As stated above, one sheet is tied with two wires and in order not to confuse the poles, the wires must be of different colors. After installation, each connection is checked for rupture by lightly pulling the wire towards itself. Reviews about infrared heated floors indicate that many inexperienced installers make a mistake at this stage. Due to one poor-quality connection, the entire heated floor will not work.
After tying, it is necessary to insulate the conductive strip on all sides: in two places in the back, where there was a cutting line, and in two places in the front, where the tying was carried out. Adhesive rubber is used for insulation. For each point, two pieces of rubber are needed to securely cover the conductive element both above and below.
Next you need to install the thermostat sensor. It is placed either directly under the heating film, or glued to it with tape from the inside. Experts advise installing 2 sensors at once: one is connected to the thermostat, the second remains free. If the first one suddenly fails, it will be possible to quickly connect the second one, and for this there will be no need to disassemble the floor. There is a bulge at the end of the sensor that needs to be hidden. To do this, a hole is cut out in the substrate and the sensor is placed there. In the same way, it is necessary to hide all the wires and places of film insulation. This is necessary so that no part of the heated floor protrudes and interferes with the installation of the floor covering.
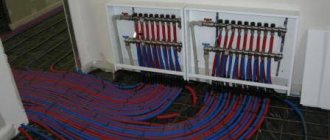
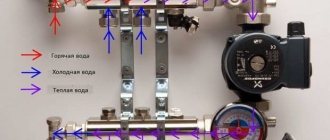
Connecting the thermostat
The thermostat should have 6 holes for contacts: 2 for the power sensor, 2 for wires from the film, through which electricity will be transmitted, and 2 contacts for connecting to the electrical network. The wires must be connected in accordance with the instructions. If the thermostat is connected, you need to check whether all elements of the heated floor are heating up.
Flooring installation
The last stage is installation of the floor covering. Immediately after tying the ITP, a protective coating is laid in the form of ordinary polyethylene film. It can be replaced with a special substrate for the laminate. The floor covering is laid on the film.
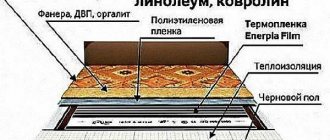
If carpet or linoleum is used as the finished floor, it is additionally necessary to lay plywood on top of the plastic film and attach it to the base of the floor between the conductive and heating elements of the IHP. Linoleum and carpet should be installed on top of the plywood.
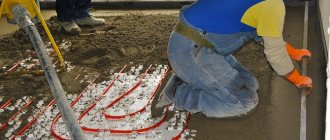
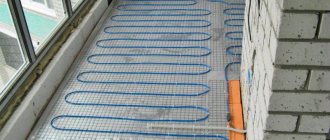
Installation of rod ITP
Infrared rod heated floors are suitable for installation in the bathroom, kitchen, bathhouse and any other room where high humidity is possible and where ceramic tiles will be used as the floor covering.
Preparing the base
The base must be clean. Small irregularities and differences are allowed. There is no need to prime the concrete screed, as is done in the case of film ITP, since there will still be another layer of leveling concrete on top.
Laying insulating material
The substrate can be a special three-layer (lamination, thermal insulation, waterproofing) or conventional, consisting of polyethylene foam. Reviews about infrared heated floors indicate that both substrate options do an excellent job. The use of a substrate containing metals (natural foil) is not allowed. If the insulation is depressurized, this can lead to a short circuit.
The material must be laid joint-to-joint, gluing the joints with tape if necessary, so that the backing does not move across the floor.
Installation of heated floors
Rod infrared heated floors have their pros and cons. One of its main advantages is the flexibility of the rods. If necessary, the rod can be bent at the desired angle so that it fits well into the room. Otherwise, the installation is not much different from the installation of a film heated floor. The rod ITP is also wound into rolls, and one of the installer’s main tasks is to use as few rolls as possible, so as not to experience problems later when tying the heated floor. Unlike film, rod heated flooring has only one standard size: 82–83 centimeters wide.
Warm floor piping
Each rod is connected to two wires: top and bottom. The wires are covered with insulation, which is cut behind the last rod. A terminal is put on the wire from the heated floor and the harness wire is connected there. Recommended cross section is 2 by 2.5. It is advisable to use 2 wires of different colors so as not to mix up the poles during tying. All joints are insulated with special adhesive rubber.
The thermostat sensor is glued with tape to one of the rods. It is advisable to install two sensors at once. If one fails, it can be immediately replaced with a second one.
Connecting the thermostat
The thermostat has 6 contact holes: 2 for the sensor, 2 for power supply, 2 for supplying electricity to the heated floor. Everything must be connected strictly according to the instructions. After connecting, it makes sense to check the proper operation of the heated floor while it is not yet filled with concrete screed.
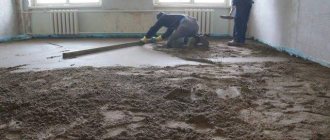
Screed device
A rod-based heated floor requires the presence of a concrete screed. Otherwise, laminate, linoleum, etc. cannot be laid on it. If desired, the screed can be replaced with tile adhesive and the tiles can be laid directly on top of the heated floor. But in this case, the excess consumption of glue will be unreasonably high. The thickness of the screed is 2–3 centimeters, more is possible, but not less. After the concrete has dried, any floor covering can be installed on it, taking into account that its fastening does not penetrate the core heated floor.
How else is film infrared kits used?
On the wall
In rooms with a lot of furniture or where there is a high constant point load on the floor, it is recommended to install the film on the walls. Thus, you can either supplement the main heating or make additional zoned heating.
To the ceiling
Installation on the ceiling is carried out most often: in attics and for heating the roof (melting snow), additional heating in greenhouses and greenhouses, as well as utility and agricultural premises.
Work principles
The functioning of IR underfloor heating, as the name implies, is based primarily on the use of infrared radiation. The structure of the system is quite simple: it consists of electrodes and a special coating in which strips that conduct electric current are embedded. The passage of current through the coating is accompanied by the emission of infrared waves, which leads to heating not only of the floor itself, but of the entire room as a whole.
It should be noted that infrared radiation is not absorbed and practically not scattered by air - therefore, all its thermal energy is transferred to surrounding surfaces and objects.
Another heating mechanism by which infrared coatings perform their function is heat transfer. The passage of electric current through the elements of a heated floor leads to its heating, after which the heat is transferred to the floor covering and the air in the room.
Finally, the convection process also plays an important role in the heating function. Cold layers of air near the floor heat up and rise upward, being replaced by new portions of cold air masses. Thus, gradual warming of all the air in the room occurs continuously.
How does the IR room heating system work?
When creating a new type of heating, manufacturers were guided by the properties of a solar ray, which, reaching the ground, heats not the air, but all objects and bodies that come across along the way. The sun emits infrared rays, which are invisible to humans, but are perfectly captured by the cells of our body.
Remember how hot it can be in the snow-capped mountains when the sun is at its zenith. As soon as the sky becomes cloudy, thermal comfort disappears.
With a convective heating method, the highest heat points are located near the ceiling, with an infrared floor - in the human comfort zone
The main trump card in the infrared floor system is that when they are connected to electricity, heat rays of the infrared spectrum are released, due to which everything in the room should be warmed. The speed of such heating is much higher than from traditional water or electric systems, which first heat the air.
Initially, heaters were created - for home and outdoor use. Having seen that this technology really works, the innovative material began to be used in laying floors.
Types and types of IR heaters
Depending on the object of application, the required characteristics, power and temperature conditions, various types of infrared heating can be used. We will look at the most popular ones.
Spot type
Can be used as part of the interior. They look like fluorescent lamps and can be mounted in different places on the bracket. They heat a small part of the room and are used locally. The only drawback of such infrared heating is the price. But in terms of the energy spent on heating, this type pays for itself quite quickly and is still beneficial as an addition to the main system.
Film type
Special IR film is installed under the floor to heat it or on the ceiling. This film does not affect the functionality of the equipment, and the room heats up evenly. This film can also be used as local mobile heating, in the form of a mat. Very convenient for creating a workspace or in the bathroom. IR film can be installed under any coating, even cement screed. Ideal for use in residential areas.
Heating drywall
This is the name for infrared panels built into a wall or ceiling with plasterboard finishing using the frame method. On the back side of the finish there are electrically conductive carbon threads, which are additionally insulated with a polymer coating for heat reflection. These panels are indispensable in the interior. They can be easily used for repairs, just like regular drywall. And by the way, it is recommended to install such infrared heating as backup heating to the central system.
Ceiling panels
Infrared heating of this type is considered the best of all available types today. Mounting on the ceiling does not create any inconvenience with repairs or interiors; the radiation comes from top to bottom. Can be installed in separate zones. For example, in a workshop, when you only need to warm up the workspace, without the area where the machines are located. At the same time, the floor and walls can be used more functionally.
The panel is a compact device, painted with powder dye, and placed in a metal case. Such devices can be installed under any non-stretch ceiling covering. IR panels are almost invulnerable to accidental damage; only water leaks in apartment buildings can be dangerous. And one more disadvantage - such devices heat up household appliances, which can damage them. Therefore, you need to use it rationally and carefully approach the issue of choosing power.
Ceiling IR heaters with water coolant
Warm or hot water (temperature from 40°C to 120°C) is used here as a coolant; it transfers heat to the pipes and the radiating screen. This type of infrared heating is used in industry. Can be used as an alternative energy source. Can also be used in air conditioning mode.
Wall IR panels
They are less efficient than the floor and ceiling type, because heated air, according to physics, always tends upward. Efficiency decreases and energy costs increase slightly. But still, in comparison with electric heating, it is many times more profitable. Wall-mounted IR panels can be used as an additional source in particularly cold areas.
Gas IR heaters
This type works by heating plates made of a heat-resistant composition, inside which an air-gas mixture is burned. Their power is the highest, so the use of this type in residential premises is contraindicated. In addition, the price of such infrared heating is quite high, which makes them in demand only in industrial enterprises or in large facilities such as a shopping center or sports ground.
Why infrared floors are popular in apartments
When advertising infrared floors, managers for some reason always focus on the heating speed and healing properties of the beam, which destroys microbes, saturates the room with negative ions, etc., although it is these properties that cause the most mistrust among consumers. Nowhere on the Internet will you find examples of people being healed of illnesses or improving their health thanks to the installation of an infrared heating system.
But such an obvious and important advantage as ease of installation is the last thing people talk about. But this is precisely what becomes decisive for those owners who do not want to open up the old floors or make major repairs, but only want to slightly improve the thermal conditions in one of the rooms, for example, in the nursery. It is enough to dismantle the floor covering, lay the infrared system and cover it again with the same finishing material.
Of course, there are some nuances when installing different types of infrared flooring, but in general its installation is much simpler than installing water or electric heating systems.
In addition to indoors, infrared floors perfectly remove ice from porches and steps and are not afraid of any temperature changes or frosts
Where is infrared heating used?
Due to their properties, IR panels have a very wide range of applications:
- Warehouses;
- Workshops and industrial buildings;
- Stadiums;
- Train stations and airports;
- Gas stations, car washes, car dealerships;
- Pavilions and exhibition centers;
- Medical institutions;
- Theaters and concert halls;
- Office and administrative premises;
What can we say about the fact that in residential premises they are most relevant in the context of constantly rising electricity prices.