In recent years, the fireplace has ceased to be an exclusively classic element of the interior. Modern biomodels are made of metal and glass, and they run on environmentally friendly fuel that does not produce smoke or soot. Fireplaces are becoming a central element in the design of living rooms, libraries, bedrooms and kitchens. They replaced the bulky stoves on which food was previously cooked. Depending on their location, fireplaces are classified into four types: island, corner, built-in and wall-mounted. The most material is spent on the first type, since the unit is installed in the middle of the room and has four walls. The most economical option in terms of cladding and decoration is considered to be a built-in model. In the classic configuration, the fireplace consists of a firebox, a smoke collector, a chimney and a portal. We are interested in the last component, since it is this that is decorated with stone decor, wood, inlay, and plaster. More modern models of electric fireplaces are a box without any communications. Thanks to this quality, they are used in the design of not only country houses, but also city apartments.
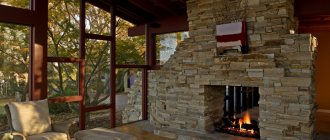
Decorating the fireplace with decorative stone returns the interior to its roots, that is, to the times when it was faced exclusively with natural, roughly processed materials. Such solutions are suitable not only for classic or ethnic styles. Modern loft, modern, Provence, Gothic go perfectly with stonework. It, in turn, is suitable for retro-style wallpaper and textured Venetian plaster. Natural stone has an impressive weight, and finishing is fraught with difficulties. There are now a number of high-quality imitations on the building materials market. Decorative stone for a fireplace is not inferior in characteristics to the original, and in some ways even surpasses it. In the article we will talk about how to choose a material from a variety of options and how to lay it correctly.
Features of facing a fireplace with artificial stone
This design method has many advantages:
- The material is suitable for fireplaces in any room.
- Not afraid of temperature fluctuations and strong humidity.
- Mechanical properties make it quite easy to work with.
- In terms of shape, texture, and strength, artificial stone is no worse than natural stone, although its cost is lower.
Cladding the fireplace with stone yourself will help reduce installation costs. This is not difficult due to its flexibility in processing. The artificial material does not require the installation of an additional foundation, since it is light in weight.
The main advantage is environmental friendliness. If you correctly decorate a fireplace with artificial stone with your own hands, a photo against its background will delight the owner for a long time.
Vintage and modern models
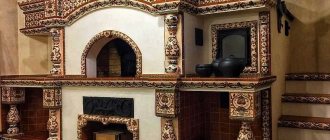
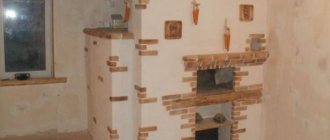
Tiled fireplaces, which were appreciated in the 17th century, shocked with their sophistication in noble estates and estates. Decorating with tiles can without a doubt be called art. Today there is an increased demand for tiled fireplaces, combining modernity and ancient traditions; they create a feeling of warmth in the house and make the interior exclusive.
Tiles are a specific type of ceramic. When creating models for the Russian consumer, Suzdal and Dutch painted tiles are most often used, which are present in large quantities and in various configurations in the decoration of the fireplace.
Compared to marble products, tile products retain heat longer and retain their external beauty for many years.
A potbelly stove fireplace is a modern ready-made solution for a country house or a loft-style room.
Modern models made of metal have a stylish design and look great in the interior. The range of such fireplaces is so wide that even the most demanding buyer will be able to choose a model to suit his taste.
A French fireplace is the pearl of any interior, which indicates the good aesthetic taste of the owners of the house. Such fireplaces are built from natural materials, for example, marble, granite, onyx. French fireplaces in white, beige or black with delicate hand-made stucco moldings captivate the eye and evoke admiration.
Making a fireplace in your home is not difficult. But what about apartment owners who also want to decorate their home with a fireplace?
There is an excellent solution for them - this is a false fireplace, which serves as an imitation of the real thing. There is no live fire in it, but the device, designed in accordance with the style of the interior, creates a special atmosphere.
The false fireplace niche can be decorated with birch logs placed in it, candelabra with candles, lighting in the form of a live fire, or you can paste a photo with a live fire inside the portal. To decorate a niche, you can use wood, imitation marble, or drywall. As a edging, you can use voluminous carvings or highlight the frame with bright paint.
Choosing artificial stone for facing a fireplace
The selection of material must be taken seriously. Not every type of stone is suitable for finishing a fireplace. Best examples:
- Terracotta has increased resistance to temperature changes. Since this stone is made of clay, the fireplace does not cool down for a long time.
- Majolica allows you to lay out beautiful decorative patterns.
- Clinker tiles are distinguished by their durability and environmental friendliness.
- Porcelain stoneware is more resistant to mechanical damage.
On a note!
To ensure that the stone lasts a long time, it is recommended to check the quality certificate for the product before purchasing. This is a guarantee of safety.
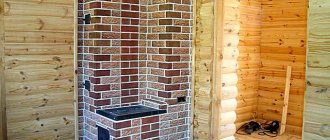
Brick in decoration
For those who do not know how to decorate a wood-burning fireplace, we offer one of the simplest solutions - brick.
If your fireplace already has standard brickwork, as an additional decoration, you can use special paint and varnish solutions, which not only make the appearance of the installation well-groomed and stylish, but also reliably protect the material itself from sudden temperature changes and significantly strengthen it, preventing all sorts of cracks may form.
Finishing fireplaces in the country
Finishing fireplaces with firewood
Finishing fireplaces with bricks
Brick joints can be additionally filled with mortar of any color.
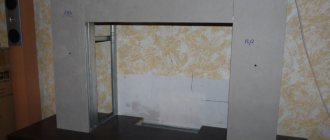
Preparing the fireplace surface for finishing
Surface preparation begins with proper processing. By skipping this step, the master risks ending up with a short-lived structure. It is necessary to wait for the walls of the structure to completely shrink and only then begin finishing. Failure to comply with this condition will lead to cracking of the cladding in the future.
Variations in surface preparation for laying cladding can be varied:
- The preparation of the shalevka board is carried out taking into account the moisture absorption of this natural material. To prevent dampness, it is necessary to apply a protective composition to the wood material; laying waterproofing is also possible.
- When plastering with concrete, a waterproofing layer is not needed.
- It is also possible to attach a metal frame.
For pre-plastering:
- A welded mesh with a cell of 10×10 mm is mounted on the surface to be finished with stone. It is attached to the brickwork using self-tapping screws with a wide head. For maximum reliability, it is recommended to close the caps with washers. The fasteners require horizontal intervals of 5 cm and vertical intervals of 15 cm. With the help of a mesh, the surface of the masonry becomes more even.
- The next step is applying plaster. The thickness of the layer that should be obtained is checked. The minimum allowable is 1 cm.
- When working with brickwork, the master marks the starting points for laying stone decorative elements. This is done to avoid installation errors.
- If the decoration of the fireplace includes shaped elements, a stronger solution is needed. It is necessary to choose a heat-resistant version of the mixture. One option would be a mixture of cement and fireclay or clay.
- Laying stone must begin from the corners. Before starting work, the surface is cleaned of dust with a vacuum cleaner, after which everything is primed.
On a note!
Surface primer is necessary for better bonding of the material to the surface.
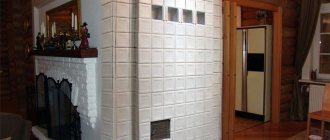
Using tiles
The tiles on the stove in the bathhouse are afraid of thermal expansion, therefore, when performing work, it is important to carefully follow the technological process. The lining of the stove in the bathhouse does not tolerate negligence
Kinds
Typically, 7 types of tiles are used for cladding:
- Terracotta is a tile that has not been glazed. It consists of terracotta clay and fireclay, which are mixed in a certain ratio. Such tiles have been known for several centuries. A correctly implemented technological process greatly influences the final quality of the material. This tile can be easily recognized by its characteristic red tint.
- Clinker tiles - clay is the main raw material. The material is obtained by pressing, then it is fired at a temperature of +12000C. The crystal lattice of the clay changes and the tile acquires the properties of ceramics.
- Majolica is very difficult to produce. Previously, only manual labor was used for drawing. Now there are industrial designs. The glaze on the tile is obtained by firing. Properties resemble terracotta tiles.
- Tiles are the most preferred option due to the air gap between the tiles and the oven wall. This layer works as an additional heat insulator, allowing the stove to retain heat near itself even longer.
- Porcelain tiles can also be used for lining a stove. Marble chips added during the production of porcelain stoneware give the material unique decorative properties and high strength. Due to this, porcelain tiles are rapidly gaining popularity.
- Fireclay is able to withstand direct exposure to fire. Fireclay is pressed into blanks and fired at a temperature of +13000C.
- Tile - only a material with a high heat resistance coefficient can withstand temperature loads.
Expert opinion
Nikolay Davydov
Stove maker with 15 years of experience
Based on their properties, the most preferable option for lining a stove is tiles. It is also the most labor-intensive. The most budget option is special tiles with a high heat resistance coefficient, but with its help it will not be possible to finish the hottest areas.
Instructions
Do-it-yourself tiling of a sauna stove is done as follows:
- It is necessary to properly prepare the surface. All traces of old finishes must be removed from the wall. Each seam should be selected at 10-15 mm.
- We dilute a deep penetration primer and add marble chips to it. Carefully prime the surface. Do not forget that the primer must dry (at least 24 hours).
- We stretch and fix the metal mesh using dowels. Such reinforcement will significantly increase the strength of the structure.
- The tiles should not be laid on an uneven surface. We level the wall with plaster. We recommend using stove mortar that is specifically designed for plastering stoves. The plaster must be allowed to dry for 48 hours.
- Apply the facing adhesive evenly to the entire surface of the tile. Carefully cover the surface of the stove and press lightly. The tiles can be leveled in about 10 minutes. Then the glue will set. We check the correctness of the masonry using a level. The glue layer should not exceed 1 cm. To make the seams even, we use special crosses. The thickness of the seam is 2-3 mm.
- When the glue dries, we grout the joints.
This is interesting: Window decoration in a house made of laminated veneer lumber - study with us
Preparation of the solution
The solution is the most important element of the entire work. There are 3 options that are often used in work:
- Clay solution. Optimal for brick construction, withstands high temperatures when burning solid fuel. Will last a long time. An important characteristic is the fat content of the clay. The most primitive method of determining it is to check mechanical strength: roll balls from a composition with different ratios of sand and clay, dry completely, and drop each ball onto the floor. The one that will not break is taken as the basis for its composition. To ensure uniformity, the clay is passed through a sieve and kneaded by mixing with water. To achieve the required elasticity, sand and water are added. To mix the mixture, it is recommended to use a drill with a special attachment - this will ensure uniformity of the mass.
- Cement mortar. The composition is popular in use, but is afraid of prolonged thermal exposure - the seams may crack. For the solution, it is necessary to add sand, the amount depends on the brand of cement used. For example, for the M300 the ratio is 3:1. The solution is mixed using a drill. To avoid rapid shrinkage and to give elasticity to the solution, it is recommended to add a pinch of washing powder.
- Dry mixture. A ready-made purchase option, also suitable for finishing a decorative fireplace.
On a note!
It is better if the cladding is attached to the same mortar that was used for the main masonry.
Alternative options
While natural stone fireplaces remain a popular choice, it is a good idea to consider other types of fireplace finishes.
Concrete
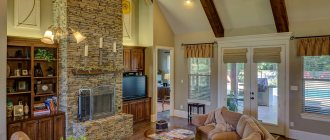
Concrete framed around the fireplace with clean lines and a natural finish gives the interior a modern feel and warms the space while retaining the heat generated by the fire. This flexible material is ideal for fireplaces, and the variety of colors and textures creates a unique design element in the space.
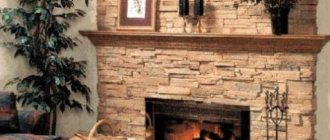
Stone veneer
The choice of design depends largely on the original design of the fireplace and how it was installed. It can be simply a flat wall, recessed, angled or have a convex design.
Stone veneer
When choosing the perfect natural stone to suit your space, it can be difficult to find the right combination of colors and shapes. No matter where the fireplace is placed, it will be the focal point of the room and the anchor of the overall design.
Expert opinion
Filimonov Sergey Vinokurovich
Heating equipment repairman
Sometimes a small adjustment to the overall look is just what is needed to make a space truly cozy. The best way to accomplish this is to combine different colors and shapes of natural thin stone veneers to create your own unique piece of art.
Brick
A more traditional fireplace surround, brick, can also be used in modern interiors to create a cozy and stylish atmosphere. Bricks come in a variety of colors and sizes and can be arranged in patterns to create a variety of looks that add texture and warmth to a space.
Tile
Tile is a great way to create a unique fireplace surround. It is available in an endless number of materials, colors, sizes and textures, meaning it can be used in any decor. It can also be a way to achieve a more expensive look when built directly. For example, a solid marble fireplace surround will be much more expensive than a fireplace surrounded by marble tiles.
Tree
A less obvious choice for a fireplace surround, given that the material burned in the fireplace is wood. When building a fireplace, if the frame is built correctly, the wood surround will not be a problem.
You still need to check your local building codes to see if this is allowed.
Steel
One of the most popular materials for facing a fireplace. Steel finishes come in many different types, making them suitable for many interiors. Typically gives the room a modern, industrial look.
Fake diamond
This facing material is in no way inferior in beauty to natural stone. At the same time, it is much lighter in weight and is very easy to install. You can find artificial stone with a variety of fillers.
Laying artificial stone
To ensure that the result matches your expectations as much as possible, it is better to listen to the advice of experienced professionals. Professionals give some installation recommendations:
- You need to start work from the corners of the structure. An important point is the alternation of parts of different lengths. It is necessary to secure the large elements of stones first. Such “beacons” will simplify further masonry.
- When laying the stone, it is better to adjust the size in advance; this will give the structure a natural and attractive appearance. This can be done using pliers or a hacksaw.
- Using a trowel, apply the selected solution to the material in a layer of about 1.5 cm, evenly over the entire surface.
- When applying it to the stone, you need to apply a little pressure, achieving alignment with the level or marks. This will allow not only to secure the element well, but also to completely fill all the cracks in the masonry.
- Press until the solution begins to squeeze out from the sides. When laying seamlessly, the side seams require special attention.
- It is also necessary to monitor the humidity of the room in which work is carried out. In a dry room, it is necessary to moisten both the fireplace and the stone with a wet brush or spray. If you don't have them on hand, you can put the stone in water for a couple of minutes.
- If the solution gets on the stone during the laying process, there is no need to remove it immediately. Let it dry a little, then it will be easier to remove the dry “drops”.
- The scheme of work is simple: first of all, you need to lay out all the elements in front of you. Alternating the type of material, its color, size will allow you to achieve originality of the future composition.
If there is unstitching, you need to start from the top. The finished design will be ideal for different masonry thicknesses.
On a note!
When finishing, it is important to observe the thickness of the seams and their location in the same plane.
It is better not to place horizontal seams one below the other. When laying without seams, installation should begin from the lower structure of the fireplace. In this case, you need to press harder on the stone elements to join them with each other. Control is also necessary for vertical seams, or more precisely, their intersection - it must be located strictly at a right angle.
Technology for installing tiles on the walls of the fireplace and exhaust pipe
From the variety of installation features inherent in each of the materials considered, some common features and rules can be identified:
- When starting the cladding, you should make a drawing on a scale of 1: 1, on which all the finishing details should be laid out. Inclined surfaces, using elementary techniques of descriptive geometry, should be depicted without distorting their linear dimensions.
- Measure the trim pieces and divide them according to size into three groups. Start the work with the most numerous.
- The masonry is laid without a seam or with a seam. To maintain the same width of the latter, plastic crosses are used, used by tile makers.
- The next row begins to be laid after checking the level of the previous row.
- Any solution that gets on the front side of the tile is wiped off with a damp cloth. Precisely wet, since using wet will lead to the absorption of the solution into the tile, which will change its color.
What else can you do to finish it?
Each fireplace is a unique product! It will be appropriate not only in the living room or recreation room, but also in the design of the kitchen or bathroom interior. Finishes can also be made from a wide range of materials. In addition to those considered, porcelain stoneware, tuff, and tiles are used. In imitation of a fireplace, if heating is not intended, it is permissible to use wallpaper and plastic. No mortar is required to secure them to the surface. It is enough to use construction adhesive.
Correct implementation of seams
Do not use mixtures used to lay tiles.
To completely fill the seam, you need to use a bag made from a regular plastic bag with one corner cut off, and the hole should be slightly smaller than the width of the seam.
After filling the bag, you should press on it and squeeze out the solution as little as possible so that it does not get on the outside of the material.
After the solution begins to harden, you need to remove the excess using a trowel.