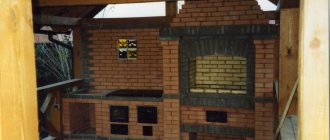
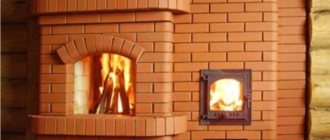
The simplest barbecues are stones piled around a fire or a metal box. They are convenient to carry or move when traveling, but for the dacha, a homemade barbecue with a brick brazier is the best alternative. Such a simple structure will safely turn firewood into coals, and remove smoke into the chimney, preventing it from filling the room or spreading throughout the area.
Consider a stationary option for a gazebo or canopy. This article does not contain photos of 101 barbecues made of brick, water and off-topic tips. There are clear diagrams and detailed recommendations
, according to which you can independently build from stove bricks not a small temporary barbecue, but a real one for country gazebos, creating an atmosphere of outdoor recreation in accordance with your ideas.
This project was developed for students in the profession of Stove Maker
, has been repeatedly implemented in practice and in work. In 2018 and 2022 alone, more than 20 hearths were built under this and similar projects. When creating it, the main goal was simplicity in construction, accessibility and compactness. The minimum amount of brick cutting makes the job accessible to any home craftsman. Let's make a grill ourselves!
How to build an outdoor brick grill with your own hands - drawings with dimensions and step-by-step instructions.
What will we build:
brick grill with dimensions 1020 x 765 x 2170 mm
Short description:
A barbecue oven is a device for cooking over open coals. Drawings of a brick barbecue will help you build a garden stove with your own hands for a summerhouse or under a canopy. All stages of construction are discussed in detail and there are step-by-step instructions. The construction takes up a minimum amount of space and requires little material; a ready-made arrangement will significantly save work time.
Difficulty class:
A (for beginners)
Brick cutting and chopping
A grinder with a stone cutting disc is perfect for cutting brick. During operation, a lot of dust is generated, so it is recommended to protect your eyes and respiratory organs with goggles and a mask.
The process takes place in the following sequence:
- Marking bricks with a pencil, ruler or tape measure.
- Cutting (splitting) elements to the required sizes.
- Teska (grinding) of the resulting blanks.
To speed up the marking process, experts recommend making templates. This is especially effective in cases where it is necessary to cut parts of the same size in large quantities.
Material for templates - pieces of roofing felt, parchment, thick cardboard.
To make templates of non-standard shapes, you need to use ingenuity. For example, to get a longitudinal half of a brick, it is enough to bend the template of an ordinary half lengthwise. This will reduce the number of templates and speed up the cutting process.
Parts for which templates cannot be made (bevels, oven appliances) are marked during preliminary dry laying.
When cutting, you need to work at high speeds, otherwise even a new disk will quickly wear out.
It is not necessary to make a full cut, just a cut is enough and then carefully split. But this applies to cases of obtaining parts of simple shapes. For complex elements, it is better to cut the workpiece to the end.
Experts recommend using a new disk to first cut off complex parts, then simple ones, since standard parts can be cut off even with a worn disk.
It is worth saying that cut parts have a smooth surface, chipped parts have a rough surface, sometimes even with defects. You can smooth out the roughness:
- processing with a grinding disc;
- grinding the chopped parts against each other;
- with a pick.
It is better to place bricks with chipped edges against a thick seam.
Specification for materials (excluding pipe)
| № | Name | Qty |
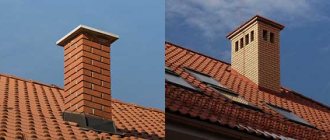
| 1 | Red stove brick Better is Vitebsk (except for pipes), workshop 1. Any solid stove brick of the chosen color and configuration is also suitable. For example, kiln bricks from the LSR Pobeda, Kirovo-Chepetsky, LODE factories. | 385 pcs. To calculate and construct a chimney, use the following advice. The chimney must be high enough: have a length of 50 cm above the ridge, and a height of at least three meters from the hearth of the fireplace. 1 row - 5 pcs. brick, 7 cm height |
| 2 | Fireclay brick. | 97 pcs. |
| 3 | Clay red Sifted sand or use a ready-made mixture to prepare clay-sand masonry mortar, this will speed up the laying process: A mixture of red clay and sand (WITHOUT IMPURITIES) | 90 kg 180 kg 11 bags of 25 kg |
| 4 | A mixture of fireclay clay and sand (WITHOUT IMPURITIES) | 2 bags of 25 kg |
| 5 | Corner 35-40 85 cm long | 11 pcs. for a block with a barbecue: 6 per shelf, 5 for the base |
| 6 | Welded steel smoke hood | 1 PC. |
| 7 | Basalt cardboard 600x1200x5 mm | 6 sheets |
| 8 | Heat-resistant mastic "Garant" or equivalent. | 1 jar |
| 9 | Pin dia. 16 mm, on both sides with a nut and a large washer. | 2 pcs. |
| 10 | Smoke hood | 1 PC. |
| 11 | Cement, sand or mixture for laying the roofing part of the pipe | of necessity |
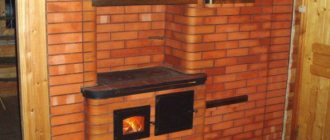
Chimney device
When the chimney continues to be laid out of brick, the order of work is as follows:
- The top of the combustion and facing parts are brought out to one level.
- To lay the smoke collector, a solid brick is taken. The solution is cement-sand. Cement grade – from M150.
- The first row is flush with the inside of the firebox. All subsequent ones are shifted by ⅓ of the brick.
There is no need to shift it over a greater distance, otherwise the bricks will simply fall inside the firebox over time.
- The laying is carried out until a small opening remains (30*30 cm, 25*25 cm).
- The finished brick chimney is covered with a protective cap on top to prevent moisture and precipitation from getting inside.
There is an option for mounting a chimney made of heat-resistant concrete or a double-circuit chimney made of sandwich pipes.
Read step-by-step instructions for installing a chimney made from sandwich pipes.
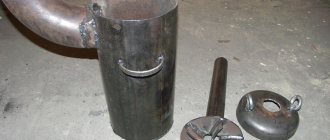
Additional structures for barbecue
Steel smoke collector hood
The dimensions of the base of the cap depend on your masonry. The calculation is as follows: measure the internal dimensions of the masonry of the 23rd row, add 1 cm on all sides, you get the dimensions of the base of the cap.
For example, 765+20=785, 515+20=535. Result: 785x535. Dimensions at the top: 120x250 mm. Height of 7 rows: 490mm.
It is important that there is no pronounced step inside at the place where the cap is installed. It will make it difficult to remove smoke.
The cap is welded from a steel sheet with a thickness of 3 mm and placed in the right place. Then, over the entire surface, gluing it with mastic in several places, it is covered with basalt cardboard with a total thickness of at least 10 mm. This is done so that the heated iron does not destroy the brick at the points of contact. Cardboard joints are carefully coated with heat-resistant mastic. After this, the brick is laid according to the order.
Pattern for drawing out the arch
The pattern for the arch is made from anything: from 2 rows of durable plywood, from boards, beams, etc. After installing the pattern and laying out a brick arch on it, do not work near the arch the entire next day. Then, do not remove the pattern and do not touch the structure at all until the clay is completely dry.
The options for arches are varied: according to the steepness of the radius, the finishing option, the use of straight or wedge (for arches with a small radius) brick. I offer an easy-to-manufacture, time-tested, slightly steep arch. Lifting height 1-2 rows.
If you analyze the project and understand the principle, you can create your own version. Of course, you won’t immediately understand how the complex is built, which consists of many blocks, each of which is a separate hearth, but changing the dimensions by adding a countertop or sink, mirroring it, removing the bottom shelf and increasing the woodshed is quite possible.
Design selection
Creating a barbecue is divided into several step-by-step actions. If you follow them exactly, then:
- the design will be strong and durable
- individuality - the barbecue grill will be one of a kind
- You can easily use this barbecue in winter
- the likelihood of error will be minimized
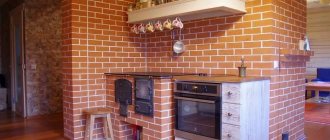
The first step is choosing a design . The stove should be simple and functional. At the same time, an appearance and some platform should be provided to assist in cooking the meat. This could be a small tabletop or a designated area for storing spoons, forks, and skewers. You can also allocate space for storing firewood for cooking.
Example of workspace organization
Since the grill is an individual item, the dimensions and design are also individual.
Barbecue can be of two types:
1. Open – the working surface is open. At the bottom there is a through niche for firewood. A table top can also be placed for convenience.
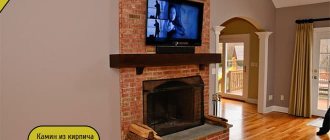
2. Closed – this is a multifunctional design. Basically, this grill is placed near the wall. The niches are all closed, there is a roof and an arch, as well as:
- Countertop for preparing food and utensils
- Place for heating the kettle or heating the first dish
- Dishes storage area
- Firewood storage area
- Place under the sink
Worth considering! This grill requires more material, as well as painstaking work associated with the stove maker.
Appearance of the grill
The topic of appearance should be thought through and studied in advance, choosing the material consciously, taking into account quality and availability. You can leave the budget option, using inexpensive Vitebsk stove bricks and refractory ones according to the specification. Or you can use the oven face and change the color, round the corners with radius elements. Sometimes, having conceived a cladding made of natural or artificial stone, during the construction process one comes to the understanding that people have overestimated their material capabilities. Then in the first year the masonry is done with straight stove bricks, and the next year they are lined with the selected material. They also come with cladding with heat-resistant tiles or imitation tiles.
This version of an open barbecue grill has advantages due to the absence of high temperatures on the surface: it allows you to work with natural stone such as flagstone or round timber, it is glued to tile adhesive with a cement base. Complex barbecue complexes, which include closed ovens - such as a smokehouse, a cauldron stove, a bread maker - and having high surface temperatures, are more demanding on facing materials and they are discussed at the project development stage.
Let's return to our construction site. Now that we have read the masonry instructions, we can begin working on the ground. The question arises about the foundation.
Foundation
Marking on the ground can be easily done using pegs and twine. We dig a pit for the foundation with a margin of 5 cm on each edge. The pit should have a uniform depth, without differences.
Then we cover the bottom with slag, after which we install formwork around the perimeter. We reinforce with metal, knit a frame or lay heavy iron with a mesh. Then we fill everything with concrete. It may take more than three days to harden.
Masonry of the furnace mass
So, the foundation is ready, the materials have been purchased, we begin the construction of the main structure. The first stage will require special attention. You need to lay out the bricks according to the pattern, leaving equal gaps of half a centimeter between them for the seams, then check the diagonals. Dry laying should continue to be carried out in order to smooth out in equal parts inaccuracies associated with the dressing of the masonry and the characteristics of the material.
To mix the clay-sand mortar, preparation is needed. The solution consists of approximately 1 part clay and 2 parts sand. Sliding off the trowel, a properly prepared solution leaves a small mark on it. It falls off without a trace - a lot of sand, smears heavily - a lot of clay.
Each ceramic brick is installed in its place with a 5 mm seam on all sides and checked with a level in all axes. In accordance with the standards for refractory bricks, the seam size is 2-3 mm.
Required Tools
To work you will need:
- shovel;
- Master OK;
- a trough for mixing mortar or a concrete mixer;
- buckets;
- building level, tape measure, plumb line;
- Bulgarian;
- reinforcing mesh;
- cement, crushed stone, sand, clay;
- fireclay brick;
- boards, plywood (for formwork assembly);
- metal corners, doors, grates, grates;
- hammer;
- mallet;
- rope and pegs (for marking under the foundation).
In order to save money, it is allowed to purchase fireclay bricks only for laying the firebox. For other areas of the oven that will not be exposed to high temperatures, you can take regular brick (not necessarily new).
We will analyze step by step the process of independently erecting a small outdoor barbecue, and clarify the nuances of each action.
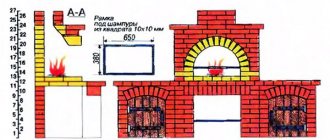
Schemes and drawings
The work process reflected in the drawings
is developed at the planning stage. The drawing is a visual representation on paper of the future structure, where the shape, dimensions, and cross-sectional view are clearly visible. Created on a scale with a reduction several times from the actual dimensions.
For example, when specifying a scale of 1:10, it means that the design drawing is reduced by 10 times. For every 1 mm of drawing there is 1 cm in reality.
Corner barbecue diagram
It is customary to use a thick solid line to show the outline of the product. Thinner lines indicate the sizes of the elements.
Block barbecue diagram
Conventional shading in the drawing indicates the raw materials used for construction. For example, under an ordinary red brick, hatching is drawn at an angle; fireclay (fireproof) is marked with a check.
The drawing description includes the following details:
- general view of the product;
- outside view - facade;
- structure in a vertical section, where the internal structure is visible;
- horizontal section showing the principle of masonry.
Recommended oven dimensions
The width of the grill when folded should correspond to the width of the skewers - 47-62 cm. The height of the frying platform is made slightly higher than the waist, so it will be more convenient to cook. The length of the firebox should be such as to simultaneously accommodate from 8 to 10 skewers.
Preparatory work
They consist of clearing the construction site of debris, vegetation, and marking. For the last step, rope and wooden pegs are used.
Foundation installation
A brick barbecue is a heavy structure, so it is recommended to pour a monolithic concrete slab under it.
Briefly, the procedure for constructing the foundation looks like this:
- A hole is dug with a depth of 30 cm. The dimensions should be 20 cm larger on each side than the future product.
- The bottom is carefully compacted.
- A 15 cm thick cushion is poured from layers of sand and gravel. It's being compacted. Moisturized with water.
- The formwork is assembled from boards. The knocked down frame is placed around the perimeter of the dug hole.
- The bottom of the pit is reinforced with metal mesh.
- Cement mortar is being poured. The M500 brand is best suited for cooking.
- The poured mixture is pierced with a piece of reinforcement to remove air bubbles.
- The slab should extend above the ground level.
- Curing time is up to 4 weeks.
- In dry weather, to avoid cracks, the surface is moistened with water.
The frozen slab is covered with waterproofing (dense polyethylene, roofing felt) on top.
While the foundation hardens, you need to soak the clay for the solution. The finished solution should not crack when compressed.
You can get acquainted with other types of foundations for the furnace by clicking on the link.
It is important to think through the supply of communications even before the foundation is poured.
The day before laying, the brick should also be prepared. It is thoroughly watered so that it does not absorb moisture from the solution. The adhesion to the surface will be better.
Order of brickwork
The order should be carried out in the following sequence:
- It’s better to start by laying out the first row dry. This will allow you to adjust each brick to size if you need to trim it. The gap between the elements is 1 cm. The evenness of the diagonals is checked.
- Laying facing bricks can be done using a solution of cement and sand (in a ratio of 1:3). To improve the plasticity of the mixture, you can add a little lime. The recommended seam size is from 8 to 10 mm.
- In areas where bricks pass without dressing, it is necessary to carry out reinforcement with metal wire.
- Each subsequent row is shifted by half a brick. To adjust the elements to size, use a grinder.
- Every 3 rows, compliance with the masonry level is checked, and preferably more often.
- After 8 rows you need to create jumpers for the grill and countertop. To do this, take metal corners measuring 45*45 mm and set them up like an inverted letter T. Half of the shelf is sawed off. The metal should not come into close contact with the brickwork.
- Afterwards you can start laying the firebox. Fireclay bricks are connected to each other with clay-sand mortar. The thickness of the seams is no more than 4 mm.
- Metal corners are also used to form support for the bottom.
- The second row of bricks for the firebox completely covers the first. This way the seams will not burn through. Some craftsmen replace the first two rows of masonry with a concrete slab, but the creation will cost many times more, although it will be no less reliable.
- Parallel laying of the firebox and facing bricks is allowed. But between the lining and the firebox there is always a gap of 1 cm so that they do not touch.
To improve the decorative appearance, stove makers resort to constructing a combustion arch. To do this, a wooden blank is first made in the form of a semicircle and placed in the barbecue portal. Next is the masonry. Bricks are cut to the required sizes using a grinder.
The arch made of facing bricks must be covered from the inside with a fire-resistant lintel. Placed on a metal corner.
Arranging a brick grill firebox with your own hands
Decide in advance how you will use the stove. Insert an iron box or grill, make steps for skewers or grates from bricks, cook frames and rearrange them - you choose.
Let's consider the option with frames, since for them you need to cut grooves during the laying process; it will be almost impossible to do this on the finished product with high quality. The bottom groove should be at a height of 12 centimeters from the hearth, as restaurateurs advise, this height will be at the beginning of the 15th row, the second groove will be in it, and the third - in the 17th. 15 mm is quite sufficient in terms of cutting height and depth.
Drawing
Before you start laying a barbecue, you should draw up a drawing on paper. On it, indicate all the dimensions, taking into account the size of the brick.
The drawing will save time, materials and give you the opportunity to evaluate the picture as a whole.
Consider an example of an open barbecue:
Drawing of an open grill
I The size of the barbecue is 1 meter wide
II The size of the refractory brick is 11.4 cm. From these data the width of the niche for firewood is calculated: 11.4*4= 45.6; 100(1 meter)-45.6=54.4 cm.
III The height of the barbecue is 80cm.
IV The height of the working part of the grill is 35 cm.
V Iron tray for coals. It can be installed above a brick surface of 5 cm, or perhaps simply installed on brickwork.
VI The depth of the grill is 60cm.
Red dots indicate holders for a mesh or for installation under a skewer.
Recommendations for using the grill
So we built a barbecue with our own hands. Now you can use it not only for frying meat and making barbecue, but also try your hand at cooking other products. You need to install a chimney damper at the beginning of the chimney, usually between rows 2 and 3, and on the front wall, according to the dimensions of the portal, make a door similar to the damper of a Russian stove, where sellers of stove castings and other fittings will tell you where to find craftsmen for such metal products. Now this oven can be used for making pies and baking other baked goods.
To achieve these goals, you will need to light a fire in the firebox, wait until the wood burns down to the coals, close the pipe valve not completely (leaving approximately 1-1.5 cm), move the coals apart, making room for a baking sheet or bread pans. Close the door and wait for the food to be ready. In such an oven the temperature can be from 100 to 250 degrees, depending on the heat of the barbecue grill and the degree of hotness of the coals. Let's keep experimenting! When you adapt to the temperature of the firebox, you can try simmering porridges and soups.
Happy construction! Bon appetit!
FAQ
Is it easy to build if you have no experience?
The process of building even a simple brick barbecue is quite complicated for an unprepared person, since a lot of rules must be followed. If there is no experience in such work, it is recommended to involve professional stove masons in performing the work. Ordinary builders are unlikely to help here, since they are not familiar with the specifics of constructing furnaces, which require the use of other technologies.
What is the correct composition of cement mortar?
The barbecue solution is made in a special way. It consists of red clay, gully sand (not river or quarry sand). It is rough and adheres better to clay particles. If in doubt, it is better to buy a ready-made mixture in a store, after consulting with the seller.
Backlight
To cook on the grill in the evening, you need good lighting. Therefore, it is worth considering this point from the beginning.
To do this you will need:
- Metal pipe or galvanized profile
- Wire of required length
- Wire plug
- Lamp socket
- Corrugation for wire
- Screwdriver, electrical tape
- Dowel-nails
- Self-tapping screws
Roaster with internal lighting
If there is a pipe available, then it is fixed to the back wall of the grill using a metal clamp. If there is no pipe, but there is a galvanized profile, then:
- The profile is attached with dowels to the back wall of the stove.
- A second profile is installed with edges to the attached profile. The sides are fixed with self-tapping screws
- A corrugated wire is passed through the created pipe along the entire length.
- A plug is attached to one end of the wire, and a lamp socket is attached to the other end.
- If it is raining outside, the lamp should be protected from above by a lampshade or a special cap
To prevent moths from gathering on the lamp, a small board is fixed nearby, near the beginning of the pipe, on which you can install a midge spiral.
To install an LED lamp or other lamps, the base is made in the same way, but at the top you should create a base for attaching the lamps and protection from moisture.
Decorative finishing
The finished grill can acquire an original look with the help of facing materials such as:
- plaster;
- brick;
- tile;
- natural and artificial stone;
- special compounds.
Cladding work must begin from the bottom up.
If you select finishing materials that match the overall design of the site or the decoration of the house, the structure will look like an integral object of the territory.
You can veneer the whole structure or a separate part, it all depends on the drafted project and personal preferences. The main thing is that a cozy and comfortable atmosphere reigns around!
Preparatory stage of construction
An important step is choosing a drawing for the future barbecue. You can lay out simple U-shaped structures yourself. When preparing drawings, the quantity of bricks required, rows and types of bricks used are also taken into account.
Brick
To build a brick barbecue, you need to purchase a special heat-resistant brick, which will be needed in the flame-heated parts of the structure. For surfaces that do not experience heating, you can use the most ordinary red brick.
The flight of fancy when creating this structure is almost unlimited, and you can cover the surface with other materials, sometimes stone is used for construction.
Foundation
When creating a drawing, it is necessary to take into account that a brick grill has a lot of weight and must stand on a strong foundation. If your design involves a barbecue under the roof, then the foundation area should be larger. The same applies to projects with additional surfaces.
All work is done in layers, and the reinforcement serves as the interlayer. At the end, the entire work is covered with film and left to dry for several weeks.
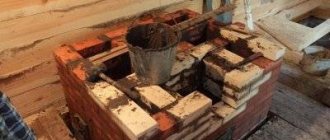
What is "order"
The word has two meanings:
- The simplest device consists of two slats one and a half to two meters long, which are attached to the lower rows with brackets so as not to destroy the damp masonry. Bricks are laid along them and along a horizontally stretched thread. This is necessary to ensure that the masonry is strictly vertical and the sides are even and perpendicular to each other.
The order is used to fix the masonry rads, ensures the verticality of the corners
- The actual order of laying bricks. In this case, there is a diagram on which each row of installation is indicated step by step.
Photo gallery: order schemes
Before you start bricklaying the stove, you need to draw a sketch of the future structure
The stove for the cauldron can be made miniature, consisting of 13 rows of brickwork
The most common model of a brick stove is a two-story design with a compartment for storing firewood under the combustion chamber.
The ceiling under the cauldron can be placed directly under the exhaust chamber
A brick oven can combine several functions: barbecue, smokehouse and barbecue