Most homeowners have thought more than once about how to make a small fireplace with their own hands. This is the most original way to change the situation, but it is not so easy to fit a large structure into a small room. It is for this reason that it is better to make a home fire yourself.
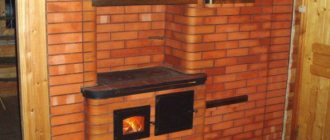
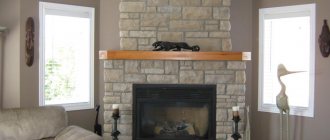
The wall-mounted fireplace in the interior is made of red brick
Imagine how pleasant it will be to sit in the evenings and enjoy the beautiful view of a burning fire, listen to the crackling of wood in the stove and discuss funny stories! A brick fireplace in a country house is not only a decorative item, it becomes a good source of heat and can also be used as a stove.
Making a small fireplace in your home with your own hands is not as difficult as it seems at first glance. Before you start creating a fireplace at home, you need to have a basic understanding of what a fireplace consists of and what it might require.
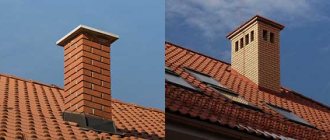
Marking the fireplace and installing a chimney system on the roof of the house
The fireplace is constructed in a simple way; it has a chimney and a firebox. The pipe must be curved to prevent sparks, smoke and precipitation from entering the room. We will also need a cast iron or steel firebox, a grate, a valve and, if possible, fireproof ceramic glass. You can learn separately about the advantages of cast iron and steel from another article.
Fireplace portal
There are two basic types of portal ceilings - straight and arched. The straight design has the simplest appearance, but its installation is rightfully considered the most difficult. The main problem of arranging a direct floor is the exactingness of calculating the angle of the brick cut and the complexity of its installation.
The fuel tank located below is usually made in the shape of a rectangle or trapezoid. A mouth is formed right above the firebox, into which all the smoke released when the fuel burns goes. To regulate smoke removal, a damper is installed in the front part of the chimney. At the front edge of the mouth there is an overlap, and behind it is a chimney tooth.
Arched portals, depending on their shape, are divided into three categories:
- Semicircular. In such designs, the radius of the arch is exactly half the width of the combustion chamber. Semi-circular portals are considered the most reliable and simple.
- Bulbous. The bending angle of arched arches is slightly less than that of semi-circular arches, so this option is best suited for fireboxes that have a large width. In addition, the beam arch of the portal may well be used in situations where there is a need to limit the height of the combustion chamber.
- Direct.
Types of models
By purpose:
- stoves - combine a fireplace and stove, can be used separately, have a chimney;
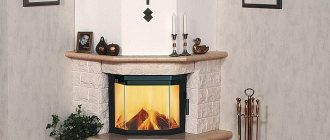
- decorative - emphasize the desired appearance of the room design;
Style classification:
- classic - made in a U-shape, has a powerful façade, and is an indicator of good taste and prosperity;
- country - a characteristic feature of such structures is negligence, rough shapes, the presence of a wooden beam;
- modern - a competent combination of classical forms and modern materials;
- high-tech - the presence of unusual forms of design and appearance using inexpensive materials and technical innovations;
Instructions for laying a brick fireplace
You should strictly adhere to the order of your own brick fireplace, especially if you want to build it in the English style. The first thing to do is to insulate the wall adjacent to the fireplace with sheet metal or durable foil. All wooden elements are impregnated with fire retardants for interior work. In addition, a fire-resistant coating is laid on the floor, which is not afraid of sparks and embers.
Before starting construction, it is worth going through and sorting the bricks, putting aside those with chips and cracks. Such defective bricks can be used for laying the foundation. Each stage of masonry can be done first without mortar in order to sand and trim the bricks.
A simple ceramic brick must first be soaked, but fireclay bricks can only be wiped off with a damp cloth to remove dirt. Then the solution will dry more evenly.
To lay the base of the fireplace, use a solid brick with an area of 1140×1270 mm, laying two rows of it with a bandage. First check the horizontalness of the foundation, and if necessary, level the level using masonry mortar, adjusting the thickness of the seam. The solution used is cement-sand with proportions of 1:2 or 1:3. The next two rows are laid according to the diagram, but for the bottom of the firebox they use fireclay bricks and heat-resistant mortar. It is made from clay and sand, mixed so that the solution does not slide off the trowel, but also does not stick to it.
Next, the walls of the firebox are kicked out. According to the ordering scheme, the inner walls are laid out from fireclay bricks onto a clay mortar, and the outer walls are made from ceramic bricks onto a cement-sand mixture or clay mortar with the addition of 20% cement. Diagonal cuts are made on the bricks in the rear corners of the firebox to improve heat transfer.
In the 12th row, as the masonry of the firebox is completed, a steel strip and corners are laid according to the diagram. In the back of the chamber, the brick is laid using the butt method, making cuts on it to obtain a vault.
During masonry from rows 13 to 16, a fireplace arch and a gas tooth are installed, which prevents carbon monoxide from entering the room. In the 15th row, the chimney opening narrows to create increased draft. And then, in the 16th row, the chimney is made wider and a damper is built into it to clean out soot. The inner walls of the chimney are made of refractory bricks, and the outer walls are made of red ceramic bricks.
Then you need to gradually, in strict accordance with the diagram, build a chimney with a pipe. All seams from the inside are carefully rubbed by hand and passed over the top with a damp rag to eliminate any roughness. Otherwise, soot will accumulate in such places.
At the very end, the chimney is laid, narrowing its clearance to 1 brick. In the 25th row it is covered with a flap.
When the fireplace laying is completed, it is left to dry at room temperature for 2-5 days, and then they begin to lightly heat it. In this way, the clay solution in the firebox is evenly heated and sintered. Thanks to this, the masonry will become stronger and more durable. Only after this can you proceed to external finishing work.
Where can the stove be installed?
By and large, this question should have been formulated differently, since you can install the stove wherever you want. However, to more effectively perform its functions, some nuances should be taken into account.
Every home has a ventilation system that removes air from the room and delivers a portion of fresh, oxygen-rich air. Such ventilation is carried out through the doors and windows of the room. Air circulation practically never stops; even closed windows cannot perfectly hermetically seal a home. If it were not for these flows, the furnace would not be able to operate for a long time. Therefore, its position should not interfere with natural circulation.
The installation of the stove must be carried out according to a certain algorithm: drawing up the layout of the room, determining ventilation flows - choosing places (usually several) for installation - choosing a device model. These stages are standard for any construction, so the available options can be considered using the diagram.
Diagram of accessible fireplace locations
We see that in any room it is possible to install different types of stoves. The choice will be dictated by personal conditions and preferences.
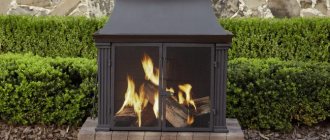
An island fireplace does the best job of heating a room, as it has the largest heat transfer area. It is also distinguished by ease of use, because the fireplace can be installed on one side, and the furnace firebox on the other.
Island location option
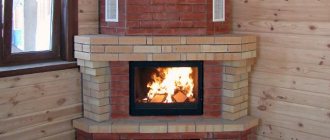
Corner models are used for brick houses, as they have a common area of contact with two walls. Their peculiarity is the visual effect in which the space of the room seems enlarged. Corner stoves are used in small country houses.
Convenient corner location
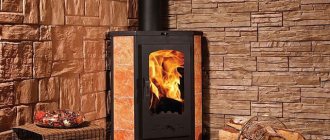
Wall-mounted fireplace stoves have one common edge with the load-bearing wall. If the stove is being built at the same time as the house, then its edge is part of the wall and it is possible to heat the adjacent room. Otherwise, ductwork can be installed for more efficient heating.
Wall-mounted fireplace option
Options
What parameters do different heating systems work with?
For central heating, typical pressures at the entrance to the elevator unit are 5 - 7 kgf/cm2 in the supply and 3 - 4 kgf/cm2 in the return pipeline. The coolant temperature varies depending on the outside temperature.
In most cases, a temperature schedule of 150/70 is used: during the peak of cold weather, the supply temperature rises to 150C, and the return temperature to 70C.
Temperature chart 150/70.
The temperature of the mixture (water after mixing the supply and return in the elevator, entering the batteries) is limited to 95 degrees in residential and industrial buildings and 37 degrees in preschool institutions.
Under a number of force majeure circumstances, the standard pressure and temperature parameters may be significantly exceeded.
Here are examples of such scenarios:
If you quickly fill an empty circuit or abruptly stop the circulation in it, an area of high pressure will form at the flow front. During water hammer, its values can reach 25 - 30 atmospheres;
The consequences are not difficult to predict.
- After the end of the heating season, heating mains are tested for density. During tests, the pressure in them increases to 12 atmospheres or more. In this case, the input valves of the elevator unit must be closed, but the human factor or malfunction of the shut-off valves may well lead to the fact that not only the route will be tested;
- During extremely severe frosts and with a large number of complaints about the cold in apartments in the northern regions, it is practiced to operate an elevator without a nozzle. The suction is suppressed by a steel pancake, and water enters the heating circuit directly from the supply line of the route. And its temperature at the peak of cold weather, as we remember, can reach 150C.
Water from the heating main supply directly enters the heating circuit.
In an autonomous heating system, a typical pressure is 1.5-2.5 kgf/cm2 at a temperature of 70-75C on the supply side and 50-55C on the return side. If the heating system is correctly calculated, these parameters are stable and do not depend on external factors.
Preparatory work
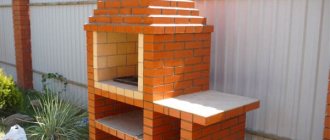
In order to obtain greater heat transfer, it is better to build a wide and shallow fireplace. The most common material for construction is ordinary red brick. The decoration of the finished structure also plays a significant role. Fortunately, the construction markets are replete with a wide range of finishing materials - there is always something to choose from.
Home hearths are placed opposite the entrance, in the corner or made free-standing (island fireplaces). There is no need to place the structure opposite the window: this contributes to the appearance of constant drafts. What the fireplace will look like depends on the wishes of the owner and the dimensions of the room, but you should not forget about the safety of the room.
Before you start building a small fireplace, you need to calculate the cross-section of the chimney. It is necessary that fresh air regularly enters the room and a strong foundation is made.
To carry out a competent installation, you will need a plan for each row of bricks for subsequent ordering.
A step-by-step guide to laying your own fireplace
Brick fireplace diagram
The first stage is choosing a place to build a fireplace.
First of all, remember that the fireplace should not be placed in close proximity to flammable products. Examine the ceiling and roof of your home. To install a fireplace, you need to choose a place so that the chimney does not pass through beams and crosscuts.
The second stage is preparation for laying the foundation.
The fireplace is built on an individual foundation. First, a recess is prepared for pouring concrete. Add 100-150 mm on each side to the dimensions of the future fireplace, and you will get the optimal dimensions of the foundation.
The depth of the hole is selected individually. Traditionally it is 300-500 mm. The specific value is determined in accordance with the characteristics of the soil composition. For example, if there is a lot of sand in the soil, a 30-centimeter depression will be sufficient. Otherwise you'll have to dig a little deeper. First, the bottom of the pit is covered with a small layer of sand, which must be compacted. Afterwards a layer of crushed stone is poured.
Corner brick fireplace
The third stage is preparing and pouring the solution.
For such a foundation, a simple cement mortar is suitable. Prepare it from part of the cement, the same volume of water and 3 times more sand. Mix the ingredients thoroughly until a homogeneous mass is obtained and pour it into the prepared pit. Level the solution using a trowel. Wait until the cement hardens, lay a waterproofing material on top of the pouring material (usually roofing felt is used, laid in 2 layers) and begin laying.
The fourth stage is the installation of formwork.
At this stage you need to install the formwork. Prepare wooden boards, beams, plates and wedges. Wedges are placed under wooden blocks.
The fifth stage is laying out the supporting parts.
Mark the rows along the formwork, taking into account the thickness of future seams. The fireplace will consist of an odd number of rows of masonry. The central brick is usually called the castle brick. It is installed vertically, at a central point.
Fireplace diagram
The sixth stage is the creation of a wedge lintel.
This element should be laid on both sides in the direction of the castle brick. Laying is done so that in the central part the lintel can be easily wedged with the center brick. Use a cord to check the seams are correct. Secure it at the junction of the lintel with the side partitions.
Wedge jumper. 1—direction of the reference plane: 2—locking brick
The side walls must have sufficient thickness and width, otherwise they simply will not cope with the incoming loads. Where the wedge lintel meets the side partitions, you need to make ties. To create them, steel strips are used. The ends of such strips should be bent upward.
The seventh stage is the installation of arched and beam type lintels. The structure of these elements differs from the design of the wedge lintel. The surfaces of the jumpers in question must form arcs with a certain radius. In the case of beam-type jumpers, their radius should exceed half the distance between the side posts. The jumpers in question are laid out evenly on both sides
Pay attention to the seams - they should be wedge-shaped
Arrangement of lintels and arches
Use a cord to check the accuracy of the brickwork and joints. Wedge the lintel with the locking brick.
The lintels must be allowed to settle in the formwork. The exposure time will vary. The specific period depends on the ambient temperature and the quality of the solution. For example, in the summer this may take 1-3 weeks. The colder it is, the longer it will take.
Eighth stage - laying out the firebox
At this stage, special attention must be paid to the rear wall of the firebox. If it is planned to install screens in the wall, the laying is carried out according to the pattern
An edged board is suitable for making patterns.
Corner fireplace. Firebox laying
Be extremely careful when laying a fireplace. Refer to the available drawings. Errors when laying even a single brick will inevitably lead to disruption of the masonry of further rows, and it will not be possible to correct the defects in all situations. Therefore, it is better to immediately do everything as required by the technology.
Design Features
There are differences between large and small brick fireplaces not only in size, but also in design features. The compactness of the device makes its appearance slightly primitive and similar to a potbelly stove. By the way, heat transfer also corresponds to a small stove.
As a rule, the design is not equipped with additional frills, such as smoke flow filters, blind chambers and other elements. This does not mean that the mini-hearth cannot cope with its intended purpose - heating the room.
Stores offer various options - made of cast iron or steel. All of them deserve attention, but it is not always possible to purchase finished products. In such cases, craftsmen create fireplaces from brick. Decoration is carried out with natural stone or facing bricks. Both purchased and self-made structures will decorate the interior. At the same time, increasing comfort and helping to maintain coziness indoors.
Optimal fireplace sizes
When determining the optimal dimensions of the structure, it is necessary to take into account the area, as well as the volume of the room, which will subsequently be heated by the unit being built. Specifically, in this example, a fireplace is being built with a combustion chamber opening having an area of about 0.3 m2. You can change the suggested sizes in accordance with the conditions of your situation.
How to build a corner fireplace
Determine the optimal dimensions of the firebox portal. In the case of the design under consideration, the portal is called the combustion hole. Its main parameters are width and height.
Adhere to the standard ratio, according to which the width should be in relation to the height as 3:2. In this example, the width of the portal will be 560 mm, and the height will be 400 mm.
Maintain the height of the fireplace portal and the depth of the fuel compartment as 2:1; a ratio of 3:2 is also acceptable.
These sizes are the most optimal. If the firebox has a greater depth, the heat transfer of the unit will decrease significantly. If the dimensions of the firebox are reduced, smoke will appear.
Corner fireplace dimensions
In the situation under consideration, the firebox should have a depth of 240-300 mm.
After determining the optimal dimensions of the combustion chamber of a corner fireplace, proceed to calculating the appropriate dimensions of the hole for the smoke exhaust pipe. Select the dimensions of this hole taking into account the dimensions of the combustion chamber hole. The size of the chimney opening should be approximately 10-15 times smaller than the area of the combustion chamber opening.
The optimal size of a rectangular chimney is 140x140 mm. If the cross-section of the chimney is round, make a hole with a diameter of 100-120 mm. The optimal height of the chimney is 350-400 cm. This figure may increase depending on the height of the roof ridge.
In order to improve the heat transfer characteristics of the unit, the rear wall of its firebox is laid out with a forward slope. This slope should begin to be created from about a third of the height of the firebox.
The design includes a smoke collector. It is installed above the combustion chamber. Between the mentioned elements, the so-called. cornice, also known as a pass. This element will prevent the emission of soot, sparks, etc.
If your fireplace is made of carved brick, make sure that all its dimensions exactly correspond to the standard masonry module. The typical dimensions of the building material in question are 25x12x6.5 cm. Maintain the masonry joint at a level of about 5 mm.
In accordance with the cross-section of the structure at the level of the combustion chamber, other dimensions of the structure being erected will be determined. Calculate them and draw up an order drawing according to which the brickwork will be made.
Also, creating the order and performing the necessary calculations can be entrusted to a professional. If desired, all necessary project documentation can be easily found in open sources. Do what is most convenient for you.
Selecting materials for decorative finishing
Nowadays, a huge number of different decorations for decoration are available in construction stores. The greatest demand is for materials that imitate valuable wood or expensive stone.
Facing stone for finishing fireplaces
First, the bottom row of the structure must be finished. The selected decorations are attached using regular tile adhesive. If you purchased very expensive material, it must be wrapped in polyethylene before work to prevent damage.
Do not use materials or products made of wood for decoration, as this may cause a fire. The exception is special wooden cladding for fireplaces with a safe distance.
It’s not difficult to build a fireplace yourself; the main thing is to study the theoretical part of this procedure, correctly draw up a drawing of the product and strictly follow the plan. Fireplaces made of stone are the most expensive and complex in design. Brick is the best option for those who are not going to spend a lot on materials and want to save their time.
Combustion chamber
There are open and closed combustion chambers. The closed structure must necessarily include additional components - a gate and transparent doors made of fire-resistant glass. The simplest option would be to purchase a ready-made combustion chamber - this will significantly simplify the installation work, and cast-iron closed fireboxes look very good.
Arrangement of the fuel chamber is one of the most problematic and difficult stages of installing a fireplace. The firebox located under the chimney must have a chimney tooth, which is necessary for the efficient operation of the entire structure. To extend the service life of a metal firebox, it is advisable to line its internal walls with fireclay bricks, which will minimize the contact of open fire with the chamber material.
Since the main working process takes place in the firebox, it is worth considering it now:
- The fuel is removed from the fuel basket, which is usually located under the firebox, and placed on a grate located in the chamber;
- The ignited firewood is set on fire, and the intensity of its combustion is regulated using a slide valve, which provides oxygen access to the working area (if the fireplace has an open firebox, the combustion process can only be changed by adding firewood);
- The burned fuel becomes ash and ends up in the ash pan, located directly under the grate (collected ash must be removed periodically, so the best option would be a retractable ash pan);
- The gas released during combustion goes outside through the chimney (for maximum efficiency, it is worth equipping the chimney with a forced draft, which will also allow you to regulate the heat transfer of the fireplace).
The second option is somewhat more difficult to arrange - it involves installing the back wall at an angle of 30 degrees towards the inside of the fireplace. If you make a fireplace with your own hands using such a scheme, the advantage will be increased reflection of thermal energy into the room.
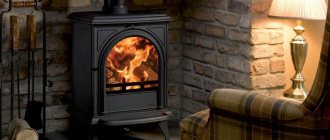
Premier fireboxes
Professionals do not recommend lighting the fireplace during the first month after its assembly. And this is understandable: cementitious solutions gain strength and dry at natural humidity. Why test them at such a crucial moment?
The next stage is trial fireboxes The next stage is trial fireboxes:
- For 10 days, 2 times a day, short-term (up to half an hour) heating is carried out with a small amount of firewood. In this case, the blower hole (on the facade of the ash pit) should be slightly open.
- It is best to place crumpled paper on the grate, and on top of it - wood chips and finely chopped firewood.
- Then set fire to the paper, close the door and open the ash pan. Although if you have difficulties in lighting, you can leave the firebox door ajar for a while.
Which firewood do you prefer?
As practice shows, it is better to use dry hardwood firewood (maple, oak). They will give an even and calm flame. Birch firewood will bring a lot of soot. Alder and aspen, on the contrary, will help burn out soot from the chimney. You can read more about the types of firewood and their pros and cons in the article Firewood - good and different.
This is the only way to visually store firewood. Readers can easily share their experience of giving the fire additional romantic attributes. So, to get a beautiful flame, you can add chopped stumps and roots to the logs, and cherry and juniper branches to get a pleasant smell. Of course, you need to use dry firewood, since wet wood leads to poor combustion and contamination of the fireplace components. The duration and intensity of combustion depend on:
- quality and quantity of loaded fuel;
- air supply to the firebox, regulated using a blower valve;
- for vigorous combustion, logs of small diameter, but in large quantities, are used;
- “leisurely” mode, on the contrary, is provided by a small amount of large-diameter firewood. And this is understandable: after all, the intensity of combustion depends on the area of contact of wood with oxygen. If you take a large log, when will the fire reach all its wood?
The intensity of combustion depends on the area of contact of wood with oxygen. From these same conditions of the need for effective contact of wood with oxygen, various tips for laying firewood in the fireplace follow. I will not repeat the well-known truths about laying a wood well approximately 1/3-2/3 of the height of the firebox. After several fires, you will succeed by experience. The main thing is that when laying the logs you should not place them very tightly - in this case, a lack of oxygen may occur. The negative effect this gives is described above. The fireplace in the country house creates a charming atmosphere of comfort. A good-quality hearth, competently constructed taking into account fire safety rules, will delight you with the beauty and warmth of a living fire for many years.
A good-quality hearth, competently constructed taking into account fire safety rules, will delight you for many years with the beauty and warmth of a living fire. And lastly: if you are the happy owner of a working fireplace, I suggest posting a photo of it in the comments. Thus, we will have a gallery of real fireplaces with various solutions. These publications on the topic will probably prove not only interesting, but also very useful:
- How to heat a two-story house with one fireplace
- How to choose a fireplace for your cottage: 5 steps to a successful purchase
- Choosing a fireplace: basic criteria
- Decorative fireplaces: no soot and smoke
- Fireplace-stove that heats two floors
- Fireplace repair and maintenance: what you can do yourself