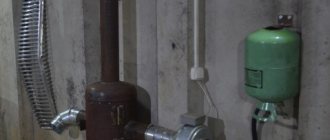
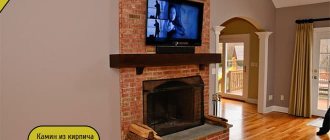
The efficiency and safety of heating equipment - stoves and boilers - the operating principle of which is based on fuel combustion, is determined by the condition and technical parameters of the chimney. The most popular and reliable design for private households and baths is a brick chimney. It has an attractive appearance, good traction and ease of operation.
High-quality construction of a chimney requires strict adherence to all stages of the technological process associated with brickwork.
How the chimney works
A brick chimney consists of several parts located inside and outside the room. The walls of the pipe in contact with the ceilings must be thickened as much as possible. This is required by fire safety regulations. Extending beyond the roof, the wall bricks must cover the hole in the roof.
There are three types of design - simplified, classic single and extended with ventilation holes.
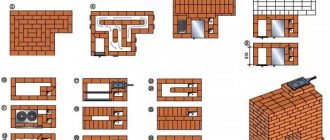
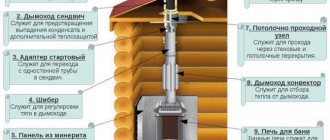
The layouts of all brick chimneys are approximately the same. Let's look at the basic, classic one:
- Metal cap (umbrella). Manufactured in various types and forms. Designed to protect against the penetration of precipitation, dust and dirt into the pipe. Attached to the protruding parts of the head.
- Header. Consists of protruding bricks. Protects the pipe neck from drops flowing down the protective umbrella.
- Neck of pipeline.
- Waterproofed otter surface. Designed to remove sediments that have fallen on the neck. Most often it is insulated with a cement layer.
- Otter. Part of a pipe with thickened walls. It is located where the chimney passes through the roof. Thicker walls are regulated by fire safety rules; they protect the insulation and other flammable layers of the roofing cake from overheating.
- Roof;
- Lathing;
- Rafter system;
- Riser. Located in the attic.
- Fluff. Part of the pipe is similar in principle to the otter. It has the same thick walls that protect the ceiling between the living space and the attic from overheating. Sometimes, instead of fluff, a metal box filled with bulk non-flammable materials (sand, etc.) is mounted. The thickness of this protective layer is 100-150mm.
- Overlap;
- Insulation. Most often made from asbestos. Serves to protect wooden floor beams from overheating;
- Smoke damper (valve). Allows you to regulate the removal of combustion products.
- The neck of the pipe connecting the stove to the chimney.
Video description
Video about how a brick chimney differs from analogues made from other materials:
- Area in the attic - some cement and slaked lime are added to the mixture.
- The pipe above the roof is laid on a mortar consisting mainly of sand, cement, lime and a small addition of clay.
The composition of the masonry mortar must be such that the joints formed are able to withstand the loads occurring in the relevant area. Closer to the firebox there is a lot of heating, in the attic there is an effect of dampness and slight heating, above the roof there is precipitation and temperature changes.
Various types of bricks are used in construction, but which one is better to make a chimney from depends on the characteristics and operating conditions for which they are designed. For example, silicate and pressed ones, despite external suitable signs, are clearly not applicable, since they are not intended for the level of heat produced by a conventional stove.
All that remains is the red fired clay. Specimens of the 1st and 2nd grades, full-bodied with a standard single size, are suitable for masonry. Grade 3, as a rule, is not used due to its increased fragility and brittleness.
Principle of operation
The basic principle of operation of the chimney is based on the difference in air temperatures inside the pipe and outside. This difference creates cravings. The higher the pipe and the temperature difference, the greater the draft. Because The density of cold air is greater than that of warm air, which creates a pressure difference at the base of the house and the top of the chimney. This difference ensures the flow of cold air into the house. Thus, the stove not only heats the house, but also creates natural ventilation.
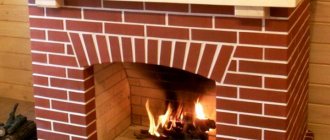
The draft depends on the cross-sectional area of the channel and the height of the pipe. For example, to create good draft in a fireplace, the cross-section of the chimney must be at least 1/10 of the area of the inlet.
At the same time, a pipe that is too wide reduces traction. Therefore, it would be better to increase its height. For stoves and fireplaces, the optimal pipe height is 5 m from the level of the grate.
How much will it cost
It is difficult to say definitively how much it will cost to build a brick chimney. It all depends on various factors. If you turn to stove makers, in addition to the cost of consumables, you will have to pay well for their services. And this will double the cost of the chimney.
If you do the masonry yourself, then the cost of the structure will depend only on the purchased materials (brick, cement).
In conclusion, it is worth noting that laying a brick chimney on your own is a long, labor-intensive and responsible process. There is no point in experimenting here. Having absolutely no skills in construction, it is better to entrust this matter to specialists. Since the life and health of you and your loved ones depends on the proper operation of the chimney.
Types and designs
What kind of brick is needed for a chimney?
Only red fired bricks are suitable for chimney installations. The use of silicate is prohibited due to its instability to high temperatures.
It is impossible to save on bricks; this is fraught with the destruction of the entire structure and large expenses for its alteration.
Red brick has its own characteristics and is divided into 3 grades:
- The first grade is the optimal option for a chimney. It is characterized by the highest clay density, low porosity, smooth edges and even edges. Frost-resistant. When tapped, it produces a moderately ringing sound. Color from scarlet to orange.
- The second grade (unburnt) is acceptable for use. It has a pale red or pinkish color and responds dully when tapped. The brick is quite porous, the ribs can be crumbled. It can be used in a chimney installation, but subject to additional processing.
- The third grade is burnt and not suitable for laying pipelines. Dark red, fragile, sonorous. Easily splits under the influence of temperature differences and mechanical stress.
A higher cost option is fireclay brick. More often used in the construction of fireboxes and fireplaces rather than exhaust pipes. It is a derivative of special fireclay (fireproof), mixed with quartz. Withstands temperatures up to 900C.
Advantages and disadvantages
Like any design solution, a brick chimney has its advantages and disadvantages.
Pros:
- Resistance to high flue gas temperatures;
- Brick retains heat for a long time;
- Low cost of material;
- Aesthetic appearance, style.
Minuses:
- There are turbulences in the corners of the chimney;
- Soot lingers on rough walls;
- Large weight of the structure and, accordingly, increased load on the foundation.
The service life of such a chimney
The service life of brick chimneys is short. In a good version, this is 7-12 years.
The lifespan of a pipeline can be increased by protection from the outside and inside, care and regular cleaning.
Methods for lining smoke exhaust ducts
The sleeve is a cylinder of a certain cross-section, made of fire-resistant material, which can be assembled into a pipe of any length.
Lining a brick chimney can be done in three ways, which differ from each other in the materials used, cost, and some installation features.
- Lining of smoke exhaust channels with polymer liners. A special pipe made of fiberglass-reinforced polymer is inserted into the chimney, which, when heated, becomes flexible and fills the smoke exhaust paths, no matter how tortuous they may be. After the polymer hardens, the inside of the chimney is a smooth pipe with a wall thickness of about 2 mm. But there are serious temperature restrictions in the use of this material: It can withstand temperatures up to 250C⁰, so it can be used to remove combustible gases only from boilers with liquid or gas fuel.
- Chimney lining using steel modules. Lining the canal using this method does not require its destruction. This material is durable and relatively inexpensive. One of the biggest advantages of using steel modules is the ease of execution. This material can be used for the reconstruction of smoke exhaust systems, heating and cooking stoves, heaters and fireplaces operating on any type of fuel. But there is also a drawback: in this way it is impossible to line winding smoke exhaust channels.
- The chimney liner is a corrugated stainless pipe. This material can be used for furnaces with a low temperature of combustion products, since this pipe has rather thin walls and will quickly burn out at high temperatures. In addition, soot will definitely be deposited on the inner surface. Due to the ribbing, corrugated surface.
Based on the above, it is not recommended to use a corrugated stainless pipe for lining the chimney of a bathhouse.
Make it yourself or order it
Tips for choosing
At the beginning of the 20th century, when gas and electric heating were unavailable, stone and brick stoves were widespread. There were many good styling professionals, much more than there are now.
If you decide to order a fireplace or stove and seek the help of a specialist, be sure to pay attention to his professionalism. To do this, it would be a good idea to look at the documents confirming his qualifications and familiarize himself with the portfolio of work. A poorly constructed chimney is life-threatening. Insufficient draft will lead to the formation of dangerous carbon monoxide, which kills more than one and a half million people every year. In addition, the occurrence of backdraft can lead to fire. Even if a disaster can be avoided, the chimney will still have to be rebuilt, and this is a double expense.
Therefore, do not skimp on a good master. But it doesn’t make sense to overpay, for example, for fireclay bricks recommended by many layers. Regular red - can withstand temperatures up to 800C, and the price is almost 2 times cheaper.
If you decide to make a chimney yourself, carefully read all the requirements of building codes and fire safety.
I will provide all the necessary ones below. In addition, you should accurately calculate the dimensions, draw up a drawing, read all the necessary literature and watch a couple of dozen videos on the topic.
The chimney can be of 3 types:
- Mounted. Here the oven serves as the base. The minimum thickness of the furnace walls is 2 bricks.
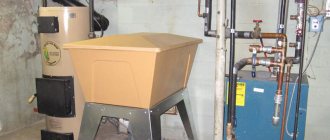
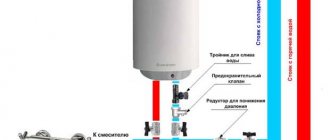
- Root. Located on a separate foundation. The smoke outlet pipe of the boiler or stove is connected to the chimney through a connecting transfer hose.
- Wall. It is a channel in a load-bearing wall.
Whatever chimney you choose, I personally recommend that when choosing to install it yourself, do not neglect the advice and supervision of a specialist. I repeat - an incorrectly laid chimney will inevitably lead to tragedy.
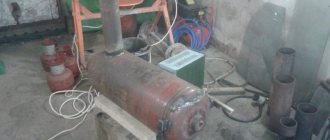
By the way, for a metal stove you don’t need a brick pipe - an ordinary iron one is enough.
Building regulations
The installation of chimneys for private houses and baths is regulated by the following building codes:
- SP 7.13130.2013 “Fire safety requirements”;
- SNiP 41-01-2003 - “Air conditioning, ventilation, heating”;
- VDPO - “Rules for production work, repair of smoke ducts and furnaces.”
Fire safety requirements for chimneys
The fire safety requirements for chimneys come down to the following main points.
- The wall thickness of the outlet pipe must be at least 120mm;
- Between the inner layer of the roofing pie and the chimney, a fire-prevention retreat must be provided - at least 130 mm;
- When using combustible insulation in the attic floor structure, it is necessary to organize protection in the form of sand backfill;
- The fluff must end at least 70 mm from the upper and lower boundaries of the overlap;
- The distance from the inner surface of the hot chimney to the combustible ceiling structures (fireproof cutting) must be 500 mm or more;
- The walls of the furnace retreat from the combustible structural elements by at least 250 mm;
- The distance between the upper edge of the furnace and the roof slab is 350 mm for intermittently fired furnaces and 1 m for continuous furnaces. This condition applies to a stove made of three rows of bricks. If there are 2 rows, the distances need to be increased by one and a half times;
- You cannot connect two heat sources to one chimney system.
Traction force
The traction force is ensured by the correctly selected pipe cross-section and its height. The cross-section of smoke ducts made of brick is calculated based on the power of the heating device.
The height of the chimney pipe is calculated using special programs and formulas, but there is one rule - the elevation of the chimney above the ridge should be less than 500 mm (if the distance from the chimney to the ridge is less than 3 m).
In a vertical brick chimney, draft is generated by convection.
A prerequisite for the occurrence of an upward flow is the temperature difference between the ambient air and the exhaust combustion products: the greater it is, the stronger the thrust.
Therefore, for the normal functioning of the chimney, it is important to take care of its insulation. I’ll tell you how to arrange the insulation a little later.
Maintenance Recommendations
After installation, the chimney definitely needs maintenance. The first and most important procedure is cleaning. It can be done in several ways:
- Traditional. It is carried out by burning non-resinous wood, such as aspen.
- Reactionary. Along with regular fuel, a special block of combustible components is placed in the firebox. When burned, gases are formed that promote peeling from the walls.
- Mechanical. It involves cleaning the chimney channel with special brushes and brushes on cables. The method is characterized by maximum efficiency.
After the chimney laying is completed, you can heat the stove without problems for a whole season - then soot will begin to actively deposit on the surface of the bricks. Therefore, cleaning must be performed periodically, at least once - before the start of the heating season.
Making and installing a chimney with your own hands
Before you start assembling the chimney with your own hands, you need to familiarize yourself with the ready-made drawings and draw up your own according to your calculated dimensions. I will attach approximate drawings and diagrams for clarity.
Drawing and diagrams
Fig.1 Fluffing device:
Fig. 2. Connection diagram of the stove and chimney:
Calculation of the height of a brick pipe
For normal traction, it is necessary to correctly calculate the height of the pipe.
The optimal length from the grate is at least 5 m. This parameter varies depending on the cross-section of the pipe.
The recommended pipe height on a roof made of non-combustible materials is 0.15 m, on a roof made of combustible materials - 0.5 m.
Another calculation option is to start from the height of the ridge (as indicated in SNiP). Let me remind you that if the pipe is located at a distance of up to 1.5 m from the ridge, its height should not be less than 0.5 m above it, if further, it can be level with the ridge or higher.
If the required distance exceeds 3 m, the height of the pipeline outlet is calculated using the following method: a conditional line is drawn from the top of the ridge along the roof slope with a downward slope of 10 degrees relative to the horizontal. Such calculations must be made on the drawing.
Calculation of the chimney cross-section
Let us summarize the data on the dependence of the chimney cross-section on the power of the heating device in a table:
| Power, kWt) | Pipe cross-section dimensions (mm) |
| <3,5 | 140×140 |
| 3,5-5,2 | 140×200 |
| 5,2-7 | 200×270 |
| >7 | 270×270 |
If the furnace power is unknown, it can be approximately calculated using the formula:
W=Vt*0.63*0.8*E/t
Where:
- W – heat generator power, kW;
- Vt – firebox volume, m3;
- 0.63 – furnace load factor;
- 0.8 – fuel combustion coefficient;
- E – calorific value of fuel, kW*h/m3. Depends on the type of wood and the moisture content of the wood;
| Wood species | Calorific value E, at wood moisture content | ||
| 12% | 25% | 50% | |
| Poplar | 1856 | 1448 | 636 |
| Spruce | 2088 | 1625 | 715 |
| Pine | 2413 | 1882 | 826 |
| Birch | 3016 | 2352 | 1033 |
| Oak | 3758 | 2932 | 1287 |
- T is the burning time of one load of fuel.
This formula only applies to stoves and does not apply to fireplaces.
Brick pipe repair
To put the pipe in order, you can go in two ways: restore the masonry or perform lining - treat the channel inside with special means.
Reconstruction of masonry
In case of minor damage to the chimney masonry, they act quite predictably - instead of destroyed bricks, they install whole ones. To do this, the crumbled elements are carefully cleaned of the solution and removed. The empty cell is scraped out, after which a new element is placed in place of the taken brick, using a fresh mixture of clay and sand.
In case of minor damage to the masonry, it is restored by replacing individual bricks with new ones
Sometimes a situation arises when cracks appear in the pipe, through which moisture seeps in during heavy rains. In these cases, the outer surface of the pipe above the roof is primed and then plastered.
When the bricks in the masonry are damaged by more than 20%, partial repair of the chimney is out of the question. The smoke channel with severely damaged elements is completely dismantled to create a new masonry.
Video: one way to repair a brick chimney
Brickwork
Lining is an excellent way out of the situation if the problem is the loss of smoothness and strength by the chimney walls. To complete this task you need a mixture of Masan or Mordax. These compositions simplify the restoration of the chimney’s functionality and do not reduce its cross-section at all.
It will take only a few hours to complete the lining. The operation consists of the following steps:
- The area near the chimney is covered with film so that drops of a special composition do not stain the roofing material.
- Taking a brush with metal bristles, peel off fragments of bricks and soot from the inner walls of the channel.
Before lining, the brick channel is cleaned, achieving a smooth surface. - The channel, which has become completely clean, is wiped with a generously dampened rag.
- Using a special brush and winch, a special composition is applied to the inner walls. The mortar mixture should spread over the surface as the brush moves.
Masan lining mixture is used for repairing chimneys, as it is fire resistant - When the applied composition dries, the internal walls of the chimney are treated a second, and then a third time.
You may need several different brushes during the lining process. This is explained by the fact that the cross-section of the chimney in certain areas may not be the same. In general, the size of the brush should correspond to the parameters of the smoke channel.
If you comply with the requirements for the masonry process in a house or bathhouse, you can create a safe and durable chimney. A self-made structure can look no worse than the structures of real masters. If you have learned how to build chimneys with your own hands, then you can also make repairs of any complexity without outside help.
Installation features
The simplest option for installation is a mounted chimney. How to lay out a pipe with your own hands? Let's consider the method of laying a classic chimney for a sauna stove:
- We calculate the parameters of the chimney using one of the methods given above;
The standard channel cross-section for a sauna stove is 250x120mm, which is exactly the size of a red brick; in addition, you will need half bricks. They can be bought or cut off;
The mortar is laid with a thickness of no more than 1 cm, preferably a clay composition with the addition of cement;
- We prepare everything necessary - bricks, mortar, tools;
- Take measurements for fluff, gate and otter;
- Laying should begin from the stove, checking each row with a building level. Periodically clean the channel of excess solution;
- Advice - after laying the first two or three rows of bricks, fasten ropes at the corners of the future chimney and stretch them to the ceiling (strictly vertically). They are used to control the position of the chimney;
- It is necessary to secure the frame at the installation site of the gate valve;
- Continue laying the brick until it is fluffy. Before installing the fluff, it is necessary to count the number of its rows. In one row, the diameter of the channel increases by ¼ of the width of the brick. The brick terminals must be tightly attached to the floor beams, there should be no gaps between them, otherwise the chimney will wobble
- The fluff should be placed according to the diagram (see above, Fig. 1). It can be changed based on your size;
- After laying the fluff, we continue laying the chimney;
- We begin to lay the otter from the underside of the roof; the increase in the cross-section of the chimney when laying the otter should take into account the slope of the roof slope, gradually;
- Advice - to increase stability, metal plates should be embedded in the otter;
- If necessary, trim the ends of the bricks;
- Head device. To do this, we increase the outer perimeter by a quarter of a brick;
- Finish row. We install a bird net in it. We fasten the protective cap on top with dowels.
Selecting materials
Only solid fire-resistant blocks are suitable for building a chimney. Recommended brands from M150 to M200. The material is available in three grades.
- 1st grade. With normal firing time. Even, smooth and dense. No crumbled areas. The color is bright red. When tapped, the sound is clear and clear.
- 2nd grade. Unburnt parts are pale orange. Porous, loose, with defects. They sound dull when tapped. They are characterized by weak frost resistance and heat capacity, low density.
- 3rd grade. Burnt bricks. They are distinguished by their dark red color. Pores, burrs and chips on the surface are visible. When tapped, the sound is excessively ringing. They are fragile, not frost-resistant, and do not retain heat well.
The chimney should be assembled only from first grade material. It is allowed to use the third, but only for arranging the foundation. The use of the second grade is excluded.
Instagram brigadir74
For the construction of the chimney, only high-quality first-class bricks are used
Frequent errors and problems during installation
The main mistakes made when laying a chimney yourself.
- Choosing low-quality bricks;
- The seams are too thick;
- Incorrect composition of the solution;
- Incorrect calculation of the height of the chimney;
- Failure to maintain uniformity when laying the channel;
- Failure to comply with fire safety requirements listed above.
Due to errors in installation, turbulence, loss of channel tightness, and poor traction occur. All this leads to a deterioration in the performance properties of the chimney.
Maintenance and cleaning
During operation, soot deposits form on the pipe walls, which must be removed. Professionals recommend cleaning the chimney at least 2 times a year - at the beginning and at the end of the heating season.
There are several cleaning methods:
- Traditional methods
Periodic burning of aspen wood and potato peelings helps to blow away all the soot from the walls of the chimney;
- Chemical method
A special chimney-sweeping log is impregnated with chemical compounds that interact with deposits in the pipe and contribute to their destruction;
- Mechanical cleaning
The most effective method. For mechanical cleaning, you can invite a professional with special equipment, or you can try cleaning it yourself using a brush. Cleaning occurs not only from the roof, but also from below, through the cleaning doors.
Expert advice
Sometimes starting a fire can be difficult. One of the reasons is the presence of condensate, which impairs the movement of gases.
If the chimney is not insulated, heat transfer from hot gases to the environment is observed. When there is a significant difference in temperature inside and outside the chimney, a “dew point” occurs. At this point, the condensate vapor is converted to liquid. This liquid destroys the chimney.
Therefore, it is recommended to insulate the chimney pipe. In this case, all combustion products come out only in a gaseous state.
How to insulate
The easiest way to insulate the outside of brickwork is plaster finishing. To do this, a special mesh is put on the pipe, onto which several layers of plaster are applied. Practice shows that the lifespan of a smoke exhaust protected in this way increases by 2-3 times.
In addition, materials with a low heat transfer coefficient are used for insulation - mineral wool, glass wool, basalt fiber.
In recent years, polystyrene concrete has become popular for insulation. It can be used to make a protective casing for a chimney of any shape.
Some would-be craftsmen line the chimney with insulation without installing a metal casing, and cover the entire structure with foil on top. Such a system is fundamentally wrong and will do more harm than good.
Advice from experienced professionals
In order for the chimney system to work efficiently, you need to follow some recommendations that professional stove makers always take into account.
- When laying brick rows, be sure to carefully select the excess mortar that will protrude into the chimney channel. These surfaces must be very smooth so that as little soot deposits settle on them as possible.
- The binding of bricks in the brickwork of a chimney requires special attention, since in such a design a large number of not whole bricks can be used, but their halves, plates, third or fourth parts. In order to evenly cut or chip off bricks, you can use a grinder (grinder). If you file the desired part with it, it will be easier to separate a fragment of the required size. The plates that are needed in some rows of masonry will have to be sawed off completely, since such thin parts can simply break.
- The seams in the chimney masonry should not be too thick - their thickness can be four to five millimeters. This must be observed because the mortar, even in a frozen state, is more susceptible to destruction when exposed to external factors than hardened brick.
- And, of course, a very important measure when servicing a chimney during its operation is its timely cleaning or periodic preventive maintenance to prevent clogging.
What it is
During normal operation of the smoke exhaust system, gas generated as a result of fuel combustion is discharged outside. If the operating mode is incorrect, you may observe the opposite situation. The smoke does not go straight up through the pipeline, as it should, but down, it does not go out into the street, instead it pours into the house - that’s what reverse draft is. And it is not just an unpleasant, but a truly dangerous phenomenon, which, if neglected, leads to a fire hazard in the house, or even to severe carbon monoxide poisoning.