In garages or workshops, in order to save money, they often install a working furnace instead of an expensive boiler: they process metal parts with their own hands, weld them and get a model that resembles a “potbelly stove.” However, when choosing a design for manufacturing, you may encounter difficulties. Do you agree?
We will tell you how to choose the optimal scheme and assemble an economical but very effective heating device yourself. The article we propose examines in detail popular options, the effects of which have been tested in practice. Advice is given on the construction and subsequent operation of the stove.
Types of homemade stoves in development
Engine oil contaminated with impurities will not ignite itself. Therefore, the operating principle of any oil stove is based on the thermal decomposition of fuel - pyrolysis. Simply put, to obtain heat, the waste must be heated, evaporated and burned in the furnace firebox, supplying air in excess. There are 3 types of devices where this principle is implemented in different ways:
- The simplest and most popular direct combustion design with afterburning of oil vapors in an open perforated pipe (the so-called miracle stove).
- Drip furnace using waste oil with a closed afterburner;
- Babington burner. How it works and how to make it yourself is described in detail in our other publication.
The efficiency of heating potbelly stoves is low and amounts to a maximum of 70%. Note that the heating costs indicated at the beginning of the article are calculated based on the indicators of factory heat generators with an efficiency of 85% (to get acquainted with the full picture and compare oil with firewood, you can go here). Accordingly, fuel consumption in home-made heaters is much higher - from 0.8 to 1.5 liters per hour versus 0.7 liters for diesel boilers per 100 m² of area. Take this fact into account when starting to manufacture a furnace for testing.
Design and disadvantages of an open-type potbelly stove
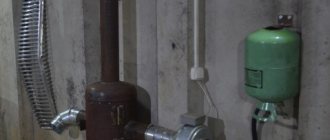
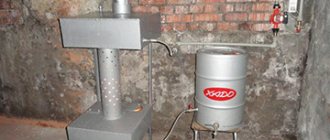
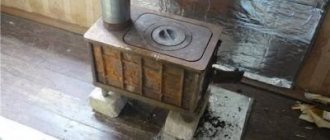
The pyrolysis stove shown in the photo is a cylindrical or square container, one-quarter filled with used oil or diesel fuel and equipped with an air damper. A pipe with holes is welded on top, through which secondary air is sucked in due to the chimney draft. Even higher is an afterburning chamber with a partition for collecting heat from combustion products.
The principle of operation is as follows: the fuel must be ignited using a flammable liquid, after which the evaporation of the waste and its primary combustion will begin, causing pyrolysis. Combustible gases entering the perforated pipe flare up upon contact with the oxygen flow and are completely burned. The intensity of the flame in the firebox is controlled by an air damper.
This stove has only two advantages during testing: simplicity and low cost and independence from electricity. The rest is all downsides:
- stable natural draft is required for operation; without it, the unit begins to smoke into the room and die out;
- water or antifreeze that gets into the oil causes mini-explosions in the firebox, causing fiery drops to splash from the afterburner in all directions and the owner has to put out the fire;
- high fuel consumption - up to 2 l/hour with low heat transfer (the lion's share of the energy flies into the chimney);
- The one-piece housing is difficult to clean from soot.
Although the potbelly stoves look different, they operate on the same principle; in the right photo, fuel vapors burn out inside the wood stove
Some of these shortcomings can be leveled out with the help of successful technical solutions, which will be discussed below. During operation, you should adhere to fire safety rules and prepare used oil - settle and filter.
Pros and cons of IV drips
The cardinal difference of this furnace is the following:
- a perforated pipe is placed inside a steel casing made from a gas cylinder or pipe;
- fuel enters the combustion zone in the form of drops falling to the bottom of a bowl located under the afterburner;
- To increase efficiency, the unit is equipped with air pressurization using a fan, as shown in the diagram.
Diagram of a dropper with bottom supply of fuel from the fuel tank by gravity
The real drawback of the drip stove is the difficulty of execution for a beginner. The fact is that you cannot rely entirely on other people’s drawings and calculations; the heater must be manufactured and configured to suit your operating conditions and the fuel supply must be properly organized. That is, repeated improvements will be required.
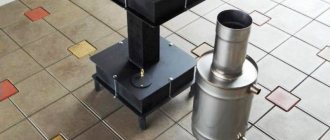
The flame heats the body of the heating unit in one zone around the burner
The second negative point is typical for supercharged stoves. In them, a jet of flame constantly hits one place in the body, which is why the latter will burn out quite quickly if it is not made of thick metal or stainless steel. But the listed disadvantages are more than offset by the advantages:
- The unit is safe to use because the combustion zone is completely enclosed by an iron casing.
- Acceptable waste oil consumption. In practice, a well-tuned potbelly stove with a water circuit burns up to 1.5 liters in 1 hour to heat 100 m² of area.
- It is possible to wrap the body with a water jacket and convert the exhaust furnace into a boiler.
- The fuel supply and power of the unit can be adjusted.
- Undemanding to the height of the chimney and ease of cleaning.
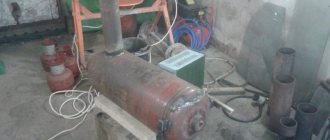
Boiler with pressurized air, burning waste engine oil and diesel fuel
Rules of operation and safety
No matter how much they talk about the safety of homemade stoves, they remain devices, improper handling of which can lead to burns or fire of surrounding objects. As a result, there are a number of prohibitions.
The following actions cannot be performed:
- use other types of fuel instead of used oil;
- use faulty equipment;
- install a heating device in a room without well-established ventilation;
- light a fire if the stove is not equipped with a smoke exhaust duct;
- block the hole in the burner;
- leave the room with the stove running for a long time;
- place flammable liquids or objects near the heated body;
- Spray oil or water onto the hot surface.
Only adults have the right to use the stove; children or animals are not allowed near it while the unit is operating.
As an interesting and original example of a stove under development, we suggest looking at the manufacturing technology of a potbelly stove. This is also a very effective model, available for self-production.
Important aspects of keeping your garage warm
Providing a traditional heating system in a garage is not easy, and it is also quite expensive, but maintaining optimal air temperature in such a building is still necessary. After all, it is even better to store transport at a temperature of at least +5 degrees, but some work needs to be done at a temperature of at least +18.
For the most part, car owners, as well as motorcyclists, prefer to use small, economical stoves to heat their garages, which are highly efficient and can warm up the room well.
It is also important that the stove not only saves the family budget, but is also safe and provides quick heating of the garage. It would be good if various wastes could also serve as fuel – for example, waste oil or wood waste. This will also make the furnace a less unprofitable structure.
This will also make the furnace a less unprofitable structure.
Heat loss in a garage is always high - it is rare that a building of this type is properly insulated with good thermal insulation materials
It is also important to understand that heating a small room often requires much more thermal energy than warming a house. To heat a two-story house, you will need a device with a power of about 10 kW, but a design with a capacity of 2.5 kW can heat a standard-sized garage. If you want to ensure that the temperature in the garage is always about 16 degrees, then you need to install a 2 kW unit
Sometimes, in order to save heat, motorists try to heat not the entire garage, but only the place where they directly work
If you want to ensure that the temperature in the garage is always about 16 degrees, then you need to install a 2 kW unit. Sometimes, in order to save heat, motorists try to heat not the entire garage, but only the place where they directly work.
A garage oven is an important piece of equipment that will create optimal conditions even in the cold season
Fuel consumption and economic feasibility
According to experienced stove makers, such a firebox remains operational when filled with 1 liter of waste. The actual data looks like this: the nominal value is 0.5 liters, the maximum is 2 liters per hour. Comments are unnecessary - the stove has no competitors in terms of efficiency and low cost of maintenance.
The costs of manufacturing or purchasing a finished installation will pay off quickly. And the benefit is obvious: the fuel is given for free, the efficiency of such a “ridiculous” stove is disproportionately serious - 0.75.
Finished furnaces undergoing testing
Russian furnaces using heavy oil and sludge products are sold - for example, Tunguska, KChM, Indigirka.
But the GeKKON boiler designed by Kurlykov is more popular. It is mass-produced, and testing is permitted by the list of fuel types recommended by the manufacturer.
The boiler operates as a flame bowl with an afterburning chamber. There is no automatic ignition of the stove, but the height of the chimney is not regulated, and the boiler burns extremely low-quality waste oil in full.
Self-production of this stove for sale will violate copyright.
Do-it-yourself waste furnaces can be very effective, especially if they are smartly built and refined. Sometimes it is possible to heat a house with such a stove, but the water jacket needs to be welded, which will turn the stove into a boiler.
It will need to be placed in a separate room to avoid contamination and smell, for example, in a barn (summer kitchen).
Installing and testing the device
The stove is installed in a fire-safe place, not on a wooden (linoleum) floor. It is advisable to provide a container with sand in the garage in case of fire. Drafts and installation in cramped conditions (under hanging shelves, racks) are excluded. Pour oil into the lower tank. It is advisable to clean it before use and let it sit.
A chimney must be installed, otherwise the stove cannot be used in the garage. Water impurities are not allowed in the oil. First, pour in a small portion, a couple of liters. Then, using a paper wick, set fire to the oil in the tank. By opening or closing the damper, stable traction is achieved. After 2-3 minutes, the stove returns to operating mode and the oil begins to boil. The unit is ready for use.
Arrangement of doors
Making a chimney I made a smoke exhaust structure from a 10-centimeter pipe.
Nothing supernatural - I simply welded the pipe to the hole in the center of the top of the body. The chimney led to the street through the wall to the roof. A piece of metal sheet was attached to the wall for fire protection. It is better to pass the pipe itself through the wall in a special fireproof glass.
Here you can see how the pipe goes through the wall
The stove is almost ready. The finishing touches remain. I cut an opening in the door of the lower chamber through which air can freely flow to the pan and the stove burner.
I riveted the thrust plates and assembled a simple lock for the top door. During the heating process, the stove body “leads”. To ensure that the combustion chamber remains airtight, the top door must close as securely as possible. That's why I made the castle.
Simple castle
I screwed several pieces of metal corner to the wall.
I installed the stove on the screwed corner. This is both convenient (if necessary, it will be much easier to carry out an inspection) and functional (heat loss into the ground is reduced).
Installed the stove
Principle of operation
The operation of the furnace is based on the combustion of motor oil vapor in a closed container. The product is not just the cheapest, but a waste product. Most often, used oil and its disposal are a headache for service stations and garage owners. After all, it is strictly forbidden to pour waste into the ground or domestic sewage system. And here “harmful” oil is poured into the stove and serves to benefit humans.
The design of the most common modification, made of metal, consists of cylindrical tanks, lower and upper, a short transition compartment and a chimney. It’s hard to imagine anything simpler. First, the fuel is heated in the first tank: the oil boils, begins to evaporate, and the gaseous product passes into the next compartment (short pipe). Here, oil vapors mix with oxygen, ignite intensely and completely burn in the last, upper reservoir. And from there the exhaust gases are released into the atmosphere through the chimney.
If desired, the heater is equipped with a tray for adding oil. Little is required from the owner: fill the tank with waste, set it on fire and monitor the normal operation of the firebox.
Types of furnaces for mining
It has already been said above that the simplest potbelly stove is not very convenient or effective. Therefore, various modification options have appeared, which we will consider below.
Exhaust stove from an old gas cylinder
Here you will also need 4 mm sheet metal (about 50 sq. cm), but another basic element is more important - a waste gas cylinder with a capacity of 50 liters, better than the old Soviet model, propane. Oxygen is heavier and more massive, making it difficult to work with. In addition, you need:
- steel pipe with a diameter of 100 m, a length of 2000 mm;
- valve with ½ inch thread;
- steel corner with shelf 50 mm, meter or a little more;
- clamps;
- loops;
- a piece of fuel supply hose;
- car brake disc. We select the diameter so that it fits freely into the cylinder;
- another cylinder (freon) to create a fuel tank.
Sequence of work:
- we drain the remaining gas from the cylinder, drill a hole in the bottom and rinse the cylinder with water;
- We cut out two openings in the side wall - a large lower one and a smaller upper one. The fuel chamber will be located in the lower one, and the afterburning chamber in the upper one. By the way, if the dimensions of the lower opening allow, in addition to mining, it will be possible to use firewood as fuel;
- We make the bottom of the afterburning chamber from a steel sheet;
- We make a burner from a pipe - a place where volatile gases mix with air and ignite. Holes are drilled in the burner (according to the principle described above), the inside of the pipe is GRINDED, this is necessary for greater efficiency of the product;
- the finished burner is welded into the bottom of the afterburner chamber;
- We make a waste tray from a brake disc and a piece of steel sheet. We weld the lid in its upper part;
- It is better to use a coupling to connect the burner and the pan cover - this makes servicing the stove easier;
- We provide a fuel supply. To do this, a hole is made in the wall of the cylinder into which a pipe with a threaded edge is welded;
- A valve is placed at the outer end of the pipe and a hose is connected to it. The hose, in turn, is connected to the fuel cylinder;
- the chimney pipe is welded into the upper part of the cylinder, then “taken away” in a smooth upward transition until leaving the room.
In fact, this completes the work with the furnace itself, but it is better to additionally build a heat exchanger - this will increase efficiency.
One of the heat exchanger options - plates welded onto the body - is shown in the photo below.
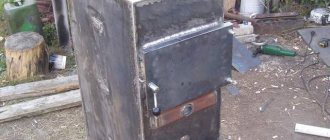
The finished oven with the doors open (the hinges were needed specifically for them; the pieces of the cylinder cut out in step 2 are attached to the hinges).
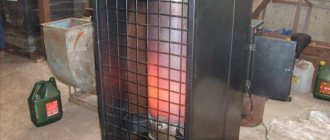
Pressurized furnace in operation
This design is also assembled on the basis of a 50-liter cylinder.
The air supply here comes from a fan (for example, from the stove of a VAZ 2108 car), which allows you to increase the draft in the afterburner and at the same time actually make the entire surface of the cylinder a heat exchanger.
The operation process and ignition are shown in the video.
Exhaust furnace with water circuit
Manufacturing a furnace with a water circuit can be almost the same as in the simplest version. The main difference is the organization of heat extraction into the water coolant. In the photo below, this possibility is realized by winding a pipe around the furnace body. In this case, cold water is naturally supplied from below, and heated water comes out from above.
A more “advanced” option is a stove with a “water jacket”. In fact, the body is enclosed in a second, hollow one, inside of which water circulates. The heated liquid is supplied to heating radiators.
True, the phrase “does not smoke” from the manufacturer is a bit of an exaggeration - this is only possible with regular cleaning of the chimney and the use of sufficiently high-quality, filtered fuel.
In the drawing, the device looks something like this.
Drip furnace
This type of stove is safer than those designs into which fuel is poured at once. In addition, in the case of gradual feeding, the burning duration can be freely adjusted.
A mandatory element of the system is a separate fuel tank, the waste from which is supplied in small portions - almost drops - using a special device.
The photo below shows a design where there is a separate tank with an oil line located above the fuel chamber. The base of the furnace is a gas cylinder; a valve is used to regulate the flow rate of the waste. The design of the furnace is discussed in more detail above.
Another type of product is with a retractable fuel compartment and a double afterburner.
It is realized in metal.
Please note: due to supercharging and the absence of fuel loss during filling, the exhaust consumption is reduced by 20...30%
Solid fuel heat gun
Any stove that burns wood or coal suffers from one significant drawback. Located in a corner of the garage, which is usually not insulated, the heater warms only part of the room. The opposite corner (usually right at the gate) remains cold and uncomfortable to work there. The problem is partially solved if the chimney is laid at an angle through the entire room, which is practiced by many owners of garage buildings.
The design proposed by one of our experts in the manufacture of solid fuel boilers and stoves, Vitaly Dashko, can boast of a more thorough heating of the garage. The unit is an old gas cylinder installed vertically and equipped with a separate chamber for heating air, which is forced into it. The design of this garage stove with dimensions is shown in the drawings:
The stove operates on the principle of a heat gun. The work algorithm looks like this:
- A portion of firewood is loaded into the firebox and ignited.
- After warming up, the fan is turned on, connected by a corrugation to one of the heating chamber pipes.
- Since the horizontal partition between the firebox and the chamber takes the greatest heat load, the air passing over it quickly heats up.
- Hot air, coming out of the second pipe, is supplied via a corrugated pipe to any point in the garage. The corner where the unit itself is installed is heated by the side walls.
Intense heat exchange inside the chamber is carried out thanks to steel ribs, increasing the heat transfer area. The drawing below shows a longitudinal and transverse section of a wood-burning stove, where the location of these ribs is clearly visible.
The advantage of a potbelly stove is that it does not need a high chimney, although it cannot do without natural draft. Any suitable low-performance fan will serve as an air blower. In a small room, a cooler from a computer power supply may be enough. For medium and large garages, household duct fans with a capacity of 50 m³/h are suitable; they are placed on the hoods from the bathrooms. A supercharger from a car heater, for example, a “snail” from a VAZ 2108, is also suitable.
A propane cylinder with a capacity of 50 liters is well suited for the manufacture of the heater body.
How to make a garage stove from a cylinder
To make a wood stove for the garage, you need to complete a number of preparatory work. To begin with, the upper part of the cylinder is cut off along the welding seam. You should first unscrew the valve and fill it with water so that the remaining propane does not explode when using the grinder. Then you need to cut a circle with a diameter of 300 mm (for the partition) and a strip 80 mm wide (for the door frame) from sheet metal 4 mm thick. From the leftovers, strips can be cut into heat transfer fins.
Advice. If you want to increase the heat output of the stove, you can cut off the top part below the seam, thereby increasing the volume of the air chamber. But remember that then you reduce the capacity of the firebox and the duration of combustion with one stack of firewood.
We carry out further work in this order:
- The next step is cutting the reinforcement and making a grate. There are no strict requirements here, follow the example in the photo, trying to adjust the length of the rods to the size of the seam protruding inside the balloon. After this, install the grill at the bottom of the container.
- In the cut off lid, you need to make 2 holes for installing threaded fittings DN50. This size is optimal, but it is not necessary to maintain it, as is the selection of threaded fittings. You can take pieces of pipe of suitable diameter, but do not make it smaller than 40 mm. Then weld the pipes in place, as shown in the photo:
- Next, in the cylinder body, in accordance with the drawing, it is necessary to cut openings for the loading door, vent and chimney hole. It is necessary to insert door frames welded from the prepared strip into the openings and weld them in a circle. Before installing the frame, you need to make blanks for the doors themselves, welding hinges and purchased handles to them.
- The next stage is the formation of the air chamber. A prepared circle with a diameter of 30 cm is placed in place of the cut-off cylinder cap and welded tightly. After this, heat exchange fins are attached to it by welding. Their number and placement can be arbitrary, but do not overdo it, otherwise you will have to select a more powerful fan that can overcome the aerodynamic resistance of the camera.
- The last step is to weld the cover with the pipes into place and install the doors with locking devices. At the very end, a chimney pipe of the required length is installed. Instead of a pipe, a ready-made 90° elbow will also work.
Note. The same wood-burning stove for a garage is made from a large-diameter pipe - 300 or 400 mm with a wall thickness of 4 mm. It will just be a little more work; the lid and bottom will have to be made separately.
Connection to water heating
The previous design of the garage furnace is quite capable of heating water or antifreeze instead of air, circulating through the water heating circuit. All that is needed is that instead of DN50 pipes, cut DN25 pipes into the chamber cover and purchase a low-capacity circulation pump (marked 25-40). A pump is required because the volume of the furnace water circuit is too small and without forced circulation the coolant will quickly boil.
For normal operation of a heating system with a potbelly stove, you will need an expansion tank and a pump.
Then everything is simple: the stove pipes are connected to heating radiators or homemade registers, whose total heat output does not exceed 3-3.5 kW. It is recommended to make the connection using metal pipes, or, in extreme cases, metal-plastic ones. The pump is installed in front of the furnace on the return pipeline, and a closed expansion tank must be installed in front of it. Mayevsky valves must be installed in the registers to remove air from the system.
Advice. Since garage heating is periodic, the system should be filled with non-freezing liquid.
Installation Tips
Installing a boiler that uses waste oil is practically no different from installing other types of heaters. There is one advantage: thanks to the presence of turbocharging and smokeless combustion of liquid fuel, the chimney does not have to be raised by 6-7 meters. It is enough to remove the chimney head from the wind pressure zone and raise it to a height of 4 m.
Regarding proper installation, we will give the following recommendations:
- The boiler and steel chimneys not protected by insulation are located at a distance of 0.5 m from combustible walls and other elements of a wooden house. The minimum distance from fireproof structures is 100 mm.
- Pass through the outer wall and the entire outer section of the flue with an insulated pipe - a sandwich, otherwise there will be a lot of condensation and soot. The chimney installation technology is described in detail in a separate material.
- Be sure to install a safety group on the heating supply line.
- Organize a good exhaust hood in the furnace to remove odors. Combustion air intake can be provided from the street.
- Equip the supercharger with a speed regulator and the oil line with a valve. This will allow you to control the power of the heat generator manually. Do not confuse the control valve with a regular tap; shut-off valves are installed on pipelines in any case.
- Make a primitive automatic emergency stop - install a thermostat on the supply, turn off the fan and the oil pump in case of overheating of the coolant.
If the waste is supplied by gravity, then for safety reasons it is advisable to install an electric shut-off valve on the fuel line. One subtlety: after an emergency shutdown, the boiler will not start on its own; you will have to light the oil manually or set up automatic ignition.
It is very advisable to insure the operation of the boiler in case of a power outage. A car fan, designed for a voltage of 12 volts, can be powered from a conventional battery, the rest of the equipment - pumps, thermostats - through an uninterruptible power supply unit.
The easiest way to supply used oil to the combustion chamber of the boiler is by gravity - from a container suspended from the wall. But such a system must be constantly monitored, plus as it is emptied, the interval between drops increases and the combustion intensity decreases.
Types and features of garage heat generators
The design of units for autonomous garage heating varies depending on several factors:
- sources of energy used;
- type of fuel and method of combustion;
- material of manufacture;
- heat transfer method.
Today we will not consider heating devices operating from the electrical network due to their inefficiency. As for the rest of the equipment, you can build it yourself:
- brick oven;
- direct burning solid fuel stove;
- buleryan;
- long burning stove;
- potbelly stove running on liquid fuel.
When choosing a unit to equip your garage, you need to consider not only the possibility of its operation on cheap fuel. Equally important criteria are ease of operation and maintenance, as well as whether the heating device can provide the required level of safety.
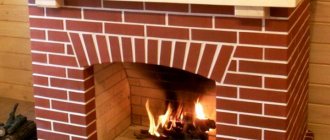
Brick kilns
A garage brick oven differs from the familiar “Swedish” or “Dutch” stove in its more compact size and simplified design of gas ducts. Otherwise, it also consists of a blower with a grate in its upper part and a combustion chamber. A brick or metal chimney is used to remove gases from the working area.
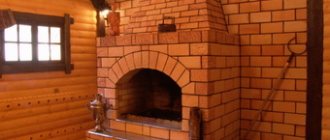
If space allows, the stove in the garage can be made of bricks
Direct burning potbelly stove
Among homemade heating stoves, metal potbelly stoves are represented by the widest variety of designs. Their body can be oriented in a horizontal or vertical plane - this does not affect the performance of the unit. To equip garages, standing-type heating devices are most often chosen because they take up much less space. If the area of the room allows you to install the stove horizontally, then this will allow it to work much longer due to the possibility of using long logs.
A direct burning potbelly stove is the easiest way to fill your garage with cozy warmth
Buleryan
The Buleryan is based on the same metal potbelly stove with a horizontal firebox, equipped with a chamber for afterburning combustion products. A special feature of the unit with such a fancy name is the large diameter pipe sections surrounding the furnace body. This design allows you to significantly increase thermal performance due to the constant movement of heated air inside the heat exchangers.
When making homemade buleryan, you can’t do without pipe bending equipment
Long-burning potbelly stoves
Units of this type use a method of surface combustion of fuel, which makes it possible to repeatedly increase the operating time to 10–20 hours. In addition, the furnace undergoes processes of pyrolytic decomposition and oxidation of exhaust gases, which ensures complete combustion of fuel.
To build a long-burning stove, you can use a metal container of a suitable size - for example, an old fuel barrel
Liquid fuel stoves
A stove that uses waste oil will be a real boon for the garage, since it can not only heat the room, but also dispose of waste. Often, an already installed solid fuel stove is upgraded to burn waste. To do this, it is equipped with an oil storage tank, a supply pipeline and a burner or flame bowl.
The potbelly stove has high productivity and does not take up much space
Analyzing the described designs, you should choose a heating device according to the following criteria:
- garage area;
- duration of the heating period;
- fuel availability;
- operating time of the unit per day;
- degree of safety of the structure.
You shouldn’t discount the cost factor either, because that’s why you build a stove yourself, to avoid unnecessary costs.
We make a heat generator from a cylinder
First of all, prepare the gas cylinders for welding - remove the spherical parts (don't forget to fill them with water first!) and cut one vessel to size so that together they form a body of the required height (1 m).
Prepare the remaining materials, taking into account the following recommendations:
- It is better to make the combustion chamber and flame bowl from stainless steel with a thickness of 1.5-3 mm (for example, grade 12X18H12T);
- if you couldn’t find stainless steel, use black steel grade St3 - St20 from 4 mm thick;
- Also select a stainless steel waste oil supply tube;
- wall thickness of flame tubes – at least 3.5 mm;
- to seal the top cover, select a 40 x 4 mm steel strip (rim) and an asbestos cord;
- prepare 3 mm sheet metal for the manufacture of an inspection hatch;
- For the heat exchanger, use pipes with a wall thickness of at least 4 mm.
The manufacturing process of a two-pass boiler during testing looks like this:
- Cut the Ø32 mm flame tubes to size and weld the heat exchanger using one cylinder as the outer casing and a Ø150 mm tube as the walls of the combustion chamber.
- Attach the water heating system supply pipes to the heat exchanger.
- In the second cylinder, cut holes for the inspection hatch and chimney pipe. Weld a Ø114 mm fitting and make a neck with a cover from sheet steel.
- Weld both tanks into one body. Make a shell of iron strip on top - it will serve as a seal for the lid. Fill the gap between the edges with asbestos cord.
- Make an afterburner in accordance with the drawing. Make holes in the hemispherical cover (formerly the end of the cylinder) for the viewing window and installation of the afterburner (in the center).
- Equip the lid with handles and a shutter on the window. The afterburner pipe can be tightly welded to it or screwed with bolts sealed with asbestos cord.
At the bottom end, the perforated pipe is closed with a plug, where 4 holes are made - one in the middle, the remaining three - radially. An oil pipeline tube is inserted into the central hole and scalded. The last step is to make a flame bowl of the boiler where the waste oil will burn.
Upon completion of assembly, weld an elbow with a flange to the afterburner pipe and install the “snail”. To prevent the outer metal wall of the water jacket from wasting heat in vain and heating the boiler room, insulate the body from non-flammable basalt wool. The simplest way is to wrap the insulation with twine and then wrap it in thin sheet painted metal.
The manufacturing process of an oil-fuel boiler is demonstrated more clearly in the following video:
Step-by-step technology for making a stove with your own hands
They start with choosing the material. Preference is given to metal that is not rusty, but is in good condition, without defects, holes or cracks. The algorithm for further actions is as follows:
- Cut out blanks for the furnace tanks. They are similar, only they differ in the lids. The bottom is solid, with a pipe coming out of the top end. In the other, accordingly, the afterburner is welded at the bottom in the center, and at the top is the chimney outlet (offset from the center).
- Select a piece of pipe for the afterburner. Holes are drilled in the walls for air intake.
- The tanks are being collected. The bottom has a solid bottom, it is important not to confuse this. An afterburner pipe is welded into the upper tank at the bottom, and a pipe for the stove chimney at the top. A damper is provided at the bottom, as in a regular potbelly stove (can be done later).
- The seams are checked for quality, the slag is removed and cleaned. The cooled furnace is ready for testing.
How to make a stove
A homemade exhaust furnace for a garage is made in the following sequence:
Assembly of the lower chamber. In such a furnace, the primary combustion chamber and the fuel tank are combined. This is a round device, closed with a lid, in which holes are drilled for pouring oil and for installing a pipe - the second chamber of the furnace.
Parts for making a furnace for mining
The parts for the lower tank are cut according to the dimensions shown in the photo, the edges are cleaned with a grinder and welded. It is better to make the walls from a piece of pipe.
A bottom made of sheet metal is welded to them, and legs are welded from the corners. A cover with holes is cut out: one hundred millimeters in diameter in the center and 60 millimeters closer to any edge.
Tip: The lid should be removable, which will make it easier to clean the device and transport the oven.
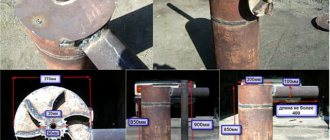
- In a piece of pipe with a diameter of one hundred millimeters and a length of approximately 360 millimeters, holes are drilled for air intake with a diameter equal to one tenth of the diameter of the pipe. The holes must be spaced evenly across the diameter and height of the device.
- The pipe is welded to the lid of the lower tank. In this case, you need to control its perpendicularity of installation. An air damper is placed on the cover; it can be fixed with a rivet or with bolts. The diameter of the hole for mounting the damper is 60 millimeters. Oil is poured into the same hole and the stove is lit.
- The upper tank is assembled similarly to the lower one. For the body, a pipe with a diameter of 355 millimeters is taken. In the plate that will serve as the bottom, a hole with a diameter of one hundred millimeters is made, offset to the edge of the bottom. A small part of a pipe with a diameter of 110 millimeters is welded to it, which will be placed on the perforated chamber where the gases are burned.
- The lid of the upper tank is exposed to high temperatures, so it must be made of metal with a thickness of at least 6 millimeters. There is a hole in it for installing a chimney; it is located on the side opposite the hole at the bottom of the chamber. Between the chimney and the chamber wall, a cut-off device is welded to the top cover, which is a partition made of thick metal. The cutter should be located closer to the smoke exit hole.
- A chimney pipe is welded to the top cover, which is then connected to the chimney. To increase the rigidity of the structure, a spacer is welded between the chambers from a corner or a small diameter pipe.
- The stove can be painted with metal paint that can withstand high temperatures.
Necessary tool
When making a furnace for heating a garage with waste oil, you must prepare the following equipment and tools in advance:
- welding machine;
- welding electrodes of the required diameter;
- Bulgarian;
- electric drill;
- Grinder;
- hacksaw for metal;
- set of files;
- hammer;
- sledgehammer;
- pliers;
- chisel;
- paint brush;
- roulette;
- metal ruler;
- square;
- calipers;
- building level;
- plumb line;
- metal brush;
- emery cloth;
- pipe bending devices;
- metal scissors.
No. 1. Water heating system
The water heating system is organized in the garage by analogy with residential premises. The coolant is heated in the boiler, and then it passes through pipes and radiators, uniformly heating the entire garage room. After the heat supply stops, the pipes remain heated for another couple of hours. This is the main advantage of this system.
The main disadvantage is the complexity of the organization. In addition, the water in the heating circuit may freeze, so if the system will not be used in the coming days, it is better to drain the water. On the other hand, frequent water changes lead to rapid corrosion of pipes and radiators. To avoid this problem, it is better to use metal-plastic equipment. It is better not to use ordinary water in the heating system - it is replaced with antifreeze, a non-freezing coolant.
The complexity of the arrangement results in another drawback - the high price. The most economical way to heat a garage is to connect its circuit to a home boiler. The cost of general heating will increase, but it will still be cheaper than organizing an independent heating system.
If it is not possible to connect to your home system, you will have to install a separate boiler. It can run on different fuels. The following types of boilers are used in the garage heating system:
- An electric boiler is the easiest to install, extremely safe, but expensive to operate. Even if you are not worried about electricity bills, you should not use such boilers in areas with frequent power outages, power surges, or in regions with severe windy winters, because the wires may break, which will ultimately lead to freezing of the water in the system. If you do not manage to drain the water in time, the pipes may burst;
- gas boilers are used extremely rarely in garages, since not everywhere there is access to a gas pipeline. If the gas pipeline runs nearby, then you are very lucky - gas heating is inexpensive, and such systems are quite simple in terms of operation. The main thing is to follow safety precautions;
- boilers for liquid and solid fuel. You can choose a stove that runs on wood, coal, diesel or waste oil - it all depends on which resource is more accessible in your case. Solid fuel boilers require constant monitoring and frequent loading of fuel. Pyrolysis and pellet units are more convenient in this regard, but they are not cheap; the most economical option is a potbelly stove, which can also be used in a water heating system.
For all boilers, except electric ones, you will have to organize a chimney. In addition to the boiler, radiators, heating pipes and chimney pipes, you will need a circulation pump and an expansion tank. All this costs money, so using a hydronic heating system only makes sense in large garages. Often such heating is done at service stations and commercial auto repair shops. If the garage is small, then there is no point in organizing such a complex water heating system - this is an option for more or less spacious rooms where constant heating is required.
The operating principle of a water heating system is quite simple. The coolant heats up, passes through the pipes, gives off heat and returns to the boiler. The system can be one- or two-pipe. A single-pipe system is much easier to organize and cheaper; it is best suited for a small private garage. In this case, the heated coolant sequentially enters the radiators, i.e. in the first radiator the temperature will be higher than in the last, where the antifreeze reaches it already cooled down. The two-pipe system allows for more uniform heating, but much more materials will be needed.
Even if the garage is not attached to the house, but is located nearby, you can try to connect it to the home heating system, but there are limitations. The distance from the garage to the house should not be more than 20 m, and the pipes must be properly insulated.
If antifreeze is used as a coolant (a liquid that does not freeze even at -45C), then you must work with it carefully, because it is a toxic substance that becomes even more dangerous when heated. Antifreeze is not recommended for use in two-pipe systems
The coolant is replaced every 5 years.
Types of devices
- Drip type;
- Pyrolysis type.
In drip-type stoves, oil from a separately installed tank is supplied through an oil pipeline to the combustion chamber. It is located above the bowl installed in the pipe. Once on the hot bowl, the oil evaporates and burns.
In pyrolysis stoves, fuel combustion occurs differently:
- The oil itself is very difficult to ignite and does not form flammable gases. Therefore, the operation of an oil stove is based on the decomposition of waste into volatile components when heated (pyrolysis).
- The main part of such a stove is an oil container made of metal. Above it is a combustion chamber. It is made from a metal pipe perforated in a circle.
- Perforation is needed to ensure air flow into the combustion chamber. Above is another metal container (afterburner), into which a pipe is welded to remove combustion products.
How does an exhaust boiler work?
Heating a private house with a waste oil boiler is organized thanks to several important elements of the fuel supply, filtration and heat exchange system. The design contains the following components:
- Oil pump - connected to a preheating chamber and a filter that traps solid particles. Pump function, optimization of supply of waste quantity to the burner device.
- Preheating chamber - to reduce the percentage of underburning, used oil is preheated to a temperature optimal for combustion.
- Turbines - fuel is sprayed into the combustion chamber in the form of fine dust, while at the same time a stable flame is maintained. To operate, the simultaneous operation of two turbines, a combustion fan and a compressor is required.
- The controller is the heart of domestic oil recovery boilers. Ensures synchronous operation of all important components of heating equipment. Modern stations are connected to a remote control and warning unit and have a multi-level protection system that prevents emergency situations.
- Heat exchanger – depends on the type of boiler:
- Convection models - air heaters, do not have a heat exchanger at all.
- Domestic boilers for the home are equipped with one or two circuits connected to the heating and hot water system.
For use in domestic conditions, it is impractical and dangerous to install homemade heaters. It is allowed to connect exclusively factory-assembled boilers registered by Rostechnadzor.
An oil-fuel heating boiler for a private home or cottage, using waste oil, is economically beneficial for several reasons:
- Availability of fuel.
- Low cost of development.
The average calculation of the required amount of oil is calculated in the following way:
- Find out the maximum performance of the boiler; information is in the technical documentation.
- Divide it by 10.
- The result obtained is multiplied by 1000 50%.
The principle of boilers operating on recycled fuel is the same in all cases. It consists of evaporating the oil and burning the steam from it.
Principle of oil evaporation
But there are small nuances in this technology. All used oils contain many heavy metals, additives and other elements. The task is to build a unit that will allow you to accumulate heat inside, and not immediately discharge all these elements into the chimney. Complete oxidation of all elements occurs only if the maximum temperature inside the boiler is reached - 6000C.
The temperature indicator in this case is a very important point. Without going into lengthy explanations of chemical processes, we can say briefly: harmless combustion and evaporation of fuel can only occur at a temperature of 600 degrees. A deviation of 200 degrees to one side or the other will provoke the release of very harmful toxic substances.
Exhaust boiler with water circuit
Used oil is poured into the lower tank. The top layer of oil in the evaporation chamber heats up, resulting in the formation of steam. As it rises, it exits into a perforated pipe and connects with air, reaches the upper tank and burns. And the combustion products themselves are discharged through the pipe through the chimney.
Thus, the room is heated, but no toxic waste is released that is harmful to human health. This fact immediately answers the main question that interests many before building such a unit: “How harmful is a boiler during mining?”
Waste oil boiler diagram
You should clearly understand the operating principle and technology of oil evaporation in such a unit. It is not the oil itself that burns here, but its vapor. Due to the fact that the spent fuel heats up and begins to evaporate even before combustion begins, it becomes possible to decompose such burning fuel into lighter elements.
Where are similar heating units used?
- in production premises;
- in premises for keeping animals;
- in auto repair shops, service stations;
- in greenhouses;
- in warehouses and garages.
Almost any oil, including shock-absorbing oil, can be used as fuel for such a boiler.
Regular Maintenance
Waste oil, unlike diesel or gas, is a dirty fuel, even despite the presence of filters. Therefore, soot formation and contamination of the main working elements of the boiler are an order of magnitude higher. Lack of regular cleaning leads not only to a significant decrease in efficiency, but also to more serious problems.
So, waste oil boilers need cleaning:
- Internal walls of the heat exchanger (every 1-3 months). After turning off and completely cooling the boiler (after about 1 hour), using a metal brush, scraper, metal brush or any convenient tool, you need to thoroughly clean the surface. We also clean out the ash drawer.
- Burners (every 1-2 months). This point applies to standard boilers where a nozzle is used to spray fuel; it is this that needs to be cleaned. This can be done with a wire brush, cloth or sandpaper, depending on the degree of contamination. If the nozzle hole is clogged, you need to clean it with wire and blow it out well. Be careful and do not allow mechanical damage to the injector or change the factory diameter of its hole. It is also advisable to clean the air and oil supply pipes.
- Bowls (every 24-48 hours). This paragraph applies to vertical drip boilers. We turn off the boiler, wait until the fuel burns out, after which the flame sensor will work and the boiler will stop. Using a scraper and a wire brush, clean the bowl and remove the ash from the ash drawer. The cleaning process takes up to 5 minutes. Upon completion, we transfer the boiler to standard operating mode.
If the room is highly dusty, turbine fans must also be cleaned at least once a season. Detailed individual algorithms and requirements for regularity are always described in the boiler operating instructions.
How should the heating be in the garage?
For many motorists, the garage is almost a second home. Here they delve into their hobby, take a break from the hustle and bustle and take care of the car. Therefore, first of all, you should think about the comfort of the person who spends hours indoors.
Heating is also necessary for the car, because... low temperatures negatively affect its technical condition and significantly reduce its service life.
When it gets cold, the garage becomes too humid. Condensation forms on metal parts, which provokes corrosion processes. In a cold room, the car body quickly rusts and becomes unusable.
To keep the garage dry, you should take care of good waterproofing and ensure the normal operation of the ventilation system. However, moisture still gets into the room on the wheels of the car. It evaporates and drops of water settle on surfaces.
If there is no heating, moisture accumulates, causing fungus, mold, and rust to appear. To prevent this from happening, heating is necessary.
Low temperatures cause the oil to thicken and reduce battery capacity. This makes it difficult to start the engine and increases fuel consumption. Therefore, it makes sense to spend time and effort assembling a miracle stove
Features of garage operation determine the requirements for heating systems:
- Efficiency. The oven must heat the air quickly and maintain the desired temperature for several hours.
- Easy to use. When coming to the garage, its owner should spend a minimum of time and effort heating the room.
- Ease of maintenance. The stove must be inspected, cleaned, and repaired in a timely manner, so its design must be simple and understandable, and its parts must be easily replaceable.
- Availability of energy source. When choosing a heating system, fuel availability is of fundamental importance. A stove using diesel fuel, diesel fuel or waste oil is well suited for a garage.
- Safety. There is always some amount of flammable substances in the garage. Since these premises often serve as workshops and sheds, flammable materials will often be found here. Therefore, heating must comply with all fire safety standards.
- Cheapness. The costs of servicing a car and arranging a garage are already high, so saving on heating without compromising its quality is a pressing issue.
When choosing a suitable heating device, you should set priorities, because... the ideal is unattainable. The easiest to use are electric heaters. This energy source is available in almost any location.
However, the price of heating with electricity is too high, so it is worth considering other options.
There is a huge advantage in assembling a diesel stove with your own hands: you choose the design yourself and make a model that is ideal for specific operating conditions. You do not have to adapt the heating device or adapt to the peculiarities of its operation.
Final Conclusion
Homemade metal stoves for heating a garage have many advantages, the main one being low cost. The second advantage is the ability to modernize the design to suit your conditions without changing the principle of operation. If you make a stove well, from thick metal, it will serve you for many years. But during operation, one should not forget about fire safety, especially when it comes to used oil. DIY heating units require constant supervision.
About useful modifications of an iron stove
There are several recommendations on how to make the above design even better. The first step is to strengthen the junction of the chimney pipe to the top slab, since this is the place that burns out most often. The reason is not only the high temperature, but also the load exerted on the weld by the chimney pipe. Typically, garage owners do not bother with separate mounting of the chimney and its entire weight rests on the top panel of the stove.
A wood-burning stove with 2 smoke circuits cannot boast of the size of the firebox, and therefore the duration of combustion. On the other hand, homemade long-burning stoves like “Bubafonya” are not the best option for a garage. They require a chimney at least 4 m high with good draft, which is not always feasible.
The heat transfer of a wood-burning stove can be improved if several vertical ribs are welded to the side walls, as shown in the photo below. A 4 mm thick strip or the same corner is used, thereby increasing the heat exchange area and increasing the efficiency of the heater.
The photo shows a cast iron stove with convection fins and a hob. A similar structure can be welded from steel
Making an economical wood stove
In order not to needlessly distract the reader’s attention with the well-known designs of simple wood-burning stoves, of which there are plenty on the Internet, we suggest familiarizing yourself with the drawings of a more serious heater. Its peculiarity is the presence of two smoke circulations (passes) organized inside the stove body for the best heat transfer. After all, what is the main disadvantage of an ordinary potbelly stove? That's right, low efficiency, since the lion's share of the generated heat immediately flies into the chimney.
In a do-it-yourself two-pass metal stove, hot combustion products pass through special channels in two directions before going up the chimney.
By making 2 revolutions through the channels of the stove, the combustion products will give off more heat to the air in the room.
Thanks to this design, a significant portion of the heat is successfully transferred to the room, which contributes to more efficient heating with wood and leads to savings. Although, to evaluate these savings, it is necessary to compare different furnaces in practice, which is not always possible. But rest assured that you will definitely get more heat from the two-pass garage stove shown in the diagram above.
To make a heat source you will need the following materials:
- Sheet metal with a thickness of at least 4 mm, optimally 5 mm. From it you will weld the body, smoke circuits and doors.
- For the roof of the firebox, which experiences the greatest thermal load, it is better to take a sheet 6 mm thick.
- A piece of pipe with a diameter of 100 mm for the chimney pipe.
- Periodic profile fittings with a diameter of 16-18 mm for the manufacture of grates.
- Angle No. 4, pipe 40 x 40 mm or other rolled metal for the legs.
- Finished door handles.
Note. To weld a garage stove with your own hands, you need to use low-carbon steel grade St10 or St20. High-carbon or alloy steel is hardened by high temperatures, and the body may crack at the welds. How to roughly determine the grade of steel is described in the instructions for making a sauna stove.
What you need to build a garage oven
To make a metal potbelly stove, you can use durable metal containers of sufficient volume or sheet steel with a thickness of at least 3 mm. Metal barrels or gas cylinders, old hunting safes, etc. are often used as the stove body. In addition, to build a potbelly stove you may need:
- pipes with a diameter of more than 100 mm for the manufacture of a chimney;
- cutting pipes and metal corners;
- steel bar with a diameter of at least 10 mm;
- grate;
- combustion and blower doors;
- old car wheels;
- asbestos cord or basalt cardboard.
Before starting work, you should prepare the following tools:
Most of the parts for making a garage heat generator can be found in a scrap metal cutter or plasma cutter;
- welding machine;
- “grinder” with a cleaning and cutting disc;
- electric drill and set of drills;
- hole saws for metal surfaces;
- a metal brush attachment for a drill or grinder;
- hammer and anvil;
- chisel;
- roulette;
- scribe;
- core
Those who are also interested in the aesthetics of the design should take care of materials for painting the stove. To do this, you will need a heat-resistant primer and paint, a rust converter and a solvent.
Those who decide to build a brick oven should stock up on construction materials in advance:
- Red brick;
- fireclay brick;
- clay;
- cement;
- sifted river sand;
- combustion and blower door
- metal corner;
- cast iron stove with burners;
- valve;
- grate;
- heat-resistant seal;
- steel wire;
- fittings Ø20–25 mm.
The chimney can be made of brick or a pipe with a diameter of at least 150 mm made of aluminum, galvanized steel or asbestos fiber can be used. In this case, to insulate it you will need any mineral insulation with a moisture-resistant reflective layer.
When choosing fireclay, preference is given to a material whose size is as close as possible to the dimensions of red brick
To perform brickwork you will need:
- trowel;
- containers for preparing the solution;
- hammer-pick;
- pliers;
- plumb line;
- square;
- jointing;
- roulette;
- shovel.
A brick stove is installed on the foundation. Therefore, if the garage does not have a solid foundation, then you will additionally need materials and tools for concrete work: crushed stone, sand and cement, formwork boards and tamping.
Advantages and disadvantages
Any option for creating or purchasing a stove to maintain the desired temperature in the garage has both positive and negative sides. There is no need to stop at the first option that comes to you.
Only by examining and analyzing them, as well as taking into account all the positive and negative aspects, can you finally decide on the choice in each specific situation.
The positive points are:
- Low cost of the fuel used and its low consumption compared to wood or coal.
- Low amount of harmful emissions into the room and atmospheric air. But it is worth remembering about safety; any process of burning hydrocarbons is accompanied by the release of a life-threatening, insidious and invisible gas - carbon monoxide, which has no odor. Therefore, issues of room ventilation should be treated with great responsibility.
- Availability and low cost of materials for the construction of such a furnace; all you need is a little metal.
- The ease of manufacturing such a stove; even a person who is far from the intricacies of metalworking can cope with such work. All you need is to be able to use a grinder and a welding machine.
- Possibility of reliable operation in cold and warm seasons.
- Small dimensions of the heating unit.
There are fewer negative aspects, but they also exist:
- The stove emits the smell of burnt petroleum products, and the effect of carbon monoxide on the human body was described above.
- The heating device needs to be cleaned regularly, at least once a week.
- If a diesel stove is not properly maintained, it often fails.
- Electrical heating appliances and other hot surfaces should not be used near such a stove.
Rules of use and safety precautions
Before placing a stove in the garage and using it, you will have to understand the basic rules for its operation:
- It is better to use solid wood as fuel, since such material burns longer and gives better heat. Hardwoods include beech, ash and birch.
- You need to light the stove with a resin torch or paper. This material improves fuel ignition and thrust.
- If the potbelly stove has not been used for a long time, kindling is carried out only with the valve slightly open.
- Do not light a fire with flammable liquids, as this may cause a fire.
Design and installation
Such a stove has two chambers in its design, which ensure double combustion of fuel. In the first chamber, waste oil burns. In this case, a large amount of flammable gas is released, which then enters the second compartment. It mixes with oxygen, and the resulting mixture continues to burn in the second chamber. This process is accompanied by high temperature and the release of a significant amount of heat. This allows you to efficiently heat the garage, even if there is severe frost outside.
What furnaces can be heated with waste oil?
Theoretically, any furnace can be heated with waste, including brick ones, but this fuel is best suited for metal products.
After all, the heating rate of a burner, even a drip type, is 3–5 minutes, after which the temperature of its flame exceeds 500 degrees , and with pressurization and proper adjustment even 800 degrees.
Such a sharp increase in temperature leads to strong condensation, because the walls of the smoke channels are not heated, which means their temperature is slightly lower than room temperature. In addition, such a sharp increase in temperature leads to thermal deformation of the masonry and its destruction.
Therefore, only those burners that can burn fuel efficiently (does not increase soot formation) even when operating at a quarter power are well suited for brick kilns. We have already talked about various types of homemade burners in the article (Do-it-yourself boilers), so the information from it will help you choose the appropriate type of device.
Metal heating devices have much lower thermal inertia , so they warm up faster. Burners of any type are suitable for working with them, so the choice of a heat generator is determined only by your skill and available materials.
Making a new stove from scratch is a complex and time-consuming process, which should be resorted to only if it is not possible to convert an existing heating device for testing.
However, it is necessary to take into account the possible negative impact , because, for example, to insert a burner into a brick oven, you will have to take up a lot of space in front of it, and such heating devices are often not located very conveniently for such an alteration.
Remodeling a metal furnace
Remaking a metal stove is similar to changing a brick heating device, the only difference is that it is easier to attach the burner shield to it. If it is equipped with any fuel equipment, then it must be carefully dismantled and stored somewhere .
We also recommend removing grates for coal or firewood, because they restrict the air supply, which will prevent the waste from burning completely, which means soot formation will accelerate, so the stove will have to be cleaned of soot more often.
How to make a potbelly stove?
In this section we will talk about making potbelly stoves with different types of burners from what can be found in any garage or at the nearest scrap metal collection point.
The operating principle of all such devices is the same. first exposed to primary air and heat , causing it to break down into volatile hydrocarbons. This process is called pyrolysis.
Then the pyrolysis gases enter the active combustion zone, where they mix with secondary air and burn, releasing thermal energy.
The heat exchanger receives the heat released during the combustion process and radiates it into the interior of the room in which the stove is located.
Stove with a primitive burner
If you decide to make the simplest stove for heating a garage or any other non-residential premises, then a burner in the form of a closed container made of sheet steel 1–3 mm thick .
This container is a parallelepiped or cylinder, of any convenient size (most often 20–40 cm in diameter or length/width), in the upper part of which 2 holes are cut.
One for:
- oil filling;
- fuel ignition;
- primary air supply.
The second is for supplying burning pyrolysis gases to the active combustion zone, made in the form of a perforated pipe. A heat exchanger of any shape is installed above the combustion zone, after which the waste combustion products escape through the chimney into the atmosphere.
Advantages and disadvantages
The main advantage of this burner is its ease of manufacture, because it is enough to weld 6 metal plates into a parallelepiped , in one of which holes are punched or cut, then weld a perforated combustion zone pipe to it.
In addition, such a burner needs legs that will move it away from the floor, this will increase combustion efficiency, because a cold floor will not cool the container, and will also reduce the likelihood of a fire.
The main disadvantages are :
- the impossibility of full power control, because the combustion intensity is changed using a valve on the air supply window;
- the impossibility of full automation, which is why the stove requires constant supervision;
- The burning time depends on the amount of fuel in the container, but rarely exceeds 2–3 hours, after which it is necessary to wait for it to cool and re-ignite it after refueling.
Some DIYers suggest connecting such a burner to a waste tank with an “auto-drinker” system, but this greatly complicates the design and deprives it of its main advantage.
Materials and tools
To make such a potbelly stove you will need :
- scraps of sheet steel of various sizes;
- steel round or square pipe with a diameter (side size) of 8–10 cm;
- an empty gas cylinder with a volume of 50 liters, if not, then a steel pipe with a diameter of 20–30 cm;
- unnecessary stamped wheel rim R20 or larger (from any medium truck, for example, GAZ 52 or ZIL-130).
In addition, the following tools are required:
- grinder with cutting and cleaning discs for metal;
- welding inverter;
- semi-automatic welding;
- drill with a set of drills of various sizes;
- adjustable (gas) wrench;
- hacksaw for metal;
- compass;
- roulette;
- core;
- marker.
Procedure
Here's the procedure:
- Open an empty gas cylinder and release any remaining contents, then use a soapy water solution to ensure that no more propane is escaping.
- Use a hacksaw to cut off the valve; do not use an angle grinder for this; the remaining liquid fraction may ignite or explode from a spark.
- Measure 20 cm from the bottom edge of the container, check the circular line and cut it with a grinder, this will be a container for oil.
- Step back 20 cm from the cut edge and draw a circular line, then cut it, this will be the heat exchanger.
- Cut 3 circles with a diameter of 39.5 mm from steel sheets; these will be the lids. You can make them not even from one piece, but from several, the main thing is that the lids are airtight. If you use a steel pipe instead of a cylinder, then cut out another lid for the bottom of the container.
- In the lid of the oil container, cut 2 holes located opposite each other - one square, with a side size of 5–10 cm, this will be a filler window, the second in size and shape of the pipe, this will be the exit to the combustion zone.
- Install the future oil container on the wheel rim and weld it in several places, this will give the structure more stability and protect it from cooling the burning oil.
- In the remaining lids, cut holes to the size of the pipe, and place them at a distance of 1 cm from any edge.
- Weld the appropriate lid to the oil container.
- Using thin metal, make a gate valve to fit the hole, then secure it so that you can use it to change the size of the hole from fully open to fully open. This can be done either with a nut and bolt (rotary gate) or with a limiting slide (sliding gate).
- Weld any convenient handle to the valve; it can be made from the thinnest metal.
- Weld both covers to the heat exchanger, positioning them so that the holes are as far apart as possible.
- Cut a piece 40–50 cm long from the pipe and drill 20–30 holes with a diameter of 8–10 mm in it; this will be the combustion zone and the supply of secondary air.
- Weld the perforated pipe section with one edge to the container and the other to the heat exchanger.
- Weld an adapter to the chimney from the same pipe to the other side of the heat exchanger.
- Install the stove in the chosen location and connect it to a chimney, the length of which from the tank is at least 3.5–4 m (the longer, the better).
Startup and adjustment
Here is the procedure that must be followed to start and adjust the potbelly stove:
- Check the draft; to do this, bring a burning match to the upper holes of the combustion zone; if the draft is sufficient, the flame will bend and go into the hole or at least lean towards it.
- Pour 30–50 grams of diesel fuel into a container and light it with burning paper. As soon as the fuel ignites, pour in the waste so that it fills the container halfway. As the fuel burns, close the valve.
- To adjust the power, close or open the valve, relying on the brightness of the fire in the afterburning zone.
Apparatus with drip burner
This version of the burner is only slightly more complex than the previous one, but if manufactured correctly, it has enormous potential for all kinds of improvements and automation , from controlling the fuel supply based on the temperature in the room to shutting off when there is overflow of fuel or a torch failure.
Such a burner is integral with the afterburning zone and the heat exchanger, so it cannot be connected to other types of devices.
Materials and equipment
To make this heating device you will need :
- a steel square or round pipe with a diameter of 20–30 cm and a length of ≥1 m, if not, then an empty gas cylinder with a volume of 50 l;
- scraps of sheet steel 5–10 mm thick;
- a steel round or square pipe with a diameter (side size) of 8–10 cm, as well as an L-shaped elbow of the same shape and thickness;
- steel or copper tube with a diameter of 8–10 mm, tips for it and adapters from tips to ½ or ¾ plumbing thread;
- unnecessary stamped wheel rim R20 or larger (from any medium truck, for example, GAZ 52 or ZIL-130);
- ½ inch steel pipe;
- steel pipe with a diameter of 30–50 mm;
- 90 degree ½ inch steel plumbing angle;
- spring with a force of 1–2 kg;
- needle tap ½;
- various bolts and nuts;
- asbestos cord;
- FUM tape.
In addition to the tools described in the previous section, you will need:
- plasma cutter;
- small flat file;
- flaring machine for copper or steel tube;
- another adjustable wrench.
Step by step guide
To make such a stove, follow these steps:
- If you are using a gas cylinder, then follow steps 1-2 from the step-by-step guide in the previous section.
- Cut the pipe to create a 1 m long piece with strictly perpendicular cuts on both sides. If you are using a balloon, cut off the rounded top to create a straight piece of pipe.
- Stepping back from the top of the future stove body, cut a hole for a square or round pipe with a side size (diameter) of 8–10 cm, this will be a transition to the chimney.
- Cut out 2 covers, the size or diameter of which exceeds the outer size or diameter of the pipe; for a potbelly stove from a cylinder you only need one cover, the metal thickness is 5–8 mm.
- Cut out 3 halves of covers, the size or diameter of which is 0.5 mm less than the internal diameter of the pipe, these will be bumpers that increase the efficiency of the heat exchanger.
- From steel scraps 5–8 mm thick, make a box for a box with dimensions of 10x15x5 (depth, width, height) cm, then make a box from metal of the same thickness of such dimensions that it fits into the box without effort. Make the length of the box such that it protrudes from the box and is located in the center of the body. Weld a plate on the back of the box, the size of which is 1 cm larger than the outer size of the box. Weld sides 2 cm high along the perimeter of this plate, lay an asbestos cord in several layers in the resulting groove, it seals the box when closed.
- At a distance of 1–3 cm from the bottom edge of the body pipe, cut a hole for the box frame. If you are making a potbelly stove from a pipe, cut a hole just above the skirt.
- Weld the box and make sure the box fits in and out properly, then install any fasteners that will prevent accidental opening.
- 5–7 cm above the bowl box, cut a square hole in the body with a side size of 5–10 cm, this will be an inspection window necessary to control combustion, then make a casing and lid for it according to the principle described above. Seal the lid with asbestos cord and secure it with quick-release fasteners.
- Weld a jumper in the protruding part of the box to form a bowl for fuel combustion; the size of the bowl should match or slightly exceed the outer diameter of the air duct pipe.
- Weld 2 sides to the top cover of the pipe or cylinder so that the walls of the potbelly stove body fit between them without a gap, the height of the sides is 3–5 cm. Fill the space between the sides 1 cm with asbestos cord.
- In the center of the cover, cut a hole for the air duct according to the shape and diameter of the corresponding pipe.
- Cut a piece of pipe for the air duct; its length should be such that it rises 7–10 cm above the lid, and the distance from it to the bowl is 3–5 cm.
- Insert and weld the duct, then make sure it is level above the bowl.
- Remove the cover and drill 30 holes with a diameter of 10 mm in the air duct, place them at an equal distance around the pipe circumference, move the rows relative to each other by 5 cm, place the first row at a distance of 5 cm from the bottom edge. The size and number of holes are approximate and depend on many parameters, so if you wish, experiment by installing covers with air ducts on which the number, diameter or location of the holes has been changed. Some do-it-yourselfers suggest welding the air duct from below with a steel plate and drilling 3–5 holes with a diameter of 10 mm in it in order to reduce the flow of primary air and not reduce the flame temperature, and increase the number of holes and rows for supplying secondary air by 1.2–1.5 times , however, no one has conducted comparative tests of both designs, so the effectiveness of such a modification is unknown.
- In the halves of the covers (chips), cut a hole in the center for the air duct so that they cover it and weld them between the rows of holes and above the holes, each of them should be shifted in the opposite direction from the other. This will increase the efficiency of afterburning and increase heat transfer.
- Place the cover on the oven body and make sure that the bumpers do not catch the body anywhere.
- Weld an L-shaped elbow to the outside of the duct to connect to the chimney.
- Not far from either edge of this lid, but not under the L-shaped elbow, cut a square hole with a side size of 4-5 cm, this will be an inspection window.
- Make a square tube for this hole, 5 cm high, and a lid with two sides, 4.5 cm high, and seal it with asbestos cord. Weld a convenient handle to the top of the lid.
- Drill a hole with a diameter of 12 mm in the outer part of the L-shaped elbow and weld a nut for a ½-inch plumbing thread to it from the outside; place the nut strictly above the center of the bowl and perpendicular to the body of the potbelly stove; this will be an adapter for the oil supply tube.
- Cut ½ a piece 5–10 cm long from the pipe, then cut plumbing threads along the edges, and cut inspection windows on opposite sides in the center, to do this, make 3 transverse through holes with a diameter of 10 mm close to each other, then align them with a file. Insert a metal washer 2–5 mm thick with a hole 4–5 mm in diameter strictly in the center into the upper part of the tube; this will be a dispenser.
- Cut a piece 20–30 cm long from a copper or steel tube with a diameter of 8–10 mm, then fill it with sand and cover the ends with something, then carefully bend it around a mandrel with a diameter of 10 cm. Both edges of the tube should be above the resulting ring, but one is directed sideways, and the other up, this will be a water seal, preventing smoke from breaking through the fuel supply system. Don't forget to empty the sand out of it.
- Place two ferrules on the tube and crimp the ends, then install the adapters onto the ½ plumbing threads. There is a high probability that such adapters will be difficult to find, so install the ¾ adapters, then attach the ½ adapters to them.
- Cut a piece 10 mm long from a steel pipe with a diameter of 30–40 mm; this will be the receiving cup of the fuel supply system. Plug the lower part of the glass with a circle of steel 5 mm thick, then drill a hole in this bottom strictly in the center for a ½ pipe and weld to it a piece of pipe 5–7 cm long with a plumbing thread cut at the other end.
- Screw the water seal tube through the corner to the dispenser, screw the glass on the other side and secure this entire structure to a steel plate welded to the L-shaped elbow so that the tube is securely fixed. If you do not want to make a water seal, then instead of a nut, weld a ½ pipe into the elbow so that it is 2-3 cm higher than the top of the bowl, and make an inspection window on top of the pipe and cut a thread for the tap. The advantage of this method is its ease of manufacture, but the disadvantage is that the pipe reduces the cross-section of the air duct channel and creates an obstacle to the movement of air, which reduces the overall air supply by several percent.
- Install a fuel tank with a volume of 10–30 liters above the tap, ensure that the tank is securely fixed so that it does not load the tap and pipe.
- Connect 1–2 heater fans from any passenger car to the L-shaped elbow through a metal corrugated hose. It’s easier to connect one fan, but two will provide stronger air flow, which, if configured correctly, will allow you to get higher furnace power and burn waste more efficiently.
Launch
To start the oven, follow these steps :
- Pull out the bowl box and check the draft with a burning match; the flame should draw into the oven.
- Knock out the slag remaining from the previous firebox from the bowl (this must be done daily).
- Pour 20–50 ml of diesel fuel and 50–100 ml of waste into the bowl, then put paper there, soak it in fuel and set it on fire.
- Insert the bowl into the stove and secure the box.
- When the mixture flares up, that is, after about 1–2 minutes, fill the water seal glass with waste until the first drops appear in the viewing window, then turn on the fan to minimum airflow.
- After 1-2 minutes, open the tap slightly so that drops are visible in the window, about one per second.
- Increase fan power.
Settings
Setting up such a stove comes down to determining the rate of fuel combustion under different modes of its supply and fan operation, and drawing up a table that will display :
- fuel supply rate (drops per minute or second);
- fan speed;
- stability of the working level in the bowl (it is necessary to check through the viewing window every 5–10 minutes during setup);
- the average temperature of the case (can be estimated by the rate at which the room warms up, but it is better to purchase a pyrometer with an upper limit of 500–700 degrees).
Determine at what fuel supply and fans running at maximum speed the liquid level in the bowl rises at least a little.
Then reduce the feed speed by 5–10% and, taking it as the maximum, determine at what fan operating mode the highest temperature is achieved. This will be the maximum power mode , the parameters of which should be written down on a plate or graph, which should always be located near the stove.
Then, in the same way, determine the optimal operating mode of the fans at a lower fuel supply (75%, 50% and 25%), without forgetting to control its level in the bowl, and enter all this data into the table. This will help you use such a stove more efficiently and economically.
Remember, you need to check the operation of such a furnace every week, but if you switch to another batch of mining, then immediately.
In addition, we recommend never using the oven at maximum power, limiting it to 75%, and checking the liquid level in the bowl at least once a day.
Also determine at what fuel supply your furnace is most efficient with the fans turned off and disconnected, this will help you use it even during a power outage .
Remember, if in the room where you installed the potbelly stove there is suddenly a strong smell of ordinary or burnt waste, it means that the fuel has overfilled the bowl and the device must be stopped to avoid a fire.
After cooling, determine the reason for the bowl overflowing (most often this is due to incorrect adjustment of the fuel supply or filling of waste obtained from another source).
How to increase the efficiency of such a furnace
The most effective way is to weld a heater around the circumference of the potbelly stove body (without covering the inspection hole and bowl), that is, vertical pipes with a diameter of 40–50 mm , possibly even in 2 rows.
They will sharply increase the area of the heat-emitting surface, which means heat transfer will increase significantly.
The only drawback of this method is the increase in weight and size of the device, but if space allows, do so. This tuning will reduce fuel consumption and provide more economical heating of the room.
If you connect the pipes from above and below with collectors, then you can organize full-fledged air heating by pumping cold air into the lower collector and delivering it to remote rooms through air ducts with a cross-section of 400–1000 cm2.
How to make a supercharged stove?
The main difference between forced-air burners and evaporators is that they do not operate without electricity, which drives the compressor and the forced-air fan. Therefore, the traction requirements for such devices are lower, but the requirements for tightness are much higher.
Therefore, the best furnace body for it would be a multi-stage heater, that is, 2–5 pipes with a diameter of 30–50 cm installed one above the other and connected into a “snake” by adapters of a slightly smaller diameter 5–15 cm long. This design is analogous to a multi-channel heating panel of a brick furnace .
You can weld the heater described above to this structure, but in this case you should not install more than three horizontal pipes, otherwise the smoke temperature will be too low and the pipe will gradually become overgrown with soot and resins due to the condensate that falls out.
Another option for a heater is a sealed firebox with an outer casing and channels passing between them for air movement. However, such designs are complex , so they can only be made by someone who not only has high welding skills, but also understands the design of such devices.
Manufacturing a furnace with a water circuit
Any of the waste oil stoves described above can be equipped with a water circuit; to do this, it is enough to weld ribs to the heat exchanger that form channels for the movement of water, then close this entire structure with a sealed housing with two holes .
At the top there will be a hot water outlet, at the bottom there will be a return flow, that is, a return of cold water. However, due to the high surface temperature of the heat exchanger, the water circuit will be effective only when the water moves quickly, so it is advisable to equip such a stove with a heat accumulator (TA), that is, an insulated water tank with a volume of 100–1000 liters.
This design will make it possible to maintain the water temperature in the TA at the specified boundaries, and will also reduce the corrosive effect, because the influx of new water means an increase in the amount of chemical reagents that cause such processes.
If the amount of water is limited (water circuit, pipes and heating equipment), then the corrosive effect on the metal is insignificant , which means the circuit will last longer. Thermal energy can be collected from the heat exchanger using a coil. The larger its surface area and internal diameter, the more thermal energy it will provide.
Potbelly stove plus water circuit
Any home could benefit from having an emergency heat source. Its role can be played by an ordinary, but slightly modernized, potbelly stove. You can improve the stove in two ways - put a water jacket on the burner pipe or wrap its body with a coil of copper tubes.
The coil turns are placed at a distance of about 5 cm from the perforated body of the potbelly stove and connected to the general heating system. A reflective screen is installed around the coil. For its manufacture, sheet aluminum, galvanized steel, and tin are used.
The water jacket is a tank on the upper chamber of the potbelly stove. There should be 2 fittings in its body - one for water supply and the other for drainage. In general, the design resembles a samovar. The volume of the water jacket depends on the length of the heating system and the method of circulation of the coolant.
In practice, the issue of constructing a water circuit is solved by installing a container directly on the potbelly stove. Hot water enters the heating system through the outlet. After going around the circle, it radiates heat into the room and returns back to the container.
If a pump is built into the system, the volume of the tank is small, but with natural circulation it has impressive dimensions. To control water parameters, a pressure gauge and thermometer are installed on the tank.