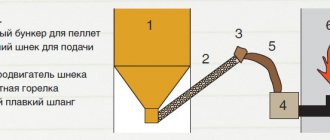
The simplicity of the design and the availability of materials for the manufacture of a potbelly stove have earned it well-deserved fame. For a hundred years, craftsmen have developed production technology, and more and more modifications of the heat-heating device are appearing.
Such a stove is made from a gas cylinder, pieces of pipes, a metal barrel, steel sheets or cast iron parts. Currently, the largest users of “bourgeois” are the owners of garages and auto repair shops. Today everyone equips their stove-stove with a water circuit. And therefore, a potbelly stove with a water circuit is a more advanced device with internal and external heat exchangers.
Disadvantages and advantages of using a potbelly stove
This homemade garage stove has only three drawbacks:
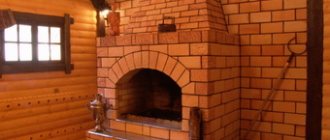
- Heating devices are made of steel, so they quickly give off heat and cannot accumulate it, unlike cast iron stoves. But solving this “trouble” is quite simple - to do this, you can simply cover it with refractory or “fireclay” bricks from open-hearth furnaces. For lining, you can use simple building bricks.
- To ensure sufficient air extraction, you will need to provide the stove with a hood, the height of which is at least 4 m. But this is also a dubious drawback. For better heating of rooms, experienced stove makers advise stretching exhaust pipes across the entire box. The gas will give off heat throughout the entire box - this will save fuel.
- An undeniable drawback is the need for constant cleaning of the chimney, especially if it is made of a thin pipe and the possibility of condensation formation.
The advantages of a homemade stove for heating a garage are many times greater:
- ability to quickly heat a room. Garage stoves, made in accordance with all the rules, can raise the temperature to a comfortable level in just 10 minutes. But if the heater is covered with bricks, this period of time will increase;
- the ability to ensure uniform heating of the entire room with ventilation pipes stretched throughout the garage;
- A potbelly stove for a garage can be made to operate on different types of fuel. This could be a wood-burning garage stove. Used oil and coal will do. Even wood shavings and sawdust can be used as fuel;
- the simplicity of the design allows the use of different schemes for production. You can make a wood-burning stove for a garage with your own hands from an old gas cylinder, a piece of pipe, or just old sheet metal;
- such a home-made design does not require large expenses for the purchase of materials and time for its production. If you make a garage oven with your own hands, running on used engine oil, it can save significant money. Electric convectors or infrared heaters increase the figures for paying for electricity;
- By adding minor changes to the plans, you have the ability to quickly reheat or cook hot food in the garage.
Let's take a closer look at the process of making a stove for a garage with our own hands.
Even a car needs high-quality heating! Effective ways to heat a garage
You are viewing the Garage , located in the large Heating section.
Storing your car in a warm garage in winter eliminates many problems.
Clean windows, easier engine starting, ease of maintenance and repair will extend the life of the car and preserve the health of the car owner .
In a warm, ventilated garage, the car body will last much longer.
Those who like to repair their car on long winter evenings know that in the cold, metal and rubber become brittle, and repairs are often complicated by broken bolts or burst plastic. The positive temperature in the garage allows you to work comfortably and without problems.
Preparatory work before assembling the heater
A potbelly stove is a source of increased fire hazard. Therefore, when placing it in a corner of the room or near a wall, you must:
- Hang protective screens on the stove.
- Raise it from the floor, and protect the floor under it near the doors of the firebox and ash pan with tiles or asbestos slabs.
The walls and floor where the potbelly stove is installed must be protected with fireproof materials, and the stove itself must be raised onto a heat-insulating base
The removal of heat by the water circuit from the boiler core lowers the combustion temperature and reduces the thermal radiation of the furnace. The heat exchanger affects the combustion process like a bucket of water on a fire. A cold recuperator zone appears inside the firebox, which prevents the fuel from completely burning, causing the formation of soot in the chimney and smoke above the chimney. The stove will smoke constantly.
Required materials and tools
To make a temporary stove you will need the following tools and materials:
- Bulgarian.
- Electric or gas welding.
- Electric drill and drill bits.
- Tools: pliers, hammer, file, sanding paper, ruler, tap.
- Plumbing: American fittings, nuts for fittings, swivel taps, adapters.
- Sealant or silicone for fittings.
- Alloy steel sheet metal.
The following can be used as a basis for making a furnace:
- Metal barrels with a volume from 20 to 200 liters.
- Car wheels from 2 pcs.
- Propane or carbon dioxide cylinders.
- Thick-walled metal pipes with a diameter from 150 to 350 mm.
- Metal water flasks for 20, 30 or 40 l.
One of the most popular solutions for making a potbelly stove with your own hands is to remake an old gas cylinder
If the specified materials are at hand, it means that 2/3 of the design of the future stove is already ready. All that remains is to assemble everything into a single device.
Manufacturing a heater and installing a main boiler on the chimney of a potbelly stove
We select available material for the manufacture of the device. We take into account that an aluminum recuperator requires twice as much material as a copper one due to its thermal conductivity properties. To install a stove with a heat exchanger 500 mm high you will need:
- Copper or aluminum tube with a diameter of 16 mm and a length of 50 m.
- Gas cylinder or compressed gas cylinder.
- Chimney pipe with a diameter of 150–210 mm.
Step-by-step instructions for making a temporary shed with a boiler:
- We cut off the gas cylinder. We weld the legs.
First, you need to cut off the top of the gas cylinder
Holes are made in the bottom of the cylinder to remove ash and create draft
We weld a metal box for the ash pan to the surface where the holes are drilled.
For fuel combustion there is enough air that will flow through the grate holes
Video: potbelly stove with water circuit
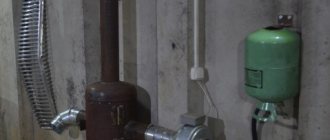
Installation of a capacitive heat exchanger on the chimney of a potbelly stove
We assemble a capacitive recuperator using the diagram.
With the help of a potbelly stove it is very convenient to fill the storage tank with hot water
Step-by-step assembly of a stove with a water jacket:
- We take a pipe with a diameter of 250–300 mm or use a carbon dioxide cylinder.
- Taking a thick sheet of metal, we cut out two metal square plates with a grinder. The size of the plates is slightly larger than the diameter of the cylinder (350x350 mm).
Holes for the firebox and ash pan are cut one below the other using a grinder
In the lower and upper parts of the carbon dioxide cylinder, nuts are welded to which pipes with coolant will be supplied
At the final stage, the chimney is attached, and the welding seams are processed with a file.
It is necessary to check all connections at an operating pressure of 2–4 atmospheres
The water heater in the bathhouse can be supplied with hot water through the heat exchanger of the stove
Construction of a potbelly stove: features, principle of operation, arrangement of heat exchangers
A potbelly stove with a water circuit works as follows:
- Firewood is loaded into the firebox.
- They light a fire, the heat is transferred directly to the water tank or the recuperator coil.
- Hot water enters the heating or water supply system.
- Remaining heat and flammable gases are removed from the room through the chimney.
- The ashes fall through the grate into the ash pan.
The design of the water circuit unit uses two energy harvesting principles:
- Direct thermal energy collection. The heat exchanger circuit is located inside the stove. Heat transfer immediately begins from the contact of the open flame and the boiler tubes. The water in the radiator boils and enters the heating system. From there it is sent to water supply pipes. The heat exchanger experiences large temperature differences (the contrast between the temperature of the water and the heat inside the oven).
The direct thermal energy collection heat exchanger is located directly in the core
- Collection of secondary heater radiation. The boiler circuit is located outside the heater. Being outside, it collects secondary thermal radiation from the heated metal surface. The degree of heating of the heat exchanger is lower than in the previous case, temperature differences are not so significant. The water in the device circuit begins to heat up after the stove warms up.
The water circuit of the heat exchanger is heated due to secondary radiation of thermal energy from the furnace body
Photo gallery: common types of heat exchangers
If it is necessary to heat a small volume of water, the heat exchanger can be installed directly on the chimney
The direct collection heat exchanger is exposed to large temperature differences, so it must be made of thick-walled pipes
In this design there is no intermediate heat exchanger; the water is heated in a tank installed directly on the stove
A heat exchanger with a large area of contact with fire will heat water as efficiently as possible, but will burn out faster
A pipe wound onto the stove body heats the water using the energy of the hot walls.
Mineral salts form inside the boiler. Therefore, instead of water, it is more advisable to use antifreeze or antifreeze, which contain additives that prevent the formation of mineral deposits . The most common heat exchanger designs:
- a water tank built into the stove - a capacitive boiler;
- tube boiler - a tank in the form of a water jacket around the stove or chimney - capacitive heat exchanger;
- main boilers - a coil spiral or a water conduit passing through the active heat transfer zone.
Calculation of the main parameters of a potbelly stove with a water circuit
To calculate the dimensions of a stove with a water circuit, you need a drawing, drawing or sketch of the future device. This will help avoid manufacturing errors.
Having chosen a suitable project, we determine the parameters: length, height, width. We calculate the dimensions of the combustion chamber, the length and diameter of the pipe, and the height above the floor. A potbelly stove is characterized by high temperatures inside the boiler, so metal with a thickness of more than 3 mm should be used. Or carry out scheduled repairs every 2-3 years.
Thick-walled alloy metal is used in the manufacture of potbelly stoves
You may also be interested in an article about making a metal stove for a garage:.
Determining the volume of fuel fill
For the potbelly stove to operate efficiently, it is important to load the optimal amount of fuel into it, and for each type of fuel it is necessary to find its own indicator. If you overload the furnace, there will be too many combustion products and they will block circulation; if you underload, there will be few of them, which also makes circulation impossible
The volume of the bookmark is selected as follows:
- fuel is collected in a bucket;
- they take a handful from the bucket and, placing it in the firebox, set it on fire;
- add fuel in small portions until the initial section of the hog is cherry red hot. Now they estimate how much fuel is taken from the bucket - this is the minimum volume of the stowage;
- continue to add fuel (the portions must be increased) until the dimensions of the hot section reach 80%-85% of the length of the “hog”. At this moment, the volume of fuel taken from the bucket will correspond to the maximum fuel load.
The test is carried out in moderate lighting: if during the day, then in cloudy weather (winter); If it’s clear outside, it’s closer to evening. When loading high-calorie fuel (pellets, anthracite), the hot area sometimes takes the form of a ring with different widths, occupying different positions along the length of the hog.
Then the volume of the bookmark is determined as follows:
- maximum: the section of the hog farthest from the furnace is hot for 1/3 of its length;
- minimal: the hot zone is located in the middle and is 3-4 palms long.
General garage heating
It is convenient to heat a garage room from a central boiler room or heating plant . The owner does not worry about fuel, and maintaining heat is done without his participation.
General heating is ideal for car repair shops, covered parking lots, and garages for valuable vehicles.
to connect a garage to the central system if it is located close to the house or heating main. The main advantage of this method is the ability to maintain a certain temperature in the garage throughout the heating season.
But there are also disadvantages:
- Risk of batteries freezing during the off-season or repair work.
- Large energy losses on the heating main.
- Relatively high cost.
- When connecting to the municipal system, you will have to obtain permission and install a heat meter.
Conditions for optimal system performance
Obviously, in order to heat the coolant and supply it to the radiator system, the wood stove must be equipped with an additional heat exchanger. There are two ways: purchase a ready-made metal or cast-iron long-burning stove with a built-in water circuit for your home, or make it yourself.
There are several types of homemade heat exchangers and options for their installation:
- Tank is a boiler built directly into the firebox or into one of the chimney ducts.
- A register welded from pipes, sometimes in the form of a coil. It is also placed inside the combustion chamber or in the flue.
- Samovar-type heat exchanger (technical name - economizer). It is installed purely on the chimney to extract heat from the exhaust gases.
- Full water jacket. In a simplified version, a similar fireplace stove with a water circuit is shown above in the diagram.
Tank-boiler for heating coolant
The water circuit can be made from the following materials:
- black or stainless steel;
- cast iron;
- copper.
In addition to the stove, the heating element of the system with a water circuit is a heat exchanger, which is built into the firebox or chimney. The water passing through the register is heated and then enters the pipes and radiators, releasing heat. Due to the temperature difference at the inlet and outlet of the heat exchanger, the liquid circulates in the circuit.
For optimal operation, a circular pump is built into the system, which allows the heated liquid to be more evenly distributed throughout the pipes.
The water circuit must be pressed out and air removed. When water heats up, it increases in volume and to prevent the system from exploding, it is necessary to provide an expansion barrel. When using a closed-type circuit, the reservoir can be located anywhere; in an open system, the expansion barrel is installed as high as possible.
To relieve pressure in the system, it must be equipped with an automatic air vent to release excess gases from the coolant and a safety valve. The devices can be combined into a security complex by including a pressure gauge.
Thus, if you include a long-burning wood-burning brick stove with a water circuit in your home heating system, you can significantly save on heating costs.
The system will be operational provided there is constant circulation of coolant in the pipes. This is ensured by a mandatory slope, as well as the desirable installation of a circulation pump, which guarantees the necessary movement and prevents water from boiling.
Small in size, but with sufficient power, the pumps guarantee good circulation. They are necessary especially if the heating system is long. Installation of such a pump is carried out on the return line, that is, on the coolant return pipe.
You should not rely only on the pump and install pipelines without a slope, since interruptions in the supply of electricity may lead to boiling and failure of both the pump and the system itself. In such cases, it is better to resort to installing expansion tanks that compensate for the expansion of water.
Design work is completed by familiarizing specialists with the diagrams. They will help eliminate errors leading to unstable operation of water heating from the stove. This is also an opportunity to avoid security violations.
Oven with water circuit integrated during the masonry phase
A brick stove with a water circuit for heating a house works according to the standard principle. To install it, it is necessary to create a water heating system, through which heat is supplied from the stove walls and heating radiators connected to the main circuit. The loop pipes are connected to the boiler or register built into the furnace. The coolant is heated by passing through a hot register, then it passes to pipes and radiators.
Features of operating a stove with a water jacket
- It is advisable to install a temperature and pressure sensor in the hydraulic system.
- It is necessary to regulate the draft in the grate and in the chimney.
- The water circuit in both types of heat exchangers must be equipped with an expansion tank.
- A main-type water system requires a circulation pump installed on the return line, i.e., on the lower tube.
- A device with a capacitive tank requires a circulation pump if the diameter of the outlets is less than 75 mm.
- It is necessary to provide a place for draining water.
- You cannot heat the stove without water - the heat exchanger may burn out.
- After use, the water must be drained.
The temperature change in the heat exchanger occurs due to the combustion rate of the furnace. The heat turns into radiation, the water heats up in the chimney, and after another half an hour in the pipes. The system is inertial due to the high heat capacity of water, so a large supply of fuel is needed.
A potbelly stove is a flammable structure; it is necessary to start and place a fire extinguisher and a hook nearby.
Oven cleaning and repair
With regular use, the chimney needs to be cleaned. The appearance of a 2-3 mm layer of soot reduces draft and reduces heat transfer. You can disassemble the chimney and clean it with a brush, but this is labor-intensive and not always possible. If the potbelly stove is used daily, then you should clean the chimney with fire:
- Once a week, heat the stove with aspen wood. Aspen has a high combustion temperature, which burns soot in the chimney. Add a little at a time after the main ignition;
- After lighting the fire, add well-dried potato peelings along with the firewood. One filling requires approximately half a bucket. It is enough to do this once or twice a week and the chimney will be clean of soot. This method will not work if the chimney is already overgrown with a 1–2 cm layer of soot; in this case, cleaning will only soften the soot, and you will have to remove it from the walls of the pipe with a brush or a metal scraper;
Burning potato peelings along with firewood protects the chimney from the formation of soot deposits
- use special firewood or pellets that are added to the firebox during combustion. The most famous remedy is “chimney sweep log”. It is burned along with firewood approximately once every six months. It is best to place it on hot coals left after heating the stove. A distinctive feature of this product is that it continues to act for two weeks after use, gradually softening the soot on the pipe walls.
The log burns in the stove in about 1.5 hours and then acts for two weeks, softening and removing soot from the walls of the chimney
The main measures for furnace repair are:
- Pipe repair. The chimney pipe is the weakest point of a potbelly stove. If it burns out, it needs to be changed.
- Heat exchanger repair. The main heat exchanger can be removed by unsoldering it from the furnace body. But the capacitive circuit will have to be welded again in a few years.
- Elimination of defects in the furnace body. If a wall or back surface burns through, a metal patch is usually welded onto the area. The cracks can be sealed with scraps of metal rods.
All operations are quite simple and understandable, so servicing the potbelly stove will not cause any big problems.
Options for making devices yourself
When selecting, the main role is played by the price of the heat exchanger. The design will depend on the material. Another important nuance is manufacturing capabilities.
You also need to understand where the stove will be placed.
It is important to take into account the purpose of operation - heating and cooking, for heating a bathhouse, a home. Each type has differences
For heating a private home
The main thing is to correctly calculate the area that needs to be heated, also clarify whether hot water is required, and calculate how many units of fuel will be consumed per season. The results of the calculations are the selection of the most suitable and affordable materials for the budget.
For a bathhouse you will need a comprehensive option. The main goal is to warm up the water, two rooms at once - a dressing room with a steam room, and sometimes a shower. It is recommended to use a heating coil for stove heating and water heating. Additional heating will improve the quality of the steam.
For the bath
For the home, the functional requirements for the device must be taken into account. The final choice will depend on this. Usually in villages they try to make universal heating and cooking structures; they install the most commonly used heat exchangers, simple ones that solve at least three problems - heating, cooking, water heating.
For garage
The garage is the easiest place to choose, here heating the liquid carrier is an optional function, the main thing is heating the room. These conditions will make the choice easier. Various homemade heat exchangers made from scrap materials are suitable - car radiators, cast iron batteries, etc.
How a potbelly stove with a hydraulic circuit works - DIY construction
The heating system in city apartments helps create coziness and comfort. For most regions, heat supply is the most integral part of ensuring life. Residents of private houses in these regions solve problems of this type with the help of stoves. A very popular type of heating system in a private home can be called a potbelly stove with a hydraulic circuit. Its design includes heating batteries, which makes it possible to heat the entire building. You can purchase a ready-made design in a special store, but it should be noted that its price is higher. With a small budget, you can make your own traditional heating system from a potbelly stove.
Air convector
There is not always enough finance to purchase a ready-made heat exchanger. In principle, it is not difficult to make a heat exchanger for a heating furnace. For this, copper and aluminum are used; if desired, you can completely do without welding. With proper preparation and accurate calculations, the budget is significantly saved.
First, a location is selected, parameters are calculated, and you need to decide what material to choose to make the heat exchanger. You can build a structure from an old cast iron radiator, a radiator from a car. The main thing is to take into account the conductivity of heat. It is also important to think over a set of tools, prepare everything in advance, each detail makes installation much easier.
Assembly must begin with drawing up a drawing taking into account the dimensions. If the stove is weak, a disproportionately large heat exchanger will do harm. When using copper for the coil, its length is maximum 3 m. The speed of heating depends on the length of the pipe and the number of curls. It is important to remember that distortions reduce the life of the equipment.
Air convector equipment
To twist the pipes into a spiral, a template is required. This is any available part in the shape of a cylinder. Its diameter must fit into the size of the firebox.
The sequence of actions is as follows:
- bend the pipe, wind it around the workpiece to form a spiral;
- keep the dimensions to fit the coil;
- the average design power of the heat exchanger is 1 kW per 10 m2.
Electric heating with TEN
There is a wide variety of heating methods and methods using electricity. Heating with electricity can be constant or intermittent. To organize it you do not need an isolated room.
Technical solutions for permanent heating with electricity.
- Closed gravity heating system with electric boiler, pipe system and radiators . Allows you to evenly distribute heat in the room, ideal for heating several boxes and multi-story garages. The downside is the high cost of equipment and electricity, the plus is the safety and reliability of the system.
- Connecting convectors, heaters, ceramic panels. Plus - safety and ease of connection, the ability to distribute heat throughout the room. The downside is the need to route electrical cables along the walls, so the fire hazard is higher.
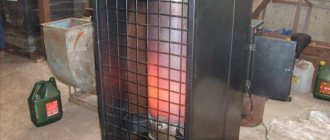
Photo 1. Electric convector installed in the garage. There should be an outlet nearby to connect the device to the network.
- Heating with electric air gun or spiral heaters. Suitable for organizing periodic heating. Advantages - quick heating of the room, do not burn out the air. The downside is an increased fire hazard due to the accumulation of fuel vapors, aerosols or dust.
- Using infrared films in the ceiling or walls of the garage. The advantage is uniform heat and does not take up space. The downside is an increased fire hazard, fragility of the insulation, and the possibility of damage to the heating tracks.
Heating elements are:
- Air. The filament resistance is designed to maintain a certain temperature on the surface of the device.
- Mermen. Due to the high power, they burn out when turned on in air, and have factory sealed fastenings.
How to make a heater with your own hands
Heating elements for heating a garage are used from various industrial or household appliances. Heating elements from electric kettles, boilers and washing machines are popular among household ones.
They are connected to a cast iron battery through a standard plug, taking into account the power and wire cross-section.
One section of a standard cast iron battery produces 0.1-0.3 kW/hour of heat, the number of sections is selected based on the power of the heating element. It is desirable that the heater be located along the entire length of the battery.
The battery is filled 85% with gear oil or antifreeze, and the plug is screwed in. The remaining 15% of the air serves as an expansion tank.
Attention! When carrying out electrical installation work, remember safety! All wires are placed in protective boxes, twists - only in the distribution box. Incorrectly selected wire sections lead to a fire.
A grounding connection must be connected to a homemade battery heater ; it is better to install a difavtomat at the electricity input to the house.
About the principle of top combustion
Today, there are 2 types of heaters that use this principle - homemade Bubafonya and boilers from the Lithuanian brand Stropuva. The bottom line is this: solid fuel is loaded inside a combustion chamber made in the form of a vertical cylinder, and then ignited from above. From there, air is constantly supplied to the combustion zone through a vertical pipe ending with a disk weight with air flow distributors.
Reference. It is not known which top-combustion unit was invented earlier - a Lithuanian boiler or a Russian stove. But many domestic manufacturers picked up the idea and began to produce heat generators operating on this principle, equipping them with automation and even forced pressurization.
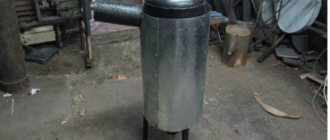
Actually, the traditional Bubafonya stove consists of only 3 parts, shown in the photo:
- a cylindrical body with a chimney pipe, installed vertically (available with or without grates);
- top cover with a hole cut in the center for the air duct;
- piston - a pipe with a welded “pancake” equipped with ribs at the bottom - air diffusers.
As already mentioned, the chamber is filled with any solid fuel - firewood, sawdust, wood chips or coal. The filling is pressed down by the weight of the piston, and a lid is placed on top of the pipe. The stove is ready for use. Now let's learn more about how it functions:
- After ignition and installation of the weight with the lid, air is sucked into the combustion zone through a vertical pipe due to the draft of the chimney. Coming out from below, under the “pancake”, the flow spreads in all directions thanks to distributors made of steel strips.
- Flue and pyrolysis gases go around the edges of the disk and rush to the upper zone, to the chimney opening. Secondary air also enters here, penetrating into the gap between the cover and the pipe (it is not specially sealed). As a result, flammable gases emitted by wood or coal are burned.
- As the logs burn, the piston lowers until it reaches the bottom or grate, after which a new load of fuel is required.
Scheme of upper combustion of solid fuel
It has been tested in practice that one load of firewood into a firebox made from a standard gas cylinder lasts for about 5 hours, and coal for 10-12 hours. Therefore, Bubafonya is rightfully considered a long-burning stove.
Economizer Fehringer
The device is used to improve efficiency. It works by extracting heat from the chimney. It has 4 pipes, 60 mm each, with spiral-shaped swirlers.
The passing gases from the smoke swirl, resulting in maximum heat release. The device is made of black steel. It is designed for the entire period of operation of the stove. It allows you to quickly warm up the steam room.
Feringer is valued by bath lovers as one of the best models. They are produced in different versions, but in two main categories:
- Steam - the heater is closed, creating a steam room atmosphere - temperature up to 50-70 degrees, humidity reaches 40-75%.
With closed heater
- Golden ratio - the heater is open, suitable for saunas, where at a temperature of 80 degrees, low humidity is needed - 10-15%.
With an open heater
Since 2011, the company has developed a new line - Lamel. It has a natural stone cladding and small innovations in the design that allow you to confidently heat log steam rooms.
Lamella
The system for securing the decorative stone of the stoves is unique - a holder is installed on the cut plates of the stone. Its hooks are fixed in a groove. The design is simple, at the same time very effective, installation work is simple, it will take no more than 1 hour.
Installation
It is most convenient to install the heat exchanger at the masonry stage. This helps to build it more correctly with strict adherence to dimensions and gaps. This makes it much easier to fit the given dimensions. After installing the heat exchanger on the stove foundation, it is covered with bricks. This is easier than disassembling the existing structure, although this approach is not excluded.
To increase operating time, you need to pay attention to the following nuances:
- do not fix pipes with metal fasteners;
- do not fill the system with too cold water, otherwise strong condensation will form;
- observe the ratio of the sizes of the furnace and heat exchanger, the difference should not be large;
- use seals with good fire resistance;
- compliance with fire safety measures.
These simple settings will help prevent the occurrence of situations dangerous to the life and health of people, increase service time, and remember safety.
Which garage heating scheme to choose?
There are a large number of options. To select, consider the following parameters:
- Availability and cost of heat source.
- Cost of equipment.
- Heating mode.
- Compliance with safety rules.
- Easy to install and use.
Based on the tasks and taking into account the characteristics of the room , choose the appropriate heating option. Busy people who need a warm car in the morning are better off installing gas or electric central heating.
Fans of rare garage repairs can get by with a gas or electric air gun or potbelly stove. People who spend a lot of time in the garage can install a wood heating system.
To reduce heating costs, think about effective insulation and proper ventilation.
Long-burning stove bubafonya
A bubafonya-type stove made from a gas cylinder is a potbelly stove only in appearance. The design and principle of its operation are significantly different from a simple potbelly stove.
Scheme of operation of the bubafonya long-burning stove
Furnaces of this type are produced by several industrial enterprises, but they are not cheap. If you have an equipped home workshop and basic skills in welding and plumbing, a bubafonya stove from a gas cylinder is quite affordable to make with your own hands.
Technology for making a stove from a conventional gas cylinder
IMPORTANT! Before starting work with any gas cylinder, it is necessary to completely remove any remaining gas from it! To do this, the cylinder is filled with water and detergent, designed to rid the future stove of gas odors and mercaptan fragrances.
Next, mark the holes for the door, vent and exhaust pipe and cut them out with a grinder. You can purchase a ready-made cast iron stove door in a block with a blower. In this case, a frame of their corners is welded to the opening in the gas cylinder, and a cast door is bolted to it. If aesthetics are not so important, then the door is made from a cut piece of a cylinder. In this case, a more or less wide gap will inevitably remain. In the most primitive version, there are no grates and protrusions that form the flow of combustion products.
Natural gas as fuel
If it is possible to supply main gas to the garage, a convenient solution would be to install a gas boiler and an open gravity heating system with radiators .
ethylene glycol-based antifreeze as a coolant - even if the temperature drops below zero or there is a power outage, the system will not be affected.
The disadvantage of such a system is the high cost of equipment and installation, as well as difficulties in connecting to the gas main. The boiler must be located in an isolated room; forced ventilation is required.
If only liquefied gas in cylinders is available, it is better to organize local heating . A powerful gas heat gun can increase the air temperature in a standard garage in a few minutes . If you don’t need such power, it’s better to take a ceramic burner. It does not burn oxygen, is safe and multifunctional. But the big disadvantage is the high risk of explosion due to the possibility of accumulation of dust, fuel vapors in the garage, burnout of oxygen and dust in the room.
The heating option with an open flame injection burner is not the best for a garage. An open flame quickly burns out oxygen; any fuel leaks can cause a fire.
Attention! The use of blowtorches, gas burners and other open flame heat sources is not permitted when carrying out painting work or repairing the fuel system. Gas combustion equipment must be located in an isolated room with ventilation!
Foundation
Most often, a potbelly stove in a garage is installed on a metal sheet. But in some cases a foundation can be made for it. This operation is performed in the following order:
- We disassemble the base of the floor and make a rectangular pit 40-50 centimeters deep.
- Fill the bottom of the hole with a layer of sand, fine brick chips or crushed stone.
- Fill the rocky bottom with cement. When performing this procedure, you should check the horizontalness using a level.
- We wait until the cement is completely dry, after which we lay several layers of roofing material. It acts as a waterproofer and protects the potbelly stove from moisture that can seep out from the soil.
After the foundation is ready, you can proceed to the next stage - making a potbelly stove.
Warm, light and flies don't bite
What can drive a man out of a garage? Only cold and hunger. The first one, as it turns out, is not difficult to deal with. You just need to choose the right heating device. And any motorist can install it and operate it competently.
Hunger is more difficult. But, of course, the iron horse will have to remain in splendid isolation if a beautiful wife and lush hot pies await his owner at home
If you have your own experience in arranging a warm car box, share with us in the comments!
| Affordable fuel price | The need for professional installation of the system |
| Economical | The need for periodic refueling |
| High level of efficiency | Explosion hazard |
| Possibility of round-the-clock automatic operation | High installation costs |
| Electricity | |
| Easy to install | High cost of operation |
| Mobility | Dependence on power grids |
| Affordable price of devices | |
| Solid fuel | |
| Independence from gas or electrical communications | Fire hazard |
| Fuel Variability | The need for constant monitoring of the furnace operation |
| Economical | The need for periodic maintenance (cleaning) |
| Working off | |
| Fuel availability | The need for periodic repairs and maintenance |
| High efficiency | Fire hazard |
| Economical | |
| Possibility of making the device yourself | |
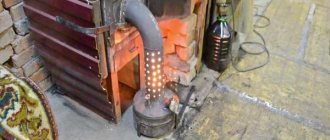
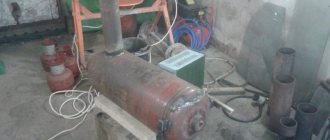
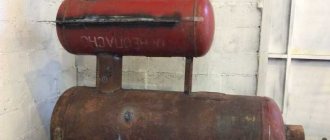
How to make an oil stove from a cylinder
The gas cylinder exhaust furnace is made in a vertical design. The top part of the cylinder is cut off, into which the afterburner chamber is welded. There is a hole in the floor of the chamber that can be closed with a flap for adding oil. The outlet for the chimney from the afterburning compartment should be located as far as possible from its partition, at least 20 cm.
Oil stove for greenhouse
It is important to remember that oil should be added extremely carefully to a hot pyrolysis oven from a gas cylinder; it is better to wait for it to cool completely. In more complex designs, the oil pipe is removed through the top cover; oil can be added to such a stove without interrupting combustion. Making such a stove from a 50-liter cylinder is quite affordable for an average skilled craftsman