Ecology of consumption. Homestead: Heating a greenhouse in winter is probably the biggest expense. Let's look at how to organize heating of a greenhouse in winter, if possible without investing large amounts of money.
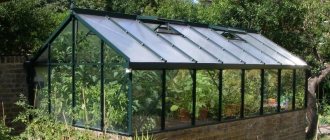
Without a doubt, a greenhouse on a personal plot is a necessary structure.
This irreplaceable building for a gardener acquires even greater value when the possibility of heating it is provided.
Growing early vegetables, herbs, strawberries and seedlings, and with year-round use of a heated greenhouse - and obtaining such products in winter - isn’t this an obvious benefit?
Especially for those who make money this way: vitamins in winter and early spring are not a cheap pleasure and the demand for them is great.
The ability to harvest 2-3 crops makes this business even more profitable.
Growing tropical and ornamental plants has now become a fashionable hobby. And it is possible to provide them with appropriate climatic conditions throughout the year only in a greenhouse or winter garden, where heating is present.
How to build a greenhouse with heating? or add heating to an existing one?
Stove heating
A reliable solution that will provide year-round heating of the greenhouse. In the simplest case, an ordinary potbelly stove is placed in a greenhouse, which can be heated with firewood, sawdust, and other wood waste. Advantages of this method:
- Maintains the temperature necessary for plant growth, regardless of outdoor conditions.
- Possibility to install the stove yourself.
- Low heating price, which will not increase the cost of the future harvest.
But installing one stove also has a certain disadvantage - the volume of the greenhouse is heated unevenly, and the temperature near the heat source will be higher. Therefore, for a large greenhouse, it is advisable to make at least a simple water heating system. To save money, they lay a circuit of pipes. Heating efficiency will improve if inexpensive registers or radiators are installed, but in this case the cost of the system will increase significantly.
Option 3 heating with gas
The main advantage of gas is that it is more stable in terms of supply, but the final cost of products from the greenhouse can surprise. Therefore, if heating a greenhouse with gas in winter lasts only a few weeks, then it is not necessary to pull it from a residential building and purchase expensive pipes for this. It will be enough to take a couple of cylinders for this purpose - they will last for a long time.
It is only important to remember that excess carbon dioxide can negatively affect the condition of plants, and therefore such a greenhouse must be well ventilated. And to remove combustion waste, it is necessary to use an exhaust device so that a constant flow of oxygen into the greenhouse is ensured
And so that the lack of oxygen does not lead to the cessation of the combustion process and the release of gas into the air, it is advisable to use heating devices with an automatic protective device - the sensors will immediately operate as soon as the gas supply to the burner stops.
Air heating
Such heating of polycarbonate greenhouses is also in demand. In this case, a stove or other heater is installed outside the greenhouse; a pipe is connected to it, through which heated air enters the greenhouse. In the simplest case, you can build a fire under the outer edge of the pipe.
The main advantage of heating a greenhouse with air is its ease of implementation. The greenhouse heats up quickly, but also cools down quickly.
This heating option is not suitable for constant use. This heating method does not warm the soil, which slows down the development of the root system, and also dries out the air greatly. It is very difficult to heat a large greenhouse in this way: it will require a large amount of fuel.
Heating in regions with warm-temperate climates
If the average winter temperature is not much below freezing, the cheapest way to create a comfortable environment for plants is to place manure or compost under the beds. The vital activity of anaerobic and aerobic bacteria is accompanied by the release of a significant amount of heat. Usually one bookmark is enough for three winter months. Backup heating in the greenhouse in winter in case of frost is still necessary. The easiest way is to lay a cable from the house to the greenhouse in a polyethylene pipe and connect an electric heater with a thermostat. It makes no sense to create a greenhouse heating system, since it will rarely be used. But even in this case, good thermal insulation is extremely important: it is better to make the greenhouse cover from polycarbonate or double glass (pro
Water heating
A water heating system is a closed loop of pipes through which water circulates, heated by a boiler or other heat source. The circuit can be laid either along the walls of the greenhouse, heating the air, or embedded in the soil, heating the root system of plants.
Water heating can operate on any fuel: gasoline, peat, bustard, biofuel. This depends on the boiler configuration. This system is safer than laying electrical cables or using gas heating. Cables may become damaged, causing a short circuit, and the gas may explode.
For optimal heating, it is best to lay two pipe circuits at once:
- The first is laid at a depth of 30 cm in the ground. It is used to heat the soil. In this case, the temperature of the pipes should not exceed +30-40 degrees Celsius.
- The second is laid along the perimeter of the greenhouse along the walls. It is not advisable to install the circuit on the ceiling, because Warm air, according to the laws of physics, will not fall down and warm the plants.
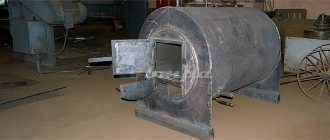
Do-it-yourself potbelly stove
such heating for a greenhouse yourself. To do this you will need the following materials and tools:
- heat-resistant metal sheets;
- pipes of the same diameter made of cast iron, steel or ceramics;
- metal rods and corners;
- tape measure and plumb line;
- grinder or metal scissors;
- welding machine;
- bolts and couplings;
- baked brick;
- clay and lime mortars.
Structure, its location and foundation
One potbelly stove can heat a space of 15 m2 . There must be at least 30 cm between the heated structural elements and the walls of the greenhouse.
If the greenhouse is made of a material that can easily be melted (polycarbonate, polyethylene), then this distance must be doubled.
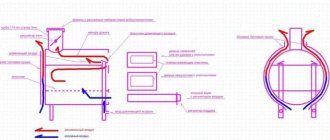
The heating structure consists of:
- fireboxes;
- chimney;
- chimney.
Fuel burning in the firebox emits warm smoke . It is distributed throughout the greenhouse using a chimney, heating the air, and then goes outside through the chimney.
Do-it-yourself heating of a greenhouse with a potbelly stove:
To do this kind of heating of a greenhouse in winter with your own hands, you first need to make a foundation . Thanks to it, the stove will not warp, its legs will not fall into the ground, and the risk of fire will be minimized.
- For the foundation, you need to prepare a pit 0.5 m deep. Its area depends on the size of the stove. If you plan to cover the finished stove with brickwork, this must be taken into account when digging a pit.
- A mixture of sand, small crushed stone and brick fragments must be poured into the finished pit. A layer of 15–20 cm will be enough.
- Now you can install wooden formwork : the boards need to be placed around the perimeter of the pit, and the gaps between them and the walls of the pit should be filled with sand.
- cement into the hole limited by the boards , and then lay a layer of roofing felt . This will provide additional waterproofing and the foundation will last longer.
- The final touch is laying the bricks . They are placed on roofing felt in two layers, secured with a clay-sand mortar.
Advice! To ensure that the structure is level, you need to check the plumb line after each step.
Designs:
There are different designs of potbelly stoves , but the simplest is the ordinary rectangular stove . It is better to install it so that the combustion hole goes outside. This will make the combustion process easier, and the possibility of smoke in the greenhouse will be reduced.
- The size of the stove will depend on the size of the greenhouse. Average parameters: width – 30 cm, length – 40 cm, height – 45–50 cm. Such a stove can heat 10–15 m2 of space. Taking these features into account, you need to draw a diagram of the future design.
- The firebox is made of any heat-resistant metal . You need to mark the sheets and cut out the structural elements (bottom, walls and roof) with a grinder or metal scissors.
- Now you should weld the bottom and three walls. inside, to a height of ¼ from the bottom . A lattice is placed on them.
- You can buy a grate in a store or make it yourself from metal rods. The rods are welded together in such a way as to form a lattice with holes of 1–4 cm2 . The size of the holes will depend on the future fuel. The grate will hold the fuel, and the combustion products - soot and ash - will pass down into the ash box.
- In the future roof of the stove you need to cut a hole for the chimney with a diameter of 13–15 cm . The roof can then be welded to the structure.
Important! If the chimney is placed underground, the hole can be made not in the roof, but at the bottom or in one of the walls.
- two holes on the front wall of the stove : fuel will be placed through one, and the second will be used as a blower. Through it you can clean the stove from ash. The doors for the holes must be cut out of a metal sheet and attached to the wall using hinges. Handles should be attached to the doors.
- Now you can weld the front part to the stove. If you intend to place the combustion hole outside, it must be covered with heat-insulating material . Otherwise, the heated metal in contact with the greenhouse parts will melt them.
- A short section of pipe needs to be welded to the hole in the roof, to which the chimney .
- Metal legs need to be welded to the bottom or ends of the stove and secured with a jumper. This will add stability .
- To reduce the risk of fire and increase heat transfer time, you can line the stove with brickwork . This material retains heat longer: thanks to it, the stove will have to be fired up less often.
Chimney
The chimney can be made either from a single pipe or from sections of pipes of equal diameter. If the greenhouse is small and air heating is sufficient, the chimney can be laid above the ground. If soil heating is required, an underground structure is suitable.
- The pipe sections for the chimney must be fastened together. To do this, you can use a welding machine or special couplings (clamps). In the latter case, the joints between the pipes under the couplings are coated with clay.
- The chimney must be connected to the stove using the same couplings or welding.
- If you plan to place the chimney underground, then you need to dig shallow trenches (25–40 cm) and lay parallel pipes in them. The distance between the pipes should be from 60 to 100 cm. The pipes are covered with expanded clay or small crushed stone, and their ends are brought outside the greenhouse. This design will be an ideal replacement for “warm floors” .
- If the chimney is above ground, it must be supported by supports. It is best to place it at a slight angle so that the end adjacent to the chimney is slightly raised. This will increase cravings.
- The above-ground chimney must be covered with lime or chalk. Any deformation or rust stains will be visible on the white surface. This will help you easily monitor the condition of the structure.
Chimney
This part of the structure will allow smoke to be removed outside the greenhouse.
- The pipe must be welded to the chimney and covered with heat-insulating material so that when it comes into contact with the roof of the greenhouse, the latter does not melt.
- a spark arrester on top of the pipe . You can buy it in a store or make it yourself.
To do this, you will need a piece of flexible metal grate or a regular tin can.
You need to make a lot of small holes in the jar, and simply twist the lattice into a cylinder.
- To prevent debris and sediment from getting into the pipe, it must be covered with a metal cone .
It can be made from a piece of tin or bought in a store. This structure can be secured to the pipe with thick wire.
- To regulate the draft, a metal damper . It is welded to a piece of thick wire. The ends of the wire are brought out from both sides of the pipe. By turning the ends of the wire, you can change the position of the damper and adjust the draft.
Advice! The damper can only be closed after the fuel has completely burned out. Otherwise, carbon monoxide may enter the greenhouse.
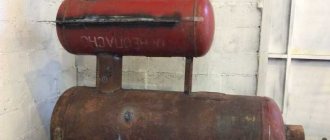
Water tank
a water tank next to or on the stove . It will allow you to water your plants with warm water all year round. In addition, water next to the stove will maintain an optimal level of humidity in the room, which will have a beneficial effect on the green residents.
Now you know how to make a heated greenhouse with your own hands. With the help of a warm greenhouse you can get an excellent harvest even in winter. You just need to choose the right heating method . For southern regions, any method is suitable, but residents of the north should give preference to electric heaters.
self-made greenhouse with heating will delight you with a tasty and healthy harvest all year round!
Heating with infrared heaters
This method is considered one of the most promising. Compared to conventional electric heaters, it requires less electricity. In addition, infrared devices have the following advantages:
- Can provide year-round heating.
- With the help of these devices, it is possible to zone the greenhouse, maintaining different temperatures necessary for the growth of different plants.
- It is possible to automate the process by installing a thermostat with a sensor; constant human control is not required.
- Heating does not lead to a decrease in air humidity, which can be detrimental to most crops.
Among the disadvantages of the solution, we highlight the need for significant initial costs to purchase the required number of infrared emitters.
Choosing a greenhouse for heating installation
Since heating is quite energy-intensive, it is better that it retains heat as much as possible:
- Therefore, its overlap must have high thermal insulation properties.
- Cellular polycarbonate and glass have these qualities.
- It should be noted that the glass is fixed into frames that trap snow on their surface.
- This results in a reduction in the passage of natural light.
- Polycarbonate does not have such problems, since it is attached directly to the frame, and its outer side is completely smooth.
If there is a source of warm air leakage, the installed heater may not cope with its responsibilities and will consume too much energy or fuel:
- This will make home growing vegetables unprofitable.
- Therefore, you need to take care of these technical requirements in advance before installing the heating.
- You should also prepare separate racks in which the plants will be planted, since when planted directly in the ground, it will not be possible to warm up the root part.
In addition, installing seedlings at an elevation will improve the temperature conditions, since warm air collects at the top.
Warm floor for a greenhouse
This method heats not only the air in the building, but also the soil itself, which has a beneficial effect on the life of plants. It is worth equipping the system at the stage of greenhouse construction: it is simpler and cheaper.
In practice, the following “warm floor” options are used:
- A system based on water heating, in which a network of metal-plastic or propylene pipes is laid in the ground. Water or antifreeze circulating through them, heated by a furnace or boiler, releases thermal energy to the ground, as a result of which the air temperature rises. This solution does not require significant energy costs; heating will ultimately become inexpensive.
- Installation of an electric “warm floor” by laying a heating cable or ready-made mats. This option allows you to automate the process by maintaining the required temperature using a thermostat. The only disadvantage of this solution is that year-round operation will require significant energy costs.
Similar solutions are used in greenhouses with a small or medium area.
Materials and manufacturing stages
For the winter version, special galvanized profiles are used, polycarbonate is most often cellular. With a thickness of 4 to 6 mm, it is mounted in two layers; when the value increases, one is enough; in cold regions, even 25 mm material is used.
To construct the foundation part, concrete or reinforced concrete blocks are used, which are insulated with extruded polystyrene foam or polystyrene foam. If a greenhouse is built at the joint to the wall of a house or outbuilding, then a slab is often laid under the base (ready-made slabs or poured with concrete mortar).
The construction of winter greenhouses takes place in several stages:
- Layout. At the initial stage, it is important to determine the size, location of the beds, what is planned to be grown, and the characteristics of the region, taking into account climatic indicators.
- Pouring the foundation part. It is necessary to position the greenhouse correctly and wait for the concrete to dry completely. Sometimes, during installation, some communications are immediately carried out, laying pipes and cables inside.
- Installation of the frame part. The so-called “skeleton” of the future greenhouse is being assembled. All parts are well secured to increase reliability and stability.
- Sheathing. Having received a metal base, polycarbonate is laid on it in one or two layers. It is necessary to seal joints and seams so that internal heat does not disappear.
- Floor insulation. The foundation slab or floor is backfilled with special materials.
- Installation of doors and windows. The installation of these elements occurs at the final stage;
- Connecting heating systems, irrigation, etc. Initially, the most suitable options are selected, and gradually during the work they are connected.
In the finished building, paths are laid out, beds are poured, the soil is watered and fertilized, and then left for several days to create its own microclimate and generally check the structure. If there are no cracks, good heat retention and normal humidity, crops can be planted in the greenhouse.
Heating the greenhouse with electric or gas heaters
The main advantage of this solution is ease of implementation. A heat gun, powered by electricity or a gas cylinder, can be easily placed in the required area of the greenhouse. No additional communications are required, and equipment of this class efficiently and quickly heats the air inside the greenhouse.
This solution should not be used as the main heating system: energy costs are too high. The operation of heat guns dries out the air in the greenhouse, so you will need to consider using humidifiers to create optimal conditions for plant growth.
Soils for greenhouses and greenhouses
In greenhouses and greenhouses, root nutrition conditions differ from the nutrition conditions in open ground. Frequent and abundant watering contributes to the leaching of nutrients, and repeated fertilizing contributes to the accumulation of ballast formations in the soil. These features require the creation of special soils that can provide favorable conditions for plants.
Soils for a greenhouse must have:
- fertility,
- good air and water permeability,
- be loose
- have good moisture capacity and retain nutrients well.
For greenhouses, the best soils are those that have a neutral environment, in which the ratio between solid, liquid and gaseous phases is 1:1:1. This means that they contain a large amount of loosening materials.
The main components for creating soils are lowland peat, turf and field soils, manure humus, old (spent) greenhouse soil, sand:
- lowland peat of weak or medium degree of decomposition - 75% + turfy medium loamy soil - 25%;
- lowland peat 60% + turf soil 20% + manure 20%;
- field medium or light loamy soil 50% + manure humus 30% + lowland peat 20%;
- turfy medium loamy soil 50% + old greenhouse soil (2 years after use) soil 50%;
- chernozem soil 80% + humus 20%; lowland peat 70% + manure humus 20% + sand 10%.
Materials intended for greenhouse soils are passed through a screen and mixed well.
A good component for soil soils are composts and leaf soil, for the preparation of which leaves that have fallen from trees are placed in a wooden box in the fall and watered with water, slurry or urine. Within 2–3 months, the leaves decompose and turn into an earthy mass; it is passed through a screen and added to the soil (up to 30% of the total volume).
Composts from waste from wood processing plants (shavings, sawdust, bark, small chips) can be added to soils as a loosening material. When composting, 44 grams of urea and 15 grams of superphosphate are added to a bucket of fresh waste, mixed thoroughly, moistened and placed in a stack or heap for 2-3 months. Ready compost can be added to peat soil (up to 30%).
The layer of soil for growing plants in a greenhouse should be 25 cm, or 0.25 m3 per 1 m2 of useful area of the greenhouse.
In film greenhouses, where plants are grown on natural soil, manure (15–20 kg/m2) or lowland peat (20–25 kg/m2) is added if the soil is light; for soils of heavy mechanical composition, add another 10–15 kg of composted wood-based materials or sand - a bucket per 1 m2.
Mineral fertilizers are also added to the greenhouse soil:
- ammonium nitrate 60–90 g/m2;
- superphosphate - 30–40 g/m2;
- potassium chloride - 10–15 g/m2.
In the fall, after applying fertilizers and loosening materials, the soil is dug up to a depth of 25 cm so that the organic fertilizers and loosening material begin to decompose, and the pests that have prepared for the winter die.
Solar heating
To maintain positive temperatures in early spring or late autumn, you can take advantage of the free energy of the sun. Such heating will not allow heating the greenhouse in winter, so the solution is only suitable as a seasonal one.
Sunlight passing through transparent polycarbonate heats the air in the greenhouse. Practice has shown that heating will be more effective with an arched roof shape. In this case, polycarbonate will work on the principle of a lens, collecting more sunlight.
An even more advanced system is using water collectors. Panels with pipes painted black are mounted outside. Heating water or antifreeze circulates through a simple hydronic heating system, releasing thermal energy to the air.
Possibilities of a heated greenhouse
A heated greenhouse has greater capabilities than a conventional structure not equipped with such a system. Using a heated room for growing herbs, berries, fruits or vegetables, the grower will be able to obtain harvests throughout the year (subject to the installation of a lighting system). In a heated greenhouse, optimal temperature and humidity levels are maintained, despite frost. Thanks to the creation of an artificial microclimate, it is possible to increase the percentage of seed germination, protect seedlings from various fungal diseases, and also harvest crops earlier than others.
By heating the greenhouse, you can obtain berries and vegetables throughout the year, collecting them several times. Thanks to a greenhouse, it is possible to create a winter garden or flower greenhouse in the cold season, increase the flowering time of crops, or grow exotic plants that are not adapted to the local climate. The above factors can significantly increase the profitability of the site and increase revenue if the greenhouse is used to grow plants for sale.
Biological heating
To increase the air temperature at the stage of planting and germination of vegetables, you can also use a biological heating method. To do this, cut straw and manure are placed in the soil. When these components decompose, the temperature rises, the soil and air in the greenhouse warm up to favorable parameters.
All these methods will be effective, and heating costs will be minimal if you first insulate the foundation of the greenhouse. This will minimize heat loss.
Horse manure is the best biofuel. Within a week, the mass can warm up to 60–70 °C, the temperature remains for a long time.
Fallen leaves, mown grass and other plants can also serve as biofuel, but such a mass will not heat up on its own. Therefore, it is necessary to add at least 25% manure to it.
All these methods will be effective, and heating costs will be minimal if you first insulate the foundation of the greenhouse. This will minimize heat loss.
Is it necessary to close a polycarbonate greenhouse for the winter?
For many owners, this is a fairly pressing question - whether it is necessary to close the polycarbonate greenhouse in winter, leave the windows and doors open for ventilation or not. It has been proven that ground freezing to a depth of one meter occurs even in the presence of a small open hole. In winter, there is practically no difference inside the greenhouse and outside; it appears only on a sunny day and only when exposed to direct sunlight. It is advisable to clear the dome of accumulated snow to avoid unnecessary distortions and collapses.
It is also worth paying attention to the formation of condensation. When doors and windows are closed, moisture forms when the external and internal temperatures differ. It harms not only plants, but also polycarbonate material. Regular ventilation will protect the entire structure and internal contents from the appearance of mold and rot, which form yellow-green stains on the walls.
Lighting and Humidity
For full development, plants require additional lighting. The level of lighting depends on the crops planted in the greenhouse. In particular, greens and young seedlings require less light, unlike berry crops.
For lighting, sodium lamps are installed that imitate the sun's rays. Lamps are mounted above beds or boxes with seedlings. You can also hang regular fluorescent lamps. But in terms of efficiency they are much inferior to sodium lamps.
It is important to equip electrical wiring with moisture protection.
Regular watering eliminates the need for additional air humidity. To avoid excessive humidity, create a forced exhaust or ventilate the greenhouse through the vents on the roof. Irrigation is organized using warm underground water supply or using storage tanks.
To build a winter greenhouse you will not need to spend a lot on building materials. As a result, it will last for many years and will be an excellent help in the garden, and fresh fruits and vegetables grown yourself will create a good mood.
Comprehensive preparation of a polycarbonate greenhouse for winter
At the end of the harvest, you need to think about proper care and preservation of the greenhouse for the winter. All manipulations must be completed before the onset of stable frost indicators.
- First, the entire frame is inspected, and if repairs are required, the load-bearing parts are restored.
- All fasteners are thoroughly inspected; if any screws have become loose, they must be returned to their place.
- The entire coating should be washed using special solutions. When cracks appear, they are degreased and secured with reinforced tape.
- Be sure to disinfect the soil and replace it if necessary. All remnants of plants and unnecessary equipment are removed, and the sides of the beds are cleaned. The greenhouse must be completely emptied.
- In the absence of heating, it is necessary to regularly remove snow to prevent deformation of the frame.
How to create the foundation of a winter greenhouse with heating
Winter greenhouses with heating require digging a fairly deep pit. It should be below the soil freezing level, which is on average 1.5-2 m. If the greenhouse area is small, you can do it manually, otherwise, it is better to use earth-moving equipment. When the pit is ready, the type of heating system and the presence or absence of sewerage are thought through, and the appropriate communications are laid. Further work is divided into the following stages:
- A wooden formwork is made and a layer of roofing material is placed in it.
- Cover the cushion with sand and crushed stone in a layer of about 10 cm.
- A metal frame is mounted on the pillow. It should contain at least 4-6 rods.
- A solution is prepared from crushed stone, cement and sand, and the formwork and frame are poured.
- Wait about 30 days until the foundation is completely dry, then remove the formwork.
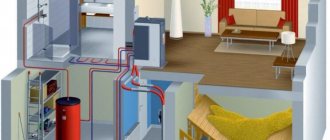
Systems with external heat source
Heating of the greenhouse is possible due to the close location of the house or other heated building. This simplifies the entire procedure, since there is no need to install an autonomous heat source. Using wired or wi-fi relays, you can remotely receive information about the temperature in the greenhouse and regulate its microclimate from home.
An ordinary wi-fi temperature complex consisting of a sensor and a relay costs about 2 thousand rubles. When the temperature goes out of range, it transmits its values to devices running Windows or Android
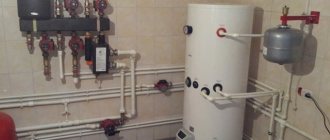
Creating a separate heating circuit
If the house uses water or steam heating, then it is possible to create a separate circuit leading to the greenhouse. It must be equipped with a separate pump, since the total horizontal length of the new segment will be large.
You also need to install an open expansion tank in the greenhouse to remove air from the system. The area of open water in the tank must be minimized to prevent intense evaporation of hot water into the room.
Radiators are rarely installed in a greenhouse, since the design of its premises plays a secondary role. If there is a lack of heat, it is better to lengthen the pipe contour, as this is cheaper and reduces the risk of leaks and breakdowns.
The outdoor segment of the circuit must be insulated to avoid heat loss and minimize the risk of freezing. The underground option for placing pipes is best suited for these purposes.
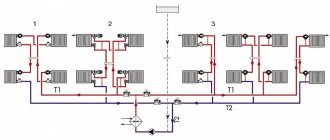
Connecting the heating segment of the greenhouse to the general circuit can be done using a three- or four-way valve.
Standard connection diagram for an additional heating circuit. The location of the taps in the house allows you to remotely regulate the air temperature in the greenhouse (+)
It is also possible to create an automatic temperature control system.
This can be done in the following ways:
- Changing the volume of hot water passed through depending on the readings of temperature sensors. In this case, it is necessary to purchase a pump with power control.
- Turning the greenhouse heating circuit on and off. For this purpose, automatic crane control systems are used.
Instead of manually changing the position of a three- or four-way valve, servo-based devices can be used. Its electronic control unit is adjusted to the readings of temperature sensors located in the greenhouse.
If it is necessary to change the heating mode, a control signal is sent to the motor, which turns the rod, setting a different position of the valve.
The servo drive for automatic adjustment is large relative to the crane. Therefore, to install it, it is necessary to remove the heating pipe from the wall
Heating using extract air
Good heating can be obtained by using warm air from the exhaust ventilation of a residential building. By directing an insulated ventilation duct into the greenhouse, you can obtain a constant incoming flow with a temperature of 20-25°C.
The only condition is the absence of excess humidity and impurities in the air, which are typical for kitchens and bathrooms.
Air outflow from the greenhouse can be organized in two ways:
- Local exhaust vent to the street in the form of a tube without a fan. It must be of small cross-section to create a high flow rate. In this case, at negative street temperatures, the condensation formation zone will be located at some distance from the tube, which will prevent the formation of ice.
- Return the flow back using an additional air duct and obligatory connection to the general house hood. Otherwise, odors from the greenhouse will spread throughout all areas of the house.
This method is the most economical in terms of one-time costs for installing the system and recurring costs for fuel use. The only question remains whether the hood volume is sufficient to maintain the required temperature. It is better to check this experimentally.
If sometimes, during extreme cold snaps, the air temperature in the greenhouse drops below the permissible level, then you can build a small air heater into the air duct, or install an additional electrical device at the facility itself.