Advantages and features of wood-burning stoves for Bereg tents:
- Removable legs allow you to reduce transportation dimensions, which makes transportation and storage of the product more convenient. There are special holes in the legs to protect against overheating. The bottom of each leg is equipped with a plastic plug that prevents damage to the floor;
- The presence of stationary screens on the end and bottom parts of the firebox allows you to protect the floor and awning from heat;
- The range includes highly specialized models. For example, Bath or Army stoves, the design of which is designed for maximum efficiency in the given conditions;
- For the Housekeeper series, it is possible to choose the most suitable option for the buyer’s purposes of protective screens: removable or stationary;
- Depending on the conditions and purposes of use, you can choose the appropriate size of the model. From the most compact (Economy Mini) to the largest (Army).
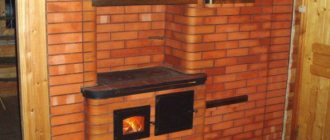
Tent stoves - main types and features
Like any other equipment, a stove for a tent is selected according to two main criteria - the purpose of the tent and its volume.
In the first case, it is recommended to consider heating devices according to the following criteria: tents for all-season hikes, summer tents, fishing tents. Separately, it is worth mentioning such tents as mountaineering ones. All these houses have their own heating and equipment requirements. Thus, an ordinary tourist tent, designed for outdoor activities only in the spring and summer, most likely does not have a special valve for installing a heating stove. Winter tents are characterized not only by the presence of such a window, but also by the presence of a special insert made of non-flammable fabric with a hole for the chimney. But a mountaineering tent is characterized by a low silhouette, so only equipment with a minimal risk of carbon monoxide emissions is applicable here. As for the volume of the tent, here, first of all, it means the capacity of the tent, the presence of several rooms, and of course how many people it is designed for.
Depending on this, the stove for the tent is selected according to its power and the type of fuel used:
- Wood-burning camping stove;
- Kerosene stove;
- Automotive fuel stove;
- Gas-burner;
- Electric heating option;
- Heating option from an external heat source.
And although all these devices are designed to heat the volume of the tent in the natural environment, very stringent safety requirements apply to them.
Requirements for a tent stove
Modern manufacturers offer a wide selection of winter tents with non-flammable walls and built-in stoves. But the cost of this camping equipment is high. Therefore, craftsmen come up with lightweight, cheap and mobile options for heating devices for tents. A home-made stove must meet the following requirements:
- compactness;
- efficiency;
- efficiency;
- budget;
- ease;
- presence of a chimney:
- fire safety;
- wood-burning models are equipped with a spark arrestor.
The heater structure is made of metal. Experts consider stainless steel to be the best in this regard. It has fireproof properties and lightness. The furnace firebox is placed with its legs on a heat-insulating substrate.
Attention! The chimney is equipped with a coil so that the spark is extinguished as the smoke passes out. If the latter gets on the roof of the tent or dead wood near it, a fire may occur.
When the chimney is not equipped with a spark arrestor, it is installed horizontally and passes through the wall of the tent, rather than through the ceiling. This arrangement will allow the pipe section to be usefully used to heat the air in the tent.
In addition to the requirements for heating devices, they also choose a tent that has the necessary characteristics. The ceiling, walls and floor must be made of non-combustible material. The shelter must withstand sudden temperature fluctuations up to 10 0C. For the chimney, a heat-resistant material is inserted into the ceiling or wall to avoid deformation.
The tent must be equipped with retractable windows that can be opened and closed as needed. When preparing a vacation, take into account the capacity of the shelter. The tent should comfortably accommodate several people and a stove at a safe distance from walls and people. This will avoid cases of accidental overturning of the heating device by a person in his sleep.
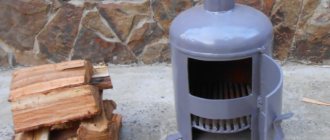
Manufacturing: second option (wood-burning oven)
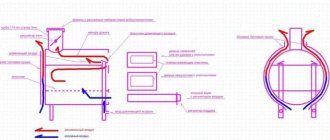
This option is suitable for people who have a vehicle. It can heat a large tent and uses combustion elements (sticks and logs) economically. All we need to make it is a piece of steel pipe with a diameter of 15 cm and a length of 60 cm, the dimensions are taken approximately. The pipe must stand strictly vertically, since it is the basis of the entire furnace. In the lower part of the pipe we cut out a rectangular hole about 30 cm high and a quarter of the circumference wide. You need to cut the pipe with a thin tool so that the width of the cut is minimal.
We will subsequently make a door from the cut piece, cut it into two even parts of 10 cm and 20 cm. The larger part is the furnace door, the smaller part is the door for the ash pan. Let's return to the base of the stove, in the upper part it is necessary to weld a pipe with a diameter of 6 cm and a length of 15 cm, through which the combustion products will escape. You need to weld a piece of the chimney pipe through the coupling to the pipe. We will cover the ends of the furnace with 3 mm square sheets of steel. and is 10 cm larger than the diameter of the stove.
Of course, it is advisable to weld the sheets to the stove using electric welding, but you can also use corners. Just below the top edge of our door for the ash pan you need to place a grate - and the stove is ready for use. You can also add a few nuances: make rectangular holes in the casing so that you can use the firebox and ash pan; fill the space between the stove and the casing with clay. The combustion elements for it are firewood. The only thing you need to know is that this stove requires a stand and the stove cannot be placed near the tent awning, as safety comes first.
There is also a homemade gas burner, it heats from a cylinder, different heating elements are possible. There are two options: the heating pad is connected to the cylinder through a special hose, and the burner is installed on the cylinder.
There is a homemade long-burning stove that can heat much longer than its counterparts using the same amount of fuel. In long-burning furnaces, waste from the woodworking industry can be used as fuel. The oven is very economical. It has no shortcomings, the fuel in it does not burn, but slowly smolders. You can also assemble a long-burning stove with your own hands. Which option to choose depends on you, whether it will be a purchased stove or one you make with your own hands.
Dimensions and characteristics of the tent stove
Ovens come in different sizes and configurations. In order not to make mistakes in calculations, you need to know exactly 3 main factors:
- the size of the tent that needs to be heated;
- total load capacity of the equipment together with the stove;
- duration of the route.
Important! Leaving the stove running overnight when no one is watching the fire is prohibited. If you want to leave it on, then distribute the hours of duty so that someone monitors the flames and the flow of clean air.
The approximate dimensions of a stove for camping or ice fishing would be as follows:
- pipe diameter - about 86 mm;
- body (firebox) size - 25×25×50 cm;
- firebox volume - 30 l;
- number of chimney pipes - 3;
- pipe length - 50–70 cm;
- pipe with a bend - 1 pc.;
- approximate weight - 5 kg.
Of course, when making a stove with your own hands, your dimensions may be different. The main thing is to worry about the functionality of the structure after assembly.
Homemade potbelly stove
At the beginning of the 20th century, a potbelly stove was a wood-burning metal stove that was installed indoors. Combustion products were discharged through the chimney out the window. A camping stove operates on the same principle, but is more compact in size. The fuel in both cases is wood chips, sawdust, and small pieces of wood. The average temperature of the side surface reaches 100-150 degrees, which is something to remember when you cook food.
Important! If you have problems welding galvanized steel sheets, grind the welded areas. Removing the galvanized layer will make it possible to make seams, but will somewhat reduce the useful life of the product, since it will be more susceptible to corrosion.
Instructions for making a stove:
- Think over the model. Draw a drawing or diagram, providing the exact dimensions of the finished product. Mark the metal sheet and pipes with a marker where you want to make metal cuts.
- In the upper part, make a hole with a diameter matching the pipe that will become the chimney.
- Cut the pipe into several pieces so that they can be folded inside the stove during transportation. Make cuts at one of the ends and bend the resulting petals inward. This will allow you to insert one end of the chimney into the other.
Sliver
A wood chipper is a small stove that can be taken with you on a summer or autumn hike for 2 people. It is a small cylinder. In its lower part there is a grate, on the side there is a hole for supplying air and maintaining combustion. A grate is installed on top, on which a container with food is placed.
Did you know? It is believed that the heat transfer of a round or oval stove is higher than that of a square one. But tourists will not be able to use the cylindrical model for cooking.
A hole is also made on the side into which fuel will be thrown. Cones, chips, and small branches are used for this purpose. The stove can be equipped with legs that will provide clearance between the bottom grate and the ground. The legs also guarantee stability and allow burnt ash to fall freely.
The wood chipper can be made of rectangular, cylindrical, triangular and any other design. The main thing is to determine whether it is needed on a particular trip, since it is too small to cook food for more than 3 people. And of course, it is not suitable for heating a tent in winter.
To make a wood chipper you will need a sheet of galvanized aluminum, stainless steel or other metal. It is necessary to mark it, dividing it into 4 walls, a bottom and a lid. Holes are made in the bottom and lid for air movement. In one of the side walls you need to create a door for storing fuel, and in the other - a hole to ensure air movement.
But the simplest version of this design is a tin can. Holes are made along the perimeter in the lower part through which air will move. A couple of holes are punched in the lower part for pouring out the ash. Fuel is placed inside the structure, and a grate is installed on its surface, on which a kettle or pot is placed.
Can stove without oil filter
We take:
- two jars with a diameter of 10 cm and a height of 6 cm;
- a metal mug, the diameter of which is one centimeter smaller than the cans;
- piece of tin;
- antenna;
- bolts and nuts.
Process
e edges of the cans so that they are smooth and do not scratch your hands. Bend a piece of tin in the shape of a circle to make three petals, which need to be lowered to the bottom of the jar, having previously drilled three holes in it with a diameter of at least 3 mm. Place dry fuel, such as small pieces of wood, on a circle placed on the bottom. In the top of the jar, at a distance of 2 cm, make three holes into which you need to insert the bolts. This will be a stand for the mug. Screw the bolts with nuts. To screw the legs to the jar, you need to make three holes in the bottom, the angle between which should be 120 degrees. Insert three pieces of antenna into them. Do not make the height of the legs greater than the diameter of the can so that the structure is stable. Cut five holes at the bottom of the stove for ventilation. The handle will be the screw terminal removed from the power supply.
Option number 4. Construction of several tin cans
First you need to prepare three canning jars (two smaller and one larger). After that, take these tools:
- metal scissors;
- asbestos;
- marker.
Follow these steps:
Step 1. Make blanks. Take a large jar, step back about 20 centimeters from the bottom, place a smaller jar there and circle it with a marker. An even circle should form.
Step 2. Cut a hole in this circle, make sure that the jar fits into it, but with difficulty.
Step 3. Make a similar hole in a smaller jar. Place the smaller one in the larger one.
Step 4. Make parallel cuts of approximately 2-3 centimeters on one side of the jar.
Step 5. Take the lid from a large jar and make a hole in it for a small one. Sand the cuts.
Step 6. On the wall of the jar, make vertical slits of approximately 1.5-2 centimeters.
Step 7. Fill the voids between the cans with asbestos, then close the lid and bend the metal.
Step 8. Take a piece of tin and make a shelf for firewood from it, secure it.
Step 9. Now just attach a handle to make it convenient to carry the structure. That’s it, your DIY camp stove is ready! You can paint it.
From a can of alcohol
The debate about how best to use alcohol, for indoor or outdoor heating, will never end. This does not prevent tourists all over the world from using it as fuel for mini stoves for tents. The weight and dimensions of this design are insignificant; it is convenient to take on a hiking trip.
Materials and tools
To make a homemade camping stove you will need:
- Any tin can.
- Nail or awl for making holes.
- Alcohol 96%. Vodka won't do.
- Metal cover
- Knife and scissors for even cutting of a tin can.
- Ruler.
Manufacturing instructions
To make an alcohol stove, no complex diagrams are needed; the principle is simple and accessible, as are the materials.
From a beer can:
- You need to take two beer cans (or Coca-Cola cans).
- The bottom of the jars is cut off by approximately 5 cm.
- Insert the bottom into the bottom, slightly twisting the edges of the jar. Make a hole in the middle in the part of the bottom that became the stove lid.
- In both beer and coffee cans, holes are made for the fire to escape by using a nail or awl to pierce holes around the perimeter, about a millimeter in diameter. The number and diameter of holes is selected experimentally and depends more on the size of the can itself. For the stove, holes are made from beer cans in the lid, and in a coffee stove at a level slightly above the middle.
- Pour alcohol into the hole on the lid and close it with a coin. The DIY camp stove is ready.
Operating rules
Such a burner must be ignited in a special way:
- The place for the stove is chosen at a short distance from the walls of the tent. This may be a stone or other immovable, non-flammable base. If a can of alcohol turns over, you will have to wait until it burns out.
- Place the stove on a metal lid; a regular seamer will do.
- Pour alcohol onto the lid under the base of the burner and set it on fire. Burning alcohol outside the stove should heat its contents.
Such camp stoves for tents are used in the off-season; the design will not give a large increase in temperature, but it will allow you to heat canned food and boil water. The stove will boil one liter of water in 9 minutes at home; when camping it will take longer, depending on the ambient temperature.
Which stove is best to use in summer?
In summer, the oven is needed more for heating and preparing food, tea, coffee. There is no point in pulling gas cylinders or wood stoves - heating the tent is not needed.
The best solution would be a mini-alcohol stove for a tent. Light weight and compact dimensions allow each member of the camping trip to take their own homemade stove.
The only drawback in comparison with ready-made branded designs is the inability to transport the stove with filled fuel. But this is not a significant drawback - putting a bottle of alcohol in your backpack is not difficult. Long-burning stoves are used for winter tents.
Basic rules for selecting a model and important characteristics
When choosing a heater, consider the following factors:
- terms of Use;
- terrain;
- heated area.
Main characteristics of the devices:
safety, eliminating the possibility of fire - this is especially important when operating the device away from assistance services; compact dimensions - the unit should be easy to carry and transport, for placement in confined spaces; efficiency - the heater should warm the air in the tent; efficiency - problems with fuel production are not allowed; ease of operation; functionality - the ability to use the stove for cooking or use it as a heat source outside the tent.
Technical requirements
Whatever the equipment, there are a number of requirements for it:
- small dimensions and weight;
- economical consumption of fuel material;
- compliance with fire safety standards;
- ease of installation of the device in a tent without the use of special tools;
- reliable and uninterrupted operation;
- ease of use.
There are many options for solving problems. They are widely discussed on forums, blogs, and presented in information sections and video tutorials.
If we group all the methods described in online resources, we get the following two categories:
- heating the tent using materials and items often included in the usual tourist kit; this method is characterized by simplicity and speed of execution, based on basic knowledge and operating principles;
- implementation of heat supply using special devices, such as a gas burner, mobile oven, lamp and others.
Operating rules
Manufacturers make many tent models from flammable material. Therefore, to prevent a fire from occurring, tourists comply with safety requirements when using a home-made stove:
The alcohol burner is placed from the walls of the tent at a distance of 30 cm. Placed on an empty tin can, sheet of metal or boulder. Alcohol is poured into the burner and set on fire. It heats up the surface on which it is installed, and it releases heat into the room.
The device slightly heats the air in the tent. Suitable for cooking. Use the burner in summer and off-season.
A wood-burning stove for a tent, made by yourself, is installed on a metal surface. It quickly warms up a shelter measuring 4*4 m. After use, the structure is left to cool naturally. It is not recommended to fill metal with water, since sudden changes in temperature can cause the walls to become deformed. Then they pour out the ash, disassemble the device into parts and carefully place it in a backpack.
All elements of the oven are collapsible. A tent pipe consists of several parts that fit into each other. The chimney is assembled and placed in the firebox. This makes it easy to carry and does not take up much space. Instead of a prefabricated tent pipe, a corrugated pipe is used; after cooling, it is compressed and placed in an oven for further transportation.
DIY infrared gas ovens are not intended for cooking. But folk craftsmen got used to using it too. Fishermen turn the burner over with the emitter facing up. Cover the sides of the stove with stones. They put a grill on them and cook food. The gas cylinder is installed vertically. 200 g of fuel is enough for two hours of operation.
Terms of use
Tourist tents are made of flammable materials, and sometimes fire situations occur in which people do not have time to get out of them and get burned. Therefore, when heating the space of a camp home, it is necessary to take all possible safety measures:
- Do not use fire-based heating devices unless the tent material is heat-resistant.
- The use of the stove must strictly correspond to its intended purpose. If the design does not provide for simultaneous cooking and heating, therefore, this is prohibited. You should also not use the stove to dry things.
- The chimney must have a spark arrester.
- Do not use flammable liquids for kindling.
- Go to bed as far away from the stove as possible.
- Avoid carbon monoxide poisoning and maintain proper ventilation.
- Do not use questionable structures for heating.
- Use an electric torch for lighting.
There are many ways to make your own tent heating. The main thing is to follow these tips and follow safety rules. And then, even in severe cold, your vacation will not only be exciting, but also comfortable.
Do-it-yourself stoves for an winter fishing tent
A fisherman or hunter knows many ways to keep warm. And if he doesn’t have or doesn’t have a stove with him, he doesn’t lose heart. He will make it himself. For example, ordinary candles can act as a heater. Paraffin or wax will do. Candles produce a lot of heat, which spreads well. But in order to cope with a large area, you will need a lot of candles. This option is suitable for temperatures down to -20 degrees.
And even cook food. What kind of fuel should I take? For example, dry alcohol tablets. The problem is that there must be enough tablets
Important! Take care of ventilation. In this case, you cannot constantly use such a heat source
Another popular option is a factory-made stove. To do this, drawings are taken as a basis, and the structure is made in a workshop or independently. The elements are checked and welding is used. Such a stove is not inferior to a store-bought one, but will be cheaper.
What tools and materials will be needed
You can make a camping heater from scrap materials. Any container made of metal, ceramics or baked clay is suitable for making the body. Such a housing accumulates heat well and distributes it throughout the entire volume. Paraffin (candles), wood chips or coal can be used as a combustion element. And the most common tools are a sharp knife and a screwdriver. This minimal set of materials and tools, combined with dexterity and diligence, is enough to create a portable heating device for all occasions.
Materials and tools that may be needed to make a heater
Requirements
A stove, including a homemade one, should be light, economical, work even on wood and coal, without forcing tourists to buy alcohol, diesel fuel or other petroleum products, or to look for plastic waste to burn, which produces very acrid and smoky smoke.
Design
The main thing is that the structure must be made of metal. The best choice as the main material is fireproof stainless steel, which does not pollute the air in the tent with combustion products, which would lead to suffocation during sleep. The best option is a stove with a chimney. The firebox must stand on legs and be placed on a heat-insulating stand.
Spark extinction and efficiency
Optionally, a potbelly stove or wood chipper can have a chimney-coil, in which the resulting sparks that rise upward have time to die out. If a hot spark falls on the roof of the tent, a hole may be burned, which will put overnight stays and halts in question in the event of sudden prolonged or heavy rain.
If there is no spark arrestor in the structure, then you need to install the pipe so that it does not come out through the roof of the tent (vertically), but through any of its walls (horizontally). In addition, the horizontal pipe significantly improves the heating of the air inside the shelter. This approach is especially relevant on frosty days, when every degree of precious heating counts.
Tent
The ceiling, floor and walls of the tent should not support combustion. It is advisable to purchase a shelter that is resistant to temperature fluctuations during the day up to tens of degrees. For a chimney in the ceiling or one of the walls of the tent, the outlet must be insulated with a heat-resistant insert, which will prevent the tent itself from being deformed.
The tent should be quite roomy so that the owner can comfortably spend the night with a warming stove, when he can no longer warm himself with his own heat, and at the same time there is no possibility of accidentally touching and knocking over a working heating device with his foot while sleeping. If in doubt, it is better to use alternative methods so as not to freeze your hands and feet. For example, you can place a heat accumulator in a sleeping bag.
We invite you to read: Interesting ideas for decorating a garden with your own hands
Spark extinguishing
Any tent has a hole for a hot smoke pipe (chimney). In addition, the area around the stove is always protected with a fireproof mat in case of hot coals flying out. Some tent manufacturers recommend rolling back the tent base and placing the product directly on the ground.
Not only hot carbon dioxide, but also sparks rise from the stove through the chimney pipe. If the pipe is short, they can get onto the roof of the tent and cause a fire. To prevent this from happening, the chimney pipe is made long so that it is at least 2–2.5 m long. While the spark flies along this path, it will have time to go out. Consequently, the chimney acts as a spark arrestor.
Safety precautions also mean that all objects that can catch fire should be kept away from the operating stove. Another danger is carbon monoxide. It must go strictly into the chimney. And the tent itself should be designed so that clean air regularly enters it.
Video: Rules for heating a tent with a stove
Can stove without oil filter
We take:
- two jars with a diameter of 10 cm and a height of 6 cm;
- a metal mug, the diameter of which is one centimeter smaller than the cans;
- piece of tin;
- antenna;
- bolts and nuts.
Process the edges of the cans so that they are smooth and do not scratch your hands. Bend a piece of tin in the shape of a circle to make three petals, which need to be lowered to the bottom of the jar, having previously drilled three holes in it with a diameter of at least 3 mm. Place dry fuel, such as small pieces of wood, on a circle placed on the bottom. In the top of the jar, at a distance of 2 cm, make three holes into which you need to insert the bolts. This will be a stand for the mug. Screw the bolts with nuts. To screw the legs to the jar, you need to make three holes in the bottom, the angle between which should be 120 degrees. Insert three pieces of antenna into them. Do not make the height of the legs greater than the diameter of the can so that the structure is stable. Cut five holes at the bottom of the stove for ventilation. The handle will be the screw terminal removed from the power supply.
This stove is enough to heat up a small portion of food and warm up in a tent. To make firewood burn better, drop a little kerosene on it. If you make holes in the top lid of the jar, the device will give off more heat, and you can even fry eggs on it.
How to build a stove on a camping trip using improvised materials
Let's look at three options for homemade stoves that you can easily make with your own hands.
Option 1. Tin can as an oven
The most affordable and easiest way to build a mini-stove is to use a tin can. You can even use an iron mug. In this case, the main thing is that the parameters of the future camping stove coincide with the dimensions of the tall glass.
How to create a simple but functional device in a matter of minutes is described step by step in the instructions:
- First of all, holes are made in the bottom of the body (mugs or jars) to provide traction: one large one or several small ones so that the coals do not fall out.
- Then the camp stove is filled with small wood logs according to the “Indian candle” principle, that is, they are placed in a vertical position, without protruding beyond the edges of the jar. The thickness of the wood should approximately correspond to the thickness of your finger.
- The next step is to remove the block of wood located in the center of the structure from the oven. The resulting space will become a channel for the passage of air masses. By the way, they should coincide with the holes made in the bottom earlier.
- Let's start lighting the stove. To do this, you need to place a small piece of paper or a bunch of dry grass into the resulting air channel and set it on fire.
- The volume of the finished device is about 500 ml. Such a container can burn for about 25 minutes, and this is quite enough for preparing a simple dish or boiling water. The main thing is that the surrounding area will not be exposed to smoke.
Using the same principle, you can create more powerful camping stoves, for example, if the company consists of several people. To do this, you need to take a container of 1-2 liters and, accordingly, increase the amount of firewood.
Option 3. Folding camp stove
To create such a design you need to spend a little more effort and time than in the two previous cases. But the effectiveness of such a device fully justifies the effort.
First you need to do the preparatory work and stock up on the necessary materials and tools. You will need a tape measure, a grinder, a drill, a file, pliers, bicycle spokes, piano hinges and 1 mm thick sheet steel.
Working on a folding stove is not difficult. Just follow these steps:
- On the prepared steel sheets, it is necessary to use a stencil to outline the contours of future structural parts, which are cut out with a grinder.
- Of the resulting elements, set aside one, which will be used as the bottom of the stove. Then you need to make holes in it for the grate.
- The edges of the resulting holes must be carefully sanded with a file to remove all irregularities and nicks.
- Now it's time to make the body of the main structure. To do this, you need to connect the side parts using piano hinges with rivets.
- For future fastenings, it is necessary to construct special grooves along the entire perimeter of the bottom and along the underside of the side walls.
- Now you can connect the main body, which consists of side walls and bottom. This is done in such a way that the ears prepared at the previous stage coincide, forming a tube into which pins made from knitting needles are inserted. This small nuance adds stability to the oven during operation. The whole design is so well thought out that, if desired, it can always be disassembled for movement and convenient storage.
- One of the important stages in the manufacture of a prefabricated furnace is the creation of a combustion chamber. To do this, a window is made in the side of the body for storing firewood.
- The grate needs to be provided with additional protrusions that are inserted into the holes on the sides.
- For optimal operation of the furnace, it is necessary to take care of the air supply. If you make holes in the upper part of the box, then in the future they may be useful for laying skewers instead of a barbecue.
No trip to nature is complete without barbecue or any other dish cooked over a fire. It is better to foresee in advance which particular source of fire will be at the center of all events. A fire is not always a convenient solution, but a camp stove is useful in any weather. Despite the availability and abundance of models presented in travel stores, you can always build a camp stove yourself. The main thing is that this will require a minimum of time and materials.
When relaxing in nature, sooner or later you will need a fire - to heat canned food, cook porridge or boil tea. Of course, you can light an open fire, but sometimes the lack of forest or rain does not allow this. A camp stove, made with your own hands and delivered with the same hands, comes to the rescue! We will talk about how to make such a structure in today’s article.
Advantages and disadvantages
Fans of winter fishing insist that the main advantage of a stove in a tent is the opportunity to comfortably spend time waiting for a catch in the company of like-minded people. Often, a properly selected stove takes up much less space than special insulated sleeping bags.
It is also worth remembering that a sleeping bag will be warm and comfortable only if the air temperature outside does not drop below -10 degrees Celsius; in more severe frosts, a sleeping bag, neither thermal underwear, nor special fishing suits with fleeces will help keep you warm .
Expert opinion
Knipovich Nikolai Mikhailovich
Zoologist, hydrobiologist. I am interested in fishing at a professional level.
Interesting! Another advantage of tent stoves is that many models allow you not only to heat the space, but also to heat food.
Along with the advantages, stoves also have a number of disadvantages:
- you must have a supply of fuel with you (gas, gasoline, solid fuel, depending on the model used);
- the stove must be constantly monitored, especially in the winter;
- often heating with a stove leads to the tent becoming covered with ice on the outside, especially in severe frosts.
Design features and its advantages
As we found out, a camp stove is an extremely useful device, which is difficult to do without when fishing or just relaxing outside the city. If we talk about standard stoves with grates, they require large volumes of firewood due to good draft. In short, the fuel burns out quickly.
But in structures without a bottom, where firewood lies directly on the ground, combustion slows down, the coals smolder for a long time, and after loading a new portion, flare-up occurs instantly. But the draft in this case is poor, and heat is practically not accumulated.
In hiking designs with stands, traction is maximum. If the dish you plan to cook should be cooked over low heat, then the stove should simply be placed on the ground, thereby blocking the grate. In this case, the supply of oxygen deteriorates, combustion slows down, and the time, accordingly, is extended. But regardless of the design, all stoves of this type have significant advantages, including:
- efficiency;
- versatility and independence from weather conditions;
- efficiency;
- compactness;
- long burning without smoke formation;
- ease of use and transportation;
- power adjustment;
- safety;
- performance.
We also add that due to the fact that the wood burns from the inside, the stove body does not heat up much. You can even hold it in your hands for a while, since wood effectively insulates heat
But, of course, you always need to be careful when working with open fire!
Manufacturing: first option
You need to process the upper edges of the jar, then cut out a 30 cm circle with three tin petals and bend them at a right angle.
You need to drill 3 holes with a diameter of 4 mm in the jar. in proportion to the arrangement of the petals. We place the circle on the bottom of the jar so that the petals fit into the drilled holes, then they are bent and dry fuel is placed. You need to retreat 20 mm from the top edge. and drill 3 holes with a diameter of 5 mm. at an angle of 120 degrees relative to each other. We put washers into the drilled holes and insert M4 bolts 4 cm long, fasten them with nuts. drill 3 holes at an angle of 120 degrees; use thermal insulation material; in this case, it will be unstable; slightly bend a pair of holes with a diameter of 5 mm
The DIY mini-stove considered is one of the options for a stove that you can make yourself. Little tips for use: for quick ignition, add a couple of drops of kerosene; if you need to not only heat food, but also cook, then make cuts on the upper edge of the stove with a dotted line, this will increase functionality.
How to make a tent heater: three options
In camping conditions, it is not easy to obtain heat and safely warm a temporary home. But if you take care of this in advance and make a simple heater, you can spend time in a tent in warmth, comfort and even with hot food. Candles should be used as the basis for making a portable device, and there may be several housing options. Let's look at three popular options for making a candle heater: from a tin jar, from flower pots and from an old thermos.
From a tin can
To make such a heater you will need tin cans, candles without dyes and fragrances, aluminum tape, corrugated cardboard and a knife. The process will not take much time, you just need to follow a few simple steps:
- Make holes in one of the cans in a circle, 1 cm away from the bottom.
- Make an accordion on the top of the other jar (along the cut edge), and several holes at the bottom.
- Make 2 equal pieces of aluminum tape.
- Make cuts in the middle of the segments equal to their width (to connect them later).
- Now you need to take several ordinary paraffin candles, break them, put them in a jar and melt them.
- Cut the corrugated cardboard, roll it up and place it in a smaller jar.
- Take candle wicks and attach washers to them.
- Place wicks in a jar with cardboard.
- Pour melted paraffin over the cardboard.
- Assemble the heater by placing the energy source in a jar and put the second one on top.
The process of making a tent heater from a tin can.
The compact homemade heater is ready. When used, the top can becomes almost red hot. The heat generated is more than enough to heat a small tent. You can also use the resulting structure for cooking. To do this, instead of the top can, you need to install a stand made of aluminum strips.
From flower pots
A simple portable heater can be made from a candle and flower pots. To do this, you need to take 4 ceramic pots of different diameters (2 large and 2 smaller), 2 bolts slightly longer than the height of the large pot, as well as 2 pieces of chain, washers and nuts. In addition to the heater itself, you will need to build a holder on which it will hang. The procedure is as follows:
- Drill holes in the pot and stand, thread chains through them through the bolts and secure with nuts.
- Insert the bolt through the hole in the pot, put a washer on the bottom and also secure with a nut.
- Then take the smaller pot and put it on the bolt, secure with a washer and nut.
- Next, you need to put on the washers and nuts one by one until they begin to peek out from the top of the pot.
- The bottom of the device is made of a stand, fixed at the bottom with a washer and nut.
- Do the same with the other pot.
- Hang the pots on the holder.
The principle of making a heater from flower pots and candles
It is easy to use such a stove - just put a few candles on the stand and light them. The device can be used to heat a house or tent. This is a simple and economical heating option that is definitely worth trying.
From an old thermos
If you have an old thermos that doesn't work (or just one you don't mind), you can turn it into a portable heater. To do this, you need to perform the following algorithm of actions:
- Remove all plastic using a screwdriver.
- Clean up the glue that was used to attach the plastic.
- Cut off the bottom, 1 cm from the edge.
- Drill several holes in the top, lid and bottom of the thermos.
- Add cuts to the bottom of the thermos.
Technology for making a heater from an old thermos.
The fuel for this design is wood chips. They need to be loaded into the oven and set on fire. Since combustion occurs inside the thermos, the inner wall is heated, and the air between the inner and outer walls is heated accordingly. Due to this, air and smoke rush upward, through the holes they again enter the chamber and burn out. As a result, this heater has a fairly high efficiency.
To boil water, you need to install a stand on the stove, which can be constructed from two steel plates. Place a mug or pot on top and wait a couple of minutes.
A significant advantage of this stove is that there is practically no smoke from it during the heating process.
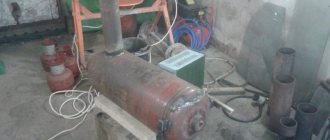
From a pipe on wood
If the trip is planned for the winter, you cannot do without a serious heating device. Any stove should not be left unattended, especially a wood stove. Purchased models of the best tent stoves are equipped with a spark arrester and an additional chamber for complete combustion of gases. It is difficult to make additional cameras in homemade structures.
If you remove the chimney not vertically, but at an angle of 30 degrees, you can increase the efficiency by 30%. A simple mesh in the chimney is used as a spark arrestor. Thanks to the installation, you won’t have to wait long for heat; the stove heats up the space instantly.
Manufacturing instructions
The diagram is quite general, but shows the principle of operation. The shape of the oven depends on the available materials and capabilities. If you don’t want to weld parts, you can use a simpler method described below in the instructions. Tourist stoves for tents should be collapsible and light in weight.
Principle of operation
It doesn’t matter whether the stove was made independently according to its original drawing or purchased at a specialized retail outlet, you need to know the basic laws of heat engineering according to which any heating structure works.
The combustion process consists of heating the fuel, when moisture evaporates and some flammable substances are released, direct ignition and burning of the fuel. The efficiency of a heating device implies the level of its heat exchange with the surrounding space, that is, radiated heat and the intensity of convection.
The first factor depends on the degree of heating of the furnace, the area of the heat exchanger and the material used to make the device. The second depends on the shape of the furnace and the direction of hot air flows.
From a can of alcohol
The debate about how best to use alcohol, for indoor or outdoor heating, will never end. This does not prevent tourists all over the world from using it as fuel for mini stoves for tents. The weight and dimensions of this design are insignificant; it is convenient to take on a hiking trip.
Materials and tools
To make a homemade camping stove you will need:
- Any tin can.
- Nail or awl for making holes.
- Alcohol 96%. Vodka won't do.
- Metal cover
- Knife and scissors for even cutting of a tin can.
- Ruler.
Manufacturing instructions
To make an alcohol stove, no complex diagrams are needed; the principle is simple and accessible, as are the materials.
From a beer can:
- You need to take two beer cans (or Coca-Cola cans).
- The bottom of the jars is cut off by approximately 5 cm.
- Insert the bottom into the bottom, slightly twisting the edges of the jar. Make a hole in the middle in the part of the bottom that became the stove lid.
- In both beer and coffee cans, holes are made for the fire to escape by using a nail or awl to pierce holes around the perimeter, about a millimeter in diameter.
The number and diameter of holes is selected experimentally and depends more on the size of the can itself. For the stove, holes are made from beer cans in the lid, and in a coffee stove at a level slightly above the middle. 4 simple steps - Pour alcohol into the hole on the lid and close it with a coin.
The DIY camp stove is ready. Work process
Operating rules
Such a burner must be ignited in a special way:
- The place for the stove is chosen at a short distance from the walls of the tent. This may be a stone or other immovable, non-flammable base. If a can of alcohol turns over, you will have to wait until it burns out.
- Place the stove on a metal lid; a regular seamer will do.
- Pour alcohol onto the lid under the base of the burner and set it on fire.
Burning alcohol outside the stove should heat its contents. Visual application
Such camp stoves for tents are used in the off-season; the design will not give a large increase in temperature, but it will allow you to heat canned food and boil water. The stove will boil one liter of water in 9 minutes at home; when camping it will take longer, depending on the ambient temperature.
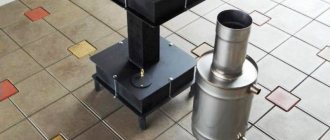
Gas infrared
In this method we will tell you how to assemble such an installation yourself, because... building an infrared burner is very difficult.
Materials and tools
For production you will need:
- Infrared ceramic burner.
- Gas cylinder.
- Oxygen hose 2 m with a diameter of 0.4-0.6 cm.
- Clamp 2pcs
- Screwdriver
- Nozzle for liquefied gas or natural gas (depending on the fuel used).
- Retaining ring
When choosing a ceramic heating pad, it is better to give preference to small models - gas is consumed more economically. The peculiarity of infrared heating is that it heats objects, not air, so if possible, it is good to have a stand under the heating pad, which will allow you to direct the energy.
Manufacturing instructions
The diagram clearly describes the principle of operation of the stove. The gas-air mixture allows you to achieve high temperatures with the least risk of fire.
Principle of operation
Essential elements
- Place the nozzle into the connection hole of the infrared burner.
- Attach the retaining ring on the reverse side.
- Place a clamp on the oxygen hose to prevent gas leakage.
- Connect to the nozzle, tighten the clamp with a screwdriver.
- Connect the gas cylinder to the hose, also using a clamp.
- To light the heater, you need to hold a match to the ceramic heating pad. It is forbidden to ignite gas near the nozzle. Fuel can be propane, argon and natural gas. When replacing fuel, you need to change the type of injector. The gas camp stove is ready.
Type of infrared gas stove for a tent
Operating rules
A camp stove for a tent should not only heat the space, but also serve as an assistant in cooking.
Infrared heaters are not intended for this, but craftsmen have learned to cook on the following tiles:
- You need to place the heating pad with the radiating side up, and place two stones or bricks on the sides.
- Place metal rods or skewers on the bricks.
- Place dishes on top for cooking and heating canned goods.
A 200g can will last for 2 hours, after which you need to replace it with a new one. The gas cylinder must stand upright. It is prohibited to leave the stove unattended. Ventilate the tent from time to time. The surface temperature of the ceramic heater is 800-900 degrees.
How to choose?
There are several factors to consider when purchasing such a stove.
- Weight. The differences in weight are huge, as is clear from the information above. In general, there are two large groups: backpack portable stoves and those that require a car for transportation. If you plan to transport equipment, then weight is not so important; it is better to focus on the characteristics and price.
- Pipe diameter. The diameter of this part of the structure can vary significantly. If there is already a chimney built into the tent, then you will have to select a stove according to size. The diameter is usually equivalent to the combustion power - the larger, the higher the indicator.
- Accessories. Some brands provide a long list of accessories for their stoves, but the cost of such models is much higher.
Step 8: Assembly - Adding the Heater to the Furnace
Show 7 more images
How about sleeping in a warm tent?
If you're adding wood to the stove every 15-20 minutes to keep the fire going, you can't go to sleep. If it's snowing outside, you load wood into the stove all night. I thought about adding a piece (candlestick holder) to the outside of the stove, keeping the candles glowing for 8 hours. A block of 3x5 candles should give the stove about 450 watts of energy and remove all the carbon monoxide into the chimney (see pictures). The material was 0.5 mm metal, which in the end was very heavy, but suited well for testing. And the idea works!
Types of structures
Large and mini ovens
Large and compact devices have different weights and sizes. The dimensions of compact stoves do not exceed 20-30 cm, weight - 2.5 kg, they easily fit into a bag or backpack, and are designed to heat a tent for 2-3 people.
The weight of large stoves starts from 2.5 kg and can reach 16-20 kg; they can also be used for heating a mobile bathhouse and drying clothes.
Gas
Gas stoves are also designed to heat tents; the main fuel source is butane or propane. Butane does not freeze at low temperatures and is more accessible.
Propane cans are sold at hardware stores; larger containers can be refilled at a gas station. A portable infrared heater should be used to heat the air in a 5-6 sq.m. tent for cooking.
Paraffin
Paraffin heaters operate on the principle of a burning candle. They are produced in the form of tablets with a wick, as well as in the form of a dissecting emitter-body equipped with a fuel afterburning system.
The stoves are easy to use; paraffin should not be used to heat the tent. Complex designs show higher efficiency.
Coal and wood fired
Wood and coal heaters are in greatest demand. Its advantage is an unlimited supply of fuel.
Cast iron and titanium are used in production.
Long burning
A prefabricated stove consists of a connected body and pipes; it ensures long-lasting combustion on one load of wood. The unit is used for heating tents, and can be used for heating greenhouses, garages, and for cooking and smoking food.
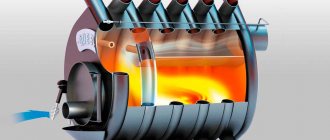
With heat exchanger
Heat exchangers are submersible, twisted, spiral, graphite. The main differences lie in the principle of operation.
The operating principle of the device is based on supplying gas to the burner, thereby heating the air. Combustion waste exits the tents through pipes, and fans pump air.
Manufacturing recommendations
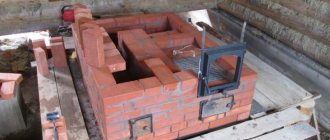
The easiest way is to make a small portable stove with your own hands - the Robinson rocket, whose drawing is presented below. You will need cutting profile pipes, metal for legs and stands, as well as welding skills. Moreover, compliance with the exact dimensions indicated in the drawing is not necessary. You can take pipes of a different section, but you just need to reduce or increase them proportionally so that the parts fit together.
Drawing of an improved “Robinson” camping stove with nozzles made of a profile pipe, cut lengthwise into 2 parts
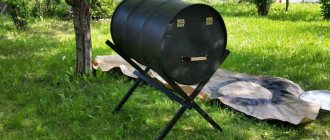
The most common versions of large rocket stoves are made from a gas cylinder or a two-hundred-liter metal barrel. You must understand that these ready-made elements are used as an outer hood, and the internal parts of the stove must be made from pipes of smaller diameter or laid out from fireclay bricks. Moreover, from a cylinder you can make both a stationary heater with a small bench, and a unit that can be moved.
Please note that calculating the thermal power of a rocket-type furnace is quite difficult; there is no single calculation method. It’s easier to rely on ready-made drawings of already working samples and assemble according to them. You just need to compare the dimensions of the future stove with the dimensions of the heated room. For example, to heat a small room, the size of a cylinder is enough; in other cases, it is better to take a large barrel. The selection of internal parts for them is shown in the diagram:
2 options for potbelly stoves - from a gas cylinder and a standard iron barrel
Stove rocket from a cylinder
In addition to the gas cylinder itself, to assemble the stove you will need:
- profile pipe 150 x 150 mm for the firebox and loading hopper;
- steel pipes with a diameter of 70 and 150 mm will go to the internal vertical channel;
- the same with a diameter of 100 mm for the chimney;
- insulation (basalt fiber with a density of at least 100 kg/m³);
- sheet metal 3 mm thick.
For a master skilled in welding, this work will not be particularly difficult. The top of the cylinder should be cut off along the seam, after first unscrewing the valve and filling it to the top with water. Openings are cut on both sides for installing a firebox and inserting a chimney. A profile pipe is inserted and connected to a vertical channel, which is discharged through the bottom of the cylinder. Further work on the manufacture of the rocket furnace is carried out in accordance with the drawing:
At the end, the upper part must be welded into place, then carefully check all seams for permeability so that air does not flow uncontrollably into the oven. After this, you can attach a chimney with a water jacket (if available) and begin testing.
Masonry of a rocket-type heater made of bricks
This stove option will require the purchase of fireclay bricks; ordinary ceramic bricks will not work for a rocket stove. The masonry is done using fireclay clay mortar; it is also sold as a ready-made building mixture. How to make a stationary rocket stove:
- First you need to dig a hole, compact the bottom and pour a foundation measuring 1200 x 400 mm and 100 mm high, as shown in the photo.
- After hardening, the foundation is covered with a sheet of basalt cardboard and the combustion chamber, a bunker for loading firewood and a vertical channel are laid. A door is installed at the end of the combustion chamber to clean the ash pan.
- After the clay has dried, the pit is filled up, and a pre-selected pipe or small barrel with a diameter of 450 mm is placed on the vertical channel. The gap between the brickwork and the pipe walls is filled with fire-resistant insulation, for example, basalt wool, expanded clay, vermiculite.
- At the last stage, a cap made of a large metal barrel with a diameter of 600 mm is put on the structure. First, a cutout is made in its upper part and a pipe is installed to connect the chimney. When the barrel turns over, he will be at the bottom.
Homemade alcohol burners
In order not to spend a lot of money buying equipment that will be needed one-time, you can make your own alcohol burner. There are projects on the Internet on how to make a tent stove with your own hands. Usually they heat food, but the heating turns out to be too weak.
To make a homemade burner you will need:
- 2 drink cans (tins);
- alcohol;
- coin;
- glue.
Stages of device manufacturing:
- Before starting work, the jars should be washed.
- We determine the height of the future burner and make notches on both cans (horizontal closing line. Cut it off.
- We clean the surface with sandpaper so that the device does not ignite from the paint during operation.
- We insert them first into the second. We fasten with glue along the seams.
Bonded cans
You need to pierce holes along the entire diameter of the jar and in the center.
Punched holes in tiles
- Pour alcohol into it;
- We place a coin in the center so that flames do not come from there, but come out evenly through the side holes;
- It is necessary to light the burner, preferably from the side.
Stoves are also made from other materials, for example, buckets, but this design will work on wood or briquettes
Heating using homemade burners and stoves must be carried out with extreme caution, as they may not be accurately calculated
Is it possible to make a tent heater yourself?
Portable heaters are not cheap, so many tourists and fishermen prefer to make devices for warmth and lighting themselves. On the Internet you can find many options for making such structures. Most of them do not require any expensive materials or tools, and some are even made from improvised materials.
With a minimum of financial costs and effort, the result will be an economical stove, which will be enough to heat a small tent, light and prepare hot food or drinks.
Using inexpensive and accessible materials, you can make a tent heater with your own hands