Although the potbelly stove has a history of more than a century, it has not ceased to be a very popular heating device for small rooms.
Potbelly stove from a gas cylinder
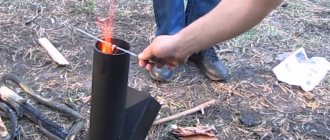
Such a stove is made not only from solid sheets of metal, but also from various metal objects that can withstand the heat from an intense flame - it could be a barrel, a flask, a pipe or an old gas cylinder.
It is especially popular among avid motorists who, even in winter, cannot refuse improvements to their car, spending all their free time in garages. The gas cylinder has an ideal shape, it’s practically a potbelly stove, you just need to improve it slightly: cut off the excess, drill the necessary holes and add a few pipes! Let's take a closer look at how to make a potbelly stove from a cylinder?
A potbelly stove made from a gas cylinder can have a vertical or horizontal arrangement. Some craftsmen even make such stoves from two cylinders, placing one of them in a vertical position on top of the other, which is oriented horizontally.
Video: homemade wood-burning stove made from two cylinders
However, there are many models, and after considering different ones, you can choose the one that seems more convenient to use and acceptable in ease of execution.
Naturally, to make a potbelly stove from a cylinder you will need some tools and materials, as well as certain skills in working with them.
We increase the efficiency of the furnace
A potbelly stove can heat a room in literally a matter of minutes.
Moreover, you can throw whatever comes to hand into the firebox: since it does not have an extensive network of chimneys, and the smoke in it comes out “directly,” you don’t have to worry about them getting clogged. But if a conventional heating stove installed in premises for permanent residence has an extensive network of chimneys that retain heat, in a potbelly stove it goes directly into the pipe, so its efficiency is not very high. That is why it is too “gluttonous” and requires a lot of fuel.
To reduce fuel consumption, you can use the following tips from experienced stove-makers:• firebox door and vent
in such an oven must be as airtight as possible;
otherwise, the air supply to the potbelly stove will increase, and the fuel will burn out too quickly;• to regulate the release of warm smoke in the chimney, it is advisable to provide a damper
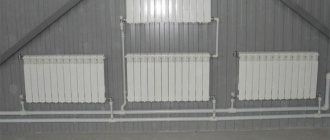
;• next to the stove, you can provide
side metal screens
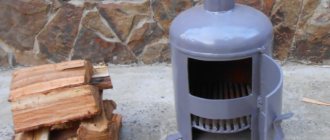
at a distance of 5-6 cm from the stove, in this in this case, it will heat the room not only through heat radiation, but also through convection (circulation of warm air); • a potbelly stove, “clad” in a metal casing, will help retain heat much longer;
Potbelly stove in casing
Round furnace with afterburner and casing with heat gun
• to retain heat in the room, elbows should be built up in the pipe; however, soot will be retained in them, so it is advisable to create a collapsible structure; • the pipe can also be given a stepped shape: arrange the elbows in stages, making a 30° turn with each step; in this case, each of the elbows must be securely attached to the wall with rods;
Stove with chimney elbows
• chimney capacity
should be less than the productivity of the furnace itself, in which case hot gases will not go into the pipe immediately;
its diameter should be only 2.7 times larger than the volume of the firebox, for example, with a firebox volume of 40 liters, the diameter should be 110 mm; • you can increase the efficiency of the stove by blowing the chimney with a fan
- this will turn the stove into a kind of smoke cannon ;• to reduce air circulation,
firewood in the stove
should be stacked as tightly as possible;
if it is heated with coal, you need to stir up the resulting ash as little as possible; • to regulate the air flow, the door to the ash pit can be made adjustable by providing it with vertically located slots and a latch
.
which will cover these gaps; • to increase the heating area, it can be ribbed, that is, strips of metal
to the stove; • if you place a couple of
buckets or a metal box with sand
.
then they will accumulate heat and store it even after the stove goes out; sand backfill or a heat accumulator made of stones
can also be sewn inside the metal body of the furnace;
Scheme of a potbelly stove with sand backfill, the stove is made of a pipe with a diameter of 500 mm, its length is 650 mm
• oven lined with 1-2 layers of brick
. will retain heat much longer;
• the volume of the furnace also matters: the larger the area of its walls
.
the more heat they will release into the room;• bricks or metal sheet
. on which the stove is installed will help not only protect the room from fire, but also retain heat.
Related video: Do-it-yourself potbelly stove stove
8f772c3fed439782b7a382d3001fa981.jpe 6e162aebc95ce3c564df48f7a0fbfc69.jpe
Schemes of potbelly stoves
The main advantage of a rectangular stove
. unlike oval products made from pipes or gas cylinders, it consists of a larger heated surface area, so its efficiency will be much greater. The optimal size for a potbelly stove is 800x450x450 mm. A stove of this size will not take up much space and will easily fit even in a small room.
The simplest design is the “Gnome” stove, which consists of a box with a pipe welded to it
An important difference between the Loginov stove
is the presence of two plates (
reflectors
) in the upper part of the combustion chamber.
Since the path of gas movement
increases, the heat transfer of such a potbelly stove is significantly higher than that of a conventional metal stove.
Advice
. If you need to reduce the size of the Loginov oven, then it is advisable to change only its width. If the length and height of the structure changes, its efficiency may decrease significantly.
Detailed diagram of Loginov's potbelly stove
Advantages and disadvantages
The positive aspects of homemade stoves include:
- excellent thermal conductivity (provided by the thick metal walls of the cylinder);
- convenient dimensions (can be made to fit your garage);
- ease of manufacture and maintenance;
- availability of consumables and fuel.
Among the few disadvantages, one can highlight only the ability to use a limited number of types of fuel (wood, coal, fuel briquettes), and with a vertical design, there is also the need to adjust the size of the logs to the length of the firebox.
Second life of a gas cylinder
A good idea for a small stove is to reuse containers that can withstand high heat. We have already talked about barrels, but how do you like, for example, a potbelly stove made from a gas cylinder or even two? These containers are good because they allow you to make your own stove for a country house or garage, both vertically and horizontally.
To create such a potbelly stove you will need the following tools:
- welding machine;
- grinding machine with wheels;
- drill with drills;
- brush with metal bristles;
- tape measure and construction pencil for marking;
- hammer, chisel, pliers.
The materials you need to make your own stove are:
- 1 or 2 gas cylinders;
- Metal sheet for the ash pan and hob (thickness must be at least 3 mm);
- cast iron doors (old ones, for example, from a wood-burning stove, or ones made by yourself from sheet metal, will do);
- chimney pipe;
- thick metal fittings for making legs and grate.
Before starting work on a gas cylinder, open the valve and leave it in this state for at least 12 hours to ventilate the container. Another way to clean a bottle is to fill it to the top with water and then empty it completely.
Potbelly stove from a gas cylinder
For a vertical stove-stove, the gas cylinder is placed in its standard position, the neck is emptied and markings are made for the future firebox and vent. The marked pieces are cut out with a grinder. The grate is made separately - for this, fittings cut to the required dimensions are welded in the places marked at the bottom of the cylinder.
2155f068ab65d10979151ecccacaf454.jpe
Hinges are welded to the cylinder on which the doors are hung. Next, latches are installed, which are designed to protect and increase the efficiency of the potbelly stove. A smoke exhaust pipe is welded on top or on the side of the cylinder.
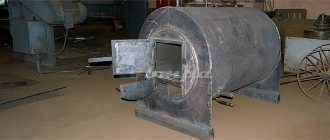
For a horizontal potbelly stove-stove, the cylinder is installed on the “legs” sideways. A square hole is cut in it for the door and a round one for the chimney pipe. Instead of a grate, a series of holes are drilled at the bottom, and a rectangular container for collecting ash is welded below the cylinder. The stove is almost ready, all that remains is to hang the door with your own hands and install the chimney.
If desired, the set of vertical and horizontal stoves made from gas cylinders can be expanded by adding a hob made from a sheet of metal attached to the top.
Manufacturing recommendations
A potbelly stove made from a cylinder can be different: the container can be placed horizontally or vertically. You need to choose the right size case and then use it correctly.
You will need sheet material made of steel that is resistant to prolonged heating, thick wire for the grate, an angle for the legs, etc. During the manufacturing process, a number of nuances should be taken into account to make the stove convenient and efficient.
Stage No. 1 - selection and preparation of the cylinder
Gas cylinders are very different. For a potbelly stove, a container for liquefied gas of 50 or 40 liters is best suited. If you need a small oven, you can take a cylinder with a volume of 12 or 27 liters.
But this will be a device for heating small utility rooms. Similar five-liter containers are practically useless. Such a small potbelly stove will heat up quickly, but will soon cool down, so the heating effect from it will be very insignificant.
An interesting option for a homemade potbelly stove is a freon container. Such a cylinder has thick walls and an elongated body. The container needs to be cut so that the length of the body is approximately 70 cm. Thick walls, of course, make the structure heavier, but retain heat better. The potbelly stove will take a long time to heat up, but at the same time it will heat up longer.
Before starting work, it is necessary to properly prepare the gas cylinder: bleed the remaining gas from it, drain the condensate and fill the container with water, which can then be poured out
When the cylinder is selected, you need to prepare the welding machine and remember the safety rules. Even in a very old cylinder there will always be some residual flammable gas. If you immediately start cutting it using welding, a life-threatening explosion is almost guaranteed. For those who have not yet used a welding machine, we recommend reading this article.
To begin with, it is recommended to open the cylinder and vent the remaining gas. Of course, this needs to be done outdoors, not indoors. Then you need to drain the remaining liquid that has condensed inside the cylinder. This substance usually has a strong and unpleasant odor, so it is best to prepare a small container with a lid for it in advance so that you can immediately carefully pack it and throw it away.
There are no particularly strict parameters requirements for the design of a potbelly stove. The larger the combustion chamber, the more spacious the room the unit can heat.
If condensation is accidentally spilled on the floor in a room, the specific aroma can persist for a very long time. After all these operations, the cylinder is still not ready for contact with the welding machine, because residual gas vapor remains inside.
You need to fill the balloon with water to the very top in order to completely displace all the gas from it. After this, the water is drained, now the cylinder can be cut without problems.
Stage No. 2 - manufacturing and filling the case
Next, you need to choose the type of potbelly stove from the cylinder, whether the cylindrical body will be located horizontally or vertically.
Image gallery
Photo from
Horizontally located stove body
Advantages of loading firewood into a horizontal cabinet
Minimum space for installing the stove
Portable potbelly stove from a mini cylinder
All other operations are carried out taking into account this orientation. If a horizontal position is selected, then one of the ends of the cylinder will serve as the rear wall, and on the other you need to install a loading door and a blower.
If you plan to make a vertical potbelly stove from a gas cylinder, you will need to make two holes: for loading fuel and for an ash pan with an ash pan.
For the grate, you can use thick reinforcing wire. In order not to cook a lattice out of it, you can bend it with a frequent zigzag, a “snake”. This structure is welded to the inner walls of the metal body.
The front wall is made of metal sheet as follows:
- The metal must be applied to the front of the stove to apply the markings.
- According to the markings, cut out a round part.
- Apply another marking on it: for the rectangular door and the blower.
- Cut holes according to the markings.
- Make doors.
- Weld hinges and latches to the front wall and hang the doors.
- Weld the wall with doors to the body.
Both doors along the contour should be sealed with asbestos-cement cord so that they fit well to the body. There is usually no need to create a back wall in such a potbelly stove; its role is played by the bottom of the cylinder. In the upper part of the body, close to the back wall, you need to make a hole for the chimney.
The pipe must be made of thick metal, since the lower part of the chimney will come into contact with heated smoky gases. Thin metal in this place will quickly burn out. Now strong legs made of reinforcement, pieces of metal or pieces of metal corner are welded to the bottom of the stove. They must withstand both the weight of the structure itself and the fuel that will be loaded into it.
Approximately the same technology is used to make a vertical potbelly stove from a cylinder. The bottom of the cylinder will become the lower part of the structure; at the top you need to make a cylindrical “roof” with a hole for the chimney. Usually the top of the balloon is cut off. Once installation is complete, you can weld it back. Doors - for loading and blowing - are made in the front part of the cylinder body.
Such a potbelly stove will take up less space than the horizontal version, and it will also be taller. If you intend to not only heat the room, but also cook food, then you will need to adjust the height of the stove taking this into account and ensure a flat cooking surface.
But usually the diameter of the cylinder is not large enough to provide a full cooking opportunity. Although boiling a kettle is a doable task.
This drawing allows you to get an idea of the design of a horizontal version of a potbelly stove made from a cylinder, to the bottom of which an ash box is attached
The grate can be made in the same way as described above: from fittings bent like a snake along the diameter of the pipe. It is welded between the loading and blower holes.
Some try to reduce the amount of welding work by leaving the top of the cylinder virtually untouched. But then all other work will be more difficult to complete.
In a horizontal potbelly stove, you can not weld the grate, but turn part of the body into it by drilling holes of a suitable diameter and attaching an ash box at the bottom
For example, the grate will have to be inserted not from above, but pushed into the fire door and somehow held in the correct position. Now you need to make doors with hinges and locks and weld them to the body of the potbelly stove, having previously sealed them with asbestos-cement cord. All that remains is to install the chimney pipe at the top and weld the legs at the bottom.
Stage No. 3 - making the door and ash pan
Doors for a potbelly stove can be made from those parts of the body that remain after cutting out the holes. Hinges and latches are welded to them. These are simple elements. Loops can even be made from thick chain links. The second, more expensive option is to purchase ready-made cast metal structures.
To install a ready-made cast door on a homemade potbelly stove, you should weld a frame made of a metal corner to the loading hole
You can choose two separate doors: a large one for the loading hole and a narrow one for the blower. But there are also kits in which such doors are combined into a single structure.
The holes for such doors must be cut exactly to size. After this, you need to weld a frame from the corner to the edges of the openings.
Several links of a thick chain, similar to a bicycle chain, can be used as hinges for a homemade potbelly stove door made from a cylinder
The frame of the cast doors is attached to the resulting frame using bolts. It is recommended to pre-weld a small side so that there are no gaps and the oven is closed hermetically.
In small potbelly stoves, you can, if desired, do without a grate altogether.
On the left is an inverted body of a horizontal potbelly stove with an ash pan welded to it, and on the right is a general view. The ash pan is pulled out to regulate the flow of oxygen; there is no need to make a blower in this model
Finding a place for it is difficult if the stove is made small or low, for example, a horizontal version. In such a device there is no vent; air access is provided using the loading door, which is simply opened slightly. Grate bars are easy to make from rebar, but they are not particularly reliable.
Over time, the fittings burn out and have to be replaced. An alternative would be a piece of sheet metal with circular slots or holes cut into it. To collect ash, you can use a special box - an ash pan.
In the horizontal version of a potbelly stove made from a cylinder, the grate can be installed in the lower part complete with an ash pan, since the lower part of the body will have to be cut off to facilitate installation.
Potbelly stove made of metal sheets
Let us present the features of making a stove from metal sheets that use different raw materials for heating: waste and firewood.
Furnace in production
To start working with your own hands, a metal sheet of about 5 mm is prepared (this is the width that allows the stove to quickly warm up and effectively heat the garage) and pipes (needed for the chimney and some other elements). For a more accurate understanding of the manufacturing principle, look at the drawing:
Drawing of a potbelly stove being processed
Let's get started:
- According to the given dimensions, you need to cut out the elements from the sheet from which the stove will be made. Try to clean up the cut edges as much as possible.
- The part for fastening the components of the potbelly stove is being prepared - a pipe with holes.
- Parts of the upper tank are prepared for installation of the chimney pipe. To do this, according to the data given in the drawing, you need to make a hole shifted to the left in relation to the cent. Also, another hole is made at the bottom of the tank (offset to the right) - it is intended for installing a connecting pipe.
- The component parts are welded together and a finished tank is obtained.
- The lower tank is welded in the same way. Only a hole is made to install the pipe in the center. You also need to make another hole with a slight offset - recycling will be poured into it. A special sliding lid is made over the filling hole.
- The lower tank is attached to the upper one (they are welded to the connecting pipe). Strengthen the structure using brackets.
- Don't forget to weld the legs to the lower tank.
- To increase service life, the stove is cleaned and painted.
You connect the potbelly stove to the chimney and try to heat the garage. To do this, pour fuel into the lower tank and set it on fire. When it flares up, you need to close the processing hole with a sliding lid.
Rectangular wood stove
Drawing of a rectangular potbelly stove
This option is suitable when you need to heat a garage or bathhouse rooms intended for relaxation.
The features of the model, the manufacture of which we will describe with our own hands further, are high heat transfer and the ability to adjust the traction force.
Our oven will have dimensions 45x45x80. These dimensions are enough to heat an average room. It will hold long pieces of wood and is easy to move.
In this case, we will not provide a specific drawing, and will try to explain it in words as much as possible. Before starting work, we buy:
- Steel 3-4 mm thick. A sheet of one and a half by two meters will be enough.
- A piece of pipe. Choose with a diameter from 90 to 100 mm. Length: 0.4 m.
- Reinforcement 16 mm. You need exactly 6.2 m.
- Five kilograms of electrodes.
- Four door hinges.
- A steel rod, half a meter long and about 10 mm in diameter.
- Seven meters of corner with a 40 mm shelf. The walls should have a thickness of 5 mm.
When everything necessary is prepared, we begin to work with our own hands in the following sequence:
- The future walls of the structure are cut out of the sheets.
- The corner is welded in such a way as to form a frame. When performing this and the first point, you need to remember the above dimensions of the stove (45x45x80).
- The reinforcement is cut and welded to the frame at intervals of 2 cm.
- The finished frame is scalded with tin.
- Along the diameter of the smooth rod in the section of the pipe that will be the chimney, you need to make 2 holes. The pipe is welded to the frame (before this you need to make a hole for it).
- A curved rod is inserted into the chimney holes. It should be shaped like a right angle. A piece of round tin, slightly smaller in size than the internal diameter of the chimney, is welded to it - it will be used for adjustment.
- The potbelly stove must have doors. They are cut directly from the body. Loops are welded onto the removed piece of metal, with the help of which they are attached to the stove.
- The doors are equipped with bolts and handles, which can be made of any convenient type. The main thing is that they guarantee maximum fixation of the door (if you don’t want to burn down the garage).
- When the work is finished, you can check the result of the work with your own hands and start heating the garage.
Bottom line
A homemade stove based on gas cylinders is an inexpensive and high-quality heating unit that will last for many years. Of course, the efficiency level of such a stove is not the highest, but welding experts are working to improve it.
A potbelly stove based on cylinders, when properly welded and designed, copes with its task much better than other heaters running on electricity or gas. What type of stoves do you think is the most effective? Share your opinion in the comments!
Sources
- https://gidpopechkam.ru/pechki/burzhujka-iz-gazovogo-ballona.html
- https://cotlix.com/kak-sdelat-burzhujku-dlitelnogo-goreniya-iz-gazovogo-balona
- https://teplowood.ru/burzhujka-iz-gazovogo-ballona.html
- https://oboiman.ru/ingeneer/burzujka-iz-gazovogo-ballona-svoimi-rukami-instruktaz-po-izgotovleniu.html
- https://stroy-podskazka.ru/postrojki/garazh/pech-iz-gazovogo-ballona/
- https://sdelairukami.ru/pech-iz-gazovogo-ballona-luchshij-variant-dlya-garazha-i-masterskoj/
- https://kachestvolife.club/otoplenie/kak-sdelat-piroliznuyu-burzhuyku-iz-gazovogo-ballona-2-luchshih-sposoba
- https://dekoriko.ru/postrojki/garazh/pech-iz-gazovogo-ballona/
- https://vdome.club/bez-rubriki/pech-v-garazh-iz-gazovogo-ballona-kak-sdelat-svoimi-rukami.html
- https://VseProGarazh.ru/kommunikatsii/otoplenie/pech-dlya-garazha-iz-gazovogo-ballona/
What are the benefits of potbelly stoves?
To begin with, it would be nice to understand the features and advantages of potbelly stoves. The main advantage is extreme simplicity. If you have a gas cylinder available, then the assembly can be completed in a matter of hours. The main thing is to have a welding machine, which is impossible to do without. A cylinder, a door, a chimney pipe - and an excellent homemade heating unit is ready to receive the first portions of firewood to give its owners warmth.
Omnivorous - a stove made from a gas cylinder is suitable for burning any type of fuel. This can be firewood, compressed eurowood, wooden waste or pellets. Throw into it everything that can ignite and burn - the potbelly stove is undemanding when it comes to the quality of fuel. The main thing is to let it flare up, and then you can burn anything in its interior.
Affordability – a potbelly stove made from a cylinder is extremely cheap. You can use a new cylinder for it or get an old one from somewhere. If you live in a rural area where there is no gas main, then there will be no problems with the search. And if you cannot get a cylinder, adapt sheet iron, an old barrel or any other suitable container under the potbelly stove.
Other features and advantages of potbelly stoves assembled from gas cylinders:
You can adapt any battered, but more or less whole, gas cylinder to a potbelly stove.
- Versatility in use - if you need a stove for a bathhouse or for a garage, use a potbelly stove. Its production will not take much time, and you will have an excellent heating unit at your disposal;
- A potbelly stove made from a cylinder does not require special maintenance - you only need to periodically clean the ash pan and check the condition of the chimney;
- Easy to install - simply mount the stove on any suitable base or weld metal legs to it;
- Ease of modernization - a cylinder stove can be made more efficient if you use some technical tricks;
- Relatively high heat transfer - thermal power, depending on the volume of the stove, will be from 2 to 7 kW (heated area from 20 to 70 sq. m);
- A stove made from a cylinder is characterized by stable operation in any conditions - you just need to build a decent chimney with a height of at least 3-4 meters;
- Easy self-assembly - if you know how to work with a tool, then after 2-3 hours of work you will have the most effective potbelly stove made from a gas cylinder at your disposal;
- Several modifications for consumers to choose from - the stove body can be vertical or horizontal, large or small volume.
There are also some disadvantages. The first of them is its unsightly appearance. But if you put in some effort, you will be able to build a nice, compact potbelly stove with good appearance. The second drawback is not the highest efficiency. For such units it is about 70%, but this figure can be improved by implementing afterburning of combustion products with secondary air.
All the main ways to increase efficiency will be discussed in the corresponding section of our review.
The final part of the work
We cut four identical pieces of round pipe and weld them to the bottom of the stove - we get support legs.
We make a locking mechanism so that the door can be closed while the oven is operating. We scald the door itself on all sides with steel strips.
At the last stage, all that remains is to clean all the welds with a grinder and paint the stove with heat-resistant paint.
The step-by-step process of making a homemade stove from a gas cylinder can be found in the video below. The idea belongs to the author of the YouTube channel DIY Projects.
A simple potbelly stove made from a can
The simplest potbelly stove is made with your own hands from an ordinary can. There is no need to talk about the durability of such a structure, but it is quickly built, easy to install and provides enough heat.
9677458bec7c3e40a0c0a5cd64bffdd0.jpe
All the work consists of installing the legs, arranging the outlet pipe and some cosmetic operations. To work you need:
- Can
- Flue pipe
- Wire for grate
- Welding machine
- Tools
Let's get started
- We install the can horizontally and mark where the blower will be, shaped like a rectangle or sickle. Place it under the lid
- A hole is cut in the wall or bottom of the can, equal to the diameter of the chimney pipe
- To make a grate, you need to stock up on steel wire. It is bent, carried inside through the lid and carefully unbent so that the zigzag is positioned in the desired position, while it remains convenient to lay wood chips, firewood, etc.
- The can must be secured to legs, which are cut from tubes or corners and welded
- The chimney is welded
A reflector can be attached to the outside of the tank, thanks to which less generated heat will evaporate. Having welded the handles on the sides, the structure can be moved to any other place.
Pros and cons of homemade potbelly stoves
Among the many advantages of such a nondescript but useful installation are:
- Full autonomy and energy independence
- Working with any solid fuel, including plant residues, allows you to save a lot of money
- The versatility of the design, which can not only be installed in various rooms, but also used for cooking
- A simple design that you can build yourself from materials available in the garage
- There is no need to construct a monolithic foundation and install a capital chimney pipe
But despite the significant and numerous advantages, a number of disadvantages of potbelly stoves can be identified:
- The high thermal conductivity of the metal leads to rapid fuel burnout and cooling of the furnace
- If the wall thickness is insufficient, they will soon begin to burn out and the oven will fail.
- You need to watch the combustion process and add firewood in time, control the draft
- Resinous and damp logs cause difficult to remove soot in the chimney pipe
Video - another option for making a stove
A homemade potbelly stove is a reliable and effective assistant in a cold workroom or your own garage. Its production is not difficult, and to start work there is no need for large material investments.
Good material is collected in your article. For a very long time I thought about buying a ready-made one or making it myself, but I finally decided to do it myself. I used a 200 liter fuel barrel as a raw material. I was guided by a detailed drawing that I found at https://kamin-maker.ru/pechi/pechka-burzhuyka-iz-bochki/ I won’t say that the option for a potbelly stove made from a barrel is very good, There is also a drawback, such as thin metal, which means the service life is no more than a year, but a huge plus is the very cheap and uncomplicated production of this unit. Based on my experience, such a stove perfectly heats a room of 80 m2, I use pressed sawdust as a raw material, one bookmark lasts me at least 6 hours. I resisted doing it for a long time or not, but in vain, it’s a great thing!
5bdedcb7ed5bd81554f3482ed13711bc.jpe
Selection of cylinder and materials
So, if you have a suitable old natural gas cylinder on hand, you can safely get to work. Well, if there is none, then it’s worth thinking about what kind of cylinder is needed for the potbelly stove. In total, several standard sizes of cylinders are used for transportation and storage of liquefied petroleum gas - the most common capacity is 50 liters - height 85 cm, diameter 30. There are even smaller sizes, for example 27 liters and 10 liters, there are tourist ones or, as they are also called, country houses options are 5 liters each, and there are very tiny ones of 2 and 1 liter. The prospect of using small containers is very illusory - there is a lot of hassle and little heat. Well, maybe use it to heat a tent for winter fishing or on a camping trip. The average size would seem to have more volume and look more solid, but what is 10 liters? How much firewood will fit in it? That's right, not much, which means the room should be no more than a closet, 2x2 meters with a low ceiling.
Another thing is a full-size 50 liter container. Here you can cut out a place for an ash pan and weld a pipe like a human. By the way, about the pipe, one of the reasons why it is not recommended for novice welders to use small cylinders is the thickness of the metal. 1-2 millimeters of metal wall thickness is not the best option for learning to work with electric welding on your own. Another thing is the large capacity, here there is enough metal for a week of work and you can get to any point.
But, understanding the thirst for creativity of craftsmen, I would like to warn against the mistakes that are often made when choosing the type of cylinder for work.
It is not recommended, under any circumstances, to use cylinders of carbon dioxide, oxygen, acetylene, and even other gases and liquids as the main material. The reason is simple - the material of these types of containers is difficult to cut and even worse to weld.
So it’s better to use what others have done well and not look for your own untrodden paths. As for the rest, with regard to the selection of materials for assembly, everything will be used - steel pipes with a diameter of 100, 120 and even 150 mm, and a steel angle of even 25 mm, and a steel strip, and construction fittings with a diameter of 8 mm. Even an old motorcycle chain will find its application in the design of a potbelly stove.
All you need to do is take a sheet of paper and figure out how, what and where will be welded and installed, and how it will all be attached in order of priority.
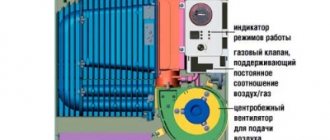
Construction of a potbelly stove: features, principle of operation, arrangement of heat exchangers
A potbelly stove with a water circuit works as follows:
- Firewood is loaded into the firebox.
- They light a fire, the heat is transferred directly to the water tank or the recuperator coil.
- Hot water enters the heating or water supply system.
- Remaining heat and flammable gases are removed from the room through the chimney.
- The ashes fall through the grate into the ash pan.
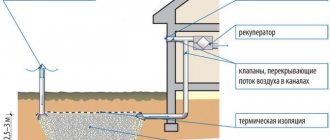
The design of the water circuit unit uses two energy harvesting principles:
- Direct thermal energy collection. The heat exchanger circuit is located inside the stove. Heat transfer immediately begins from the contact of the open flame and the boiler tubes. The water in the radiator boils and enters the heating system. From there it is sent to water supply pipes. The heat exchanger experiences large temperature differences (the contrast between the temperature of the water and the heat inside the oven).
- Collection of secondary heater radiation. The boiler circuit is located outside the heater. Being outside, it collects secondary thermal radiation from the heated metal surface. The degree of heating of the heat exchanger is lower than in the previous case, temperature differences are not so significant. The water in the device circuit begins to heat up after the stove warms up.
Photo gallery: common types of heat exchangers
Mineral salts form inside the boiler. Therefore, instead of water, it is more advisable to use antifreeze or antifreeze, which contain additives that prevent the formation of mineral deposits. The most common heat exchanger designs:
- a water tank built into the stove - a capacitive boiler;
- tube boiler - a tank in the form of a water jacket around the stove or chimney - capacitive heat exchanger;
- main boilers - a coil spiral or a water conduit passing through the active heat transfer zone.