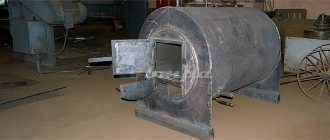
Features and principle of operation
It implements the principle of long-term combustion, based on the physical and chemical phenomenon of pyrolysis - the smoldering of fuel with a lack of oxygen and the combustion of gases released during this process.
One load of firewood is enough for 4-8 hours of combustion. The design of the stove is different in that the air supply pipe with a damper at the end is located vertically and exits through the top of the stove with a small, non-sealed gap. The pipe has vertical mobility. At its lower end there is a massive disk with guides for the flow of gases. The chimney is welded to the top of the stove on the side. Firewood is loaded into the oven vertically, the disk presses it against the grate. As the lower layers of fuel burn, the disk lowers and combustion air is supplied to the upper layer of fuel, which is subjected to pyrolysis.
Advantages and disadvantages
The advantages of the Bubafonya top combustion stove are as follows:
- High fuel efficiency. Heat does not escape into the chimney.
- Ease of manufacture and operation.
However, the design also has disadvantages:
- It is impossible to replenish the fuel supply in the stove before it is completely burned.
- It is impossible to interrupt the combustion process.
- When the sand draft decreases, it smokes.
- Not suitable for quickly warming up cold rooms.
Necessary materials for making a bubafonya stove
The necessary materials are the same gas cylinder, fittings for the grate, a 90-degree pipe, a metal pipe one and a half meters long and a heavy disk with a diameter slightly smaller than the internal diameter of the gas cylinder.
Features of operation
During operation, it is important to remember the following: Firewood in layers must be of the same length, they should be loaded carefully and evenly, avoiding distortions
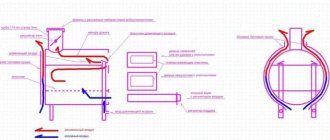
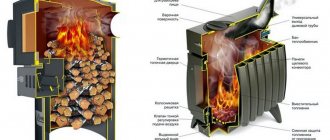
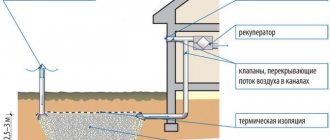
Diagram of a long-burning stove Bubafonya
For initial warming up and entering the pyrolysis mode, the stove requires an hour or more, and up to one fifth of the fuel is consumed.
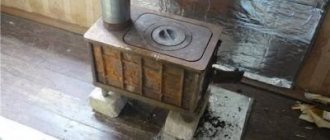
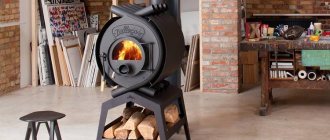
Potbelly stove in the garage: pros and cons
Car enthusiasts install a homemade potbelly stove in the garage for several reasons:
- the stove heats the room in winter;
- you can cook food or heat a kettle on a potbelly stove;
- With a design approach, a homemade heating device can become a decoration for the garage.
We advise you to read in more detail why a potbelly stove smokes and find answers to your questions.
A potbelly stove has a number of advantages compared to other heating devices:
- For kindling, you can use a variety of fuels - firewood, coals, construction waste, petroleum products, waste oil, etc.
- The main advantage of a potbelly stove is the speed of heating the room. Thanks to its high efficiency and power, the stove will heat a garage of 50-60 square meters. m. in 15-20 minutes.
- The stove distributes heat evenly regardless of where it is located.
- A potbelly stove is an economical heating device. For example, heating a garage with a potbelly stove will cost several times less than with an electric heater.
- An additional advantage of a potbelly stove in the garage is the ability to cook or warm up food. When creating a stove yourself, it is enough to attach a metal cooking surface to its upper part.
- A homemade stove will cost the car owner almost free if there is an unnecessary barrel, sheet of metal and pipe lying around in the garage.
We previously wrote an article about installing a potbelly stove for heating and recommended adding it to your bookmarks.
The potbelly stove will fit harmoniously into the interior of any garage. In addition to the heating function, the heating device has a “cooking mode”. A hob is installed at the top of the stove, where you can heat a kettle or cook food.
The disadvantages of a potbelly stove in the garage are:
- the need to install a chimney in the garage;
- periodic cleaning of the chimney;
- the need for constant fuel supply;
- inability to accumulate heat.
How to choose a cylinder
A 5 liter household gas cylinder is too small to heat the room. And fuel can only fit in it in the form of briquettes or wood chips. A 12-liter cylinder will allow you to develop thermal power up to 3 kW. This stove can warm a small lodge or tent. Gas cylinders of 27 liters provide up to 7 kW, we can talk about heating a small garden house, greenhouse or garage.
Gas cylinder options
And finally, the king of household gas cylinders is the 50-liter giant. This is the best option for creating a potbelly stove with your own hands, suitable for heating a country house. 40-liter industrial gas cylinders have too small a diameter and thick walls. It is better to cut and shorten them. Thick walls will take longer to warm up and retain heat longer. Such a stove will also last significantly longer.
Horizontal pipe
Another way to prevent heat from escaping into the atmosphere is to trap it indoors. To do this, you should slightly modernize the chimney. The essence of the procedure is to create a long horizontal section that will transfer heat into the room. For example, in the case of a bathhouse, a small country house or a garage, its length can be 3-4 meters (in addition to the vertical section). Having passed through the pipe, the heat will mostly transfer to its metal, after which it will enter the room. The combustion products will enter the vertical section already noticeably cooled.
Precautions and operating instructions
During heating, the stove becomes very hot.
Safe use of a potbelly stove
It is advisable to make a reflector, in addition, it will improve the distribution of hot air flows. To increase heat transfer, you can line the stove with stones or bricks. I recommend installing it on a foundation. Can be made from bricks and mortar. Flammable materials must be kept at a safe distance. The stove produces almost no ash, so you will have to clean it very rarely, using a scoop with a short handle. Over time, the metal of the case may burn out. It will have to be replaced with a new one.
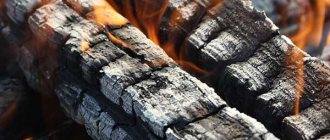
Pyrolysis ovens can only be heated with wood (chips, sawdust). Liquid fuel will not provide a long burning effect. In addition, toxic substances are released into the air and pollute the atmosphere. Before lighting, remove the lid and remove the piston. Firewood is laid on top, then wood chips and paper are placed. Ignite through a pipe supplying air. Open the damper and throw lit paper or a rag inside (matches go out due to strong draft). When the wood burns well, close the air supply. The combustion process goes from top to bottom.
Video: how a DIY potbelly stove works
The task is simple - make a stove with your own hands. Determination in achieving goals and a little creative ingenuity. Follow the technology, show perseverance and the fruit of your labor will serve for many years, creating a warm atmosphere.
Strengths and weaknesses of Bubafoni
The pyrolysis stove has a number of positive qualities:
- Simplicity of design . Having welding skills and experience working with metal, building a stove will not be difficult.
- Universalism . Bubafonya is very unpretentious in terms of fuel: you can throw firewood, coal, sawdust, chips and other types of wood waste into it. The stove also copes well with pellets – inexpensive, environmentally friendly granules.
- Duration of work . The time it takes for one stack of firewood to burn out is almost a day: during this time, the stove regularly generates heat. This indicator may vary depending on the modification of the device, the volume of its firebox, the oxygen circulation rate, etc.
It is also worth mentioning the main disadvantages of Bubafoni:
- Low efficiency . The reason for this is uneven heating of the device body with sufficiently low heat transfer. More “advanced” pyrolysis furnaces are much more efficient in this regard: their efficiency often exceeds 90%.
- Inconvenient to clean . There is no ash pan as such in the design, so the remaining combustion products are removed through the top. Some modifications of the stove are equipped with a door at the bottom, which facilitates the procedure for removing ash and ash.
- Low aesthetics . The appearance of Bubafoni can hardly be called beautiful, so it is mainly used for heating utility rooms.
Simple and convenient “ash pan”
In a long-burning potbelly stove, an ash pan is not needed; a small amount of light ash after combustion remains directly in the firebox. But you can still adapt the stove for easier cleaning, especially if you plan to add coal to the firewood.
1. Stops from the corner. 2. Grate over the ash pan
If the potbelly stove is positioned horizontally, you need to cut out the same plate that was used to form the upper chamber. Instead of a partition, it has a regular 35 mm corner welded transversely. In the front part, a handle is made from a thin rod. The plate is installed on two guide angles welded along the body. To ensure a tight fit of the plate and avoid strong air leaks, it is recommended to do the following:
- weld the corners under the bottom of the plate with the shelves up on small tacks that are easy to break off;
- insert the plate into the body and weld the corners to the walls, filling the thick weld seam well;
- insert a crowbar into the lower chamber and undermine the plate, if possible, clean out the weld marks.
Through small cracks, the minimum amount of oxygen required for combustion will enter the chamber.
1. Disc. 2. Holder made of reinforcement. 3. Side of the “ash pan”
For a vertical potbelly stove, you need to cut out another flat disk and weld a piece of thick steel reinforcement to it in the center. A side made of steel strip is bent and welded along the perimeter of the circle. In both cases, ash removal is carried out after the potbelly stove has cooled: the ash pan is removed, cleaned and replaced before a new filling.
Drawing up a drawing
The main proportion in the process of making a homemade Bubafonya stove from a gas cylinder is the mathematical ratio of the parameter of the internal diameter of the body and its height. It should be between three and five to one. The optimal diameter is from 30 to 80 cm.
Making the diameter of the stove body less than 30 cm is not effective, since oxygen will circulate too quickly through the combustion chamber without fully reacting with the wood. This leads to a noticeable decrease in the efficiency of the device. In chambers with a diameter of more than 80 cm, another problem arises - in it, the firewood on the edge burns very slowly, and in the center - faster. As the fuel burns out, a hole appears into which the piston descends. As a result, the flame gradually fades away. In the drawing, it is more convenient to denote the diameter by the letter D, and the height by H.
Maintenance of pyrolysis furnaces
Pyrolysis ovens require much less attention compared to conventional devices. This is due to the fact that there are practically no solid particles in the flue gases that form soot. The presence of water vapor in the exhaust determines the formation of condensation on the walls of the chimney. Therefore, it is necessary to install a condensate collector with a drain tap, which must be used regularly as it accumulates.
This statement is true for perfectly balanced stoves, where complete decomposition of the fuel occurs. But a breakthrough of conventional furnace gases cannot be ruled out, so regular inspection of the internal surface of the chimney is necessary. If necessary, it must be cleaned. Inspections are carried out at least twice a year.
Long-burning stoves must use an insulated stainless steel pipe.
Furnaces using waste oil must be cleaned regularly as carbon deposits and slag deposits form in the fuel bowl. In the first fuel combustion chamber, normal combustion occurs with the release of solid particles. The design of the furnace allows you to visually monitor the condition of this unit.
There are no small details when making a heating stove yourself. Each circumstance must be carefully weighed and thought out. Otherwise, all efforts will be in vain. I wish you success!
Balloon oven options
There are several main options for such designs:
The simplest of them is an ordinary potbelly stove. It is customary to use a 12-liter or 27-liter cylinder for it. For efficient heating, it is advisable to use a horizontal elbow for the chimney. The most difficult part is attaching the door for the opening through which the fuel is loaded. Convenient for storage in a city apartment. It is short-lived due to the gradual burning out of the walls of the cylinder.
Special long stoves. They work as long-burning stoves. The basic principle of operation is that the fuel burns continuously with only a small amount of fuel. Pyrolysis products are then formed, which burn in a separate combustion chamber. To ensure combustion efficiency, it makes sense to preheat the air that enters the furnace. The oil garage stove requires vertical installation. Used engine oil is used as fuel. Adjusting the combustion temperature The design looks something like this.
"Rocket". Its name comes from the fact that it sometimes makes a noise similar to the roar of rocket engines. However, this can happen if the oven is not adjusted. A properly functioning structure makes only a quiet rustling sound. Its design is not particularly complicated and a 50 liter gas cylinder is very convenient for its manufacture. This type has many important advantages. They heat the room well, are economical to use, and relatively simple to manufacture. They can be adapted to heat a bed. But, on the other hand, they must be done accurately and carefully. If the furnace is poorly adjusted, it will be ineffective. The fuel is firewood (usually thinly chopped chips or branches). It comes through a pipe from above. Air enters through the hole at the bottom left. Combustion occurs in the lower pipe. The blowing here is very strong. The combustion products rise upward and exit through the pipe on the right, heating the room. Let us tell you what a stove called “bubafonya” is. It uses a special principle of working with pyrolysis products. The combustion chamber is located vertically. Pyrolysis products are contained by a special metal “pancake”, which limits the combustion space from above. The efficiency of this design can reach eighty-five percent. This stove is not designed to use wet fuel. Humidity should not exceed 12 percent. The stove is very economical in fuel consumption. Convenient to use for heating garages or other utility rooms.
A rocket stove can be made not only using gas cylinders, but also using barrels, cans and other means.
What you will need for work: tools and materials
This model of a “long-lasting” stove can be made in just a few hours. All you need for this is a great desire and proper organization of the work process. You will also need to thoroughly understand the design of the unit and prepare everything you need in advance.
Tools you will need:
- welding machine - a small, lightweight inverter with the ability to adjust the current up to 200 A is best suited for these purposes;
- angle grinder (colloquially a grinder or “grinder”);
- cutting and grinding discs intended for metal work;
- drill press or electric drill;
- set of drills;
- medium-sized hammer;
- blowtorch;
- chisel;
- sledgehammer;
- tape measure and metal ruler;
- core (a device designed for applying marks to facilitate drilling);
- scriber for marking metal surfaces.
As for materials, there is no need to follow the list exactly. The beauty of homemade structures lies precisely in the fact that they will use any iron that can be found in the backyard or in the corners of the garage (workshop).
Any large container, for example, an unnecessary metal barrel, is suitable for making the furnace body.
So, the list of necessary materials:
- steel pipes with a diameter of 80 to 250 mm, which will be needed for the manufacture of an air supply riser and a chimney;
- a suitable metal container with a diameter of 300 to 600 mm with a wall thickness of at least 2.5 mm (you can use a used gas cylinder, a fuel barrel or a piece of pipe at least 120 cm long);
- a metal sheet with a thickness of at least 4–5 mm from which the air distribution piston will be made;
- durable metal hinges, which will be needed to secure the firebox and ash door;
- asbestos cord (it is needed to seal the loading window and other operational openings);
- corners with a flange from 50 mm, channels and profile pipes - for the manufacture of air distributor blades, support legs and other structural elements;
- a round metal pancake with a thickness of at least 5 mm and a diameter of 120–150 mm (you can take any suitable gear or sprocket from a motor vehicle);
Self-production of a balloon furnace
We take a medium or large cylinder, but it should not be too small. In addition, we will need:
- a small curved pipe (diameter approximately 15 cm);
- a long pipe of the same diameter for making a chimney;
- material for making the door handle;
- door hinges;
- box needed for making a ventilation hole;
- long rod to regulate air flow.
Tools:
- angle grinder;
- welding machine.
The furnace manufacturing process begins with emptying the gas cylinder:
- To do this, in a well-ventilated place, open the cylinder valve and let the gas escape. But that is not all. Then you need to unscrew the valve and release the gas. Then you need to fill the cylinder with water, which will finally displace the gas from the cylinder.
- Next, cut off the top of the balloon. The resulting edges need to be sanded. We mark a hole in the side for the door and on the opposite side for the chimney. Next you need to cut out the door and attach it in place on the hinges. It will be closed using a special latch. The cut is made using an angle grinder.
- Next, a hole for the chimney is made in the same way and a pipe that was prepared in advance is welded. The chimney pipe is made by welding two pieces of pipe: a curved one and a long one.
- Next, a third hole is made - the air duct. It is made below the door. This is a rectangular hole 5 by 5 centimeters. A rectangular box without a lid is welded there. There, a piece of metal is welded onto the central axis. By rotating it using a small lever, you can adjust the airflow for the oven.
- In order to get rid of gaps on the door, small steel strips can be welded around the perimeter. This completes the furnace manufacturing process.
Main types of oven
A vertical stove is made more often, as it takes up little space and has a neat appearance.
The horizontal design is valued due to the large cooking surface area. The dimensions of the ash pan and the hole for storing firewood in any device are 10x20 and 20x30 cm, respectively. Their markings are applied both to the drawings and to the cylinder itself - this makes it easier to cut out. The location of the holes is chosen arbitrarily, depending on the type of stove.
With the help of such a stove you can heat the room and even cook food outside
The chimney is made from a steel pipe, cutting it into different sections and welding them together. Additionally, you need to insulate it with mineral wool and foil. You can use the finished potbelly stove indoors or outdoors. If the stove is used for cooking outdoors, then it is enough to attach a low pipe for the smoke to escape.
Vertical stove
To create a vertical stove from a propane cylinder, it is placed vertically. It is necessary to cut off the neck, use a marker to draw the markings of the ash pan, chimney and firebox. The holes are cut with a grinder or cutter. Reinforcing bars are cut into identical pieces, forming grate bars. They are welded to the body in parallel rows or in a snake. Hinges for doors are attached, doors are cut out of steel sheet or cast iron. A sliding mechanism or latches are welded to them.
See also: modern types of potbelly stoves.
A hob is necessary if food will be cooked or water will be heated on the stove. To create it, you need to cut out a metal part of suitable size and weld it to the top of the cylinder. After this, all joints and seams are checked for tightness and strength, cleaned and sanded.
The vertical oven is more popular because it takes up less space
The hole for the chimney should be located at the top of the cylinder or on the side, sometimes the pipe passes through the central opening. In the side part, the elbow is first attached, then the chimney itself. Smoke and combustion products come out through the pipe. A metal stand or strong legs are attached to the bottom of the cylinder. Additionally, you can prepare the foundation for the potbelly stove.
Horizontal design
The first step is to create a strong stand. It is made of metal, the legs are welded, and then the body of the finished stove. A marker on the cylinder marks the location of the blower, chimney and fuel holes. The openings are cut with a chisel, grinder or cutter. Using a drill, holes are drilled in the lower part of the body. An ash pan is attached to the top; it is made of strong, heat-resistant metal. A damper is welded to the opening, which will serve as a blower.
The door is prepared from the cut out part of the cylinder. It must be scalded and attached to the body using hinges. Although you can make a cast iron door with a latch and weld it. The chimney should exit from the top rear of the stove. A steel sheet is laid and secured on top of the body to create a flat cooking surface.
A horizontal stove will require more space - this is its main disadvantage
Recommendations for masters
When making a stove from a cylinder with your own hands, you need to take into account several nuances. It is necessary to adhere to the basic recommendations and operating rules:
- the chimney should consist of broken sections, since all the heat will quickly escape through a short pipe;
- fuel can be anything - coal, firewood, wood waste, household waste;
- the efficiency increases with increasing chimney length, but straight and downward sections must be avoided;
- heat transfer increases if another container is placed inside the main body, but of a smaller size. This way you can increase draft and prevent smoke from entering the room.
More information about a wood-burning stove made from a gas cylinder:
Design features and operating principle
Those who want to build a potbelly stove with their own hands should first understand the features of its design. This is a very simple stove in appearance, but despite its simplicity it is quite effective in heating rooms.
The main highlight of the device is the pipe, or rather its diameter. Therefore, during manufacturing, it should be remembered that the throughput of the chimney pipe should be lower than the productivity of the firebox for the formation of flue gases. It is necessary that gas distribution be ensured by accurately calculating the pipe diameter. For example, if the volume of the firebox is 40 liters, the diameter of the chimney should be made equal to 106 mm.
Device design
Hot gases cool down too quickly, so it was invented to burn the fuel in partial pyrolysis mode. The secret lies in the presence of a metal screen on three sides - at the back and on the sides of the structure. These plates should be located at a distance of 50 mm from the furnace body in order to reflect back 50% of the IR radiation. This makes it possible to achieve the desired temperature inside the firebox and reduce the risk of fire in the enclosing structures, as well as avoid burns when operating the stove.
A potbelly stove burning dry wood or coal emits a lot of heat at the beginning of combustion
Therefore, even if you heat the stove little by little, it will fly out into the chimney, which means that when creating a structure with your own hands, you should pay great attention to convection. It is necessary not only to prevent the warm air from going in different directions, but also to hold it near the stove. The bottom of the stove heats up moderately compared to the walls, but also radiates heat downwards
This does not reduce the performance of the potbelly stove, but you should think about safety - avoiding a fire, especially if the stove is installed on a wooden floor. In this regard, it should be placed on a metal sheet with a 350 mm offset along the contour of the structure. The sheet is laid on a layer of asbestos or other non-combustible material. This will further increase the efficiency of the stove.
The bottom of the stove heats up moderately compared to the walls, but also radiates heat downwards. This does not reduce the performance of the potbelly stove, but you should think about safety - avoiding a fire, especially if the stove is installed on a wooden floor. In this regard, it should be placed on a metal sheet with a 350 mm offset along the contour of the structure. The sheet is laid on a layer of asbestos or other non-combustible material. This will further increase the efficiency of the stove.
Chimney
Chimney installation
Another important element in the design of such a stove is the chimney. It must be constructed as follows: a vertical part with a height of at least 1.2 meters is installed. In this case, it is advisable to wrap it with heat-insulating material, for example, basalt cardboard.
The next part of the chimney is the hog, which is a horizontal or slightly inclined pipe of the same diameter. It is in this compartment that the remaining flue gases burn out, and from here up to a quarter of all heat is released into the room. The length of the hog is at least 2.5 meters, and ideally 4.5 meters.
According to injury safety requirements, there must be at least 2.2 meters from the bottom of the hog to the floor covering so that a tall person does not touch his head on a hot pipe. It is advisable to surround the device with a special protective fence in the form of a metal mesh or cylinder.
Advantages and disadvantages of the oven
A simple-looking stove combines many important advantages, among which the following points must be noted:
- Extreme simplicity of design. Almost anyone can handle the assembly of bubafoni.
- Economical. Depending on the volume of the firebox and the quality of the raw materials, the bubafon can work on one load for up to several days.
- Unpretentious in care and handling. After igniting the fuel, the bubafon can be left unattended for a long time and go about its business (but it is still better to periodically check the condition of the unit), and all stove maintenance comes down to periodically cleaning the ash pan and chimney.
- To assemble a bubafoni, you do not need any expensive or hard-to-find materials. A tank, a lid, a few pipes and various simple metal products will be enough.
- The stove copes with its main task perfectly even in very severe frosts.
- Bubafonya can be used to heat a residential building, greenhouse, garage, country house and other objects.
- The unit is characterized by a high fire safety rating - there are no holes in its design for an open flame to escape.
Despite the obvious advantages, this stove also has disadvantages:
- Small “radius of action” with high heat transfer. It’s warm, even hot, near the stove. If you move a little further, it’s cold.
But this problem can be solved. To improve the situation, they do it in two ways: they arrange forced convection (air change) using a fan or make a water jacket, and run the heated water through pipes to heat the room.
If everything is simple with the fan, then the water jacket can be made in two ways: around the body or removing heat from the chimney pipe.
A shirt on the chimney is easier to implement. This option has one more advantage: the heat from the stove body is then used for heating, as well as the heat that previously went outside through the chimney. Now it also heats your room.
In addition, when installing a water jacket on the pipe, the smoke at the outlet will no longer be as hot and you won’t have to worry so much about insulating the wall around the pipe.
- Another important drawback is that it is not the most attractive appearance.
If you use bubafonya in a technical room - in a garage, greenhouse, in a country house, then there is nothing to worry about. It is what it is.
Well, if you want to heat your house with it, you will have to hide it somewhere in the boiler room, basement, or outbuilding.
You can still refine it. For example, cover it with brick. By this, by the way, you will greatly increase the comfort of being near the stove: the brick will extinguish most of the hard radiation, soften it, and become a kind of heat accumulator: the brick will heat up, and then, when the stove goes out, it will gradually cool down and release the accumulated heat.
Positive and negative parameters
Using a gas cylinder to form this design has certain advantages:
- You can get a long-burning stove without spending a lot of money, since you will need standard and inexpensive elements and materials.
- You can do all the processes yourself.
- The resulting equipment can be used for a home, bathhouse or other structures.
- On the Internet you can find video instructions for creating the structure.
- These stoves are easy to use and there is no danger involved.
- You can make different types of ovens.
The disadvantages of this equipment include the fact that all work must be carried out according to the drawings. Without them, you can violate the basic principles of stove design and make serious mistakes.
The basic principle of the work performed
A do-it-yourself long-burning potbelly stove, like all wood-burning devices, consists of the following elements:
1. The vent is a special channel, which is usually located at the very bottom of the stove body. It is through this channel that air is usually supplied, which is the main catalyst for fuel combustion. This element is usually equipped with a door, which is used to effectively regulate the intensity of the combustion process. It simply closes or completely opens the channel from time to time. At the same time, the internal space of such a blower can be used as a special container designed to collect ash.
2. Firebox, that is, the combustion chamber of the fuel used, located strictly above the ash pit. This element is part of the channel through which air is supplied. It is separated by special rods, which are known as grates. The firebox must have its own separate door, which is required for loading fuel.
The ignition process, as a rule, is carried out strictly with the door of the combustion part open and with the door of the existing blower completely closed. All unburned parts of the fuel usually fall through the grate into the mounted ash pit. They can also fly out through a special exhaust channel.
3. The chimney is an exhaust duct used to remove combustion products from the stove. A view, that is, a special wedge-shaped shutter, is mounted in the body of the chimney. It was originally intended to completely close the entire exhaust duct. Using it, you can seriously slow down the overall process of efficient fuel combustion, while simultaneously increasing efficiency parameters.
Do-it-yourself stoves made from a gas cylinder usually involve placing two structural elements in a metal container body: a firebox and a high-quality ash pan. The chimney of this stove can be mounted separately.
- Such a potbelly stove works based on the following principles:
- The blower supplies air to the combustion part;
- The firebox usually burns coal or wood;
- A part of the stove, such as the chimney, removes gas and all unburned elements, that is, soot;
- The combustion control process is carried out by means of a throttle valve. It, in turn, is inserted into a short fitting and a special wedge-shaped view, pre-installed into the body of the chimney;
- Fuel is loaded into a special door cut into the body of the cylinder.
In fact, everything is relatively simple and clear. All that remains is to figure out how to correctly place the combustion part and the blower in the cylinder. It is important to understand how to connect a special chimney duct to it. All this can be found out by studying the information below.
Calculation of basic parameters: drawing and recommendations
To make an optimally efficient potbelly stove, an all-metal cylinder with a volume of 50 liters is suitable.
A standard 50 liter cylinder will be sufficient
Finding such a cylinder is usually not difficult. They are often used in households and industry.
To equip such a stove with a chimney, a pipe with a diameter of 100–125 mm and a thickness of at least 3 mm is used to make the chimney pipe. The chimney itself should be positioned vertically, but deviation from the axis is also allowed (slope no more than 30 degrees). The slope is made for greater efficiency of heat transfer from the chimney pipe. Although the location of the pipe directly depends on the local conditions for installing the potbelly stove.
For ease of operation, the firebox and ash pan compartments are equipped with doors with a locking mechanism. With the doors closed, the combustion process improves and the risk of fire hazardous particles falling into the room is reduced. And also by adjusting the gap with the ash pan door, you can regulate the intensity of air supply to the firebox.
The doors are made of any shape. The main thing is to take into account the standard size of firewood and the convenience of loading it.
An important part of the potbelly stove is the grate. The grate serves to support fuel (wood) and at the same time helps to separate loose combustion products. The combustion process takes place on the grate
Therefore, the metal from which the grate is made must be strong enough and resistant to high temperatures. It is better to make a grate from reinforcement rods with a diameter of at least 12 mm. Such rods are cut to the dimensions of the inside of the cylinder (width) and assembled into a grid with a gap width of 10–15 mm. The rods are connected by welding
The combustion process takes place on the grate. Therefore, the metal from which the grate is made must be strong enough and resistant to high temperatures. It is better to make a grate from reinforcement rods with a diameter of at least 12 mm. Such rods are cut to the dimensions of the inside of the cylinder (width) and assembled into a grid with a gap width of 10–15 mm. The rods are connected by welding.
Potbelly stove from a cylinder
The approximate assembly diagram of a horizontal solid fuel stove is applicable to a gas cylinder.
The diagram is applicable for a gas cylinder
Chimney equipment for a gas cylinder boiler
To operate the stove you will need to have good draft. To do this, the chimney is mounted at a certain height. This place is located above the edge of the grate. You will also need to equip a place to collect moisture. You will also need to remove heat from the chimney.
Heat removal methods:
- Install the horizontal section, maintaining a slope of 35 degrees. Next, the chimney will need to be turned up and brought out into the street. A heat exchanger is installed on the channel.
- Warm air can be carried by a pipe that exits the oven at an angle. This increases the efficiency indicator and combustion duration.
By equipping a water jacket on the stove, you can significantly increase the useful properties of the structure. All features and nuances of installation can be seen in special drawings. In this case, the heat exchanger can be equipped on the housing.
Water circulation in the jacket occurs in a forced manner using a pump.
In this case, the diameter of the heat exchanger must be larger than the diameter of the chimney. The open ends of the pipes will have to be welded. When water passes through the shirt, it heats up and transfers heat to the room.
We make a long-burning stove with our own hands
The first step is to decide what the stove body will be made of. It is advisable to choose thick metal so that it does not burn out longer. Most often, such a potbelly stove is made from a gas cylinder with a volume of 50 liters. You can use a large-diameter thick-walled pipe or a 200-liter steel barrel, but its walls are thinner.
You will also need
:
- steel pipes;
- metal profile;
- tool for cutting metal (grinder, gas cutter, etc.);
- welding machine with electrodes;
- Sheet steel.
Let's take a closer look at how to make a potbelly stove with your own hands. It is first recommended to sketch out a design diagram and determine the dimensions of the elements.
Frame
. When making a body from a gas cylinder, it is necessary to carefully cut off the upper part (cut line 1 cm below the weld). If desired, the body can be extended by welding the cut-off part of another cylinder. The top part with the lid is also cut off from the barrel. And if a pipe is chosen for the body, a round or square bottom made of thick sheet metal should be welded to it.
Housing options
Lid. In the cut off top of the gas cylinder or in the lid of the barrel, a hole should be cut in the center, corresponding in size to the pipe from which the piston will be made
The lid is scalded with a steel strip - it is important that it fits tightly onto the body. For a pipe body, the lid will have to be specially made from sheet metal. Chimney pipe
On the side of the stove, a couple of centimeters below the lid, a hole is cut and the chimney pipe is welded
Chimney pipe. On the side of the stove, a couple of centimeters below the lid, a hole is cut and the chimney pipe is welded
It is important that the removable chimney elbow fits tightly, without gap
Chimney. The lower, horizontal section of the chimney should be longer than the diameter of the stove. The chimney pipe can be made broken to increase the surface area that transfers heat to the room
It is important that there are no angles less than 45°. A pipe with a diameter of 10-15 cm is suitable for installing a chimney.
Piston
. The length of the air duct must exceed the height of the housing by 100-150 mm. It is necessary to weld a steel circle with a hole in the center to its lower part and equip it with five to six blades on the lower side (arranged in a circle, with rays from the center).
The blades can be
:
- pieces of steel angle;
- U-shaped sections;
- wave-curved strips of metal (welded edgewise).
In the middle, a small steel circle with a hole in the center is welded onto the blade. If the platform with the blades is made of steel less than 6 mm thick, it will deform over time due to overheating. To prevent this from happening, stiffening ribs are welded on top - a triangle made up of angle segments. Attach a steel plate to the upper section of the pipe with a bolt to adjust the combustion intensity.
Assembly
. Install a top-burning stove, check the tightness of the chimney connection. Insert the piston into the stove, put on and close the lid. Make sure that the cap fits tightly and that the gap between the piston and the hole in the cap is minimal.
Commissioning
. Homemade long-burning potbelly stoves can be placed on an earthen or concrete floor. If the floor in the room is wooden, lay out a brick platform using stove mortar and cover it with a steel sheet. Instead of brick, you can lay a sheet of refractory material and also cover it with sheet metal. It is advisable to line the walls next to a self-made stove with bricks, which will accumulate heat and transfer it to the room.
Firewood is placed into the installed stove, filling the firebox approximately 2/3 or a little more. Place paper on top and set it on fire. After making sure that the firewood is occupied, you can install the piston and put on the lid. The next addition of firewood is possible only after all the fuel has burned out and the stove has cooled down.
Making from a barrel
Among other options, you can use a barrel to make a homemade stove. For example, a sauna stove made from a 200-liter barrel would look good; let’s look at the stages of its manufacture:
- The first step is to determine the required height of the barrel using a grinder;
- Next, the inner walls of the barrel are lined with refractory bricks;
- You can limit the combustion chamber using metal sheets or mesh. Remember that the minimum height of the combustion chamber is 60 cm;
- Stones are laid out on a sheet of metal or mesh;
- Next, you should weld a lid to the barrel and install special doors for ease of use.
Choosing a quality barrel
To make a potbelly stove, you can use any steel barrel used in the petrochemical, paint and varnish, chemical, and metallurgical industries for storing and transporting technical products:
- bulk - oils, solvents, paints, diesel fuel, sodium liquid glass;
- pasty - thick lubricants, bitumen;
- bulk - caustic soda, various plasticizers.
They are produced in two types - with an open and closed top; they also differ in the thickness of the bottom, lid and shell.
Any of these containers can be used as a potbelly stove if you first thoroughly clean and rinse its inner surface. However, the thinner the walls of the container, the faster they will burn out and the stove will fail. Therefore, for a potbelly stove you need to choose a product with a metal thickness of more than 2 mm.
Well, the best option is a stainless steel barrel. High-alloy stainless steel is most resistant to high temperatures in the fuel combustion zone, which means a stove made from it will serve for a longer period.
Manufacturing of a two-chamber pyrolysis stove
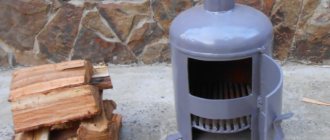
The photo above shows a potbelly stove made from a gas cylinder. This version of the potbelly stove is more compact and economical. Instead of two 50 liter propane cylinders, we will need 1 24 liter propane vessel and 5 pipes with a diameter of 57 mm and a length of about 400 mm.
The operating principle is as follows:
- The first propane cylinder is similar to the previous option. The only difference is that instead of grates, there are slits cut on top of the cylinder itself.
- There is an opening on top of the cylinder. 5 heat exchanger pipes fit there. Through these pipes the smoke rises into the secondary chamber. Following this path, the heated air releases some of the heat into the room.
- Additionally, warm air is supplied to the secondary chamber through a separate channel. A pyrolysis effect is created - the smoke burns out in the fuel chamber and releases additional heat. And only after that they finally come out.
The power of such a horizontal stove can reach up to 5 kW. This is enough to heat 50 m2 of usable area.
Making a pyrolysis (long-burning) two-chamber stove is not much more difficult. It is more compact, but has less power. In the same way, we will prepare tools, materials and you can make the necessary drawings.
Materials and tools
You will need the following materials:
- electrodes
- cutting wheels
- 1 gas cylinder 24 liters
- sheet 2 mm thick
- corner for making “legs”
- fittings with a diameter of 20 mm
- pipe diameter 57 mm
- pipe diameter 20 mm
- other
You will need the same tools:
- portable welding machine
- "Bulgarian"
- drill
- drill
- other tool.
Below is a drawing of a potbelly stove made from a 24-liter gas cylinder.
Step-by-step instruction
Diagram of a two-chamber pyrolysis stove
Your actions should be like this:
We cut a hole for the stove measuring 260x200 mm in the bottom of the propane cylinder. Make an ash pan and weld it to the bottom. Weld the supports. Make a grate. We make a heat exchanger according to the drawing above. We cut the pipes in a checkerboard pattern
It is critical to maintain all distances. We weld a pipe with a diameter of 20 mm for an additional supply of warm air, having first bent it at a right angle. We cut a hole in the cylinder and weld the heat exchanger. Now let's make a secondary chamber with a chimney. We use a blank cut from a cylinder as a cover for the chimney. It is needed for longer burning.
What and how to make doors from
Doors for potbelly stoves can be purchased cast. You will need a small height for the ash pan and a larger one for storing fuel. There are ready-made blocks - a flow door with a blower in one design. In this case, a frame made from corners welded to size is welded into a hole cut to size, and the casting is already bolted to it. To prevent air from blowing in from the cracks, a small edge is welded around the perimeter of the cutout under the door - a 1-2 cm strip of metal.
How to attach a cast iron stove door to a gas cylinder
You can not buy doors, but use a cut piece of a balloon wall. Then you will need some kind of hinges or replacement parts. It’s clear with the hinges: mark the places, weld them. There is an interesting version of homemade loops: several links of a thick chain.
The hinges on the door can be made from several links of steel chain
A latch will need to be welded to such a door.
Safety precautions
Precautions when operating a structure made from gas cylinders:
- The stove should be installed away from the passage to avoid accidental burns. It is also advisable to provide good lighting at the installation site. There should be no flammable objects near it on the floor and walls of the garage.
- The walls of a homemade garage oven made from a gas cylinder heat up very quickly to a high temperature. Sometimes the metal glows red. Careless touching will result in severe burns. To increase safety, the structure is fenced with one or two screens.
- The first start-up of the stove is accompanied by an unpleasant odor from paint burning on the surface of the gas cylinder. During this time, ensure good ventilation in the garage.
Important! The screens around the stove not only provide protection from burns, but also work as deflectors: they direct the flow of cold air from the floor along the hot walls, ensuring quick heating of the garage.
Safety precautions when working with equipment differ little from the recommendations when using a welding machine, grinder and other tools. We need protection for the eyes and skin of the hands, and care when handling fire and hot metal. The only thing you need to pay attention to is the preparation of the gas cylinder. Here, in addition to caution, you need to follow simple requirements - working in the open air, away from fire, i.e., taking smoke breaks over a cylinder that has not yet been filled with water is an unwise decision.
With grates or without?
In the simplest version, no grates are provided. If the cylinder is small or stands horizontally, then selecting a part inside is problematic. In this case, the design of a potbelly stove made from a cylinder is quite simple: the body is placed on legs, one door, and a pipe for connecting the chimney is welded in the upper part. All. The whole stove.
The internal structure of a potbelly stove made from a horizontally located cylinder is quite simple: only a door for loading fuel/unloading burnt coals and an exit for the chimney
The photo above shows examples of such simple ovens. In order to improve heat transfer, metal strips are welded to the outside of the body. In the upper part, in addition to the smoke pipe, there is another outlet - a lid is installed on it, and this outlet is used as a stove for cooking food and heating tea.
If you still want to make grates in a potbelly stove from a horizontally installed cylinder, you will have to weld a tray for collecting ash from below. Below there is a drawing and photo of the practical implementation.
What do you need to prepare?
From the tools you need to collect:
- welding machine (200A);
- grinder – “grinder”, preferably with discs with a diameter of at least 180 mm;
- electrodes;
- circles for grinding and cutting metal;
- hammer cleaning slag from welding;
- a brush with metal bristles;
- folding meter, tape measure, chalk or marker for marking;
- drill and drill bits of the required diameters;
- chisel, regular hammer and pliers.
From materials, in addition to one or two gas cylinders, you must purchase:
- a sheet of metal, at least three millimeters thick - it is useful for constructing a hob and ash pan;
- ready-made cast iron doors, or you can also make them yourself from a metal sheet or a piece of metal cut from a cylinder;
- chimney pipe;
- corner or thick reinforcement - they will be needed for the manufacture of legs and grate. The latter can be purchased ready-made (from cast iron) or constructed using holes drilled in the bottom of the cylinder.
It should be noted here that both a standard gas cylinder and a small cylinder are suitable for the manufacture of such a stove.