With elements from car wheels It is not always possible to install a heating system in a country house, garage or outbuildings that would run on natural gas. There may be several reasons for this - the lack of a centralized gas supply, the high cost of connecting to the gas main, etc. Therefore, many “homemade craftsmen” decide to build a miracle stove with their own hands, which can be heated with any type of solid fuel. And such fuel outside the city limits is usually in abundance.
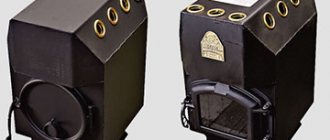
Making a potbelly stove
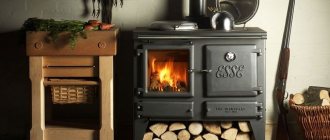
Long-burning potbelly stoves are good because they are made from any available materials - these are various barrels, old capacious cans, pieces of large-diameter pipes or simply sheet metal. We chose sheet steel as the starting material - it is a more convenient material to process. You can adapt a barrel for this, but doing work in its internal volume is not very convenient.
All sizes are presented rather as guidelines, a kind of averaged best option. You, in turn, can deviate from the dimensions of the parts to create a stove that satisfies your specific wishes.
The design of a long-burning furnace is quite clear from the drawing presented above. Here are its main components:
- Combustion chamber - wood burns in it with the formation of pyrolysis gas;
- Afterburner – combustion of pyrolysis products occurs in it;
- Doors of the combustion chamber and ash pan - they are purchased in the store, but you can make them yourself;
- Chimney - in most cases it is a pipe with a diameter of 100-150 mm.
You can deviate from the drawing in one direction or another. But remember that as the size decreases, the burning time decreases and the power of the long-burning stove decreases.
The lower the power, the smaller the heated area. Therefore, it is best to provide a small reserve.
To make a long-burning stove like a potbelly stove, we need sheet steel with a thickness of at least 3 mm - this will ensure a long service life of the heating equipment. If the steel is thin, it will begin to burn through - after a couple of seasons, holes will form in it
Therefore, special attention is paid to the thickness of the steel. The optimal thickness is 3-5 mm
For our example, we will take the classic scheme of a potbelly stove, modify it and get at our disposal an effective wood-burning stove for a home. At the initial stage, we prepare the side sheets - in our drawing they have dimensions of 450x450 mm. Next, we make the lower walls, front and rear walls - their dimensions are 200x450 mm. As a result, we should get a rectangular box. But don’t rush to weld it together - there is a lot of work ahead.
First you need to make a base - this is the bottom wall and two side ones. We weld them together, weld the grate at a height of 80 mm from the bottom. Now we need to prepare the front wall of the long-term heating oven - we weld both doors into it, and then weld it to our structure.
We prepare two metal sheets measuring 200x370 mm. We weld the first of them to the front and side walls at a height of 160 mm from the top. Next, we prepare the back wall - we weld small metal tubes into it, which should fit into the space between the two inner sheets that form the afterburning chamber - secondary air will be supplied through them. Then we weld the back wall and a second metal sheet at a height of 80 from the top (welded to the side and rear walls).
The damper is used to regulate air flow. It is this that improves the efficiency and quality of traction.
Our DIY long-burning stove is almost ready - all that remains is to figure out the top cover. We make a hole in it with a diameter of 100 mm and weld a piece of pipe for the future chimney. Now it remains to find out whether you need a hob or not - it is also welded into the top cover. At the last stage, we install the lid in place and weld it - the stove is ready, now it can be installed on a non-combustible base, attached to the chimney and started.
When starting the long-burning stove presented above, let it burn, then cover the ash pit so that the wood barely smolders and the generation of pyrolysis gas begins.
Another interesting long-burning pyrolysis furnace is shown in the following figure. It is made from a barrel or a piece of large diameter pipe and is equipped with a suitable lid. In the lower part, at a distance of 80-100 mm from the bottom, a metal disk with a hole in the middle is welded. A door is welded between the disk and the bottom, on the side wall. The resulting space forms our firebox. We weld a chimney with a diameter of 70-100 mm in the upper part.
In terms of low cost of use, such a stove is a real gift, since there is no shortage of sawdust in a private home.
The resulting long-burning furnace receives heat by burning pyrolysis gases generated when heating sawdust. The sawdust itself is poured into the main volume, and to prevent it from spilling into the firebox, it is compacted using a wooden cone. When the stove starts, a fire is lit in the firebox, the cone is removed - after a while the unit will begin to produce heat.
How to make a long-burning stove with your own hands
The operating principle of such a unit is based on the fact that firewood does not burn, but smolders. This makes it possible to make one stack of firewood, which lasts for 12–15 hours.
To make a stove, you need any metal container with a wall thickness of at least 5 mm and, of course, detailed drawings. The shape of the future heating device does not play a significant role. For example, take an old iron barrel. The top (lid) is cut off using an autogen, welding or a chisel and all burrs are cleaned off.
Long burning
After this, it is necessary to cut a circle smaller than the cross-section of the barrel, to which a pipe with a diameter of 100 mm is welded. The pipe should protrude 15–20 cm above the upper edge of the barrel, counting from the bottom of the combustion chamber. From below, several more plates need to be welded onto this circle, located perpendicular to the plane of the circle. This part will serve to supply air to the furnace and at the same time pressurize fuel. It is important to make the lower blades rounded clockwise so that the smoke transfers all its heat to the walls of the furnace before leaving the combustion chamber .
A hole is cut out in the front for loading firewood and equipped with a door. A hole is cut out at the back to remove smoke, into which a pipe with a diameter of 150–20 mm is welded. At a level of 20 cm from the bottom, grates are installed inside the barrel, and a hole is cut in front of this part to remove ash and slag. The entire structure is closed from above with a previously cut lid with a hole for the pipe. The lid should be equipped with handles for convenient use.
Under the stove you need to make a solid foundation of red brick or concrete. The chimney pipe is vented outside. Such a miracle stove must be located at some distance from the walls for fire safety purposes.
Technical nuances
- The oven should not be placed close to walls, objects, etc. Leave enough space around it.
- The oven gets very hot - do not keep flammable materials, fuel, or anything that can catch fire, dry out or melt near it.
- When making a chimney, think about how to clean it in the future. The best option is to make it collapsible.
- If the chimney pipe is prefabricated, install the elements so that the joints are located in the opposite direction in relation to the moving gases.
When cleaning out ash, leave some of it behind each time. If the combustion takes place on an ash bed, the bottom of the stove will not burn out longer.
Safety precautions when operating furnaces
When using these furnace structures, you must adhere to the following rules:
- You can turn on such a stove only in well-ventilated areas, as mentioned above.
- You cannot use fuel that does not meet the requirements specified in the passport data.
- It is prohibited to install the stove structure close to furniture and flammable objects.
- The furnace operation process should be monitored. This structure should not be left unattended for a long time.
- Water must not come into contact with the oven while it is running.
- Also, you should not install the miracle stove in places with strong drafts.
This material will be perfectly complemented by the following publications:
- Using a rocket stove with a stove bench for heating a house or bathhouse
- Construction of Kuznetsov furnaces, their advantages and drawings
A few words about the chimney and reflector
For the chimney of a long-burning stove, a pipe 150 mm in diameter and 5 m long is suitable.
If you take a pipe with a smaller diameter, it will not cope; if it is larger, the draft will be excessive, and the efficiency of the furnace will decrease.
To regulate the draft, the pipe is equipped with a valve.
A cleaning door is made at the bottom of the chimney. Condensation inevitably accumulates in any pipe, and especially in long-burning furnaces, because the gases, having given up all the heat, become completely cold at the exit.
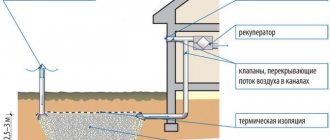
For the same reason, chimney pipes must be well insulated. The “sandwich” technology is perfect – these are two pipes, one in one, with a layer of thermal insulation between them.
It is better if there are a minimum of elbows and joints in the chimney. In places where pipes pass through the roof, ceiling or walls, insulation must be done.
A deflector (or chimney) is made at the very top of the pipe to protect against snow, rain and wind blowing into the pipe.
Homemade long-burning stove
If the stove is installed in a fireplace, then it does not need any reflector, but if it is located in a room that it heats, then the brickwork around it can perform two functions:
- Become a protective screen for walls and objects.
- Become a heat accumulator.
The body of the stove is metal, which means it heats up quickly and cools down quickly (as soon as the combustion process in the firebox ends). A brick screen laid out on three sides of the stove accumulates heat and will release it longer. The role of a reflector can also be performed by a profiled sheet or a smooth sheet of metal.
Ignition
It is better to ignite outdoors, and only then bring the working device into the house (this will avoid unpleasant odors in the room).
If the stove has not been used for a long time, it must be cleaned before starting ignition. The grate, burner, tank on the rear wall are removed, and the entire fuel unit is pulled out. All parts are cleaned, the reflector screen is rubbed.
It is very important to install the device strictly horizontally, otherwise it will be difficult to achieve uniform burning of the wick along its entire length.
Then ignition:
- Fuel is poured into the removable tank.
- A new wick is installed in the burner (twisted into a ring at the bottom of the burner).
- The burner and grate return to their original place.
- The valve unscrews slightly, which allows fuel to access the wick.
- The front panel opens and acts as a door.
- The edge of the rolled paper is lit and brought to the burner from below.
- When the fuel burns well and the flame rises above the grate, the valve closes completely (the red-hot bottom of the burner will indicate that sufficient heating has occurred).
- After waiting until the flame begins to go out, turn it off again, but this time to the intensity that you would like to achieve.
When you need to turn off the stove, turn the valve all the way.
While the user has little experience in handling the stove, it is very difficult to achieve even burning of the wick (this can take more than half an hour).
But if you have experience igniting, but still cannot get a blue flame throughout the entire wick, this may be one of the following problems:
- Uneven surface, tilt of the oven.
- The burner cylinder has not yet warmed up completely.
- The wick is worn out (it burns slightly every time and the more it is used, the more damaged it becomes).
You can try to extend the life of a worn wick by simply turning it over, or trimming the burnt edge with scissors. To make the wick last longer, it can be periodically washed in kerosene.
What types of homemade stoves exist?
Such devices include:
- Traditional potbelly stoves.
- Buleryan stoves.
- Furnaces under development.
Potbelly stove
Wood-burning potbelly stoves have been providing heat to residential houses, garages, greenhouses, sheds and other premises where the creation of a warm microclimate is required for decades. Such stoves are a simple metal barrel, usually second-hand, with fairly thick walls. First of all, it is necessary to make drawings, in accordance with which all work should be carried out.
The volume of the barrel must be at least 100 liters. All the work consists of dividing the internal space of the barrel into two compartments, one of which will serve as a combustion chamber, the second as an ash pan. To do this, a horizontal metal partition with a thickness of at least 5 mm is made in the barrel, in which holes are cut to remove ash.
Potbelly stove diagram
The lower compartment, which is an ash pan, is equipped with a retractable metal box where fuel combustion products are collected. On the front wall, a hole for the combustion chamber measuring approximately 40x40 cm is cut out with a chisel or by welding, and an opening for the ash pan, the size of which is 10–15 cm smaller than the combustion chamber. The combustion hole must be equipped with a door and a valve.
The top of the barrel is closed with a lid, in which a hole should be made for the chimney pipe. The lid itself is scalded around the perimeter by welding. In the future, the barrel must be placed on legs or a brick foundation to prevent the floor underneath from catching fire. Naturally, such a structure has many disadvantages. This includes low efficiency, since most of the heat is lost through the chimney pipe, rapid cooling, and the need to constantly add firewood to the firebox. But this is the most economical model, which you can make with your own hands in just a few hours.
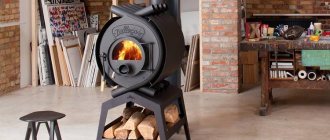
Stove Buleryan
Buleryan device
This type of wood-burning stove is much more expensive at cost than a simple potbelly stove. You can also make a similar design with your own hands, although you will need more professional skills of a welder and mechanic, as well as detailed drawings. Unlike a potbelly stove, in such a stove you can regulate the duration of fuel combustion, which can reach 10–12 hours with one load of firewood.
In addition to the fact that the heat comes from the stove itself, the room quickly warms up due to the hot air coming out of the pipes, which are present in the design of the buleryan stove and are its distinctive feature.
Furnace in production
Ideal for the garage
It is undesirable to use such a design for heating a living space, since burning oil, in addition to unpleasant odors, also emits some carcinogenic substances, which are extremely harmful to breathe. Such stoves are most often used by car enthusiasts to heat the garage, given the availability of fuel, which you don’t even need to buy. Having primitive drawings in hand, any car owner can build such a miracle stove.
All of these stoves, despite the rapid heating of the room, have a number of disadvantages, which include low productivity, the need for constant control over the process of burning wood and the addition of fuel.
In long-burning furnaces, these shortcomings do not manifest themselves to the same extent.
Tips for the master
In the process of making a miracle wood-burning stove, you will have to cut out sections of pipes that need to be bent. At the next stage, a device is manufactured that will be used to assemble and remove smoke. The master will have to make dampers for the outlet and blower. We must not forget about the need to make a door that will cover the combustion chamber. A miracle wood-burning stove, the price of which can reach 20,000 rubles, must have a frame that will consist of bent pipes. These elements are welded together, and then a partition is installed inside. You will need to install a sheet of metal in the hollow space between the pipes. The door must have a lock, and the next step will be its installation. In order for the structure to stand firmly during operation, it will be necessary to manufacture and then weld metal legs.
Design Features
Thanks to the special internal structure of the oven, it heats up quickly and retains heat for a long time. Historians claim that the Pompeian oven appeared on the Iberian Peninsula and was initially used specifically for preparing an open cheese pie, where the structure was not needed to heat the room.
Decoration of a Pompeii oven
Later it spread throughout the world. It is also called Neapolitan, Italian oven, tandoor.
The Pompeian oven will not only be an ideal design for preparing pizza, pies and bread, but will also decorate any countryside area. In combination with a gazebo or barbecue, it becomes a real landscape decoration, becoming a favorite vacation spot for the whole family.
Stove in the yard
Basically, such a stove is installed in suburban areas on the street, in a barbecue area, in an outdoor garden, but if desired and some technical modifications are made, a Pompeii stove can be built in the house. To do this, of course, you will have to provide not only a reliable, solid foundation, but also a chimney.
In this article we will look at the classic option for building an Italian oven in the open air. Before proceeding with the step-by-step instructions, I would like to warn you that laying a Pompeian stove is a very difficult and expensive undertaking.
But if you do everything correctly, then such an oven will delight you for decades, giving you an authentic look to your dacha and helping you prepare delicious homemade baked goods. Thanks to our clear and simple instructions, even a beginner can master the laying of a Pompeian stove with his own hands.
The structure of the Pompeian stove is somewhat similar to the design of the ancient Slavic stove.
Construction of a Pompeii furnace
But, unlike a traditional Russian stove, it heats up much faster. You can cook pies in it literally 30 minutes after heating, while a Russian oven will take at least 3-4 hours before reaching the optimal temperature for cooking.
This heating rate in the Pompeii furnace is achieved due to the lower thermal mass. The layer of brick that is heated is only 12 cm. Within 45 minutes after kindling, the temperature in this oven reaches 260 degrees, and after an hour - 370 degrees.
How is the temperature distributed in a Pompeian oven?
| In 30 minutes | In 45 minutes | In 60 minutes | In 90 minutes | |
| Outer part of the vault | 150 | 260 | 370 | 370 |
| Inner part of the vault | 315 | 370 | 370 | 370 |
The peculiarity and main advantage of the Pompeian oven is that you can cook almost any dish in it in a short time. Thanks to the high temperature that is reached inside the vault, pizza and bread are perfectly baked in it. Smoke adds a special piquancy to baked goods.
What is the secret of gas generating equipment
Many people know that there are long-burning heating units, but not everyone knows what they are. Therefore, before buying such a model, it does not hurt to find out basic information about it.
So, a stove operating on the long-burning principle is a heating unit capable of maintaining a comfortable room temperature for at least 4 hours. Its design features are designed for the most complete consumption of combustion energy of any fuel.
Such equipment has a fairly high efficiency, thanks to high-quality heat transfer. Long-term burning devices on the market are presented in three varieties:
- Stoves and fireplaces
- Potbelly stoves
- Heat generators
The first, in addition to heating the room, are designed to allow the viewing of living flames. Their design will fit into any interior and can be made both in a classic antique look and in a modern one.
Potbelly stoves are the simplest of this class. They are a metal container equipped with a door for loading firewood. The stove has a built-in pipe that allows you to connect the unit to the chimney.
The third type of equipment is considered the most effective. Its feature is the ability to maintain a special combustion mode, which produces a gaseous product with a high specific heat capacity. For such models, efficiency can reach 80%.
Design and principle of operation of a homemade furnace for mining
This heating unit must have the following structural elements:
- lower combustion chamber, low-temperature, which is combined with the tank and equipped with a hole for regulating the air supply. Fuel is also poured through it and the device is set on fire;
- middle chamber - gases mixed with air burn in it. It has the shape of a pipe with holes to ensure the supply of the required amount of air;
- upper chamber – in it the remaining gas is burned and smoke is formed. A pipe leading into the chimney is connected to this part of the device.
Tools and other materials you will need:
- grinder plus cutting and grinding wheels;
- sheets of metal;
- welding machine plus electrodes;
- corner for making legs;
- metal paint that can withstand high temperatures.
Ways to increase the efficiency of a miracle stove
The working stove, which has a simple design, is suitable for heating garages, greenhouses, and workshops (read: “Do-it-yourself heating stove for the garage”). But for rooms where people are, it is not suitable due to the combustion of oxygen. Therefore, to heat industrial buildings, such units must be installed in separate rooms, and heat supply must be provided by installing a water system.
The chimney, after leaving the upper chamber, is passed through a sealed container with fittings located at different levels for supplying and removing coolant. A water supply pipe is connected to the upper one, and a return pipe is connected to the lower one.
Another way to increase the efficiency of the stove during exhaust is to create forced air convection. It is performed using a fan designed to pump cool air to the upper chamber. How to make a working furnace with your own hands is shown in the video:
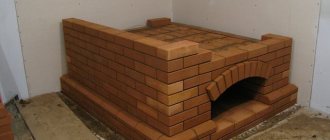
Stove for a cauldron
This version of the garden stove is designed for cooking in a cauldron or on a built-in stove. It has a simple masonry scheme, and can be done independently if you have certain skills.
Stove with built-in cauldron
You can, of course, just hang a cauldron over a fire and cook food, but such a stove, designed for a cauldron, will help distribute the fire evenly under it, and the dish will turn out exactly as it should be according to the recipe, and not with a burnt taste. In addition, a carefully constructed and decorated building will add a special warm note to the landscape of the site and become a decorative element.
The first thing to start working on a stove is site planning. To do this, you need to know the dimensions of the building - in this case they are 1010 × 1114 × 800 millimeters.
Schematic diagram of a stove with a cauldron
- Next, based on the diagram, the necessary materials are purchased: brick (preferably fireproof); mortar of fireclay dry mixture and sand for masonry; doors for the blower, firebox and cleaning chamber, grate and hob made of steel with a thickness of at least 3 mm.
- A well-designed site is a reliable basis for such a stove. Since it does not have the same weight as heating and cooking buildings, it is not necessary to make a capital foundation for it. The area under the stove should be raised above the soil surface by 10-15 centimeters. The base is made using formwork, and it is advisable to reinforce the structure with five-millimeter metal wire.
- The main feature of the internal design of a cauldron stove is its shape - it resembles a truncated cone. This is done to ensure that the surface of the cauldron is heated evenly.
An important feature of the stove is the channels for uniform heating of the cauldron
- On a prepared and fully set site, you can begin laying the masonry. In this case, the bricks are bandaged in the corners, so that even rows begin with half a brick, and odd rows with a whole brick. The firebox is laid out from halves of bricks, which are cut at an angle - this is done in order to achieve a semicircular shape.
- The diagram above clearly shows that starting from the first row, a hole for the blower chamber is marked, and a door is installed on it, which is secured with metal wire.
- A grate is installed on the third row, and the laying of the walls continues.
- On the fourth row, at the back of the building, a hole is left to remove smoke and a firebox door is installed, securing it in the same way as the blower.
- Fifth row - external and internal walls are laid.
- Sixth row - the masonry around the fire door is completed.
- From the seventh to the eleventh row, work proceeds according to the scheme and the inside of the firebox is laid out.
- On the twelfth row, the structure is strengthened with a metal corner, a plate is installed on top of it, in which a round hole is made in advance the size of the cauldron.
The hole can be made with a grinder, short cuts, or using a gas cutter. Then the hole needs to be leveled, since the cauldron must fit tightly into it at two-thirds of its height.
Such a stove will help you cook not only in a cauldron, but also use the stove for boiling water or frying vegetables or meat products in a frying pan. To do this, you need to provide a lid to cover the hole for the cauldron.
What should you pay attention to when making a stove?
When making a homemade miracle wood-burning stove, you will need to make a special damper; it is necessary to remove smoke from the device. With the help of this component you can adjust the intensity of traction. For the blower, which is located on the front door, the master must make a blind damper. In order to ensure its reliable and correct fit, you need to use a spring. The most complex component of a homemade Buleryan is the front door. It should close almost hermetically. The better it adheres to the surface of the furnace, the more efficiently the entire structure will work. The miracle wood-burning stove, which has the most positive reviews, should be made using the technology described in the article. This is the only way you will be able to get a device that will work efficiently and be durable.
Using a pipe of impressive diameter, you should make two rings that should fit almost tightly into one another. To do this, you need to cut pieces of 40 millimeters in the amount of 2 pieces from a pipe that has a diameter of 350 millimeters. One of the segments needs to be cut and then unfolded. Then the front side of the structure is made, using a ring of a smaller diameter. The second ring should be used when installing the door and should be welded to the sheet metal circle. Then another ring is welded onto the door, which is slightly smaller than the diameter of the ring located on the front side of the device. In the gap formed by the door rings, you need to lay an asbestos sealing cord, and then a damper.
Required materials and tools
To build a brick stove for a summer residence, you will need the following materials:
- Ceramic brick.
- Fireclay brick.
- Kiln mixture for masonry.
- Metal parts of the oven: doors, grate, valves, cooking platform with rings.
- Cement grade M250.
- Sand.
- Ruberoid.
To build a brick stove for a summer residence, the following tools are needed:
- Small pickaxe.
- Trowel for mortar.
- Building level.
- Plumb.
- Rule.
- Large square.
- Cord for masonry.
- Grouting tool.
- Container for solution.
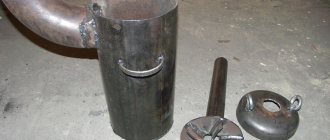
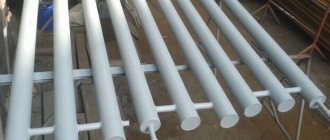
To make a bubafonya country stove you will need the following materials:
- Thick steel pipes;
- An empty gas cylinder or solid metal drum. If these materials are not at hand, the furnace body can be made from sheet steel with a thickness of at least 5 mm.
- Cold rolled steel sheet, at least 8–10 mm thick. A piston will be made from it to transport air and residual flammable gases.
- Hinges for doors at the bottom and top of the structure.
- Asbestos cord used as a seal for the loading and operational cavity.
- Trimmed fragments of metal corners, channels or profile pipes.
- Gear with a diameter of 15 cm with a mounting hole of at least 5 mm.
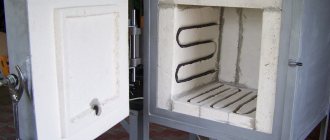
When creating a long-burning furnace, you cannot do without the following tools:
- Autogen.
- Welding machine.
- Grinder with grinding and cutting disc.
- Hammer.
- Bit.
- Medium sledgehammer.
- Yardstick.
- Building level.
- Graphite pencil.
Performance characteristics
The Slobozhanka stove has the following characteristics:
- Long-term combustion, and therefore the heat supply, is ensured for six to twelve hours, everything directly depends on the type of solid fuel used. For example, well-compacted sawdust smolders for up to twelve hours, and needles or cones for about six hours;
- The efficiency is about 90%, which ensures the production of thermal energy up to 16.00 kW/hour;
- The furnace operates on various solid types of energy carriers of plant origin, and some models operate on waste oil;
- Heating time at full load is about 12 hours;
- Various combustion chamber volumes. If you use a metal barrel for the body, then 200 liters. That is, you can choose the volume of the combustion chamber that best suits the conditions for heating rooms with different functional purposes and area;
- High degree of fire safety due to the absence of open flame and soft combustion, smoldering of fuel. This allows the use of heating devices of this type in greenhouses (plants can grow half a meter from the stove).
Advantages and disadvantages of sauna stoves made of metal
Example of a metal pipe for a sauna stove
To build a sauna stove, they usually use metal or brick. Both options have their advantages.
What are the advantages of metal stoves?
- Resistance to high temperatures;
- Wear resistance and long service life
- The ability to quickly heat the bath. Even the simplest stoves made from a sauna pipe can warm up a room in 40-90 minutes, depending on the ambient temperature.
- Possibility of using different types of fuel.
- Availability of materials. For example, if you build a sauna stove from a pipe with your own hands, then the cost of purchasing materials will be insignificant. And if a piece of pipe is found on the farm, left over from repairs, then the stove will be built practically for nothing.
- Easy installation. If desired, the stove can be assembled by any person who knows at least a little how to handle the tool.
- Light weight. For a metal stove there is no need to build a massive pedestal, which is necessary for a heater.
We suggest you read: How to choose the right stones for a sauna stove
Of course, metal stoves also have disadvantages. One of the main ones is that such a stove cools down quickly, so it has to be “heated” during the bathing procedures.
In addition, the heat from metal stoves is distributed unevenly. However, if the bathhouse is small, then this drawback is almost invisible.
https://youtube.com/watch?v=TNUp9vUaeQQ
https://youtube.com/watch?v=gNir7kWjfHg
Methodology of work
When making a miracle wood-burning stove with your own hands, you will need to cut individual elements from the pipe, of which there should be 8 in the design. The length of each of them should be 1.2 meters. A pipe bender will help bend these workpieces, giving them a radius of 225 millimeters. These components of the furnace will need to be arranged in a checkerboard pattern. To remove smoke and accumulated moisture, T-shaped devices should be made, through which the smoke will rush up into the pipe; as for moisture, it will flow down. To eliminate moisture, a special tap is installed to remove water; it must be opened only for these purposes, and then closed again. This is the only way you can prevent deterioration in traction.
Disadvantages of modern devices
Please note that all the excitement around the new cooking device is gradually subsiding and the new product, at best, quietly and silently serves its owners. More often than not, the culprits will have to sink into oblivion, as a certain disappointment ensues. The housewife in the kitchen needs an assistant for convenient, quick preparation of delicious food that is also healthy.
With the advent of microwave ovens on sale, all manufacturers, suppliers and sellers unanimously insisted that this was the oven of the future. Cooking food using high frequency waves is a guarantee of a healthy lifestyle.
A new round of development of devices with intelligent cooking was marked by the appearance of the multicooker. This story looks simply funny, the housewives were promised a super device that is capable of preparing any dish from the ingredients, but in the end they received the same pan in which they need to put cooked, peeled, chopped vegetables. Naturally, no one expected a miracle.
A modern variation on an old friend
We must pay tribute to the developers, the lack of contact of food with the heating element could not fail to impress housewives, but the accompanying work on caring for the device becomes the reason that for many it is easier to cook dinner in the traditional way than to then clean, wash and dry the elements of the multicooker.
Good to know: What is an electric mini oven, how does it work
Features of a pyrolysis furnace and its application
Pyrolysis furnaces are called long-burning furnaces. Combustion of solid fuel in them occurs without access to oxygen: volatile gases are first saturated with the fine fraction of wood, and then burned at a high temperature (from 450 °C), mixing with residual air in the second chamber. Fuel and gas burn almost completely, providing high efficiency (up to 85-95%).
The simple design of the stove allows you to build it yourself and makes the device convenient to use
A stove of this type is installed in a garage, in a country house, in your home, and in any small room where long-term heating is needed. The devices are easy to operate and provide maximum heat output with significant fuel savings. In this case, the solid material is processed almost completely: gas and coal are burned, so smoke, soot and ash are almost never formed. This principle of operation is relevant for all models of pyrolysis furnaces, but different designs may differ in characteristics, appearance and internal structure.
Advantages and disadvantages
The heating device is efficient and economical, but also has a number of features. Knowing the pros and cons of pyrolysis furnaces allows you to make the right choice. The positive features of these devices are expressed as follows:
- Efficiency up to 95%, fast heating;
- minimal percentage of smoke and soot, environmental friendliness;
- no need for constant monitoring (fuel is loaded once a day);
- use of different types of fuel;
- accessibility of assembling and installing the stove yourself.
The simple operating principle ensures the practicality of the unit
The main disadvantage of using such a stove is the need to properly store firewood, selecting the optimal level of humidity. Otherwise, the material will not burn efficiently, because wet vapors will not allow the gas to be processed.
When burning waste (raw wood, car tires, industrial waste), there is an unpleasant odor, so it is recommended to use only clean and high-quality fuel, or additionally install a ventilation system in the room. It is also worth considering that condensation forms in the chimney, for which a special storage tank is provided. The outlet pipe and chimney have a larger diameter than the storage tank, so proper installation of the stove is important.
Cleaning and repair
Over time, the partitions in the furnace will burn out and will need to be replaced. In the described case, this can be done by removing the fuel door and cutting off the side strips in the central part of the stove. Having replaced the partitions, we weld the steel strips back. These inconveniences can be easily avoided by making the fuel door wider so that the partitions can freely pass diagonally.
The firebox is cleaned from carbon deposits with a stiff metal brush. If you use only firewood or waste from wood production as fuel, and do not burn various plastic waste in it, then you will not have to clean the stove often, maximum once every 5 years.
Modern model - hermetically sealed, easy to move to another place
The process of assembling a long-burning potbelly stove is not complicated, so its assembly is feasible for anyone with welding skills. If you follow the manufacturing instructions, such a stove will last a long time, warming you in the country, in the garage and at home.