Electric underfloor heating can be used both as the main source of heat and as an addition to the main heating system. Film (infrared) and cable varieties of heated floors are available on the market.
Do-it-yourself electric heated floor
Familiarize yourself with the procedure for preparing the base, laying and connecting the heated floor, installing the finishing coating and get to work - you can handle all the activities on your own.
Do-it-yourself electric heated floor
Important features of the work
One of the articles examined the types of heated floors in the house, in particular, water and electric.
Their advantages and disadvantages were also indicated, but it did not mention another advantage of electric heated floors over water ones - the ability to install them yourself.
To make water-heated floors in a house, you need a large amount of preparatory work, you also need to be able to do the wiring correctly and securely fasten the pipes, connect them to the centralized heating, and then there will be a lot of finishing work.
Warm floors, in which electricity is the heat source, are much easier to make, and there is much less preparatory work.
But since there are three types of electric heated floors - cable, thermomats and infrared, their installation is different.
But in general, it is quite possible to install each type of electric heated floors yourself.
Choice
Electric heated floors come in several types:
- Film infrared - there is a separate article about it. The thinnest option, but it is made for “dry” installation under laminate and linoleum; it is better not to use it under tiles;
- Cable is a separate wire that is laid at the pitch you choose, due to which you can achieve stronger heating. In order for it to heat more or less normally, you need to buy a power of at least 15 W per linear meter, and lay it in increments of no more than 10 cm. According to the technology, its installation is done in a screed 4-5 cm thick. The approximate energy consumption is 150-200 W per square meter.
- Mats are a ready-made cable attached to a mesh. Most often you can find them on sale with a power of 120 and 160 W/m2. There are very weak options (100 W/m2), and there are also more powerful 180/m2 (Thermo).
- Rod is another type of infrared heating, which is optimally suited for installation in tile adhesive.
Comparison of electric heated floors
Heating mats and rod heated floors are best suited for installation in tile adhesive. In this lesson we will only talk about laying heating mats, since the rod system is the topic of a separate article.
In practice, anything less than 150 W/m2 practically does not heat. A power of 150-165 W allows you to heat the temperature to a comfortable level, but this takes time. Mats with a power of 180 W/m2 allow you to heat the floor surface faster and install them not in tile adhesive, but in the top layer of the screed.
It takes half an hour or more to heat up the surface, and after turning it off it cools down in a couple of minutes. If you look into those. passport to some manufacturers, you can generally see heating to the set temperature for up to 24 hours.
In fact, people rarely use heating. Usually it is turned on in two cases: to show off, when guests come and in the off-season, when the heating is turned off.
Energy consumption
Electric heated floors are beneficial only in small areas
To calculate electricity consumption, you need to find out the total power of the mat over the entire area, multiply it by the percentage of active daily operation of the system and then calculate the monthly consumption, multiplying by 24 (hours) and 30 (days).
Example:
- You have a bathroom of 4 square meters. Of these, only two meters lies an electric cable with a power of 180 W/m2.
- In total, the total power of the system will be 360 W/m2.
- In “automatic” mode, the heated floor will work 60% of the day. Multiply 360 by 0.6 and get 216 W/h.
- Energy consumption per day: 216*24 = 5.184 kW.
- Energy consumption per month: 5.184*30 = 155.5 kW.
- If we calculate the costs at the current cost of 1 kW of 4.68 rubles (in Moscow), then it will cost 728 rubles per month to heat a bathroom.
Consumption can be reduced by using expensive programmable thermostats through efficient power management.
If you want to install an electric heated floor over a large area, you need to take into account the maximum load on the wiring. The load limit may vary, but the approximate value according to SNiP 31-02 “Electrical supply of residential buildings” is 8.8 kW per apartment with an electric stove.
Conditions for laying heated floors
Regardless of what type of electric flooring was chosen, there are certain conditions that must be met so that in the future such equipment at home will only please you:
- The area covered by the heating system must be at least 70% of the floor area. In this case, its work will be effective;
- Before installing the system, you should immediately determine the location of furniture and large household appliances in order to eliminate the possibility of damage to the system wires;
- Calculate the electrical power that the system will consume and find out whether the house wiring can withstand such a load.
If these conditions are met, then you can proceed to the next stage of work.
First you need to decide which type of heated floors will be the most optimal.
Thus, cable heated floors have the most complex installation technology, require careful preparatory work, and additional screed will definitely be required. But this type is the most economical in terms of energy consumption.
Thermal mats are the easiest to install; the preparatory work for their installation is minimal, but they also consume the most energy.
The infrared type of heated floors is of average complexity in terms of preparatory work; their installation is not particularly difficult. Their electricity consumption is higher than cable ones, but less than thermomats.
Advantages and disadvantages of heated floors
The positive aspects of electrically heated floors include the following features:
- heating a room with a similar heating system evenly and over the entire area;
- the ability to regulate the degree of heating and turn the system on/off at any time;
- Possibility of installation in any room.
Naturally, this heating method has certain disadvantages:
- it is necessary to constantly monitor the operation of the system;
- floors can be deformed in case of excessive heating during uncontrolled use;
- installation, maintenance and operation require excessive consumption of electrical energy;
- Furniture cannot be placed on top of electrically heated floors. Taking into account the fact that the mat or energy cable can have different sizes, you can first make a schematic diagram of the room and designate areas for installing furniture;
- It is important to understand what function this heating system performs, so as not to worry about every kilowatt of electrical energy spent and not to be afraid of stepping on the floor again with subsequent damage.
To ensure that electrical energy consumption does not exceed acceptable standards, it is recommended to install a full-fledged system with all possible regulators, sensors and controllers. Otherwise, the system will always work at full capacity and there can be no talk of its future payback from savings.
Features of calculating the required materials
After choosing the type of heated floors, you should calculate the required materials.
For example, if a cable system is selected, you should decide on the total length of the cable to be laid.
To do this, you need to take into account several factors:
- The cable should not be located under the furniture, therefore, when determining the parameters of the room, the area allocated for it should not be taken into account;
- The cable should not come close to the walls. The minimum distance from the cable to the walls should be 5 cm;
- The most common installation method is “snake”. With this installation, the cable stretches across the entire width or length of the room, not reaching the wall, is wrapped and laid to the opposite wall, where it is wrapped again. In this way, the entire floor area allocated for the system is covered. In this case, the distance between parallel parts of the cable must be at least 8 cm.
Calculating the number of thermomats or infrared film is much simpler; for example, a thermomat section is 50 cm wide and the length can reach 30 m. Therefore, calculating the amount of required materials will not be very difficult.
The infrared film has the same width, but its length cannot exceed 8 m.
You can use the formula.
Safety precautions when working with electricity
It is worth understanding that the voltage used to work with heated floors is dangerous, and each worker must take care of their own safety and comply with all rules for working with wiring.
Before starting installation, it is recommended that you familiarize yourself with the following recommendations:
- installation instructions and the necessary assistance are best obtained from specialists or people who have already had experience in such work;
- Any actions related to deformation of the purchased cable or mats are unacceptable. You cannot cut the mats to make installation in hard-to-reach places easier, or extend the cable. Heating elements must be solid;
- work is carried out only at temperatures above -5 degrees Celsius;
- You can test and operate the installed heated floor only after the period allotted for drying of the adhesive mixture, screed, etc. has expired. It is advisable to wait at least 1 month to avoid any problems associated with high humidity in the ceiling;
- Installation cannot be carried out under furniture that does not have legs at least 5 centimeters high.
Bottom line
Lack of heat in the house is a big problem that affects the comfort of living. You should not spare money on equipping the premises in such a way that they are always comfortable. In this case, electrically heated floors are a universal solution that will help solve any problem with heating a room. By following the instructions and strictly following all steps, you can create a high-quality, efficient and durable home heating system.
Preparatory work
Before laying all three types of electric floors, preparatory work is carried out, and they are the same.
The first thing to do is select the location of the thermostat.
It can be located on any of the walls. The only thing is that its location should have good access to control the system and be as close as possible to the electric meter.
It is not recommended to install the regulator below 30 cm from the floor surface.
After determining the location of the regulator, a perforator with a special attachment is used to make a seat in the wall.
You will also need to make grooves for laying the mounting ends of the system with which it will be connected to the regulator.
In this case, it is better to lay these ends not in one groove, but to make two of them at a short distance from each other.
One of the grooves will be used to install the temperature sensor.
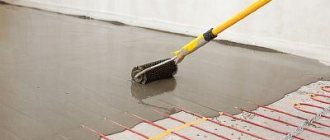
After this work, the floor surface on which the system will be laid is prepared.
If there is a floor covering, it is better to dismantle it and place the system itself on the main floor screed.
In this case, the screed needs to be prepared. All surface irregularities must be removed.
Then the floor must be cleared of debris and the surface treated with a primer that provides better adhesion of the surface to other materials.
Next, proceed directly to installing the system on the floor.
At this stage, the order of work differs depending on the type of heated floor chosen.
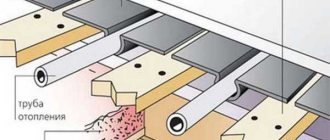
I. Water-heated floor on a wooden base
The construction of warm wooden floors differs from the generally accepted one in that the heating elements are not poured with concrete, but are placed inside a structure specially made for them and then wrapped in foil. After this, a finished floor is laid on top of the heating system, preferably made of hardwood or laminate. As already mentioned, the denser the material, the more readily it transfers heat, so pine and linden are less suitable for flooring that is laid on a warm floor than oak and maple.
- A damper (otherwise known as compensation) tape is laid around the perimeter of the heated floor and decorative floor structure, which will compensate for the expansion of the materials.
- To prevent heat from the coolant from escaping into the structure to which it is attached, it must be insulated. To do this, a layer of insulation is laid between the joists laid on the subfloor. For example, extruded polystyrene foam or basalt wool.
- The latter must be covered, inside and out, with a steam-hydroprotective film. This is necessary so that moisture from wooden structures does not get into the material and it does not become damp.
- To lay pipes or cables using pine boards or fiberboard or OSB slabs, grooves are made for their laying.
- The pipes are laid flush in the grooves, wrapped in foil and secured with metal plates.
- A finished floor is laid on top of the structure.
Laying cable heated floors
First, let's look at how the cable system is installed, which, by the way, can also be used to heat the roof and gutters in the house.
After treating the surface with a primer, preliminary marking is made taking into account all the indents and distances between the cables and places where it will not be located.
You should also determine the correct installation so that the mounting ends of the cable extend to the place where the regulator is installed.
Then, for better heat transfer, the entire floor surface is covered with a heat-insulating layer. It is important to choose the right thickness.
If there is another heated residential room under the room, then a thermal layer 3-4 mm thick will be sufficient.
If the room below is not heated, a thicker thermal insulation layer is needed.
After laying the thermal insulation layer, aluminum cable mounting tapes are secured to its surface.
These tapes are installed on the surface with a distance of 1 meter from each other. In this case, they must be located perpendicular to the main direction of the cable.
It is better to fasten the tapes with dowels.
Having finished installing the mounting tapes, we begin laying the cable itself.
First of all, pull the mounting end of the cable to the location of the regulator and secure it with mounting tape clips.
Afterwards, the rest of the cable is laid, securing it to the tape and maintaining the distance between the cable sections and the walls.
Next, the thermostat is installed in the seat, the mounting ends of the cable are connected to it, and it is connected to the electrical network of the house.
Then they move on to installing the temperature sensor.
To prevent possible damage, it is better to place it in a corrugated plastic tube, and close it with a stopper on the side of the sensor position.
The sensor, protected by corrugation, is placed on the floor, strictly in the center between two sections of cable.
After this, the grooves made with the cables embedded in them are sealed with alabaster.
At this stage, you can conduct a test run of the system.
By setting the minimum temperature on the thermostat, and then gradually increasing it, check its performance.
If everything is fine, you can begin finishing work.
To protect the cable from possible damage, an additional cement-sand screed is applied to the surface of the main screed, with the system already laid.
But its thickness should not be large - 3-4 cm. Such a tie will completely cover the cable, protecting it from damage.
Afterwards, the floor covering is applied to the dried screed.
Warm cable floor in section.
How they do it in a wooden house.
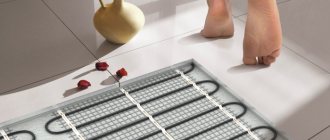
Underfloor heating under tiles
How to make a heated floor.
Electric floor heating If you need to install a heating system under the tiles being laid, and you do not have the opportunity to raise the floor, it is recommended to use a heating cable laid in a mesh
.
A cable with a diameter of 2.5 mm is laid in a so-called mat having a width of 0.5 meters and a length of at least 4 meters. The power of such a cable per 1 m2 is 100 W, which allows for comfortable heating of the tiled floor. In this case, additional thermal insulation is not laid, otherwise the solution connecting the tiles will lose strength due to overheating.
The single-core heating cable is well shielded and is not afraid of water. The so-called “warm mat”
laid on the base. If it is necessary to turn the cable, an incision is made into the mat mesh.
After the system is practically installed, a floor temperature sensor is placed in it, placed in a corrugated protective tube. After this, the installed thermostat is connected to the cable and to the sensor, and a tile is placed on top of the solution.
For identification, each type of cable has an alphanumeric marking and also differs in color. The power range of thermostats included in the system is up to 3.5 kW.
Installation of thermomats
A heated floor system consisting of thermomats is much easier to install.
After the preparatory work, you can proceed directly to installation, since a thermal insulation layer is not used with this type of heated floors; thermomats are placed directly on the primed screed.
For ease of placement, the mesh on which the cable is attached can be cut, the main thing is not to touch the cable itself.
This allows you to lay thermomats in the most convenient way.
Next, the mounting ends of the thermomats are connected to the installed regulator, and the temperature sensor is also installed.
Since the sensor placed in a corrugated tube will be thicker than the heated floor layer, installing it will require making another groove in the floor.
The sensor should be placed at an equal distance between the cables of two adjacent sections.
This type of underfloor heating is perfect for tiled flooring. By gluing the tiles to the floor using an adhesive, the thermomat is also fixed with this glue.
It turns out that the thermomat will be placed in the thickness of the glue, which will protect the cables from possible damage.
Methods for installing heated floors under different coverings.
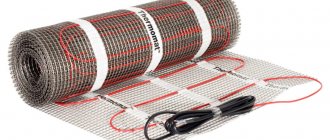
Electric floor based on thermomat
For the production of thermomats, a cable no thicker than 45 mm is used. It is fixed on a fiberglass mesh 0.5 m wide. The cable has a shielded core and protected by an outer sheath. For residential premises, heating mats with double cores are used due to their significantly lower level of electromagnetic radiation.
If tiles are chosen as the finishing coating, instead of concrete mortar, glue for this type of material, specially designed for heated floors, is poured over the cable
Principle of operation and construction
The heating mat includes 2 elements: the thermomat itself with a cable and a corrugation. A sensor is inserted inside it, and it protects it from moisture and aggressive influences. If the adhesive layer is so thin that it cannot completely cover the corrugation, you need to use a moisture-resistant sensor.
The thermostat complete with an external temperature sensor, mounting boxes, and wires are purchased additionally. When choosing the first element, maximum energy consumption is taken into account. The cross-section of the wires is selected based on the power of the system and the material of manufacture.
If the cable needs to be wrapped, the mesh is cut. The cable itself cannot be cut or shortened. During installation, it should be at the top; the mesh is attached to the floor using tape or staples
The installation process is extremely simple, because thermomat is a product completely ready for installation. There is no need to attach a heating cable, and uniform laying is ensured by the structure itself. Its cost is higher than that of a cable floor, but it has many advantages, including faster heating of the surface.
Installation of thermal mats
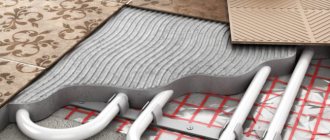
Before laying out the thermal mat, the floor is covered with a layer of primer. This will increase the adhesion of the glue to the concrete surface. Usually the glue is applied directly to the mat, but if it is a damp room, then after a thin layer of glue has been applied and dried, it is covered with waterproofing and then glued again.
In order not to damage the integrity of the cable and to apply the adhesive evenly, you need to distribute the adhesive composition using a plastic comb. The tiles are laid on the glue and leveled.
The total of tiles plus glue should be 20 mm, although some manufacturers recommend a minimum of 50 mm. This is explained by the fact that with such a thickness of the layer, the heat is distributed more evenly.
The photo shows the sequence of laying a heated floor from thermal mats under the tiles, starting from choosing a location (1) to laying the tiles (7). Installation is simplified if the room has a rectangular shape
In accordance with the PUE, it is imperative to install a protective shutdown that guarantees safety and a circuit breaker. If the system is installed in a bathroom, the thermostat should be moved to an adjacent dry room.
Image gallery Photos from
There are significantly fewer steps in installing heated floors using electric mats. However, the preparation of the base is carried out in the same order: repair, level if necessary, remove dust and debris
After waiting for the screed to completely harden, lay the mats. When using them, there is no need to construct a reinforcing mesh or attach a cable to it
A cement-sand or polymer screed is poured over the mats laid according to the diagram. It is laid not only along the heating system, but also in areas unoccupied by mats
Step 1: Installing a screed along the base
Step 2: Laying mats over the hardened screed
Step 3: Pouring screed over electrical mats
Step 4: Flooring installation
Laying infrared film
Finally, let’s look at how to install infrared-type heated floors.
The installation operation is not particularly difficult, but before installation it is necessary to carry out preparatory work.
It will be necessary to lay a thermal insulation layer on the floor surface. In this case, the layers of thermal insulation are secured to each other with mounting tape.
Next, an infrared film is spread on the surface of the thermal insulation.
If necessary, pieces are cut off; this should be done only in the places indicated on the film.
In this case, a distance of 4-5 cm must be maintained between the two strips of film.
Also, the film does not need to be placed in furniture locations; it should not come close to the walls or other heating elements of the house.
Heating elements
The following floor heaters can be found on the modern market:
- cable;
- film infrared;
- mat.
Before you make a heated floor, you should choose the right one from all the variety.
The principle of operation of all types of elements is the release of heat or radiation when an electric current passes.
- Cables are divided into resistive and self-regulating. The first has constant power and can be single- or double-core. Self-regulating consists of two parallel conductors with a conductive polymer located between them. When the temperature changes in individual sections, the current in them changes, and the cable is not in danger of local overheating. It is mounted in a cement screed 3-5 cm thick.
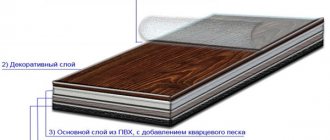
- The film infrared heater consists of a conductor in the form of strips of laminated carbon foil. Electrical current is supplied through conductors to graphite strips, which generate infrared radiation, heating the flooring located above. Unlike cable, heat is evenly distributed over the entire surface, like the sun's rays. The heater is designed for installation under floor coverings without glue or screed. It does not tolerate an alkaline environment, but with waterproofing it can be laid under
- A heating mat is a thin cable with one or two strands glued to a fiberglass mesh. The elements are connected to each other and to the power source using special terminals. Their width is 0.5 m, and their length can vary. Even for complex layouts, they are easy to assemble by connecting them to each other with terminals. The joints are additionally secured with sealant or tape. The mats can be placed in the adhesive layer when laying tiles. This does not require waterproofing.
Infrared floor design
The main difference between an infrared floor and other heating is its operating principle. The energy of a warm infrared floor is not used to heat the air in the room, but is spent on heating objects located in its enclosed space. They, in turn, accumulate and release heat into the room, maintaining a natural microclimate in it. Infrared radiation is absolutely safe for the health of living beings and is comparable to solar heat.
The infrared heating system is made on the basis of elastic heating mats or Mylar film. The heating element has the form of conductive strips, which are located in 15 mm increments and are made using Carbon NanoTube technology. The electricity that initiates the heating element is supplied to it through copper-silver contacts. The entire system is sealed on both sides with a polymer, which has increased electrical insulation, fireproof and waterproof properties.
The infrared heated floor is connected to the electrical network through a thermostat in a parallel manner. The tightness of the connections, the high quality of the materials used and the use of carbon adsorbent spraying ensure the operation of the heaters in an efficient and continuous mode. Thanks to parallel connection, the system will function even if any of its sections fails. Sometimes this happens due to mechanical damage.
Why you shouldn't cut the heating cable
Heating resistive cables (warm floors) are sold in the form of ready-made sections connected to a cold power cable. Each section has a certain length and power. When calculating heating systems, these values are used. But when an error creeps into the calculations and there is nowhere to mount the rest of the cable, the first solution that seems logical is to cut off the excess.
The instructions supplied with the heating sections prohibit any manipulations to shorten or extend the sections. Why? Indeed, in catalogs the same heating cable, for example with a power of 20 W/m, is sold in the form of sections from 5 m to 120 m. And it seems that if you approach the matter thoroughly, then at home you can make a completely high-quality end sleeve, and use the rest of the cable somewhere else...
It is not for nothing that the instructions prohibit cutting resistive heating cables. The thing is that despite the same article number, heating sections of different lengths use cables of different composition. For example, sections 10m long and 20m long, basically contain completely different heating cables. The manufacturer calculates the cable resistance in advance, establishing at what length the heating power will be 20 W/m. And if this cable is shortened by half, then its power will increase by 2 times, which will already be 40 W/m. Structurally, both the heating cores and the cable insulation are not designed for such heating. When plugged into the network, such a cable will overheat and burn out. This is comparable to an incandescent coil in heating devices; if you shorten it, it becomes almost white-hot and quickly burns out.
When making local repairs to a resistive heating cable in a screed, the damaged area should be replaced with a piece of heating cable from a similar section so that there is no overheating in this area. Do not insert a piece of cold connecting cable, as this will disrupt the resistance of the remaining heating cable.
Best answers
Stas Shabanov:
Lots of nuances! You need to know where you are going to lay the mats, the thickness of the screed, the information about the mats, power, quadrature
ip:
In my opinion, an electric heated floor is a waste of money in vain. The degree of reliability of such a system is much lower than water floors, and they cannot be repaired (((Moreover, local overheating from moved furniture can already cause a reduction in resource, which does not happen in water systems... And Thermophysics is the same for any floor. If it is the second floor of a residential building, then let the ceiling on the first floor receive some of the heat, it’s not a problem at all. And if there is a cold basement below or, in general, a drafty subfloor, then you need to insulate the floors even without heating)))
Guy from the Future...:
Mats, unlike molded heating cables, have a significantly smaller thickness... And due to their small thickness, their use is relevant when it is not possible to make a screed of significant thickness.. That is, by their very design they do not imply a certain significant layer of screed on top. Because of this, the mats are used directly on the surface of the base, and the finishing coating, for example, tiles, is glued directly onto the mats. Because of this, even without insulation on the substrate, the mats warm the floor surface well. (due to almost direct contact with the finishing material of the floor) ... Otherwise, about the insulation on the floor, as such, is said in the answer above ...
WARM FLOOR branded store chain:
Thin mats cannot be laid over heat-reflecting insulation, as the adhesive will not adhere to the concrete. Cable and mats are different systems and the installation diagram is different, despite the fact that both systems are cable.
I’m not sure about cracking of the screed under the tiles; we’ve never heard of this before.
Those who say that concrete will not warm up through and through are right. Due to design features and the laws of physics, heating mats in a layer of tile adhesive will heat both the concrete below and the tiles above. And if the cable in the screed needs to warm up the screed itself first, and the screed will already heat the floor covering (tiles and others), then the mats only need to heat the tiles + glue. It should be noted that the floor temperature sensor is installed in the tile and the degree of heating is adjusted according to the tile. And since the tile heats up much faster than the screed under the mats, and especially the concrete slab, it will not be possible to warm the neighbors below.
booster of boosters:
A
anon unknown:
try this liquid insulation. Excellent quality nano34
artem TULISOV:
I have thermal insulation. When I wanted to make it, I searched for a long time for a good company, and this company nano34 made it for me.
Alex59:
You know there are a lot of different little things in this matter! When I was planning to make a heated floor last year, I was advised to contact here s.caleo, the guys came and measured everything, the next day the floors were already ready, so there’s no need for you to rack your brains, ask for help. GOOD LUCK
Answers from experts
Vladimir Andreev:
You need to see the element heating up. You can't cut across. I would ask the seller.
Dmitry Ostankov:
No. you can't cut it. If the mat has tails on both sides, then it is connected to the regulator with them. You need to lay it out so that the second end approaches the first. That is, so that he can reach the regulator.
Lommaster Honored:
TP needs to be filled. Read the instructions. Make sure there are no voids around the wire, otherwise it will burn out too quickly.
Gennady Dudnikov:
I poured the screed.
Elizaveta Goshovskaya:
of course make a screed!
LUCK:
the temperature generated by a heated floor will be maximum if you put tiles on it without a screed, so the instructions say and from experience we have tested our Russian heated floor (with wire) under the screed, the thickness of the screed is 4-6 cm, it warmed up in 3-5 hours but also cooled down slowly and the matte under The tiles started to heat up after half an hour, the main thing is to rub the seams well and let the glue dry for at least a month. I haven’t seen matte floors with a screed at all that they are poured if only with a thin layer to fix it, but I still think it’s unnecessary
Igor Shkurny:
Tile can be laid on a thin heated floor (mats) without screed; use tile adhesive for heated floors
Mikhalych:
Apply one layer of glue under the mat, the second layer directly on the tile and connect... turns out min. layer, if your height is critical... but in general, spread it thinner under the mat and spread it thinner, then press the mat in and wait (this is the second option)
Anatoly Gorbachenko:
Be sure to use a screed on top of the TP. firstly, the floor warms up more evenly, secondly, it is a kind of heat accumulator, and thirdly, it saves tile adhesive. on heated floors with coolant, I practice screeding at least 5 cm.
alxndrn:
You can carefully place the tiles directly under the comb, but we recommend that clients fill the mat with Vetonit 5000 to the thickness of the cable, and only then the tiles - this is more correct.