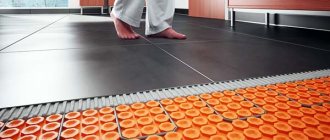
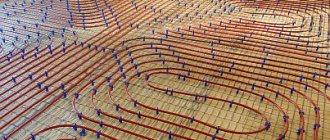
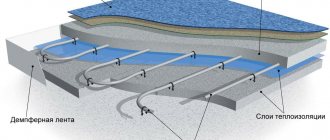
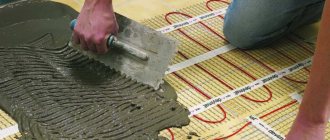
Water heated floors are the most economical floor heating system to operate. But the traditional method of laying in a screed is not always possible: one square meter can weigh up to 300 kg. Such a load is sometimes unacceptable for wooden floors or old buildings. Another disadvantage of installing in a screed is the large height of the “pie” - 7-10 cm or more. Not every room can be painlessly removed by 10 cm of height.
But for any of these cases, installation of water heating is possible if flooring systems are used. They allow you to install water underfloor heating without overloading the ceiling, have a small height, and can be used immediately after installation (no need to wait 28 days for the screed to mature).
Dry water heated floor - wooden system
But you have to pay for everything, and so it is here: flooring systems are less efficient (more coolant is used for heating) and less inertial - they cool down quickly. Which suggests that such systems can work mainly to increase comfort. To heat the entire room with such a system, most likely, the heat removal value will not be enough. Such designs can only provide a maximum of 50-60 W/m2. Although, if you live in the south, your winters are mild, and your house is well insulated (which is rare in these latitudes), then you need to do the math (determine the heat loss of the rooms and compare it with the heat transfer of the floor). If there is still not enough heat, or you live not quite in the south (or not at all in the south), other systems must provide the missing heat load. Traditionally these are radiators, in some cases - convectors, air heating.
Despite the low temperatures, the finishing coating is selected as for any other floor heating system.
“Less inertial” is both an advantage and a disadvantage at the same time: on the one hand, it takes less time and energy to reach operating temperature, the set temperature can be maintained more accurately (advantage), but on the other hand, the system cools down much faster (disadvantage). However, water heated floors without screed are often the only solution.
When to use dry heated floors?
Such systems are not only more convenient, they are used when the standard method cannot be used, for example:
- A dry heated floor in a wooden house will reduce the pressure on load-bearing walls, which are much inferior to concrete slabs.
- In apartments located on the top floors of a high-rise building, there is a problem with transporting cement, so lightweight structures will save the owner’s effort and money.
- It is necessary to raise the floor to a minimum, this is especially true in Khrushchev or other small apartments and houses.
But dry water heated floors can also be installed in other buildings, as they have the following advantages:
- Light weight;
- Simplicity and high speed of installation;
- Small thickness and heat resistance;
- Additional sound insulation.
But along with advantages, disadvantages also go hand in hand.
The main disadvantage is the need for moisture insulation. This is due to the fear of moisture in the system and the possibility of swelling and subsequent breakage.
Pros and cons of this method
If we compare both methods of laying heated floors in terms of labor intensity and time, dry screed looks preferable. For those who decide to independently make a heating system with heated floors, this technology does not require specific knowledge and skills. All you need are tools, desire and materials.
In terms of time, laying the screed dry will also take significantly less time. You can do everything in several stages, without limiting yourself in time. After finishing the work with the heated floor, feel free to do other repair work.
For example: a concrete screed made from a sand-cement mixture poured indoors will dry to a solid state for at least 25-30 days.
Let's summarize. What are the advantages of a heated floor made without a wet screed:
- the main advantage is easy and quick access to the damaged water circuit for subsequent repairs;
- light weight of the structure (25-30 kg/m2), allowing work on any type of floor;
- the cake has a small thickness (35-60 mm), maintaining the internal volume of the premises;
- the ability to begin installation of the floor covering after completing the work on installing the heated floor;
- the ability to use any of the existing foundations (concrete and wooden floors);
- the ability to use the system in temporary residential premises;
The only deviation from the technology may arise as a result of leveling the concrete base. If there are obvious and visible flaws in the concrete base, it is necessary to make a rough wet screed, on top of which the remaining layers of the pie will be installed. This technology is called semi-dry screed.
Serious disadvantages in this case include a number of important points. The condition of a dry screed is extremely negatively affected by moisture. Plywood or gypsum board sheets begin to deform and become moldy.
This flooring design is definitely not suitable for baths and bathrooms. Moreover, in rooms where warm water floors are laid on a dry screed basis, it is impossible to erect additional elements of a residential structure. The system is not designed for additional load. No other significant shortcomings of this system of equipment for warm water floors were identified during operation.
What should the thickness be?
The thickness of the screed directly depends on the choice of heating element and the initial state of the surface on which it will be laid.
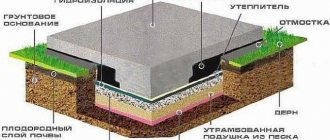
If there is no strict horizon level, it will be necessary to make a rough screed. Its thickness directly depends on the deviation of the floor surface from the horizontal and is individual for each room. If the surface on which the heated floor is installed has a slope, then the heating elements will be at different distances from the surface of the finishing screed and the floor covering. The result will be uneven heating across the room area and heat loss. It is clear that if a rough screed is necessary, the size of the so-called “pie” and the consumption of materials increase.
Below is a calculation of the thickness of the “pie” when installing a water-heated floor and having a horizontal surface. The waterproofing film has a thickness measured in microns, so it should not be taken into account. Polystyrene boards are used with a thickness of 60 mm (2x30) and more, depending on the climatic characteristics of the region of residence. Thermal insulating metallized material must be at least 3 mm, the mesh for reinforcing the screed and securing the heating elements must be from 5 mm.
Taking into account the overlap of one bar on another, it takes 10 mm. The diameter of the element itself varies from 16 to 25 mm, the minimum height of the beacon for the screed is 10 mm.
Based on the given figures, the thinnest “pie” will be 102 mm thick, of which the screed itself will take 46 mm. From operating experience, such a screed is thin for a water floor and can collapse during operation. Therefore, many craftsmen prefer, instead of purchased ten-millimeter beacons, to use starting profiles for installing drywall measuring 27x28 mm - they are stiffer and higher than standard beacons.
The technology for laying mini-mats on fiberglass mesh is different in that there is no need for a reinforcing metal base and a thick screed on top. In addition, extruded polystyrene boards can be used in a smaller thickness. Therefore, the minimum thickness of the “pie” will be 60 mm, and the screed itself will be 17 mm.
But this is only acceptable if ceramic floor tiles are subsequently laid on its surface, which will provide additional rigidity to the floor. If you are planning a floor covering in the form of linoleum or laminate, it is advisable to increase the screed to 25-30 mm, which is the maximum value. The proportions of the mixture are selected individually.
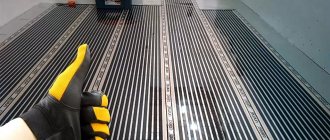
For film heated floors, plywood or OSB boards are used instead of finishing screed. Manufacturers claim that there is no need for a screed. Its advantage is much lower inertia, since heat loss for heating a thick screed will be less. True, the floor will also cool down almost immediately after turning off the thermostat.
The advantage of infrared film floors is that they do not dry out the air. When drawing up a floor design, the places in the rooms where there will be furniture standing in one place are not taken into account. Do not place film under cabinets, cabinets, sofas to avoid their deformation. A distance of at least 20-30 cm must be provided from walls and heating appliances.
Installation of film heated floors begins with laying heat-reflecting foam material, for which it is very important not to conduct current. After laying all the elements in accordance with the project, connecting the temperature sensor and thermostat, you can lay laminate flooring on the film floor without pouring screeds
To waterproof and prevent moisture from entering electrical contacts, you need to lay PVC film before laying the floor covering. If you plan to lay tiles, it is better to protect the floor elements with either plywood, OSB board, or cement-bonded particle board. It is also possible to seal all connections very tightly.
Types of “dry” installation of water floors
There are two flooring systems: wooden and polystyrene. Regardless of the material, they consist of two components: blocks of the flooring system and heat-distributing metal strips. Due to the low thermal conductivity of the base materials, laying pipes directly into the grooves of the blocks gives too low heat transfer. For better heat transfer, metal (aluminium-based) plates are laid.
Wood flooring systems
Wooden structures are more popular. Firstly, because they are natural (or almost, when using fiberboard and OSB), secondly, this material is more accessible, the system is easy to assemble independently.
There are ready-made modular “wooden water floors”. These are blocks made of OSB or chipboard, in which channels for laying pipes are formed. The width of such a module is standardized - 13, 18, 28 cm. They are connected to each other using a standard method - a lock.
A water heated floor can be placed on a wooden
There are inter-tube boards - this is already clean, processed, well-dried wood. The parameters of the boards (thickness*width) may vary from company to company, but 21*120 mm or 28*120 mm are more common.
Select the width of the block or board based on the required pipe laying step. The boards are nailed to the joists, and the blocks are also laid on the joists. In this case, both are positioned so that the grooves for the pipes repeat the selected installation pattern (simple or double “snake”, “snail”, etc.).
Polystyrene water floors
Polystyrene systems weigh even less. Standard modules can have a thickness of 15 mm, 30 mm, 50 mm or 70 mm, the pipe laying pitch is 15 cm and 30 cm. In this case, polystyrene is also thermal insulation.
The slabs are laid on a flat and clean base. If necessary, first lay a layer of thermal insulation, and then on it - mats of a polystyrene dry-laying water floor system. The system plates can be simple or “rotary”. They are combined so that the pattern chosen for the pipes can be laid.
Interestingly, for laying dry, warm water floors, it is quite possible to get by with standard polystyrene slabs with fixing bosses. Metal plates are perfectly installed in them. Moreover, in this case it is possible to assemble a much more complex installation scheme than with special modules.
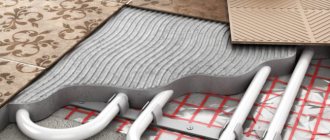
After the installation of wooden or polystyrene modules is completed, metallized heat distribution plates are laid out on them. They have grooves in which pipes are secured.
Metal plates are laid out on polystyrene mats for a dry water floor, and pipes are reinforced in them
Regardless of the chosen system, a damper tape is required around the perimeter of the room. It will compensate for the thermal expansion of the floor and prevent cracks from appearing between the floor and the wall. If there are several circuits in one room, they also need to be separated with a damper tape; circuits from different rooms that are connected (for example, a room and a corridor) should also be separated. Let's consider several options for a “dry” water floor system.
Selection of materials
Before laying heating water circuits in a wooden house, it is necessary to insulate the floors. Therefore, you will have to choose 3 groups of components:
- type of insulation;
- pipe material;
- plate material.
Among the common and affordable insulation materials, mineral (basalt) wool is best suited for thermal insulation of wooden structures. It is permeable to water vapor, due to which it combines well with wood, gives it the ability to “breathe” and does not cause rot. Another thing is that when laying mineral wool, it is necessary to ensure the release and removal of these vapors, otherwise it will get wet through and stop serving as a heat insulator.
Mineral wool and shaped polystyrene foam boards
Advice. To insulate the covering of the first floor, it is better to use basalt fiber with a density of 40-80 kg/m³ and a thickness of at least 150 mm, and in the northern regions - 200 mm or more. Mineral wool with a thickness of 50-100 mm will be used for the interfloor ceiling. Its task is not to allow heat intended for the upper rooms to pass into the premises of the first floor and to serve as sound insulation.
Polymer insulation - foam plastic, foamed polyethylene and extruded polystyrene foam - practically do not allow moisture to pass through. Therefore, they must be used wisely, otherwise the wood in places of contact with the polymer will turn black and rot. The minimum thickness of materials for thermal insulation of the floors of the first floor is 100 mm; it is enough to put 20-30 mm in the ceiling.
We recommend: Brick stove for home (115 photos): DIY installation instructions, stove drawings
For heated floors without screed, installed on wooden joists, the following types of pipes with a diameter of 16 and 20 mm are used:
- made of cross-linked polyethylene with an anti-diffusion layer that does not allow oxygen to pass through;
- metal-plastic;
- copper.
The most popular pipes for heated floors are polymer
High-quality polyethylene pipes (for example, from the Rehau brand) are no cheaper than metal-plastic and are not inferior to it in terms of performance properties. Hence the conclusion: there is no fundamental difference between these types of polymer pipelines; they are equally good for heated floors.
Copper pipes are much more expensive than plastic ones, and installing them is more difficult and takes longer. But, from the point of view of heat transfer, copper has no equal, and therefore is successfully used for underfloor heating of any buildings. An important point: do not use copper heating circuits together with aluminum heat distribution plates; these metals are absolutely not friendly with each other.
Since the thermal conductivity of aluminum is higher than that of steel, plates made of this material are more preferable (excluding copper piping). But keep in mind that high-quality aluminum distributors are 1.5–4 times more expensive than galvanized ones.
Note. Prices for aluminum and galvanized plates from different manufacturers vary widely and cannot be compared because they are made from metals of different thicknesses. Hence the advice: try to purchase thick-walled products, they are able to accumulate and transmit more thermal energy.
Corrugated stainless steel is also an excellent option.
Of recently emerged materials, flexible corrugated stainless steel pipes are of interest. They are durable, can be installed without welding or soldering, transfer heat well and can be used in lightweight flooring systems.
Calculation of the pipe length in each circuit, laying pitch and surface temperature is presented in a separate publication. Familiarize yourself with the methodology in order to accurately determine the amount of materials.
Installation using Uponor technology
The technique has become widespread as the simplest and most affordable. Mineral wool serves as a thermal insulation material; you can use pipes and plates at your discretion and financial capabilities. The essence of the method is to lay wooden boards 20 mm thick on logs at intervals of 2 cm for the further installation of a water-heated floor, as shown in the diagram:
A ventilation gap is created between the thermal insulation and the base boards (not visible on the diagram)
Note. A similar scheme can be used in any residential buildings where wooden floors are laid on joists, including on top of concrete foundations.
To make heated floors using this technology with your own hands, you will need the usual set of plumbing and carpentry tools, as well as special scissors for cutting polymer pipes. When installing underfloor heating on the ceiling of the first floor (above the ground or an unheated basement), perform the work in this order:
- Nail cranial bars with a cross section of 25 x 25 mm flush with the bottom edge of the beams. Lay subfloors made of 20 mm thick boards on top of them, as shown in the drawing below.
- Cover the subfloor and joists with waterproofing membrane (technically called diffusion membrane), waterproof side down. Maintain an overlap between the panels of at least 10 cm and carefully seal the joints with double-sided tape.
- Place mineral wool slabs on top of the waterproofing so that they do not wrinkle, otherwise the basalt fiber will partially lose its thermal insulation properties. The thickness of the insulation should be at least 5 cm less than the height of the log in order to provide a ventilation gap between the surface of the wool and the future wooden flooring to remove moisture.
- Place vapor barrier film over the joists. The polyethylene must be pulled up and secured to the wood with a stapler so that it does not sag in the gaps between the beams.
- Nail 2 cm thick boards across the joists, 30 mm away from the wall. Depending on the pipe laying pitch (15 or 20 cm), leave 20 mm wide gaps between the boards for heat distribution plates.
- Insert metal plates into the slots and arrange the heating circuit pipes over them, placing them in the Ω-shaped grooves. To rotate the pipe, shorten the ends of the boards by 10-15 cm in this place.
- Run the ends of the pipes along the walls to the heated floor comb, connect them and check the tightness of the system. Lay the final floor covering.
Please note: when installing an insulated floor, the membrane and vapor barrier are swapped - the polyethylene film is laid from below.
The method of laying a water-heated floor over wooden joists is shown in detail in the video:
Work on the interfloor floors is carried out in the same order, only the subfloor boards can be nailed directly to the joists from below. By the way, instead of wood, you can use OSB boards here, while simultaneously hemming the ceiling of the first floor.
Important! Do not confuse the diffusion membrane with the vapor barrier film, otherwise the mineral wool will become saturated with water and cease to be an insulator. The waterproofing at the bottom of the “pie” protects the cotton wool from getting wet from the outside, and the top film prevents water vapor from penetrating. In floors, everything is the other way around - the vapor barrier is laid from below, the membrane - from above. To remove moisture from the insulation, use a 5 cm ventilation opening and vents made in the walls of a wooden house.
Along with its simplicity and low cost, this method of installing water heated floors has one drawback - the pipes can only be laid in a “snake” pattern, which is why the rooms of a wooden house have to be divided into several heating circuits in order to achieve uniform heating.
Installation Guide for Polystyrene System
This method of laying underfloor heating circuits allows you to complete the work much faster and easier, since it involves the use of two-layer polystyrene foam boards with guides in the form of protruding bosses. Polystyrene of different densities is used to make the plates - the top layer is more durable, the bottom layer is soft.
It is quite simple to make piping for heating floors according to this scheme
The technique is suitable for any floors with a flat surface, for example, made of OSB plywood (as in houses made of SIP panels). Warm water floors on a flat wooden surface are made using the following technology:
- Cover the joists with OSB sheets and fasten them with galvanized self-tapping screws. If work is carried out on a wooden floor of the first floor, then mineral wool insulation should be laid between the beams, as described in the previous section. The thickness of the polystyrene system is not enough to fully insulate the building from below.
- Attach damper tape to the walls around the perimeter of the room.
- Place polystyrene foam boards on the finished surface, fastening them together with locks.
- Install the dissipative plates in accordance with the layout and spacing of the pipelines, fixing them between the bosses. Unwinding the pipe from the coil, insert it into the recesses of the plates.
- Cover the heating circuits with plastic film, overlapping and gluing the sheets.
- Mount the base of the floor from gypsum fiber sheets (GVL), where you will subsequently lay the finishing coating (a popular option is laminate).
Details of the work are shown in the video from the Russian manufacturer of polystyrene foam systems -:
Advice. Before laying the finishing coating, connect the main lines from the circuits to the manifold of the distribution and mixing unit and conduct a leak test (pressure test) with a pressure of 4 bar.
The advantages of shaped insulation for warm water floors are obvious - simplicity and speed of installation work, the ability to lay out pipes not only in a “snake”, but also in a snail. There are also disadvantages:
- high price;
- the material can bend under heavy mechanical loads;
- Due to the gaps between the bosses, a small part of the heat is wasted on useless heating of the air under the floor covering.
Other pipe laying methods
Other products can serve as the basis for heating loops, into which metal plates can be inserted:
- expanded polystyrene boards with ready-made grooves;
- factory kits made of wooden products with cutouts for laying pipelines;
- polystyrene sheets with a density of 35 kg/m³, where the recesses are cut out with your own hands using a special thermal knife.
In addition to polystyrene foam with bosses, polymer slabs with ready-made recesses are also available in the retail chain. This option is suitable both for installation on a flat surface and inside the ceiling flush with the joists, as shown in the diagram:
We recommend: Water in-floor heating convectors: their types and characteristics
Thermal insulation boards can be placed in the gaps between the joists
Note. The disadvantages of this option are the need to cut grooves in the joists for the passage of tubes and fastening the polymer at the corners so that it does not adhere to the wood. Therefore, it is better to place slabs with recesses on a base made of OSB plywood or leveled boards.
A set of wooden elements (left) and polystyrene foam with grooves for pipes (right)
A big plus of wooden sets for water underfloor heating is the ability of the coating to carry a large load from bulky furniture without deformation. Products with cutouts for plates are mounted on beams along with insulation, as described above (Uponor brand technology). A stacked wooden heated floor has only one drawback - the high price of materials.
Homeowners with time can save money on a polystyrene system by purchasing a thermal groove cutter and regular high-density foam. The technology is simple: insulation boards are laid out on a leveled surface, after which you need to burn out the pipeline route in them in accordance with the diagram. All that remains is to install heat distributors and insert pipes into them.
Burning grooves in polystyrene with a thermal knife
What to look for when choosing
When choosing expanded polystyrene for a heated floor, take into account its quality and variety.
Granular dense structure of polystyrene foam
Quality control
The quality of polystyrene foam boards that will be used for floor insulation can be judged by visual inspection. You will need to pay attention to the following:
- The product must have a bright, evenly distributed color. Typically, slabs of orange or blue color go on sale. This does not in any way affect the characteristics of the products, except for the tone and uniformity of color, which indicate the quality and compliance with the manufacturing technology of the slabs.
- The presence of a slight specific odor is acceptable, but there should not be a strong unpleasant odor.
- During a visual inspection, you must make sure that the slab has clear geometric dimensions, its edges are smooth and dense - they do not crumble when pressed.
- The surface of the slab must be flat, otherwise the thermal insulation properties will be significantly reduced.
- It is necessary to visually assess the quality of the granules - they must be the same size without voids.
When choosing slabs, you should pay attention to their cut structure
Advice! By breaking a sample of a slab in half, you can evaluate its quality by looking at the location of the break. If the granules in this place have retained their integrity, then this indicates poor adhesion between them. If the slab is of high quality, then the granules are also destroyed at the fracture site.
When broken, high-quality polystyrene foam granules also break due to strong adhesion
Kinds
The properties of expanded polystyrene directly depend on its production technology. In this regard, three types of material can be distinguished:
- Non-pressed polystyrene foam is produced by molding a mixture of granules pre-dried and foamed at a temperature of 80 degrees. This is the most budget option, which is characterized by high fragility.
- Material produced by extrusion (extruded polystyrene foam) is produced under the influence of a reagent, which is introduced into a container-form, followed by squeezing the foam mass into a slab shape and drying.
- When replacing the foaming reagent with an autoclave, the resulting material is not suitable for use as a heat insulator.
- Pressed boards with a thickness of 15 to 70 mm have similar characteristics to extruded polystyrene.
Expanded polystyrene balls can be used as insulation in wooden floors along joists
Hydraulics and circuit lengths
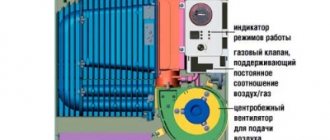
- Schemes for direct connection of all underfloor heating circuits directly to automated gas or electric boilers, which can produce a low coolant temperature of 60 - 65 degrees, appear to be workable. In this case, in short circuits (up to 50 meters are recommended), the energy output (temperature) is adjusted by changing the flow rate using a tuning valve. To create the simplest system, one manifold with such valves on each outlet is sufficient. For a solid fuel boiler, you will need an outgoing temperature stabilizer in the form of a buffer tank and a three-way valve...
- A more progressive option with automatic temperature maintenance in short circuits (up to 40 m in length) can be implemented using RTL taps - thermal heads that respond to the temperature of the coolant and which are installed strictly on the outgoing stream from each circuit. Here, too, the energy output of the circuit is regulated only by the amount of passing fluid. But it is also recommended to install a maximum temperature limiter in the heating system, for example up to +70 degrees.
- If you make a warm floor of a large area throughout a wooden house, then it is recommended to use classic hydraulics with long circuits of 80 - 90 meters and a temperature controller with a separate mixing pump unit, which would maintain the desired temperature in the entire system. In this case, adjustment of the energy output along the circuits is carried out by slightly changing the flow rate by adjusting valves.
Pressure testing of floors
An important point in our instructions. After laying the pipe, all circuits need to be pressurized. This is done in order to finally verify the tightness of the pipes and the absence of defects in them.
The system can be pressurized with either air or water. If you are sure that you will move into the house before winter, then you can resort to water pressure testing. In other cases, it should be pressurized with air. Pump the pressure around 4 bar and watch it “hold”. If the pressure drops a little, it's okay. This is often due to changes in temperature. But if the decline is significant, then you should look for the leak.
Installation
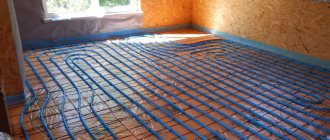
Attention: installation of water heated floors in a wooden house is carried out in all rooms separately. One floor section should be no more than 40 square meters. For rooms with a larger area, two sections are made.
Laying the base
PPS mats are laid out on the base in accordance with the drawing. Reflective plates are installed on them (the plates also have recesses for pipes). Pipes are laid in increments of 15-30 cm.
Wood-shaving modules are also laid according to the scheme and connected with tongue-and-groove locks. Pipes are laid in the channels.
With the slatted method, chipboard slats with a height of about three centimeters are attached to the laid plywood (slabs) in increments of two centimeters. It is necessary to ensure that the grooves in the places where the pipe turns are rounded.
After installing the base, a reflective layer of foil is placed. Other options: install heat-reflecting plates.
Pipe laying
There are two schemes for laying the working circuit: spiral and snake. The snake is led in zigzags from one wall to the other, opposite. The floor near this wall will be colder, because... As it moves along the circuit, the coolant cools down.
The spiral ensures uniform heating over the entire area: the first (hottest) coil is placed along the cold walls, and the cooled section is located in the center of the room, where it is warmer. From the center the pipe is led in the opposite direction, repeating the same turns in parallel. At the finish line it is connected to the return manifold.
A gap of at least seven centimeters should be left between the outer turn of the pipe and the walls.
Before installing the finishing coating, the system must be tested for leaks: connect to the collector, fill with water and leave for about a day.
The pipes are secured with narrow aluminum plates laid across the groove.
If laminate is used as the finishing cladding, an underlay is usually placed on the particle board base. The laminate can be laid on a polystyrene base without a backing.
Installation of floor with screed
For finishing screed, you can use a mixture based on M-300 cement. Plasticizers and polypropylene fiber are added to the solution. Another option is to buy a ready-made mixture for screeds.
- Place a waterproofing layer on the rough screed.
- Lay damper tape along all walls at the joints with the floor. If at least one wall is longer than eight meters, the tape is additionally placed in the middle of the room. This is mandatory, because When heated, thermal expansion of concrete begins. Without a damper, the floor will open up.
- Lay insulation. The approximate layer is 10 cm, the exact one depends on the heat calculation and the characteristics of the material (density, thermal conductivity).
- Lay the reinforcing mesh.
- Lay the pipe in turns with a pitch of 15-30 cm. Attach it to the mesh cells with plastic clamps with a pitch of thirty centimeters.
- Test the system for leaks and performance.
- Fill the screed 5-7 centimeters. If the floor is subject to high loads, another reinforcing mesh is placed in the screed during the pouring process. Wait for the concrete to harden (about a month).
- Lay the finishing coating: laminate with or without backing, ceramic tiles.
As a wood covering, you can use planed boards instead of laminate, but its thermal conductivity is lower than that of laminates for heated floors.
You can’t lay parquet boards, it will dry out quickly. In addition, in the production of parquet and parquet boards, chemical compounds are often used that reduce the environmental friendliness of the coating: when heated, it will release toxic volatile substances.
Boards should be laid with gaps to compensate for thermal expansion.
Construction of electric heated floors without screed
The process of laying a cable floor without a screed is much simpler and faster than installing it on a concrete screed.
The work includes the following stages:
- the location on the wall where the thermostat will be placed is determined;
- grooves are made for the temperature sensor;
- the base for the mats is prepared - irregularities and cracks are sealed, and the surface is cleared of debris;
- the base is laid - if these are polystyrene mats or wooden modules, then they are already equipped with grooves where the cable is laid; with the rack method, the cable is mounted between fixed slats;
- the cable is laid according to the prepared diagram in the grooves;
- the temperature sensor is placed in a corrugated pipe on the floor;
- the system is connected to the power supply and the functionality is checked;
- hydro and thermal insulation is installed;
- A decorative covering is installed on the cable floor without a screed. It is possible to use both ceramic tiles and linoleum or laminate.
When using electric mats, the process is even simpler, since no additional substrate is required. The mesh is laid directly on a concrete or wooden base, which has been previously prepared, and is fixed with adhesive tape.
Nuances to consider
Any job has its own subtleties and limitations, below is a list of points that you need to consider:
- The maximum length of the working circuit is 70 meters; if a pipe of this length does not cover the entire area of the room, then the organization of a second heating circuit is necessary;
- Reliable waterproofing. In a wooden house, the presence of excellent insulation from moisture is the guarantee that your floor will last a long time without repair. Waterproofing must be done in several layers.
Dry water heated floor using Finnish technology
Dry water heated floors using Finnish technology are a good solution for installation on joists. A conventional concrete screed performs two main functions: it fixes the system and transfers heat upward. Due to its heavy weight, it cannot always be used in wooden houses, which is why a fairly effective alternative was invented. In the Finnish version, its role is played by gypsum fiber sheets, laid in several layers between pipe loops and forming the base. The voids between all components of the structure are filled with tile adhesive. Finishing material is attached to the top in the usual way.
GVL sheets
A warm water floor over wooden logs using gypsum fiber boards is lightweight and has a permissible load on the floors. Compared to conventional plasterboard, this material is more resistant to bending and deformation, and at the same time has increased thermal conductivity. The desired screed height can be easily achieved by simply fastening the plates together with tile adhesive. Gypsum fiber sheets also have the following advantages:
- Affordable price.
- Ease of processing.
- Environmentally friendly.
- Fire safety.
Another advantage of such a floor is that in the event of a leak, it is much easier to carry out repairs than with a concrete screed.
Tip: Today, for dry screeding of heated floors, not only gypsum plasterboard is used, but also sheets of chipboard, OSB or plywood. On sale you can find ready-made kits, the material in which already has the shape necessary for convenient installation.
How to install a dry screed using Finnish technology
Installation of a water floor using Finnish technology involves a standard installation algorithm, regardless of the type of slabs used. In order for heat to be properly distributed and rise upward, it is necessary to pay great attention to insulating materials: a vapor barrier is laid between the joists, insulation is placed on it, and then another layer of vapor barrier that will protect the wood from condensation.
We recommend: Malfunctions of the Junkers gas boiler: error codes and methods for eliminating them
Dry heated floor with gypsum fiber sheets
If you do not use a ready-made dry screed kit, the further installation technology will be as follows. Using self-tapping screws, GVL sheets are attached to the logs, onto the surface of which the further route of the water pipes is applied. After this, they begin cutting the material into strips and attaching it to the base.
Tip: The distance between the strips of gypsum fiber boards should be slightly larger than the diameter of the pipes. This will make it more convenient for you to carry out installation, and in the future, all voids in any case will need to be filled with tile adhesive.
Results
Floor heating is good in cases where heavy screed cannot be laid due to the low load-bearing capacity of the floors, in wooden or old houses, or low ceilings do not allow it to be installed. Wooden warm water floors are more popular; polystyrene systems are used less frequently. But in any case, this method of installing floor heating can only be used as a means to increase comfort: heat output does not exceed 60 W/m2, which in most areas does not allow using these systems as the main heating.
Floor in the bathroom of a wooden house with dry screed for heated floors
Due to the processes occurring in the bathroom, special requirements are imposed on the structures and finishing materials used in this room. The greatest attention should be paid to the floor, as it receives the most water. If the room is on the second floor, it is important to take care not only that the coating lasts as long as possible, but also to be sure that the lower rooms are protected from leaks.
A bathroom floor in a wooden house with a dry heated floor screed will cost slightly more than a similar option in other rooms, since in this case a larger amount of materials is used. The most optimal technology is considered to involve the use of specialized mixtures that can be purchased at any hardware store. First, the surface with a layer of vapor barrier laid on it is covered with expanded clay material, on which the dry screed is distributed. Sheets of moisture-resistant plasterboard are mounted on top, which will protect the system from moisture penetration from the outside. As in other cases, the perimeter is sealed with a special polyethylene tape that dampens impact noise.
Dry screed in the bathroom from a specialized mixture
This technology for laying a dry, warm water floor in a bathroom is the least labor-intensive and there is practically no dirt during operation. The main disadvantage in this case is the inability to withstand high loads.
One of the most important steps when laying dry screed in a bathroom is preparing the waterproofing layer. Experienced specialists suggest using bitumen mastic or roll materials. With their help, you can protect not only the floor itself, but also the base of the walls, which are captured to a height of up to 20 cm.
Tip: instead of conventional moisture-resistant gypsum, you can use Knauf gypsum boards, which are strong enough and can withstand weights of up to 1000 kg per square meter. This option will be optimal for rooms where it is planned to use heavy finishing materials for the floor and large furniture.
Methods for fixing coolant
There are several ways to fix the coolant.
Reinforcing mesh and ties
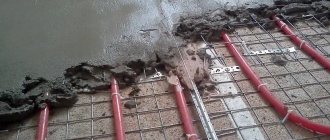
The pipes are fastened to a reinforcing mesh with cells 10 x 10 cm using plastic ties. As the pipe is laid to the mesh, it is fixed with plastic ties, cutting off the protruding tails. The pipe is secured with plastic ties every 1–1.5 meters. When bending a pipe 90 degrees, it is enough to use a pair of plastic ties; when bending 180 degrees, use three ties. The advantages of this method include simplicity and reliability, as well as the availability of plastic elements. The disadvantages include the labor intensity of the work, the likelihood of damage to the pipes on the mesh, especially if they are made of metal-plastic, when walking on the floor. Voids may form at the point of contact between the pipe and the mesh, which will lead to a decrease in the thermal efficiency of the floor.
Fixing pipes to the reinforcing mesh with ties
Reinforcing mesh and plastic fastenings
Manufacturers offer special devices for fixing pipes to reinforcing mesh. By fixing the mesh with a clip-mount, it and the coolant pipe are raised above the insulation. This ensures even distribution of the screed under the mesh and under the pipe. Thus, the mesh becomes an additional reinforcing layer, and maximum heat transfer is achieved from the surface of the pipe.
Special plastic fasteners
The advantages of this method of fixing the coolant include:
- additional screed reinforcement;
- absence of air voids and improved heat transfer;
- quick and easy pipe laying;
- less chance of pipe damage.
The disadvantages include the higher cost of fastenings compared to plastic ties.
Plastic fasteners
Attaching the pipe to plastic guides
Pipes can be fixed using plastic guides laid on smooth polystyrene foam. Their length can vary, but more often they are 50 cm long and are inserted into each other, secured with clasps. In this way, they can acquire any required size depending on the parameters of the room. Before fixing the guides, you need to know the pipe layout pattern in advance. The planks can be laid in any pattern. They are attached to polystyrene with U-shaped plastic brackets. The pipe snaps tightly.
One of the advantages is the quick and convenient layout of pipes and their reliable fixation. The disadvantages include the complexity of preliminary marking and the lack of additional screed reinforcement.
Fixing pipes using plastic guides
Laying on polystyrene foam boards with fixation
Slabs with bosses require additional fixation. The bosses play the role of guides, helping to lay the pipe in any pattern, and anchor brackets are used to secure them. They are also used when attaching to foil-coated flat polystyrene.
Mat with bosses
The advantages include the prevalence of such fasteners and mats in hardware stores; the bosses protect the pipe from damage and make the installation process easier. The disadvantages include the high cost of the slabs and the need to use additional means of fixing the pipes.
Fastening with plastic brackets
Mat with lugs with fixation
Modern manufacturers have improved polystyrene foam mats with bosses, correcting their shape so that they firmly hold the coolant pipes. The laying step should be a multiple of 50 cm. The advantages include reliable, durable and convenient fixation of the pipe. Such a mat is both insulation and a means of fixing the pipe. The ceiling is rigid and does not bend under loads, the pipe is reliably protected from damage. In addition, this mat is an excellent combination of price, convenience and reliability. The disadvantages include the high cost of the plates.
Improved bosses securely fix the pipe
Video - Advantages of mats
Velcro fastening
New – fastening pipes with Velcro. Fixation occurs due to reliable adhesion of the tape wrapping the pipe and the fleecy base. When laying, the pipe adheres tightly to the insulation. The advantages include speed of installation, ease of installation and fixation, and no need to use additional fastening devices. One of the disadvantages is the lack of markings, which complicates installation. There is an assumption that the pipes may shift when walking on the floor.
Tubes with Velcro
Prices for polystyrene foam for heated floors
expanded polystyrene for heated floors
The principle of organizing a heated floor into rack modules
Using this technology, it is a little more difficult to install a warm water floor in a private house without a screed with your own hands. The fact is that the method does not involve the use of ready-made flooring systems. Grooves for laying pipes and distribution plates are formed by installing boards. In fact, these are ordinary strips of wood. They have a thickness of 28 mm. When organizing a dry water heated floor, the boards are placed at a distance of 20 mm from one another. No preparation needed. The strips are laid directly on the logs, the distance between which does not exceed 600 mm or 300 mm. If this is a cable heated floor under a laminate without a screed or ceramic tiles are chosen as the final finish, then the distance between the floor beams should not exceed 300 mm. In other cases 600 mm.
This installation method involves the use of a heat-insulating layer - polystyrene, basalt wool, etc. It is laid strictly between the beams. When installing a water-heated floor in a wooden house without a screed using a rack-class wooden flooring system, plates are used for laying pipes with a pitch of 200 and 300 mm. And in areas near external walls, windows and doors - 150 mm. Afterwards, the installation procedure repeats the previous one.
It doesn’t matter what type of heating system you choose - electric heated floor under laminate without screed or water. The main thing is to correctly calculate the load on the system. Also, one should not lose sight of the location of the collector and automation. Stable and safe operation of the system depends on the accuracy of the design calculations. Despite the fact that dry screed for heated floors makes the installation of a heating system as easy as possible, this procedure is very responsible. Therefore, it is wiser to entrust it to professionals.
Principles and subtleties of preparing the base
The process of any installation work has its own nuances, so when installing a heated floor you should know:
- To lay the foundation in an apartment on the first floor, at least 5 centimeters of thermal insulation is required, since this is where the entrance door is located - a source of drafts;
- The best insulation boards are those with bosses and grooves. This is very convenient for laying pipes;
- The laid thermal insulation boards should not sag underfoot. If this happens, it means they were placed on an uneven surface. It is necessary to adjust the sheets very carefully, otherwise the properties of the material will deteriorate;
- Craftsmen often use reflective film with special markings, which serve as a guide for laying pipes. There are people who simply cut off the edges of the film along the border of the slab; this cannot be done. It is better to tuck excess material under the insulation sheets. This way it will lie firmly and evenly;
- Many experts advise laying pipes taking into account furniture locations. After all, there is no need to heat the floor under the built-in cabinets. These points should be discussed in advance, and the locations of such items should be outlined;
- Before pouring the final screed, it is necessary to pressure test the water system with maximum pressure in the pipes. Tests should be carried out within 24 hours. If this is not done, then it will be difficult to find a water leak;
- You cannot start heating the floor if the screed covering has not yet completely dried. Usually it is enough to wait 28-30 days and you can safely use it.
Some installers with many years of experience advise performing a hydraulic test repeatedly with pauses of several days. It is better to find errors with heating, water supply before finishing the room, before laying tiles, laminate, and so on.
Features of the operation of heated floors
Dry heated floors, a photo of which can be found in this article, have a number of advantages over other systems.
It is immediately worth noting the reduced maintenance costs. Since hot water is used as a heat source, utility costs are reduced.
In addition, there is no possibility of short circuits or overheating of the surface. The plates used to dissipate heat allow the load to be distributed over the entire area.
- The dry system does not require the owners to spend several days while the screed dries. In case of a leak, you can get to the pipes quickly. This reduces the overall repair time.
Mats for heating systems under tiles or laminate
They have a number of properties that improve thermal insulation and facilitate the installation of a heating system. They have standard fastenings for tubes of different diameters.
Important To ensure that the floor can fit into any room, mats are produced in several sizes, but 1.5 × 0.5 m is considered the standard. Although there are 1.1 × 0.7 m. Pipes with a diameter of 16 and 18 mm can be laid in the mats
Price - from 80 to 500 rubles per 1 m2. It depends on the quality of the product, its density, level of sound insulation and thermal conductivity. The standard for mats used without screed is polystyrene foam panels covered with foil and protective film.
Pipes with a diameter of 16 and 18 mm can be laid in the mats. Price - from 80 to 500 rubles per 1 m2. It depends on the quality of the product, its density, level of sound insulation and thermal conductivity. The standard for mats used without screed is polystyrene foam panels covered with foil and protective film.
Possible mistakes
At first glance, it will seem that dry screed under a warm water floor is very simple and no difficulties can arise.
But novice performers may encounter certain mistakes that will lead to ineffective operation of the water heated floor. To avoid this, you must first calculate the heated floor, both before starting work and after installation. The measurements taken may indicate possible errors, which would be better to eliminate first than to spend more effort and money later. The pressure on the floor base is also calculated here.
An ideal screed should not heat up above human body temperature. There are maximum temperatures that conventional piping can withstand, depending on the material chosen. But it is recommended to create an operating temperature of no more than 55 degrees.
Another possible mistake is installing temperature sensors deep in the structure. They cannot serve for a long time and periodically fail, requiring replacement. It will be very difficult to get them and check their functionality.
Under no circumstances should you rush to install a heated floor. It is better to check the completion of each stage and then enjoy the high-quality operation of the system for a long time. Experts recommend leaving the system alone even for several days after finishing work. That is, it should not be turned on. When all the elements adhere to each other, especially if glue was used during installation, you can begin to use it.
You cannot save on purchasing materials, as the system will last a very long time. It’s unlikely that anyone would want to lay down a floor covering and then dismantle it a year later to repair the water-heated floor.