When building a house, the planner will definitely be faced with the issue of providing heating. Within the city limits or in large populated areas, gas equipment is widely used, as this is facilitated by the close location of the main line and the relatively low cost of the fuel itself. An alternative to such a system can be electricity or the energy of burning wood and coal.
Using electricity to heat a room is not always justified due to its final cost, and frequent power outages can lead to unpleasant time spent in a cold room.
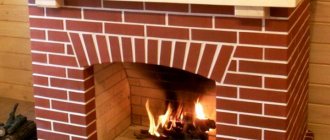
Based on similar reasoning, in houses located far from large populated areas, or in country houses, good old stove heating is used. But modern stoves are completely different from those we remember from our childhood. They have gone through several stages of modernization and are distinguished by high performance. In this matter, we are not considering brick stoves, since their use is not always appropriate, construction is accompanied by the expenditure of effort, money and time; there are devices that are more efficient for heating.
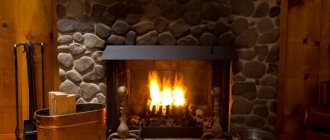
Modern home heating device
Ready-made metal stoves are devices that combine the functions of a fireplace, hob, oven and, directly, the stove itself. They are so efficient that they can act as the only heater in the house. A distinctive feature is that a metal fireplace stove occupies a small area and does not require pouring a foundation. The wealth of choice of different methods of external decoration will allow you to choose a model for any interior that provides a single harmonious picture.
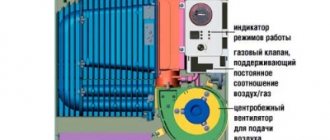
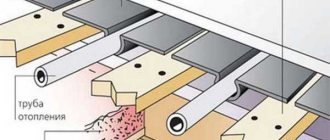
Air loop system
The main idea of an efficient heating device is that convection in a fireplace allows air flows to be used as a coolant and distributed in several directions, which helps to warm up several rooms at once. It should be noted that a traditional fireplace gave off only a small fraction of energy in the form of radiation, and warm air escaped through the chimney.
An important element in the structure of such a fireplace is the body and air ducts. The housing allows you to localize warm air, playing the role of a kind of storage device, and air ducts are needed to transport it to the right rooms. In this way, the entire house is heated, and not just the room where the fireplace is located.
When wood burns, the wall of the firebox becomes very hot. The air, passing through the labyrinths and coming into contact with the surface of the walls, also increases its temperature. The heat capacity of air is low, so it manages to heat up to the desired state in a short time.
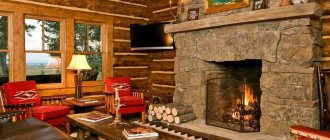
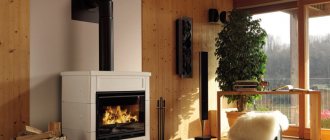
Placement of a fireplace in the bedroom
When constructing a wood-burning fireplace yourself, one nuance should be taken into account. In order for the air to heat up more efficiently, it needs to increase the contact area, that is, using a system of labyrinths, it will force it to travel a greater distance while inside the fireplace body. But such a number of bends will interfere with the natural convection that occurs due to the buoyant force. You will have to install special fans that are capable of pumping cold air into the firebox, displacing hot air.
Good to know: Brick barbecue fireplace, subtleties of self-construction
In order not to experience unnecessary noise from operating fans and to achieve a natural upward movement of masses, the layout of the labyrinths is significantly simplified. In any case, the heating fireplace is based on constant displacement by incoming air flows. Cold masses, falling down, push the air of the lower layers inside the fireplace body, and rising masses push warm air upward.
To ensure heating of the house with a fireplace, all that remains is to supplement the convection system with a distributor with air ducts. If all equipment installation work is carried out correctly, then the fireplace can become a full-fledged device for heating a country house.
Briefly about the main thing...
Chimneys can be single- or double-walled. Based on the material of manufacture, metal, brick structures and structures made of sandwich pipes are distinguished. The last option is optimal for private houses. When installing a chimney, the rules for its placement in the room are observed. Its functionality, as well as the presence of draft in the heating equipment, depends on the correct determination of the diameter and height of the structure.
The installation technology through a wooden and brick wall is the same, but there are some nuances: wood is more susceptible to ignition and requires maximum protection. During installation, you must comply with fire regulations, and also take into account possible errors. Date: September 25, 2021
Advantages of a convection fireplace
To make a fireplace for your dacha with your own hands, you need to clearly understand its positive distinctive advantages in order to concentrate your attention on them.
Air circulation in the system
- The intensity of combustion, as well as the temperature, depend not only on the amount of fuel, but also on the amount of oxygen. High-quality air supply allows you to save firewood.
- The convector forces air to circulate throughout the system even some time after the combustion has completely stopped. Ordinary fireplaces cool down immediately.
- Air ducts can be arranged in such a way that an additional share of energy will be transferred to the air from hot smoke.
- The fireplace body is involved in three methods of heat transfer at once.
Power calculation
A light fireplace stove for a country house consists of a firebox and a frame called a portal. Understanding that the installation process would take a lot of effort and money, we wanted to end up with not only a beautiful interior element, but also an element of the home heating system. Heating is planned for a while, but warmth on cool autumn evenings is always very welcome. It was clear that one firebox could not cope with heating the entire area, so the plan was to heat at least the first floor.
Having studied materials from construction portals, we realized that 1 kW of furnace power is designed to heat 10 square meters of area. And since our house has an area of 160 square meters, then, based on half, the firebox should be from 8 kW and above.
How to install it yourself?
Unlike ordinary stone fireplaces, installing a fireplace stove does not require special knowledge in construction or lengthy preparation. Installation of the heating device is carried out in several steps:
- The location for installation is selected. The distance to flammable objects must be maintained in accordance with the instructions.
- is made in the ceiling above the stove to ensure fireproofing of the area.
- A double-circuit pipe with an adapter is installed in the hole . Such a pipe can withstand strong thermal loads.
- Using a single-circuit pipe, the double-circuit pipe is connected to the stove .
- A roof trim is installed on the roof to protect against leakage.
- A special chimney with an umbrella to prevent rain and snow from getting into the fireplace.
- Aesthetic preparation of the fireplace by painting with heat-resistant paint.
The whole process is quite simple and takes from one to four days . If you have basic knowledge in construction, installing a fireplace yourself will not take much effort and time.
Tools
To install a heating device you will need a standard set of tools. The following may be useful for installation :
- hammer;
- screwdriver;
- perforator;
- Bulgarian;
- putty knife;
- adjustable wrench;
- scissors;
- hydraulic level;
- container for solutions.
These tools are essential for a quick and efficient installation.
In addition to tools, it is necessary to prepare in advance the building materials that will be needed for installation. Basic building materials :
- heat-resistant sealant;
- self-tapping screws;
- mineral or plasterboard sheets with fiber filling;
- ceramic tile;
- metal profiles;
- foiled mineral wool;
- heat-resistant mixture.
When purchasing materials for installation, you should not save money . High-quality materials will ensure the reliability and longevity of your design.
Which location should I choose for the stove?
Proper placement of the fireplace stove guarantees good heating of the entire room. During combustion, the device heats up to 400-600 degrees , and thanks to the metal structure it provides strong heat transfer.
This property requires the absence of masonry or other screens between the stove and the room.
For the correct location of the heating device, it is recommended to draw a plan showing the location of doors and windows.
This will help to approximately calculate the movement of the draft during ventilation. To retain heat, the stove should be located in a place least affected by cold air flows.
What to do before installation
Before installation, it is necessary to completely clear the area and prepare the floor covering on which the device will be installed.
Important! One of the advantages of a fireplace stove over a stone stove is the low installation cost. Most models do not exceed a weight of 200 kg - this allows you to install the stove without additional brickwork.
To ensure the protection of the floor covering, it is enough to use liner sheet , which is made of non-combustible materials and provides heat resistance. ceramic tiles are laid on top of the sheet , which provides protection from fallen embers and warm air flows, and also adds aesthetics to the appearance of the fireplace.
Step-by-step description of the process
To obtain a reliable and safe design, it is necessary to perform all installation steps sequentially.
Installation of the device proceeds as follows :
- Calculations . It is necessary to study all the dimensions of the stove and chimney, and plan in advance the location and possibility of caring for the fireplace.
- Preparing the installation site. The distance between the stove and flammable objects must be at least 1 m. The distance can be reduced if the surface of the walls is protected with gypsum or metal sheets.
- Cutting a hole in the ceiling for the chimney. To improve the aesthetics of the appearance, you can install a decorative plate that will bridge the gaps between the chimney and the opening.
- Installation of thermal insulation . Metal profiles are attached, onto which a plasterboard or mineral sheet is mounted. A layer of foiled mineral wool is placed between the sheet and the wall.
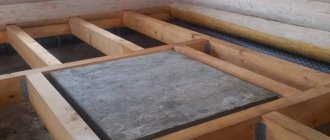
Photo 2. The stove installation process is in full swing: the outlet hole has been cut, the installation of thermal insulation is being completed.
- Arranging a passage opening . It is also lined with foil wool or other heat-resistant material.
- In accordance with the instructions, all pipe elements are assembled and fastened . The distance to the combustible structure when passing through the ceiling must be at least 10 cm.
- Decorative decoration . Insulated sheets and the floor can be decorated with decorative stone or ceramic tiles, and lighting can be added to the ceiling, which will enhance the atmosphere of coziness and comfort.
Types of foundations for a stove in a wooden house
There are several types of foundations used for furnace equipment, each of which has its own characteristics, design and operation features.
When choosing a suitable foundation, consider the following:
- Installation cost – the price of building materials, installation and preparatory work is taken into account.
- Characteristics of the foundation and soil characteristics - the choice is based on the total weight of the structure, the type of soil (clayey, sandy, black soil, stone).
- Dimensions of the foundation for the stove in the house - depending on the area occupied by the stove equipment, the total weight of the structure, the required type of foundation is calculated.
Additionally, several other factors are taken into account. The choice of foundation is influenced by the time of manufacture of the foundation (in an already finished building or simultaneously with the construction of the house), the qualifications of the craftsman, weather conditions, speed of work, etc.
All existing foundations are usually classified into several groups:
- On stilts and pillars.
- Concrete bases.
The stove, subject to certain conditions, can be installed directly on the floor.
Foundations on piles and pillars
Pillar foundations were first used in areas with a high probability of flooding and the absence of shallow dense soil. Piles are widely used in the construction of multi-storey buildings. Pile foundations in their design are somewhat reminiscent of a table with legs.
The base is made in three ways:
- Screw piles are a method that requires material investments. The advantage of using screw piles is the speed of installation. During installation, a worker drives a steel screw into the ground. The steel pillar will be the basis of the future foundation. The piles are tied together, after which a concrete pad is poured on top. The work only takes 1-2 days. You can even put a heavy cast-iron stove lined with brick on a screw foundation. The only drawback is the limited service life. The steel base rots after 50-60 years of use.
- Bored piles - in this case, holes of sufficient depth and diameter are drilled with a drill. The resulting cavity is reinforced with a mesh to prevent soil from falling out. Knit a reinforcing structure. After reinforcement, the pillars are filled with concrete mixture.
- Columnar piles - the process of installing the foundation is the same as in the case of using bored structures. The difference is that ready-made concrete or wooden pillars are used. Massive structures with a large weight load are installed on a columnar foundation. This is the design that is used in the construction of multi-storey buildings.
If you want to make a foundation for a stove in a wooden house with your own hands, without involving outside help, it is better to choose a pile structure, which is easy to install and does not require (with the exception of a screw device) serious material investments.
During installation, the foundation is insulated, thereby preventing the appearance of condensation on the walls of the furnace or cladding. Pillars without insulation will be “cold bridges,” which will negatively affect the operation of furnace equipment.
Concrete bases
The most common type of foundation used for furnace installations is a monolithic foundation made of concrete with mandatory reinforcement.
Advantages of the device: ability to withstand heavy loads of strength, possibility of self-production, relatively low financial costs. Cons: time required for installation and excavation work.
Concrete foundations are made in two ways:
- Strip foundation - a trench is dug along the perimeter of the structure below the freezing point. A metal frame made of reinforcement is installed. The structure is poured with concrete. The strip foundation of the stove cannot be connected to the foundation of the house. The foundation of the building is squeezed out of the ground in winter. The intensity of the “walking” of the walls, the rise from the ground varies, reaching 20-30 cm. If you make a common foundation, this will lead to the destruction of the brick cladding, and often to the deformation of a steel stove decorated like a brick. In any case, SNiP imposes a strict ban on making a common foundation for a stove and a residential building.
- Concrete slab is another popular solution. The slab is poured with a thickness of 15-20 cm. If installed correctly, the result is a monolithic base that can withstand almost any load. To level and evenly distribute the weight, you will need to make a gravel-sand cushion under the foundation. The layer is thoroughly compacted with plenty of water. After filling, a layer of waterproofing is laid, beacons are placed, along which a concrete screed is poured. To prevent the slab from cracking, freshly poured concrete is covered with oilcloth. The base is watered for 2 weeks.
The foundation gains strength gradually. Installation of a metal furnace and lining it with stone begins no earlier than 28-30 days after pouring the concrete.
Floor placement (floor installation)
Installing a steel stove or installing a cast iron stove in a wooden house with your own hands can do without the need to make a foundation, provided that the total weight of the heater with cladding does not exceed 750 kg.
Existing building codes for installing a home heating stove in a wooden house allow the installation of equipment that does not have cladding directly on a wooden floor. When installing on the second floor, you will need to strengthen the logs with metal corners and channels.
To prevent fire, the tree is protected with a metal sheet or a clay-brick layer. Otherwise, installing a wood-burning stove in a wooden house yourself is not difficult.
Manufacturers of heating equipment must provide detailed installation instructions. By following the recommendations and the step-by-step installation plan specified in the technical documentation, you can independently install the stove and connect it to the chimney.
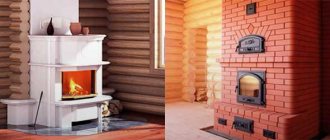
Varieties
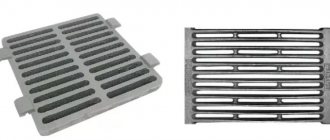
The material of manufacture determines two types of furnace units - brick and metal. The brick oven is made of refractory fireclay bricks and lined with ceramic. The metal structure can be made of different metal alloys.
The most accessible option is to install an iron stove in the bathhouse. The metal warms up quickly with low fuel consumption. The weight of the stove structure varies depending on the dimensions of the firebox and heater, on average 100 – 400 kg. A cast iron stove is characterized by heavy weight and increased heat accumulation.
READ MORE: How to make a wooden floor in the kitchen question
The advantage of such units is obvious:
- economical and fast installation;
- low labor costs during installation;
- compact size and weight;
- the tightness of the structure increases safety and reduces the leakage of carbon monoxide.
The disadvantage of using a metal stove is the rapid cooling and uneven heating of the room. When fuel burns, the metal quickly cools and stops giving off heat.
The stove heats up to 500 degrees, which can lead to burns if touched carelessly
The further the distance, the lower the temperature. Disadvantages can be neutralized by installing a brick case.
Brick furnace structures do not have the negative aspects of metal units. Uniform and long-lasting heat will remain for several hours after heating. But to heat a brick oven, you will need a lot of firewood and at least 2 hours to heat the brick.
The skill of masonry, the preparation of a solid foundation and its impressive size pose a challenge when installing a brick stove.
Depending on the location of fuel loading in the furnace design, there are separate types of heating units:
- Fuel loading is carried out from the steam room. When installing oven equipment in a steam room, proper installation and additional ventilation are required. If the bathhouse is made of timber, then the stove is placed according to fire safety rules. When the firebox is open, oxygen burns out from the room, so you need to ensure high-quality ventilation. The advantage of placing the stove in the steam room is constant control and the ability to quickly regulate heating.
- The furnace firebox is located in the dressing room. This location is relevant for a wood-burning stove. This is optimal from the point of view of cleanliness and ease of fuel loading. In this case, it is planned to erect a frame wall between the steam room and the dressing room.
- Fuel is supplied from the street. This option is suitable for mini-baths or seasonal summer cottage buildings when heating with coal. Fuel is loaded from the street side, which can cause inconvenience when loading and monitoring the stove.
Furnace structures can be of various shapes - cylindrical, rectangular, barrel-shaped, with high or low sides. In addition to the firebox, the design of the stove may include a tank for heating water and a container for the heater.
Brick laying process
To obtain even rows, stretch the thread from one edge to the other; you can also control the brick row with a long level. Clay or special stove mortar is placed using a trowel, although some experienced stove makers carry out a similar operation simply with their hands. The mortar is taken with the right hand, a wet brick is held in the left hand, and the area prepared for the brick is smeared with the mortar. The brick itself is also completely covered with mortar, except for the top “bed”. The mortar is also applied to the edge of the adjacent brick, and the inserted brick is pressed into the masonry with the right hand. Excess mortar can be trimmed with a trowel. (See also: What is the temperature in the oven)
Gas outlet options
Smoke removal depends on the fireplace insert in combination with the flue storage system. The following versions exist: Fireplace insert with cast dome. Recommended for connection to an air storage system with an internal diameter of 180 mm. Fireplace inserts with heat exchanger. Recommended for direct connection to pipes with an internal diameter of 200 mm. Fireplace insert with 45° heat exchanger. Recommended for direct connection to pipes with an internal diameter of 200 mm. Fireplace insert with a heat exchanger with a vertical outlet. Recommended for connection to a storage air duct system or for direct connection to a chimney. Fireplace insert for connecting accumulative rings. Recommended for connection to storage rings with an outer diameter of 440 mm. Fireplace insert with cast iron smoke collector. Recommended for direct connection to pipes with an internal diameter of 200 mm. The fireplace insert is right-handed. Recommended for lateral connections with pipes with an internal diameter of 200 mm. The fireplace insert is left-handed. Recommended for lateral connections with pipes with an internal diameter of 200 mm.
Selection and types of devices
A stove in a wooden house not only performs a heating function, but it can also be used for cooking, heating water and food.
The first is a heating option, and the second is a cooking option. Depending on what goal you are pursuing, you can choose between a fireplace or a stove. The fireplace wins from an aesthetic point of view, but practicality is the main feature of a traditional stove. A fireplace cannot replace a stove, as it ventilates rather than heats the room. But a clear advantage is the ability to observe long-term combustion and the type of flame. A difficult decision in choosing the type of heating is the combination of a fireplace and stove. True, it will be more difficult to make such a system correctly with your own hands. Installing stove appliances will require care and precision, especially at the junctions of the stove and oven. You can also use the services of a stove maker at your dacha if you discuss the details with him in advance so that you don’t have to wait a long time.
The stove in a wooden house can be either a purchased metal potbelly stove or a brick one. When choosing among them, consider the disadvantages and advantages of each type.
A metal stove has the following advantages:
- long service life;
- quickly heats the room;
- unit of reliable design;
- any fuel is suitable for heating a potbelly stove;
- the temperature can be controlled by installing oven devices;
- reasonable price for potbelly stoves.
The fact is that rapid cooling is directly proportional to heating, and this is one of the disadvantages of metal structures. They need to be looked after. For a large room this type of heating is not economical. It will be more difficult to use it for cooking purposes if there is no stove.
It is more appropriate to install a brick oven at the dacha because of its undeniable advantages:
- If the stove is installed correctly, it will heat any area.
- Fire safety is higher compared to its metal counterpart, even with prolonged burning.
- The heat is retained for a long time.
- Additional protection of walls and ceilings is not required.
Laboratory and practical work
The stove making training program includes laying models of stoves, fireplaces and barbecues according to the drawings attached to this manual. When laying exact copies of furnaces, knowledge of the entire complex of furnace work is acquired. The models of all furnaces being studied for correspondence education must be folded several times according to the drawing, until it becomes possible to fold them without a drawing in several options - with a change in the location of the firebox, cooking floor, pipe channel, etc. During the period of learning the stove business, one masters such a number of different types of stoves and fireplaces that it will take many years for novice stove makers and practitioners, inevitably making various kinds of mistakes, often leading to reworking their work.
| Layout of the model according to project No. 155 Fireplace stove - 3000 | Laying a fireplace stove according to project No. 155 |
| Layout of the model according to project No. 226(A) BBQ fireplace | Laying a barbecue fireplace according to project No. 226(A) |
| Layout of the model according to project No. 202 POV - 2200 barbecue | Furnace laying according to project No. 202 |
Installation requirements: safe installation of the fireplace
Before deciding how to install a classic fireplace in a wooden house, you need to make sure that all installation safety requirements can be met. An open hearth should be a source of heat, not problems.
There are special requirements for the installation of fire hazardous appliances in wooden houses.
General safety rules for installing fireplaces in wooden houses
Those who decide to build a real brick fireplace will have to check the project’s compliance with 10 basic requirements for fireplaces in a wooden house:
- At least 12 months must pass from the date of construction of the house.
- The optimal interval between the completion of construction and the installation of a stove or fireplace is 36 months - this is how much time should pass for wooden structures to become stable and natural shrinkage to complete.
- Installation of open fireboxes on upper floors and attics is prohibited.
- The structure cannot be installed on a wooden floor.
- The foundation for the fireplace must be poured in isolation from the foundation of the house.
- Construction of a chimney is mandatory.
- All wooden surfaces located near the stove or fireplace must be insulated from overheating and sparks.
- You cannot install fireboxes near windows with curtains or drapes, or place upholstered furniture or textile decor near the fireplace.
- The firebox must be equipped with a removable screen.
- There must be a working fire extinguisher in the room at all times.
Can't meet all the requirements? Give preference to safe electric fireplaces, especially if you plan to install them in the attic, on the second floor of a house with a wooden floor.
Beautiful and safe: an alternative to standard stoves
Surface insulation: how to protect wood from fire
Those who decide to build a classic brick fireplace will have to take care of protecting wooden surfaces. The main tasks are to prevent heating of the walls and ceilings, to protect the floor and walls from sparks that could fly out of the firebox.
Wall insulation scheme
Basic insulating materials for wooden walls:
Basalt wool.
Plates of different thicknesses
Mineral sheet insulation with a heat-reflecting screen - sold in sheets.
Rolled non-flammable insulation.
Heat-resistant synthetic foil insulation
Brickwork: instead of sheathing with sheets, you can lay out part of the wall with half-brick masonry.
You can protect the floor made of parquet or deck boards with steel sheets or stainless steel, or line the area in front of the stove with porcelain stoneware, ceramic tiles or facing stones.
The chimney passing through the ceiling is insulated with rolled fire-resistant wool with foil film.
Combination of materials
Quite an interesting result can be obtained by combining different finishing materials.
This technique allows you not only to create a unique appearance, but also saves on materials. You will be able to use cheaper finishing options for parts of the stove that are subject to less wear. This question interests home craftsmen who decide to lay a stove or fireplace. It is also very relevant for everyone who has stove heating in their home. Finishing the hearth with simple plaster is not highly aesthetic and after ten years of use requires replacement.
Of course, cracks and peeling of the finishing layer can be repaired. However, after such a procedure, the stove does not look its best and after a short time begins to crack again.
We will tell you how to cover a stove or fireplace so that it looks great, gives off heat well and does not require repairs for a long time.
Installation of stove and chimney
The installation of a metal stove itself is not difficult. The main thing is to strictly follow the recommendations in the instructions supplied with the equipment, and also to align the structure at a horizontal level. In this case, the minimum distance specified above must be observed from the wall.
Advice!
Before installing the device in the house, it is recommended to carry out the first firing in the yard so that the thermal paint that covers the stove outside and inside is firmly fixed and loses its specific smell.
After installing the stove, the chimney is connected. The most successful option for a wooden house is a sandwich chimney. There is a heat insulator between the two layers of steel that it is made of, so the outer surface does not get too hot. Other advantages of chimneys of this type include the fact that they are not prone to condensation and less soot accumulates in them.
If the pipe is made of stainless galvanized steel, then it must be insulated with non-combustible material. But, despite the presence of insulation, the chimney, according to safety regulations, must, like the stove itself, be located no closer than 38 cm from the wall.
The rules for installing a chimney are as follows:
- In order to make chimney passages through the ceiling, a factory-made cutting (special box) is used. This type of cutting is called interfloor or attic.
- The box should be selected so that the diameter of its hole matches the outer diameter of the pipe.
- A square hole should be cut between the beams, the size of which should correspond to the square part of the cutting. You can make this hole a little larger so that you can metal it with two layers of basalt wool.
- After this, the assembly of the chimney begins. A pipe must be connected to the chimney outlet, which is located on the top or rear surface of the housing. A slide valve is mounted above, which is designed to regulate draft.
- To create hermetic connections, special heat-resistant compounds are used. If it is necessary to create a connection between pipes of different diameters, special adapters (so-called glasses) are installed. You should not make a chimney with a large number of turns - fuel combustion products will accumulate in them.
- Next, the chimney is passed through a box in the ceiling, and the space between the cutting walls and the pipe is filled with basalt fiber.
Exploitation
During the first start, a chemical smell is felt. This is the burning of oils and lubricants. Then, everything went away. Heating was carried out regularly throughout the summer season. They burned with briquettes and wood. During all this time, it was overheated only once, after which the steel changed its color to bluish. After reading on the Internet, we concluded that this is a common option.
The structure has been standing quietly and working properly for a long time. Glass can be easily cleaned with wet newspaper soaked in ash, without any chemicals. The contractor was left with positive feedback and given the best recommendations. The cost of the entire installation with work and materials was as of September 2022. 74,000 rubles.
Since we are building a house for ourselves, trying not to attract borrowed funds, the process is not moving very quickly. Over the past period, other large-scale work has been completed, so the external finishing of the box is still in the plans.
Despite the fact that installing a fireplace is a difficult, slow and expensive process, the installation was worth all the costs. It's nice to sit near the fireplace, warm your feet and enjoy the cozy warmth, listening to the crackling of the firewood.
We thank Irina from the Moscow region for the material provided, who together with her family is building a warm and cozy frame house. You can read the story with a photo report about the cladding of this house here.
Follow new materials on the website GreenSector.ru so as not to miss interesting stories about country construction and site development!
Protective cladding for walls and ceilings
The walls directly adjacent to the stove, as well as part of the ceiling along the passage of the chimney, are subject to significant thermal loads.
Therefore, before installing a stove in a wooden house, you need to fulfill a number of prerequisites:
- The ceiling lining is made of non-combustible material. Wooden or plastic panels are not used. It is best to purchase gypsum fiber boards treated with gypsum putty for painting.
- The walls must be protected with a layer of basalt cardboard and covered with a sheet of steel. As an option, you can use ready-made decorative stainless steel screens. These products are able to provide safety and are distinguished by external beauty. In addition, the walls can be plastered with a layer of 3 cm or more, and also lined with brick (read: “How to line a metal stove with brick in a house - a step-by-step guide”).
Fire safety rules for installing iron stoves in wooden houses are described in more detail in SNiP 05/31/2003 and SP 118.13330.2012.
Adjacent to the wall at one of the ends
Such models are recommended for fairly large or medium-sized rooms. By making a similar fireplace in your home with your own hands, you can zone the room or reduce the size of the passage between separate rooms.
A special feature of this option is the possibility of installing a through metal firebox with two-sided or three-sided finishing with heat-resistant glass. In addition, you can make a firebox on one side and decorate the back with natural stone.
In small rooms, you can also build a fireplace with your own hands, adjacent to the wall at the end. In this case, it allows you to divide one room into two functional zones, making your stay more comfortable.
Treatment of wood against fire
Additional means of protecting wooden structures located in the immediate vicinity of an iron stove are fire-retardant impregnations and mastics. Beams, load-bearing structures, floors and walls adjacent to the furnace are subjected to this treatment. Mastic has a higher level of fire protection, and the impregnation is almost colorless.
Fire retardant treatment can be carried out by both representatives of the Ministry of Emergency Situations and the owners of a wooden house. In the latter case, before starting to operate the stove, it will be necessary to obtain a certificate from the inspector of the Ministry of Emergency Situations about the compliance of its installation with the requirements of the safety regulations.
All leading European and Russian manufacturers of solid fuel stoves describe in detail the rules for installing equipment and fire safety requirements in their technical documentation.
How to protect a country house from fire when installing a stove
Fire regulations require protection of walls and floors made of combustible materials when using solid fuel heating equipment. Fire prevention measures include:
- Use of thermal insulation materials with a high degree of fire resistance to protect walls and ceilings at the installation site.
- Application of fire protection: impregnations and mastics.
Safe installation of the furnace and the use of fire prevention products are a mandatory requirement for the operation of furnace equipment.
How to cover the walls and ceiling when installing an iron stove
The part of the ceiling located above the stove and at the point where the chimney passes, as well as the adjacent walls, experience severe thermal stress. The following fire safety conditions and measures are considered mandatory:
- The ceiling is made of non-combustible materials. The use of wooden and plastic panels is not allowed. It is optimal to use gypsum fiber boards treated with gypsum putty for painting.
- The walls are protected with basalt cardboard followed by sheathing with steel sheets. For convenience, we use ready-made protective decorative wall screens made of stainless steel, which have a beautiful appearance and provide a high degree of safety. The walls are protected with plaster with a thickness of at least 3 cm, as well as brickwork.
Fire safety requirements for installing a metal stove in a wooden house are described in detail in SNiP 31-05-2003 and SP 118.13330.2012.
Fire retardant treatment of wooden structures
Where the stove is installed, wooden walls are protected using fire retardants: mastics and impregnations. Load-bearing structures and beams must be processed. Fire retardants are applied to the walls and floors where the furnace equipment is installed.
Mastics and impregnations have been developed for protection. The former provide better fire protection, the latter are almost colorless.
The order of installation regarding fire safety measures specified by the manufacturer is specified in the technical documentation. Fire protection work is carried out by representatives of the Ministry of Emergency Situations. You can take measures to prevent fire yourself, but before putting the stove into operation, you will need to obtain a certificate from the inspector of the Ministry of Emergency Situations about the fulfillment of all requirements of the safety regulations.
Detailed parameters for installing a solid fuel heating country stove are described in the technical documentation attached to the heaters of leading European and Russian factories. Compliance with the described rules is mandatory.
Small brick stoves without a foundation are great for country houses or temporary buildings, especially if the building is already ready, and there is no way to build a foundation for the stove in it. You can install a small stove on a regular floor, even a wooden one, as long as it is made of thick enough boards. Being equipped with a cast iron hob, it can be used not only for heating, but also for cooking. At the same time, this unit is more convenient to use than steel stoves, since it emits heat softly and can accumulate it in sufficient quantities (you have to add firewood less often).
It is not always possible to allocate space for a stove foundation, but there are stove options where a foundation is not required.
Many owners of already built country houses do not dare to build such a unit due to reluctance or lack of opportunity to build a foundation for the stove. In such a situation, you can build a miniature brick oven without a foundation.
Construction of a ceramic smoke channel
The most reliable and safe option for installing a chimney in a wooden house is a construction made of ceramic blocks. Its outer side practically does not heat up, which means there will be no problems with passage through the ceilings.
Let's consider the sequence of assembling a smoke channel from components of the German brand Schiedel Rondo Plus:
Let’s immediately make a reservation that the main one is constructed from ceramic modules, i.e. a separate pipe for which a separate foundation is arranged.
All technological holes are cut out along the construction site. Cutting is done with a regular grinder with a diamond blade.
To make geometrically accurate holes, the ceramic chimney kit includes a template. Further:
The ceramic chimney is assembled in a standard manner: modules are built up one after another
However, it is worth paying attention to the specifics of passages through the attic floor and through the roof
In our example, the chimney and ventilation riser are located next to each other, which is why we had to slightly trim the rafters:
We also have another article on our website containing step-by-step instructions on how to build a ceramic chimney, attach it and decorate the outside.
Video description
This video clearly shows an example of violation of the rules for installing a sandwich chimney:
- The position of the pipe is not observed. It is installed strictly vertically. When insulating main walls with foam plastic or mineral wool, long dowels are used to secure the chimney.
- There is no ebb on the side roof slope. In this case, precipitation can get on the insulation and impair its functions.
- Insufficient overall vertical height. This error leads to poor traction.
Problems arise when using low-quality insulating material. Cheap insulation shrinks over time, so there is a possibility of local overheating of some parts of the chimney.
Tips for installing a fireplace chimney
Chimneys for a fireplace are easier to install than chimneys for stoves. Typically, this is an almost straight vertical pipe that runs from the fireplace insert to the roof. If you need to make a branch or tie-in into a common chimney, then the elbow is mounted at an angle of no more than 45º.
The diagrams of all fireplace chimneys are similar, since the system works on the same principle.
Brick chimneys are not practical, since more soot settles on these chimneys and the draft is worse.
At the moment, stainless steel sandwich pipes with a thermal insulation layer are used to install the chimney. Installing a chimney from such pipes is much cheaper, plus any home craftsman can do it.
The basalt layer in sandwich pipes protects the chimney channel from condensation.
A sector of a regular (not insulated) pipe is installed directly above the fireplace insert; in advanced models, this sector can be equipped with an adjustable smoke damper. An insulated pipe is already installed on top of it.
A draft regulator is necessary in any chimney.
To connect the insulated and non-insulated parts of the chimney, a special adapter is used; it prevents the basalt layer from “sliding” down and ensures the tightness of the system.
It is impossible to assemble an insulated chimney without a transition washer.
Remember - all joints and connections in the chimney must be coated with heat-resistant sealants, and where this is provided, the pipe is also secured with a metal clamp.
All connections in the chimney must be sealed.
The box for the chimney pipe, which we mounted directly above the firebox, is not only made for beauty; with the help of this thermally insulated chamber, you can easily redirect the flow of warm air to neighboring rooms or to the general ventilation system.
Scheme of heat redistribution in the fireplace.
In order to ensure good draft in the chimney, the pipe must be correctly mounted on the roof. The higher the chimney, the better the draft, but it is not always possible to install a high pipe; for such cases there are minimum requirements, which are reflected in the diagram below, the data is indicated in millimeters.
To ensure good draft, the chimney on the roof is installed according to certain rules.
Design Features
The main feature of the design of a furnace with a remote firebox is the independence and autonomy of the latter from all other elements. The remote combustion channel is welded to the main structure if it is light, or removable if it is heavy. Thus, the firebox with the door is located through the wall in the adjacent room. It is usually made in a rectangular or square shape; it is slightly wider at the place where the door is attached. There are models in which the external channel is located not in the next room, but on the street. This option is not very common, it is found mainly in commercial saunas, where one person looks after the firebox without the need to enter the sauna room itself. This model of heater can be made of metal or brick, but more often there is a combined option - a metal body lined with brick.