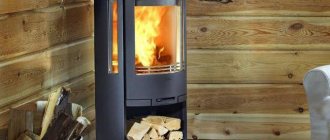
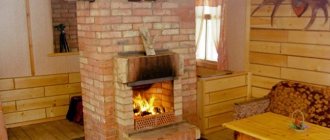
At a certain stage of building a steam room or sauna in a country house, you will need to choose a heating method and equipment for heating the room. There are not many options, installing electric heating elements, building a brick stove or installing a boiler in a bathhouse with your own hands. The difference between them is quite significant, so before buying equipment, it makes sense to figure out whether the option of installing a boiler in a bathhouse is better or worse than traditional stoves.
The use of a water boiler is economically justified; in addition to a bathhouse, the device will easily provide heat for a summer kitchen and a country house
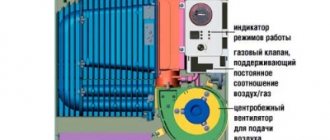
Gas heating system
When connected to a gas main, heating a bathhouse with gas is the fastest and most efficient option for the system.
The system has two implementation options:
- traditional heater equipped with a gas burner;
- gas boiler with installation of heating radiators and water pipes.
The undoubted advantage of such heating is the absence of unpleasant odors, the formation of soot and soot. At the same time, gas equipment has a compact body, low weight and does not require much space during installation. The power of a standard boiler reaches 45 kW, which is enough to heat a room up to 280 square meters. m.
Summarize
Modern sauna boilers are sold in stores in a wide variety. Unfortunately, among a large number of models you can find too expensive options that are unaffordable. There are also economical options, but they are of poor quality, primarily due to the use of cheap material. As a result, it is the independent manufacture of boilers and their installation with your own hands that are becoming increasingly popular, especially considering that this is a fairly simple job if you prepare for it correctly and use all the useful recommendations.
Bath boiler - device
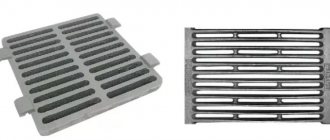
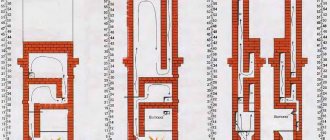
This sauna structure is a small stove made of cast iron or steel. Inside there is a firebox, which is separated from the ash pan by a grate. Through the grate, air enters the firebox where the wood burns. The grate also performs another function - through it the ash enters the ash pan, from where it can be removed without much effort.
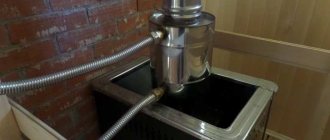
The firebox is connected to a chimney pipe to remove combustion gases. The oven also has a lid on which the stones are placed. Many boilers also have a built-in water heating tank, which is located above the firebox. The water in this tank is heated by the heat released as a result of burning fuel in the firebox.
Chimney installation
Popular material options for chimney pipes:
- stainless steel;
- fire brick;
- ceramics;
- sandwich pipes.
Sandwich pipes have a layer of heat insulator inside.
Thematic material: “How to properly assemble a chimney.”
Metal sauna stove
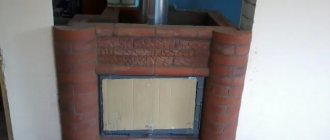
To achieve good steam in a sauna, you need a good brick stove. It will keep you warm for as long as possible. However, such a furnace requires a serious foundation. This requires additional money and time.
In order not to spend money on pouring the foundation, you can make a metal stove yourself. Creating such a furnace does not require an in-depth study of the circuits, and its effectiveness has been proven in practice.
Although a metal stove heats up quickly, it cools down just as quickly. This is its main drawback.
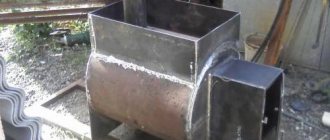
In order to assemble such a structure, you will need a metal container, sheets of metal or pipes of various diameters, a gas burner, an angle grinder, and a welding machine. Those who do not know how to use a welding machine can make a body from an ordinary pipe. This will not make the stove any worse.
Gas cylinders and pipes can be selected in other sizes. The size of the required parts depends on the size of the heated steam room. If its area is large, then it is worth making the stove larger. She will cope with her task as efficiently as possible
The result will be a stove about 80 centimeters wide and about one and a half meters high. A heater and platforms for installing a container with water are mounted on top. Thus, to create a steaming atmosphere in the steam room, you will need to pour water on the stones.
When drawing up a conditional drawing, you need to take into account the exact dimensions of all parts. Initially, you need to find a pipe or gas cylinder with a height of 180 centimeters and a diameter of 80 centimeters. In this case, the walls of the pipes must be quite thick - from 0.4 cm or more.
You will also need a metal sheet one centimeter thick, a steel rod with a diameter of one centimeter, cast iron or steel doors, a chimney pipe, a gas burner and a tap. All material can be purchased at a hardware store. You will also need tools: a grinder and a welding machine. You can rent them or borrow them from friends.
First of all, the base is prepared at the place where the metal stove will be installed. It needs to be made even and level. It is necessary to cover the foundation with fireproof material.
Two rows of refractory bricks are laid on top. Do not forget that the ceiling and all walls at a meter distance from the stove must be covered with fire-retardant material.
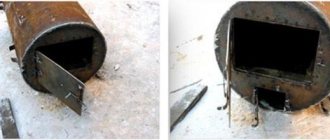
The manufacture of the furnace is carried out in several stages. First you need to cut the pipe into two parts with a grinder, one of which will be the furnace body, and the second will be used to heat the water barrel.
In the lower part of the first section of the pipe, a rectangular hole measuring 20x5 centimeters is made with a grinder. This method provides access to the gas burner.
The vast majority of gas furnaces have approximately the same structure and sequence of assembly and installation. The water tank is installed on top or welded to the side. If you want to install an advanced model, you can additionally install a number of elements and devices that will automate the control of the furnace
In the middle of the first section of pipe, another rectangular hole of the same dimensions is cut. The brackets on which the mesh will be held are welded. The mesh cells should be smaller than the size of the stones that will be laid on it.
A tap is welded at the bottom of the second pipe. Then the second piece of pipe is attached to the heater. In this case, it is necessary to check the seam for leaks. Next, you need to weld one door and hang the second on its hinges.
The pipe is insulated using refractory bricks or other material. After welding all the elements, the burner is installed and the stove is ready for use. It is worth remembering that a metal oven heats up to high temperatures, so it is imperative to cover all nearby surfaces with refractory material.
Assembling a gas stove for a sauna with your own hands is not difficult. To implement such an idea, you need to observe safety precautions and follow recommendations. Thanks to self-assembly, you can save a lot of money, and the efficiency of this design is not much inferior to store-bought models. Before you start assembling the stove, you need to carefully prepare the room.
Video description
One of the options for how to install a stove in a bathhouse on a wooden floor, how to finish the floor and walls, is shown in the video:
Such protection should be larger than the dimensions of the heating unit by 5-10 cm on the back and sides and protrude beyond the firebox by 40-50 cm to prevent accidental fire from falling coals.
Making a concrete foundation
If calculations have shown that you need a foundation for an iron stove in a bathhouse, how to do this work yourself? This depends on whether there is already a floor at the installation site or its arrangement has not yet begun. In the first case, the flooring will have to be disassembled and re-installed after pouring the foundation. It may be necessary to rearrange the joists or lay additional ones around the perimeter of the concrete base.
It is necessary to lay logs under the ends of the flooring boards around the stove. Source pechkur.ru
- The dimensions of the foundation in plan should be 10-15 cm larger than the dimensions of the stove. And if it is covered with a brick screen, then it will protrude beyond the masonry by the same distance.
- After marking, soil is selected inside it to a depth of about half a meter, making the walls vertical. At the same time, make sure that the pit does not adjoin closely to the foundation of the bathhouse: there should be a minimum distance of 5 cm between them.
- Therefore, if the stove is located near a wall or in a corner, fifty-fifty boards are laid between the main and stove foundations to ensure the necessary clearance and independent settlement. If not left in place, uneven settlement may cause the base under the stove to crack or become deformed.
- Crushed stone or a sand-gravel mixture is poured into the bottom of the mini-pit, making a cushion 20-25 cm high.
Pit for pouring the foundation Source homerenovates.com
See also: Catalog of companies that specialize in the installation of stoves and fireplaces
- Next, the formwork is lowered into the pit, the walls of which should be of such a height as to slightly not reach the level of the finished floor. And concrete is poured into the formwork, which is prepared from 1 part cement and 3 parts sand and filler (crushed stone).
- If the base is made for a heavy structure, it needs to be reinforced, since installing the stove correctly in the bathhouse is not enough - it needs to be prevented from “moving” over time due to a weak foundation.
- The base is left to dry for at least 2-3 weeks, periodically spraying the surface with water.
- The final stage is waterproofing the surface with roofing felt and laying bricks on it. Using brickwork, the base is raised to the required height and leveled in a horizontal plane.
Ready base Source oteplicax.ru
Types of boilers for baths
It should be said that designs can be differentiated depending on the fuel used:
- Solid fuel installations that operate on coal, peat, wood and other similar types of fuel;
- Electric boilers are the safest designs, as they have a much lower risk of fire. In addition, such installations have a main advantage over others - there is no need to ensure that the fuel does not run out. Simply plug the device into a power outlet and turn it on;
- Gas boilers are also quite economical; in addition, such designs are produced assembled with a water tank. The main thing in this case is to correctly calculate the power of the installation;
- Liquid fuel boilers operate on waste oil, kerosene, diesel fuel and other liquid fuels.
When choosing the material from which the boiler will be made, certain points should also be taken into account. For example, cast iron boilers are not suitable for installation directly in a steam room, since due to increased humidity they can simply burst. A separate room will have to be made for them, which is not very advisable in an ordinary bathhouse.
In this regard, it is best to install boilers made of the following materials directly in the steam room:
- Metal;
- Brick;
- Metal lined with brick.
If we talk about tradition, large brick stoves were built in the baths, but now, thanks to modern technologies, today it is possible to build a small boiler, especially when using metal. It is worth saying that not every person is able to purchase a boiler made at a factory, so you can make it yourself.
You need to decide on the fuel that will be used in the boiler. Gas and electric installations should not be assembled yourself - such installations are purchased ready-made. Neither electricians nor gas workers will allow you to install similar homemade boilers yourself, as this can lead to an emergency. The easiest way is to make a boiler that runs on solid fuel.
Preparing for installation
There is no need to rush to install the new unit in place. Before placing the stove in the bathhouse, you need to heat it well in the open air by loading the heater. This is done for two reasons.
Firstly, the paint that covers the metal body finally sets only at high temperatures. At the same time, it partially burns out and releases an unpleasant odor.
Secondly, bath stones often contain sulfides, which decompose at high temperatures into sulfur oxides. In turn, when combined with water they turn into acids. Sulfuric acid fumes don't just smell bad - they are very dangerous to health. But sulfides burn out quite easily, so it is advisable to heat the stove outside until the smell of sulfur completely disappears.
This is what a stone with sulfide inclusions looks like Source parilochka.com
Helpful information. Stones on which inclusions of sulfides occupy no more than 5% of the total surface area are considered safe. They burn out completely in 1-2 firings.
If the task is how to install a stove in a bathhouse with a firebox from a dressing room with your own hands, then if there is a partition between it and the steam compartment, part of it will have to be cut out. If there is no partition, it is better to immediately build it from a non-combustible material, for example, red brick. Or lay out the masonry to the desired height and continue with timber.
The dimensions of the opening in the combustible partition under the firebox are also not taken “from the ceiling”, but are determined depending on the power of the heating unit. With factory-made stoves, everything is simple: these parameters are indicated in the product passport. You can’t reduce them, but you can’t increase them as much as you like.
It is difficult to determine the power of a homemade stove. In such cases, the opening is made in such a way that there remains 25-35 cm from the firebox to the wooden wall, provided that it is protected along the contour with heat-insulating material: a strip of asbestos cardboard, basalt wool, etc. If such protection is not provided, this distance is increased to 40-50 cm.
An opening cut into the partition for an external firebox Source vsaunu777.ru
Features of the design of heaters on metal boilers
Some manufacturers claim that only their boilers are capable of producing high-quality steam; this is one of the important advantages of the advertised products. What is quality steam? Such a characteristic does not exist; we can only talk about comfortable conditions for staying in a steam room, and they are individual for everyone.
The conditions in the steam room depend on the temperature and relative humidity. The more you heat the boiler, the higher the temperature, and the more water you splash on the heater, the higher the humidity. This means that high-quality steam is made by people, not boilers. You can add infusions of medicinal plants to the water and obtain a therapeutic effect. If you want, add aromatic substances to the water - the air will smell pleasant. By the way, if you splash a little natural beer on the heater, a very pleasant smell of freshly baked bread will appear in the steam room.
Light steam for a bath
We have become familiar with the characteristics of steam, it’s time to move on to the heaters
What characteristics should you pay attention to when choosing a boiler?
- Volume. The larger the heater, the better the boiler. A large number of stones allows you to accumulate thermal energy; a stable temperature will be maintained in the steam room for a long time.
- Location. The heater can be located on the upper surface of the boiler, surround it around the perimeter, be installed in the chimney, etc. We recommend buying those boilers in which the arrangement of the stones allows them to heat up to maximum values (upper location). The fact is that each portion of water poured to create steam cools the stones. If they are not warmed up enough, then after just a few ladles of water the temperature of the stones will drop significantly and steam will not form.
Kamenka around the perimeter
There are boiler options in which the heater is attached along all sides of the stove. This is a pretty good option, a large amount of heat accumulates, the stones warm up to a high temperature.
Conclusions and useful video on the topic
Pros and cons of gas sauna stoves and operating features:
Sauna stoves with the possibility of switching to the use of blue fuel are convenient and practical to use. They allow you to save on heating and reduce the period of preparation of the bathhouse for your favorite procedures. But you need to choose such a unit, armed with complete and reliable information about the functionality and characteristics.
Would you like to tell us about what kind of sauna stove you purchased to equip your own sauna?
Share whether your choice has the ability to switch to gas. Please leave comments in the block form below, ask questions and post photos on the topic of the article. Date: September 25, 2022
Metal boiler or stove: which is better?
It should be noted right away that the brick oven has been and remains an invariable element of the traditional Russian bathhouse. But this pleasure is labor-intensive, expensive and difficult to implement. But the steam is softer and the heat lasts for a long time. And in terms of safety, a brick oven is an excellent option: the likelihood of getting burned is almost minimal. Among the disadvantages of a heater stove, one can also note the need for a long fire and, accordingly, high fuel consumption. That is, in order to take a good steam, it must be heated continuously for 4-5 hours. Metal boilers are a more modern type of furnace equipment. Interestingly, their advantages and disadvantages are almost the opposite of heater stoves. That is: installing a boiler for a bath, as well as its manufacture, is much faster and easier. You can also buy a ready-made model at a very affordable price. Metal structures heat up much faster than brick and stone ones. The main disadvantage is insufficient heat accumulation. That is, when the fire stops, the boiler cools down extremely quickly.
Features of homemade gas stoves
A gas stove differs from a wood stove in that it uses gas for kindling. Therefore, in such a device, instead of a window for storing firewood, a cavity for the burner is mounted. However, you can also make a gas-wood stove with your own hands.
A metal sauna stove is often lined with brick. The lining is made to increase heat transfer. In addition, a metal structure with a brick casing cools much more slowly
Most gas furnaces have the following design. A pressurized or atmospheric gas burner is mounted in the device body. Fuel is supplied through a sealed gas hose or pipe.
At the top of a homemade gas stove there is a closed heater or an open tray with stones that are heated by a burner, as well as a device that removes combustion products.
When assembling it yourself, be sure to take care of installing a thermostat and a fuse that cuts off the gas supply if the burner goes out. The gas chamber containing the combustible gas is usually located under a tray with stones.
The advantages of homemade gas stoves for baths include:
- compact size, because gas stoves do not have a firebox or ash pan;
- rapid heating to the required temperatures;
- economical resource consumption;
- there is no need for constant maintenance of the device;
- When installing a water tank, you can also heat the water.
The disadvantages include the need for a gas source. For example, if the bathhouse is located outside the city in a non-gasified area, some owners will have to buy gas cylinders or install a mini-gas holder. However, there is an advantage to this - there is no need to obtain permits.
It is worth remembering that when working with gas you must always follow safety precautions.
When choosing a gas burner for a sauna stove, it is worth considering that the efficiency of atmospheric burners does not exceed 90%, and the efficiency of forced-air burners is more than 95%. However, the first option wins in terms of independence from electricity
When installing an open combustion stove, it is necessary to design and install a ventilation system and chimney. Also, when oxygen is burned, the air becomes drier, so you need to take care of humidifying the air.
Types of heat exchangers
Heat exchangers
Heat exchanger is a device used to heat water. The more efficiently it works (the greater the efficiency), the better the heating stove heats, the higher the temperature in the rooms can be. The heat transfer coefficient depends on the material of manufacture and the total area.
Example of a copper heat exchanger
It is best to make heat exchangers from copper, but this option has three significant drawbacks:
- high cost of copper. The heat exchanger requires a large number of thick-walled copper pipes; at current prices, the cost of such material can be equal to the cost of the entire boiler;
- complexity of manufacturing. Copper can only be welded in an inert gas environment; it is impossible to do this at home. Another method of making a copper heat exchanger is soldering. Unfortunately, such connections do not have satisfactory strength indicators, especially at high temperatures;
Welding (soldering) of copper
- copper under the influence of an open flame quickly oxidizes, becomes fragile and burns out.
Heat exchanger made of copper pipes
For heat exchangers in solid fuel boilers, it is optimal to use materials made of carbon sheet steel of ordinary quality with a thickness of at least one millimeter.
Thick-walled pipes
An important factor in the efficiency of a boiler is the heat exchanger area. There are two options to solve the problem.
Tubular heat exchanger
Prices for heat exchangers
heat exchanger
First. Increase the internal area of the firebox and, due to this, the dimensions of the heat exchanger. The option is good, but difficult to implement. A large firebox is not always appropriate in a sauna stove; increasing its dimensions causes significant difficulties during manufacturing, excessive consumption of materials, etc.
Second. Increase the heat exchanger area. Heat exchangers can take the form of containers with flat walls or be tubular. The second option significantly increases the effective heat exchange area, the water heats up faster, and the efficiency increases noticeably.
Heat exchanger - photo
How to choose a boiler by power
Table for calculating boiler power
A very interesting question that requires detailed consideration. In order to select the optimal boiler power, you need to know the thermal characteristics of the building as a whole and each room separately. Let us immediately warn you that thermal calculations are one of the most complex sections of design work.
The diagram shows the main heat loss zones
The heat loss of a building depends on:
ceiling heat losses. You need to know the thickness of the ceiling covering and materials of manufacture; heat losses of walls. For calculations you need to have the same data as for ceilings. Plus materials and methods of external and internal cladding; floor heat losses. Here, in addition to the above, one should take into account the type of foundation (column foundations are blown away by the wind, and strip foundations have only small vents), type of flooring (flowing with cracks in the boards or solid), etc. These data significantly influence the amount of heat loss .
Additionally, you need to know the maximum and minimum temperatures in a given climate zone, the rose and strength of the winds, the efficiency and type of ventilation. Another very important factor is the quality of construction work and the qualifications of the builders. The same building, built with different quality, can have completely different heat loss indicators. Can you take into account all the data and accurately calculate the thermal performance of the bath? With this data, you can find out how much energy is needed to heat rooms to different temperatures.
Solid fuel boiler
Based on them, the boiler power should be selected. In bathhouses, boilers are installed using solid fuel, the vast majority using wood. In order to find out the power of the boiler, in addition to the characteristics of its engineering device, data on the thermal capacity of the fuel used per unit of time is needed.
The combustion heat of wood depends on:
wood species. The calorific value of different types of wood can differ significantly;
relative and absolute humidity of firewood at the time of combustion. The higher their humidity, the more energy will be needed to evaporate water, this is a direct loss of thermal energy;
firewood burning rate per unit time. It depends on the draft of the chimney, the linear dimensions of the logs, the method of placing them in the firebox, etc. Large logs have a smaller contact area of the open fire with the surface per unit of weight - they burn longer, but release less energy per unit of time;
the amount of firewood per stack in the firebox. You can put 1, 2 or 3 kg of firewood in one load.
This is by no means a complete list of factors that directly affect the power of a heating boiler. Will someone be able to take this data into account, and not just once, but throughout the entire time the boiler is burning?
For example, only one of many indicators (heat flow on the inner surface of the outer boundary wall) is calculated using the formula:
Calculation of heat flow to the inner surface of an external wall
What to do? It's simple. Ask for advice from an experienced craftsman who has installed many boilers or installed more than one sauna stove, chat with neighbors who have different boilers, or ask a question on a specialized forum. Only studying practical information from users and comparing it with your own conditions will allow you not to make mistakes when choosing the brand and technical characteristics of a boiler for a bath.
Making a boiler for a bath
Making a boiler for a bath
The iron boiler has a fairly simple design. Preparatory work consists of studying boiler drawings, as well as purchasing all the necessary equipment.
Making a boiler for a bath
Stage 1. Consumables and equipment
In most cases, boilers are made of thick-walled metal pipes. Experienced specialists use large barrels with a volume of up to 200 liters, but in our case it is recommended to use a small pipe ø50 cm with a length of 75-100 cm. This will make it possible to design a device capable of heating a room with a volume of 15 cubic meters, which approximately corresponds to an area of 9 m².
Steel pipe for boiler making
In addition, you will need the following tools:
- welding machine (electric);
- Bulgarian;
- metal circles.
Stage 2. Welding of structural supports
Boiler drawingCutting the pipe
After preparing everything you need, you can start working.
Step 1. The boiler body will consist of a pipe in which three supports must be formed, located parallel to the ground, at three different levels. To do this, you will need three pieces of reinforcement ø1.4 cm, 3 cm long each.
Level No. 1 is required to install the stove.
The height of level No. 2 is calculated depending on the planned type of blower door.
Level No. 3 should be located 20 cm from the top edge of the structure.
Step 2. A circle of the appropriate diameter, cut from sheet steel 5 mm thick, is used as the bottom.
Furnace from the inside
Step 3. All wood-burning stoves include a grate - a metal grate necessary for supplying oxygen to the combustion chamber (installed from below). It will require a circle of metal of the maximum possible thickness, perforated or with slots.
Step 4. The oven lid will also serve as a support for the stones, so it is cut out of the same 5 mm steel. A hole is made in the center of the lid for the chimney pipe.
Step 5. A hole is made in the lower part of the pipe for the box, and it is closed with a stove door.
Step 6. The box itself is constructed, and a partition is installed inside it to separate the combustion and ash chambers. The level of this partition must coincide with the level of the grate, and the grate itself must be located inside the boiler.
On the right side there is a round door for laying stones.
Prices for popular models of welding machines
Welders
Stage 3. Assembling the structure
This process can be divided into several stages.
Step 1. First, a box is welded into the structure. If the installation takes place indoors (and in our case this is exactly what happens), then the box should go either into the combustion chamber or outside.
Step 2. Then a chimney pipe is installed on the hole made in the lid.
Ready boiler
Step 3. The foundation for the furnace is built. This can be either an ordinary reinforced concrete slab or a 10-centimeter concrete screed poured onto a “cushion” of crushed stone 15 cm thick.
Step 4. The structure is installed on the base, stones are placed on the lid.
Stage 4. Heat shield
Sauna stove with brick screen
In most cases, the screen is built from brick. This can be done in two ways:
- cover the entire boiler;
- fence it off with a small wall.
How to install a metal sauna stove
Fire safety requirements
The current document that regulates the procedure for installing a stove and boiler in residential buildings and baths is SP 60.13330.2016 (updating SNiP 41-01-2003).
When deciding where the structure will stand, it is important to consider:
- distance from the stove to the walls of the building;
- placement of air ducts;
- What material should be used to protect walls from heat and fire.
According to SP 60.13330.2016, the distance between a metal stove, boiler and a non-combustible wall (fire resistance limit from 60 minutes) is 38 cm.
But in fact, even if the baths are made of non-combustible bricks and foam concrete blocks, they are most often finished with flammable wooden lining.
When building a bathhouse from logs, timber, you should follow a number of recommendations:
- There should be at least half a meter from the partition, wall without any protective screens to the hot surfaces of the oven.
- The wall from the floor to a level of 25 cm above the combustion door, through which the fuel channel will be discharged, is built from non-combustible raw materials. The minimum wall thickness is 12.5 cm.
- The distance from the non-combustible ceiling in the steam room to the top of the stove is from 80 cm.
- If there is no fireproof protection on the ceiling, the distance from it to the stove should be 1.2 m.
- The distance from the firebox door to the opposite wall of the room is from 1.25 m.
- You need to leave 3 cm between the wall and the front of the stove with an external firebox.
Photo: left – side view, right – top view.
Installation of the boiler and factory stove must be carried out strictly in accordance with the manufacturer’s instructions and diagram.
Rules for organizing heating in a bathhouse
Wood heating sauna
The simplest option is a sauna with heating from home. This scheme involves connecting the steam room, dressing room and other premises to the autonomous heat supply of the cottage. But this can only be realized if the bathhouse structure is closely adjacent to the house or is located at a distance of no more than 3-4 m from it.
The most common option for the location of a building on a site is remote from a residential building. How to make water heating in a bathhouse and at the same time optimize the costs of its organization? Options for using standard schemes are possible, but at the same time the specifics of using the bathhouse should be taken into account:
- The source of thermal energy (boiler) must ensure heating of the air in the steam room to a level of +90°C +100°C. For this purpose, special sauna stoves with a container for stones are used;
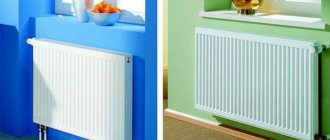
- For rooms larger than 60 m², it is recommended to install pipe heating. Together with it, you can make a hot water system to increase comfort. If there is a second floor, heating of the attic of the bathhouse must be provided;
- Ensuring the removal of carbon monoxide along with a well-thought-out ventilation system;
- Fire safety. Since wood is used in the vast majority of cases for finishing rooms, its contact with heating elements - pipes, radiators - should be prevented.
Gas heating baths
Another important point is the choice of energy carrier. Gas heating in a bathhouse is advisable only when installing a specialized boiler. Installing homemade structures can lead to emergency and dangerous situations.
In addition to gas, you can use other, no less effective sources of thermal energy:
- Firewood. A traditional type of fuel with which heating a bathhouse in winter turns into a kind of ritual. A significant drawback is the constant monitoring of the fuel level in the firebox, as well as the impossibility of quickly adjusting the water heating level;
- Diesel fuel or used oil. The most unacceptable energy source for a bathhouse. The problem is the unpleasant smell and the difficulty in organizing fuel storage.
How to make gas heating for a bathhouse yourself? To do this, you need to choose the right equipment and components for heat supply - pipes, radiators, as well as containers for indirect heating of hot water.
How to clean a smoke duct
It takes a lot of effort to get the insides of the chimney from a sauna stove covered with a thick layer of soot. For deposits to form, the heater must constantly operate in slow smoldering mode or be “refueled” with damp wood. In both cases, it will not be possible to heat the bathhouse properly. In normal mode, high-temperature gases simply burn out the soot in the pipe and no blockages arise there.
Now about how to clean a chimney in a bathhouse with your own hands if plaque does appear on the walls and the draft force has decreased:
- Place dry wood of high-calorie species with a low resin content in the furnace firebox: acacia, oak, ash or aspen. Burn the fuel with the ash-burner fully open at the maximum setting to burn off the soot.
- Clean the flue using a special “Chimney Sweeper” log, burning it strictly according to the instructions on the package.
- Using a brush attached to a rope with a weight, perform mechanical cleaning of the pipe, reaching its head.
For a master class on making a homemade brush and removing soot from a chimney, watch the next video:
Combinations
Let's consider several successful combinations of boilers that can be used for a bath and made with your own hands:
Pellet and electric. The disadvantage of this solution is the cost of the equipment. Therefore, quite large initial costs are required. In this case, you will need to allocate quite a lot of space to place the devices. However, there are also advantages of this solution: the affordable cost of pellet fuel, the possibility of automating the process, reducing costs by turning on the electric boiler only at night if a two-tariff meter is installed.
Gas and electric boiler. This is a technological solution that will allow you to fully automate the process, without fiddling with solid or liquid fuel, while always being provided with heat. After all, if there is a power outage, the gas supply is unlikely to be interrupted and vice versa.
Electric-gas boiler
Coal and electric boiler. Under certain conditions, such a combination can be both beneficial and convenient. Of course, you need to be able to buy coal profitably.
Sauna stove made from a pipe or an old cylinder
The ideal material for production is special boiler steel. However, there is an opportunity to save money if you use cheaper materials. In the case when you plan to take a pipe or an old cylinder, the water tank should be placed above the firebox. It is important to take into account that the thickness of the metal cannot be less than 1 cm, otherwise the use of such material is unsafe.
Manufacturing technology of an electric boiler for a bath
Instructions for making an electric boiler for a bath
We carry out the work in this order:
We install a heating element with a power of 1 kW into a removable steel pipe with a diameter of about 15-20 cm and a length of about 50 cm. Its diameter should be smaller than the pipe. We connect the structure to the end of the water tank pipe using the welding method. It is worth noting that the more compact its dimensions, the more energy efficient the device will be. Heating a small amount of water will use less electricity. Pour about 700 ml of water into the container. On the reverse side we build an electrode into the tank
At this stage, it is important to ensure that the electrode reaches the bottom of the container. We fix the pipe at an angle to the wall surface. We do grounding. To do this, we will equip a grounding center
It is represented by several metal pins coated with zinc or copper, which are connected using fittings. We bury the pins into the soil. After connecting the boiler to a separate machine on the distribution panel, we draw a neutral cable from it. We install a pressure gauge into the housing through a three-way valve. This will protect the boiler from overheating and save on power consumption. We run a phase wire to the boiler from a separate machine on the distribution panel. We connect the RCD and the automatic circuit breaker to it.
Installation of a homemade electric boiler in a bathhouse
We install the boiler in the following sequence:
- Mark with a pencil the location of the device.
- We drill the necessary holes with a drill or hammer drill.
- We attach a galvanized steel fastening profile and a mounting strip.
- We measure the evenness with a hydraulic level.
- We attach the equipment with dowels. To install a floor-standing boiler, we attach a special metal tray to the floor.
- We connect the water supply pipe to the tank using couplings. It is better to fix it from below. Thus, the water will be mixed more efficiently in the tank.
- Attach a filter to the pipe inlet.
How to make a foundation for a stove
The choice of the required foundation must be made at the planning stage. You can’t just put the stove on the wooden floor of the steam room. The stove is a very heavy thing and over time it will simply push through the floor. This will affect the horizontal position of the furnace, which can lead to the metal splitting when heated.
If the mass of the stove is less than 700 kg, then there is no need to make a separate foundation for the stove. A sufficient condition would be to lay the brick in several rows and connect the structure with load-bearing joists. This applies more to metal stoves, because... they are relatively light in weight. It must be remembered that if you cash the stove with bricks, plus the weight of the water in the tank, the number of stones laid - all this will increase the total weight of the stove. And if the total weight is more than 700 kg, then you definitely cannot do without a separate concrete foundation for the stove.
Is it necessary to connect the foundations of a bathhouse and a stove? In accordance with the recommendations of SNiP, the following types of foundation are used when constructing baths:
- the foundation is reinforced, monolithic, poured below the soil freezing level and is not connected to the foundation of the bathhouse;
- when arranging a bathhouse on highly heaving lands, a foundation on a pile foundation, not connected to the bathhouse, is used for the stove;
- a shallow foundation for the stove is erected in conjunction with the foundation of the bathhouse.
Pouring a monolithic furnace foundation
A pit 120-150 cm deep is prepared for a monolithic foundation. Sand is placed at the bottom of the pit, leveled, and compacted. A layer of waterproofing is laid. The formwork is installed and a reinforcement frame is constructed inside the box. Pour the concrete mixture to the top. After the solution has completely dried, the formwork is removed and the entire space between the foundation and the ground is covered with sand, carefully compacting each layer.
Pile-grillage foundation
A pile-grillage foundation takes less time than a monolithic foundation and costs less.
To make a foundation on piles, you need to remove the top layer of soil and use a rope to mark the dimensions of the future foundation for the stove. At the corners of the resulting square, holes are dug, 15 cm deep, and piles with a diameter of 108 mm are screwed into them. The piles should be as long as the depth of the main foundation of the bathhouse. The piles must be installed to such a depth that they are 10 cm below the level of the future clean floor of the bathhouse.
Next, the heads are welded to the piles. All parts of the metal that are above the soil must be painted with metal paint to protect against rust. The next step is to install 10 channels at the heads. A sheet of steel is welded to the channel, which must be laid inside the resulting square base for the furnace. Cement is poured into the prepared metal pit.
Shallow base
This foundation can only be done on solid, stable ground. The installation of such a foundation is similar to a monolithic foundation, the only difference is that the layer of finely buried foundation is 30-40 cm. This foundation is made without reinforcement.
Brick laying around the perimeter of the sauna stove
Brick will not only help protect against possible burns, but will also make it possible to retain heat in the bathhouse for a long time. Make half-brick masonry and lay waterproofing on the floor. There is no need to be afraid that the boards underneath will begin to rot - the brick will always be warm, and the floor will have time to dry quickly. How to make masonry?
Cladding a metal stove with bricks
Brick laying around the perimeter of the sauna stove
Prices for fireclay bricks
fireclay brick
Step 1. Make markings on the floor. The distance between the brick and the boiler should be within 2÷3 cm.
Step 2: Place the bottom row of bricks on the mortar. We have already said above that using a clay solution is not always advisable. You can use clay only if the location of the kiln guarantees a minimum amount of water entering the masonry.
Step 2. Make a dressing at the corners, check the position of each row.
Step 3. Constantly check the position of each row of bricks using a level or plumb line.
Step 4: Carefully seal the seams. These works must be done on a solution that has not completely hardened.
Preparation of the base and walls
The amount of preparatory work depends directly on the material of the walls and floor. If the flooring in the boiler room is made of ceramic tiles, and the walls are plastered or even lined with sheets of heat-resistant cardboard, then no additional preparation is required.
It’s another matter if the boiler is installed on the walls of a log bath. In this case, a wooden board is stuffed under the body and asbestos cardboard or vermiculite board is laid. The body remains cold even during prolonged operation at maximum load, but the combustion chamber may burn out if the automation is incorrectly adjusted, and then fire-resistant protection will save the wooden frame of the sauna from fire.
Let's get started
In order to independently build a reliable and simple metal boiler, you need to acquire the following materials:
- One and a half meter pipe with a diameter of more than 0.5 m
- Meter pipe with a diameter of about 0.35 cm
- Steel hinges, handles and latches
- Sheet metal
- Fittings for making a grate or a ready-made grate
It is very important to pay attention to the thickness of the selected metal - at least 0.8 cm. The smaller this value is, the faster the material will begin to burn out and you will have to think about making a new boiler. All those who value reliability and durability can consider the options of brick stoves
All those who value reliability and durability can consider the options of brick stoves.
It is necessary to cut a one and a half meter pipe into two sections:
- The first, 0.9 m long, will be intended for the manufacture of the combustion part
- The second, 0.6 m long, will be intended for the manufacture of a water tank
If it is possible to find a stainless water container of a suitable diameter, this will be a big plus. Steel, like most other metals, will soon begin to rust.
Gas sauna stove from a cylinder
To independently assemble a gas stove for a bath, you will need to collect and purchase the following materials:
- You need to buy an atmospheric burner at the construction market or in a store with gas equipment.
- Find an old but not rusty gas cylinder. A new cylinder, large-diameter pipe or sheet of metal with a thickness of 8 to 16 millimeters will also be suitable.
- For the base of the heater you will need thick metal, for example, a brake disc from a car. It will last for at least several years.
- A gas pipe with a diameter of 5 centimeters and a length of approximately 3 meters.
- A pipe with a diameter of 10 centimeters, which will be used to remove gases.
- Some copper or bronze elements to connect parts.
- Additionally, you will need to acquire the following tools: grinder, welding machine, drill, measuring instruments.
After assembling the complete set of tools, you need to use a grinder to cut off the outer part of the cylinder so that the cut diameter is equal to the external size of the brake disc. Then, using welding or a drill with bolts, you need to attach the disk to the cylinder.
The next step is preparing the air supply pipe. In a pipe with a diameter of 5 centimeters you need to drill about ten 5-mm holes.
A hole with a diameter of approximately 55 millimeters is also made at the bottom of the cylinder. The whole, that is, not drilled, part of the five-centimeter pipe should extend out of the cylinder by about two meters. It must be welded to the cylinder.
First you need to cut the workpieces with a grinder according to the sketch. Then weld all the components using a welding machine. After completing these procedures, you must also grind all welds. The same grinder copes well with this task
The pipe that will supply gas is welded in the same way. An adapter is attached to the second end of this pipe, with which you can connect the device to a gas pipe or gas cylinder.
A hole is cut out on the cylinder for the chimney and the corresponding pipe is welded. Using a grinder, a rectangular hole for the door is also cut. The hinges are welded and the door is hung directly on them. You also need to attach a handle to the door.
In this way, a simple model of a gas oven will be made. Gas is supplied to the burner through the pipe. The combustion process is started, depending on the burner, by piezo ignition or electric pulse.
Electric oven installation
It is much easier to solve the problem of how to properly install a stove in a bathhouse powered from the mains. The placement of such a unit is simplified due to its more modest dimensions and the absence of connection to the chimney, which is not necessary.
But in this case, other requirements arise, primarily related to electrical safety.
The main advantage of an electric furnace is independent installation. Source usproekt.ru
When installing an electric furnace, it must be grounded. If this is difficult to implement, then grounding is used by connecting the ground wire of the unit to the neutral terminals on the distribution panel. Also, to avoid short circuits during power surges, a residual current device (RCD) is installed.
Certain requirements are also imposed on the wiring: its cross-section must correspond to the power consumption and voltage in the network. And the shell material must be heat-resistant.
Choosing a location for the oven
The most correct decision would be the initial design of the bathhouse, taking into account all the rooms and the location of the stove. If it is possible to heat all other rooms from another source, it is placed in a steam room. If not, consider the option of installing a stove in a bathhouse with a firebox from the dressing room so that it heats both it and the washing compartment. To do this, an opening is provided in the partition between these compartments, which is subsequently lined around the firebox with fireproof materials.
Project of a bathhouse with a steam room and shower Source sk-ac.ru
Both options have their positive and negative sides:
- Installation in a steam room allows you to control the operation of the stove without interrupting bath procedures. But the firebox and the space in front of it take up extra space; with this placement, the oxygen in the room burns faster, which requires the installation of a ventilation system. And most importantly, you have to organize autonomous heating of the dressing room, locker room, bathroom and other rooms of the bathhouse, or conduct it from home.
- The second option is much more effective and economical, since installing a stove in a bathhouse with a firebox in the dressing room is not much more difficult, but there are more advantages. The steam room maintains a normal microclimate and frees up useful space; all rooms are heated from one stove. But the bathing procedures have to be interrupted in order to add firewood to the firebox.
However, convenience is not the only and not the most important criterion for choosing a suitable location for a heating unit. The issue of fire safety is much more pressing.
Correct corner placement scheme Source banyabest.ru
First of all, you need to decide how and where to bring the chimney through the roof. It is best if it is connected to the stove in a straight line, without unnecessary bends or turns.
When placing it in a corner or against one wall, you need to follow the rules for installing a stove in a bathhouse with a firebox from a dressing room in a wooden log house. The distance from the metal body to walls made of flammable materials must be at least 50 cm on any side. It can be reduced by insulating the walls with fireproof shields. This can be sheets of mineralite, asbestos cardboard or basalt cardboard, as well as facing with ceramic tiles or a screen made of red ceramic brick.
Insulating walls with mineralite slabs before installing a stove Source bg.aviarydecor.com
A distance of at least 120 cm should be maintained from the firebox door to the front door. And in front of the firebox, be sure to lay a metal sheet or cover the floor with tiles.
It is easier to provide for all these points at the design stage. If this has not been done, the task will become more complicated, and there will be fewer options for convenient placement of the stove.
How to install correctly
Before proceeding with the installation of the boiler, it is necessary to build a strong foundation. It is made of refractory bricks, in several layers. Then the already prepared concrete solution is poured there, after which the structure is installed.
The walls to which the structure adjoins, and some part of the ceiling through which the chimney exits to the outside, should be laid with a layer of fire-resistant material, for example, Izover material. It should also be borne in mind that the chimney pipe must be straight, and without any bends or turns should come out strictly vertically upward.
Usually the pipe has to be bent if the structure was first made, and only after that they began to think about its location. Therefore, you first need to decide on the location of the structure, and only then begin manufacturing the structure.
The boiler is the main attribute of the bathhouse. For it to truly perform its functions, it must be installed correctly, in accordance with all the rules. Only then will the operating process be a pleasure
Choosing a chimney pipe
To remove combustion products from a sauna stove, 3 types of chimneys are used:
- from ordinary steel pipe;
- special three-layer pipes for furnaces and TT boilers, made like a sandwich;
- smoke channels lined with brick.
The cheapest option is a conventional single-wall pipeline made of ferrous metal or stainless steel. And although the installation of such a chimney allows you to save money, a number of unpleasant moments arise during installation and operation:
- To prevent a fire from starting from the hot iron surface in the bathhouse, all wooden structures of walls and ceilings will have to be protected;
- the bare chimney pipe passing to the roof through the ceiling and attic will need to be insulated with basalt fiber;
- Due to the temperature difference inside and outside the furnace flue, condensation forms on its walls, which is characterized by the appearance of dirty streaks on the pipe.
An option for the successful use of single-wall stainless pipes is inside an old brick channel
To avoid the problems listed above and not to insulate a single-wall chimney for a bath during installation, it is better to buy and install ready-made sandwich pipes. The inner sleeve in them is made of stainless steel, and the outer casing is made of galvanized steel (in a budget version). Between the two sleeves there is a layer of basalt insulation, the thickness of which can be selected. We recommend staying with this option.
Connection to heating mains
Connecting not only bathhouses, but also private houses to centralized heating mains is very problematic. This is due to the hydraulic structure of the central heating system. Connecting an insignificant low-power facility, without the possibility of constant access for repair and maintenance, can negatively affect the operation of the entire centralized system as a whole.
As a rule, heat supply organizations do not accept applications and do not issue technical conditions for such events.
Difference between boiler and stove
And when you have found detailed information, photos and drawings of boilers for the bathhouse, how to build a stove with your own hands, you need to understand well that the brick stove that is installed in a traditional Russian bathhouse is not a cast iron boiler at all. But a metal structure welded from a barrel or pipe cannot be called a stove; it is nothing more than a boiler for a bath.
At the same time, boilers, like stoves, are necessary for one thing:
- heating steam rooms;
- heating water and stones
- as well as maintaining the desired temperature in the steam room.
Therefore, a stove is a brick structure, and a homemade boiler for a bath means a different heating device.
Building a boiler yourself
There is nothing special or complicated about building a boiler for a sauna with your own hands. Before starting work, you need to prepare special tools and materials, and if there are instructions, study them carefully.
Material
The correct installation of the boiler in the bathhouse depends on the material that will be used in the process.
- When installing boiler equipment, professionals usually choose metal barrels with a volume of up to 200 liters for its base. To do this, you can use a small piece of thick pipe, up to 1 meter long and 51 centimeters in diameter.
Advice! Do not install the sauna boiler very close to wooden walls to avoid fire.
Homemade boiler diagram
- Such an installation can heat a room with a volume of up to 15 cubic meters, which is an area of 3 x 3 square meters. First you need to prepare > with metal circles and a home welding machine. grinder>
Advantages and disadvantages
Termofor stoves have a number of advantages:
- affordable price;
- ease of use;
- safety;
- Possibility of use in any room;
- durability and reliability.
An important aesthetic advantage is that the stoves are produced in several colors: terracotta, anthracite, stainless steel and chocolate. The units fit perfectly into any interior.
If we compare the products of this manufacturer with popular domestic brands of bath units Ermak, Vulkankomplekt or Teplodar, then Termofor has more compact dimensions, high fuel economy and an attractive design.
The disadvantages of stoves include:
- high price;
- Lack of stainless steel stoves with a steel thickness of more than 3 mm in the range.
What do you need to know?
First you need to decide on the fuel that will be used and, therefore, on the type of boiler. It is not advisable to make electric and gas appliances yourself, but if the choice was made in favor of one of them, then it is better to buy a ready-made high-quality boiler. Otherwise, the risk of emergency situations will increase.
Solid fuel boiler for baths, diagram
It is also worth noting that an installed gas boiler must be inspected by a representative of the relevant authorities. Therefore, it is much easier to assemble and install a solid fuel unit.
Cylindrical boilers
The easiest way is to make a boiler for a bath from a pipe with thick walls (6-8 mm). You can take a thin-walled pipe, or even an iron barrel, but such a stove will not last long. So, a pipe with a diameter of 400-500 mm up to 1 m in length will be the combustion chamber. The bottom and cover made of a steel sheet with a thickness of at least 5 mm should be welded to it. Such a boiler for a bath can be made without a grate; all operations are performed through the loading door. The external channel for its installation can be made of rectangular or circular cross-section, its length is equal to the thickness of the bathhouse wall.
Boiler in a bathhouse from a pipe
There is a hole in the center of the lid to which the chimney pipe is welded. You can regulate the intensity of combustion by installing a damper in the chimney, which will reduce draft. But more often they make a hole in the door and cut a pipe with a damper into it, as shown in the figure.
Side on the boiler
A homemade boiler for a bathhouse made from a pipe must have a heater, here a special side made of steel 4 mm thick is welded for it. This is the simplest stove model, and the pipe can be positioned horizontally, especially if it has a large diameter. Then the door will need to be installed at the end, and the chimney will need to be welded at the end of the pipe. For stability, you will need to attach supports to the firebox body.
Homemade boiler for a bath