A wooden house has many advantages: environmental friendliness, beauty, comfortable microclimate. But such buildings are potentially fire hazardous, so when installing heating equipment, you must follow the rules described in the instructions and be especially careful.
Even if you decide to entrust the installation to specialists, we recommend that you familiarize yourself with the basic requirements that must be taken into account when placing a metal stove in such a building.
Location of the stove in the bathhouse
A classic Russian bathhouse has an unheated dressing room and a steam room combined with a washing room. Modern projects are much more convenient to use and usually have the following layout:
- dressing room - the furnace of the stove usually opens into this room;
- steam room - inside this room there is the stove itself and the heater;
- washing room - equipped with a large drain (drain or siphon);
- relaxation room - a separate room inside the bathhouse or in the attic floor.
Option for the layout of the bathhouse and the location of the stove.
Therefore, stoves are equipped with a remote or telescopic fuel channel and are mounted inside the walls/partitions between the steam room and the dressing room in order to heat all existing rooms separated from each other by partitions.
Remote fuel channel for sauna stove.
In this case, a heating device installed in this way should be isolated from load-bearing/enclosing structures made of flammable material:
- a sheet of iron, asbestos or any other non-combustible material (brick, clinker, porcelain stoneware) is placed under the stove;
- the junction of walls/partitions with the firebox is lined with ceramic or clay bricks (cutting);
- Aprons or screens made of heat-resistant sheet material are attached to the walls (can be lined to improve the quality of the interior).
Factory protective screens for sauna stoves.
In most cases, a sauna stove has a chimney, inside of which high temperatures remain and there are sparks that are dangerous to the wooden structures of the building. Therefore, in the places where the chimney pipes pass through the floors and roofs, grooves filled with thermal insulation materials are installed.
Important! Providing a set of these measures is mandatory for a wooden bathhouse or a building with a wooden floor, regardless of the energy carrier used in the heating device.
Inside the steam room itself, the oven can be positioned in different ways:
- by moving it to the corner, the working space of the room is freed up;
In both cases, it should be taken into account that, according to existing fire safety standards, the minimum permissible distance from metal stoves that are not lined from the inside to combustible structural materials of the walls is 1 m. The stove in the center of the steam room is very inconvenient to maintain and during steam procedures. Therefore, in 99% of cases, protective screens are used to allow the heater to be moved as close as possible to the wall.
Preparing for installation of a metal furnace
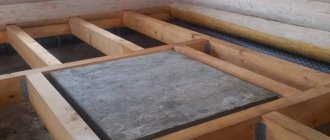
Installation of a metal stove in a house made of combustible materials provides for the following:
- A fireproof cutting, which is also called a fireproof sheet, must be installed on the floor under the stove. It consists of a layer of asbestos cardboard on which a sheet of steel with a thickness of at least 1 mm is laid. A rim made of non-combustible material should be made around the protective layer. This is necessary so that the coals that fall out of the stove cannot roll onto the wooden surface.
- The flush sheet on the side of the combustion door and on other sides should protrude at least 600 mm and 300 mm, respectively.
- Protective screens that are mounted on walls must be 30% larger than the corresponding sides of the stove and at least 300 mm.
- An uninsulated chimney should be located at least 1000mm from unprotected walls and ceilings.
DIY installation
When making vertical/horizontal grooves and screens, the sauna stove manufacturer's instructions must be followed. This document indicates specific values of safe distances from the body of the heating device to combustible materials, screens, protected and unprotected wooden floors, doorways, depending on the actual thermal power of the stove, the nuances of its design.
For example, for some modifications of Termofor, the minimum permissible size of a vertical brick cut is 61 cm. Therefore, the stove cannot be pushed tightly into a corner.
Brick cutting vertical
Regardless of the layout and configuration of the bathhouse, installation of a factory stove-heater with an external fuel channel is carried out in only two ways:
- inside the wall - under the load-bearing structures there is always a foundation or grillage, a window for the fuel channel is made in brick walls, part of the crowns and racks are dismantled in wooden walls, masonry is made in half a brick 1.5 x 1.5 m;
Laying on the foundation.
If the brick cutting is small, you can rest it on a wooden floor without a foundation, but in the place where the joists pass.
The thickness of the cutting portal is ¼ – ½ brick to save the construction budget. However, stove manufacturers take into account that the remote firebox can be built inside walls of greater thickness, so they provide the necessary size margin.
The main difficulties when laying cuttings traditionally arise in the interface nodes:
- brick/wall - the masonry is prohibited from being rigidly connected with reinforcing pins to the crowns of an unsettled frame; a damper tape is glued to the end of the wooden wall; the bricks do not adjoin closely, but leave a gap of 0.5 - 1 cm, decorated with platband or fillets;
Platband around the portal.
Advice! Due to the small volumes of masonry, facing ceramics can be used to get rid of plaster and putty.
Several types of screens are used for metal sauna stoves:
- fireproof - protects wood from ignition or charring, mounted directly on the wall (in some cases through thermal insulation inserts);
In addition to fire protection, screens additionally decorate furnace equipment and give interiors a complete look.
Important! Fire barriers are often constructed from asbestos-containing panels/sheets or steel structures. In 90% of cases, protective screens are made of brick, which is not acceptable for a wooden floor due to its heavy weight. Therefore, you will either have to dismantle the tongue-and-groove board and pour a foundation/floor on the ground along the outer perimeter of the screen, or use other materials and technologies.
The only option for covering with tongue and groove boards without changing the design of the wooden floor and casting a separate foundation is a metal sheet. However, this material has high thermal conductivity, so thermal insulation should be laid underneath it:
- MKRP-340 – heat-resistant ceramic plate based on silicon, 0.4 x 0.6 m in size and 3 cm thick;
Attaching the fire retardant layer.
The galvanized steel sheet is attached to the wooden floor with self-tapping screws through a layer of thermal insulation. Instead of these materials, you can use budget asbestos cardboard (2 layers of KAON 1 cm thick, 0.8 x 1 m in size), PNAKH-1S asbestos fabric or AT-1 - AT-9 fabric, basalt wool.
Fire screen options are:
- steel sheet - mounted similarly to a floor screen on top of a fire-resistant material, has reflective properties, retains some of the thermal energy inside the steam room, but does not have a sufficiently attractive front layer;
Steel fire protection screen.
Fire protection screen made of porcelain stoneware.
Factory steel screens.
There are two types of protective screens:
- metal - Sami manufacturers care about the safety of users, producing screens made of cast iron and steel, installed through special spacers at a distance of 2 - 5 cm from the body;
- brick - more comfortable to use, since it is impossible to get burned on the outer surfaces; large cracks can be made in the masonry for convection heat exchange.
Metal screens reduce the temperature on external surfaces to 80 - 100 degrees, which eliminates the risk of fire in the walls, but does not protect against burns.
Despite the conflict between two structural materials - elastic wooden floors and heavy brickwork, some individual developers use the technology:
- under the stove, a sheet of gypsum fiber board is laid on a tongue-and-groove board, and a platform of large-format paving slabs 40 x 40 cm or 50 x 50 cm is laid on it;
Option for a floor screen made of paving slabs.
Important! The height of the vertical protective screens is much lower than that of fire-fighting modifications - 5 cm higher than the stove body (1 row of bricks, respectively).
Chimney cutting
Unlike brick vertical structures, the horizontal groove where the chimney passes through the bathhouse ceiling is made of bulk, cotton wool or slab material:
- sand or expanded clay;
- basalt wool;
- PKVT, TISK, MKRP slabs.
Filling the cutting with sand.
To fix the specified materials in the design level of the space, galvanized or stainless steel plates with a hole in the middle are fastened with self-tapping screws from below and above along the perimeter of the sawn hole. Thus, step-by-step instructions for fireproof cutting of a chimney at the bath floor level are as follows:
- fastening the bottom sheet to the bathhouse ceiling - with self-tapping screws to the ceiling;
- chimney assembly - sandwich elbows or pipes made of ceramic, asbestos or stainless steel are assembled sequentially, led just above the ceiling into the attic;
- backfilling - refractory material is poured/laid on the bottom cutting sheet from the attic side between the chimney pipe and the wooden floor structures;
- installation of the top sheet - the cutting element is put on the pipe, fixed over the insulation to the ceiling from above.
Installation of ceiling trim.
There are cuttings with their own pipes, a universal size of four sheets.
Important! The sections of the chimney in a bathhouse are always joined “along the smoke” and not “along the condensate”, that is, the socket of the upper pipe sits on the narrowed edge of the lower bend.
Roof passage unit
Unlike ceiling modifications, roofing trim has a more complex design:
- made of galvanized steel, polymers, non-flammable elastomers;
- has an inclined plate surface and a truncated cone;
- ensures the tightness of any roof covering.
Roofing cutting – master flush.
For the convenience of the individual developer, each set of roofing trims is accompanied by a description of the design and method of installation on different roof claddings.
Thus, a home craftsman can install a bath stove and a chimney for it on a wooden floor covering independently, choosing a convenient option with a minimum budget and acceptable quality.
Advice! If you need floor repair specialists, there is a very convenient service for selecting specialists from PROFI.RU. Just fill out the order details, the experts will respond and you can choose who to collaborate with. Each specialist in the system has a rating, reviews and examples of work, which will help with the choice. Looks like a mini tender. Placing an application is FREE and does not oblige you to anything. Works in almost all cities of Russia. Without your desire, no one will see your phone number and will not be able to call you until you yourself reveal your number to a specific specialist.
If you are a master, follow this link, register in the system and be able to accept orders.
Dimensions and location of the hearth in the room
When choosing the design and drawings of the fireplace, pay attention to the dimensions of the portal, fuel chamber and chimney. The indicated dimensions are selected according to the area of the heated room and are related to each other by the following ratios:
- cross-sectional area of the chimney pipe - 1/9 of the portal quadrature;
- the depth of the firebox is made 1.5-2 times less than the height of the portal opening;
- the area of the open opening is 1/50 of the square footage of the room.
If you make a large fireplace in a small room, the chimney draft will not have enough air flow. The fireplace will begin to smoke into the room or “suck” air from neighboring rooms, along with the heat. It is permissible to build a small structure in a spacious room, but the heating will be minimal - the fireplace will decorate the living room and play the role of a barbecue.
For the convenience of determining the size of the firebox and smoke exhaust duct, depending on the square footage of the room, there is a ready-made table:
According to their shape, fireplaces are divided into 2 types - wall-mounted and corner. In the publication we provide a description of the first type - it is relatively simple. To build corner-type home fires, you need to gain experience in the stove business. Having decided on the dimensions of the heater, select a place for installation, taking into account our recommendations:
- Place the fireplace in the central part of the interior partition. If a private house is under redevelopment, renovation or construction, the rear wall can be brought into the adjacent room by making an opening inside the partition.
- It is not advisable to build a fireplace near the outer wall - some of the heat will go outside.
- Think about convenience - do not place the structure near interior doors and do not place furniture close to each other.
- Carefully study the design of the ceilings and rafter system so that the chimney pipe does not fall into the load-bearing beam or onto the edge of the reinforced concrete floor slab. The minimum distance from the wall of the flue to the rafters is 10 cm (taking into account fire-resistant furnace cutting).
When choosing a site for a fireplace, do not forget about the foundation. In a residential area, you will have to dismantle the floors, dismantle the screed and dig a pit without affecting the existing foundation of the building. Remember if there are house utilities installed in the selected location - sewerage, water supply or heated floors. The basement under the room is also a problem; not every ceiling can withstand the weight of the masonry.
Installing a stove in a bathhouse on a wooden floor step by step in compliance with fire safety
Installing a stove in a bathhouse on a wooden floor is an important and responsible step. It is best to select a stove and how to install it before the foundation of the bathhouse is laid. After all, it is in this case that it will be possible to design rooms of optimal dimensions, provide a place for storing firewood if the stove is solid fuel, or take care in advance to comply with the PUE if the unit is electric. Gas heaters are installed only by qualified craftsmen, and permission to install certified equipment is issued by Rostechnadzor. It is prohibited to independently manufacture and connect to the gas pipeline in “makeshift conditions”. But, if the bathhouse has already been built, and even the finishing work has been completed, it is possible to install a stove on a wooden floor, provided that a number of important nuances are observed.
Installing a sauna stove on a wooden floor
Wall cladding with tiled tiles for stoves
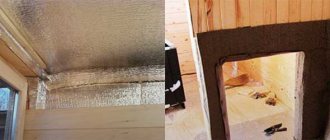
When installing a fireplace or stove in country houses, you will have to take care of thermal insulation of the nearest walls.
In this case, the enclosing corner of the internal OSB partition was lined with super-insulated boards. The material is ugly, so we decided to cover it with tiles for stoves. The walls were made of super-insulated material, lined with tiled tiles, and the fireplace stove was installed in a pre-prepared place.
| They decided to lay the tiles without a reinforcing mesh, and to ensure better adhesion between the tiles and the base, they used “Betokontakt” - an acrylic primer containing small pebbles. For reliability, the surface was coated twice, with a break of a day. Heat-resistant adhesive mastic was used to lay the tiles. Usually it is applied to one of the adhesive surfaces in a layer of 0.5 to 1 mm, but not more than 2 mm. In this case, it was applied directly to the tile - with five dots. |
| The laying began from the bottom from the corner. In this case, there was no need to set the horizontal lines, since the floor tiles were already laid and served as a guide. The thickness of the joints was adjusted using ordinary crosses for laying 1 mm tiles. |
| The tiles and joint thickness were selected in such a way as to avoid undercutting. However, in the upper part of the partition, near the ceiling beam, adjustments were required. To do this, we first prepared a paper pattern. It was used to make cuts on tiles. |
| After 24 hours, the crosses were removed, the seams were moistened with water and filled with grout using a rubber spatula. The mixture was diluted with a special latex additive for cement mixtures, which improves the technical properties of the grout, in particular, increasing its resistance to deformation loads in the form of sudden temperature changes. |
| After 10 minutes, use a damp sponge to thoroughly clean the tiles from traces of grout. To improve the hydration process of the cement contained in the grout mixture, the joints were additionally moistened several hours after grouting. |
| The edges of the tiled masonry and the ends of the wall were edged with wooden corners and plinths, combined with the floor plinth. For this purpose, you can use special plastic or metal strips for tiles, which give a beautiful, smooth edge. |
Load on wooden floor
The maximum load on a wooden floor depends on the cross-section of the beams and their pitch. The larger the cross-section and the smaller the pitch, respectively, the greater the load the floor will withstand without any deformation. If under the wooden flooring instead of beams there are inch boards placed on the edge, and their pitch is about 60 cm or more, then in the steam room you will have to be content with a miniature electric heater weighing 10-12 kg. Therefore, the first step before installing a stove is its correct selection, taking into account the permissible load on the floor.
Required materials and tools
To build a fireplace stove, you do not need any special equipment. All the tools necessary for this can be found at every owner:
- Bayonet and shovel.
- Big crowbar.
- Hand-held circular saw.
- Hacksaw.
- Building level.
- Yardstick.
- Plumb.
- Large square.
- Rule for leveling a concrete base.
- Containers for water and masonry mixture.
- Deep vibrator.
- Trowel.
- Mallet with a rubber striker.
- Pliers.
- Hammer.
To fill the foundation you will need the following materials:
- Material for waterproofing. You can use roofing felt or thick polyethylene.
- To make a reinforcing grid, use reinforcing bars with a cross section of 0.8 cm.
- Sand.
- Fine-grained (from 20 to 30 mm) crushed stone or large granite screenings.
- For the manufacture of formwork - edged boards, plywood or OSB boards.
- Concrete mixture grade M 300 or M 400.
- Nails and screws for strengthening formwork.
- Wire or plastic clamps for fastening reinforcing bars.
- Fireclay brick of SHA brand 8 standard parameters.
- Red refractory brick grade M 150 in regular sizes.
- Facing material.
- Cement.
- Clay.
- Metal corners made of steel with a shelf width of 50x50 or 60x60 mm.
- Metal gate valve.
- Insulating heat-resistant material made of asbestos or basalt.
It is convenient to use ready-made material from hardware stores as a masonry mixture. Such mixtures are specialized for the construction of such structures.
Large selection
Date: September 25, 2022
Types and weight of sauna stoves
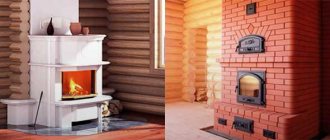
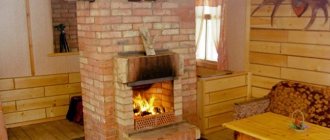
The largest and most massive stoves are brick . Their weight can reach several hundred kilograms. They are distinguished by excellent heat capacity and durability; it is possible to install a large tank for heating water and install a beautiful fireplace in the dressing room. For decorative purposes, such stoves are finished with natural stone: coils, marble, granite, soapstone, flagstone, heat-resistant tiles, etc. However, even without special finishing, neatly embroidered brickwork looks presentable.
Brick heater
A separate monolithic reinforced foundation is built for brick stoves, not connected to the base of the bathhouse. It is not always advisable to build a brick stove in a ready-made bathhouse; you will have to dismantle the floor, ceiling and roof, as well as, possibly, the partition between the steam room and the room next to it, which is associated with significant financial costs. The optimal alternative to a classic brick stove is a thick-walled metal stove with cladding.
One of the foundation options for a brick kiln is columnar
A cast-iron sauna stove itself weighs a lot, and if you add a water tank, a heat exchanger, a lot of stones, cladding, the total load can become critical for the wooden floor. Therefore, we recommend that you plan in advance to purchase a cast iron unit, if necessary, strengthening the floors under the stove installation site.
Cast iron sauna stove "Sibir-24"
On a note! The entire heating unit or just the firebox can be made of cast iron. Some stove models have a steel heater. Fully cast iron products weigh more than steel and composite ones.
Steel solid fuel
Steel solid fuel sauna stoves cannot boast of such wall thickness as their cast iron counterparts. If we compare cast iron and steel stoves, the latter cool faster and are prone to burning out, the radiation from them is not so soft, but such units are cheaper, weigh less, and the range of models is very wide.
Steel solid fuel sauna stoves with lining
Electrical
The most compact ovens are electric . They operate on 220 and 380 V, saving owners from the need to prepare and store firewood, clean the chimney and other “dirty work”. High-quality electric heaters are compact, do not fail when exposed to moisture, and are equipped with an overheating protection system, a steam generator and temperature sensors. The stoves are selected according to the size of the steam room (the larger the volume of the room, the more powerful the unit should be purchased). On average, the equipment weighs 10-28 kg; from 20 to 75 kg of stones can fit inside, depending on the design and dimensions of the furnace.
Electric sauna stove
Brick oven
Full ceramic brick is the best option for laying a stove in a wooden house with your own hands
Pay attention to the quality of the material. High-quality bricks have approximately the same burning color and have no defects, and the geometric shapes should not differ
Features of laying a brick oven
The masonry of the furnace has a strict pattern, violation of which is fraught with consequences such as destruction of the finished structure or an asymmetrical result.
The first row requires especially careful laying; this will be the key to perfectly right angles and long service life of the unit. Before starting work, it is recommended to soak the bricks in a ladle of water. When starting work, take care of purchasing the necessary materials and accessories. Cast iron elements are the best option for a brick oven: for the oven, stove, firebox door, ash door, cleanout, ladle, grate and valve. The ladle can be used as a tool in the construction of a furnace. Professional stove makers also have their own kits for laying stoves. You can rent them or buy them at hardware stores.
Everyone chooses a clay solution or a solution from manufacturers for themselves, but experts recommend taking ready-made solutions because of their improved qualities. Clay mortar is made from sand and clay with water.
Stove makers share a trick: they get the same thickness of the seam by using two thin wires as a spacer between the bricks.
Here are some more tips to know:
- Compliance with bandaging of seams will increase the strength of the masonry.
- Before laying bricks in the mortar, it is exposed and adjusted dry.
- It is better to round off turns for the release of gases for a smooth exit.
After laying 2-3 rows of corners, vertical guides are installed in the form of ropes or wooden slats. The ropes are tied to the nails on the four sides of the stove and to the ceiling.
The grate must be cast iron so that the fallen coals burn out there. Therefore, this element is installed with a gap and sometimes with a bevel. It is safe to burn coals in such a place. Then the combustion door is installed on a mounting wire, which is placed in the seams so that it does not melt during prolonged combustion of the fuel. For the rest, bricks, boards and other devices will help.
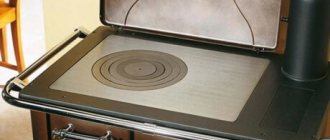
The last row on which the slab will be installed is first laid without mortar to outline the location of the slab. We select a groove, put an asbestos cord in it, and only then place it on the solution. Cooking stoves at this stage can additionally be equipped with full-fledged ovens and even a tank for heating water. In the absence of an electronic oven, a stove oven can perform its functions.
When working on laying the chimney, do not forget about the need to install a valve on the summer flow channel. It is located in the inner corner of the cooking compartment.
The walls of the hood are laid out up to the opening in the ceiling. The stove is covered with several bricks, and the gap between them is filled with mineral wool. This is done in order to provide additional thermal insulation and increase heating.
Next, you should lay out a decorative brick band along the top of the finished structure, and begin constructing the chimney pipe. The brick version is more durable compared to asbestos and metal.
Ready! You were able to install a stove in a wooden house! Now all that remains is to carry out the exterior finishing in accordance with your individual preferences and tastes.
Thus, through the centuries, the wood-burning type of heating still remains the main type of fuel in the country.
And when choosing the type of stove, you should pay the most important attention to fire safety. Despite the fact that the masonry process is not an easy and time-consuming job, you can do it yourself and be satisfied with it
TOP 3 popular models of wood-burning cast iron sauna stoves
Hephaestus PB-04 MS
A modern stove made of alloy cast iron (a firebox made of cast iron with the addition of chrome), which harmoniously fits into the interior of a Russian steam bath. Decorated with forging elements. Through the door with heat-resistant glass, the live flame is clearly visible. Stainless steel ash box.
High efficiency (up to 87%), energy efficiency (active afterburning of pyrolysis gases), quick heating of a steam room with a volume of up to 15 m³. The firebox is remote. The thickness of the elements is up to 40 mm.
The stove weighs 130 kg. The heater can hold up to 180 kg of stones. Product dimensions 39.4 x 56 x 64.5 cm.
Vesuvius Legend Forging 16 (271)
A sauna stove made of a special cast iron alloy “Vesuvius Legend” is suitable for steam rooms with a volume of 8 to 18 m³. Wall thickness 12 mm. It has a combustion tunnel with a length of 250 mm (filling firewood is implied from the adjacent room). The door is cast iron, without glass. Convection-ventilated steel casing. Furnace efficiency up to 80%. It warms up the steam room quickly and gently, the steam from the stove is finely dispersed, light and pleasant.
“Vesuvius Legend Forging 16 (271)”
Product dimensions 70x56x69 cm. The weight of the unit itself is 98 kg and the stones additionally up to 120-160 kg.
NMK Sibir-18
The Siberia cast iron sauna stove (grade SCh-15) with a panoramic door is designed for steam rooms with a volume of 12 - 18 m³. It features a spacious firebox, is visually aesthetic and ergonomic. Wall thickness 10 mm. Flame stopper made of steel, thickness 6 mm.
Suitable for use in commercial baths and saunas. Loading firewood from an adjacent room.
The dimensions of the stove are 72 x 72 x 43 cm. The weight of the stove is 104 kg, stones - up to 80 kg.
* Heat exchanger tanks for water are purchased and installed separately. The volume of tanks varies, from 6 to 85 liters or more. When calculating the load on the floor, it is worth taking into account the weight of the metal (10-15 kg on average, indicated in the product passport) and the water being poured.
Selecting a water tank
Preparing the floor surface
Installation of a sauna stove on a wooden floor will be done without dismantling the ceiling.
Work progress:
- The future location of the stove is marked on the floor in compliance with the rules and regulations. Next, install the pre-furnace protective sheet. Dimensions are 50 cm wide and 70 cm long. The protective element can be brass, copper or steel; it is placed in front of the firebox door.
- Each installation method is considered by professionals separately, based on individual characteristics. For example, if the door of a metal stove opens onto the street or into an adjacent room, additional pouring of concrete mixture or laying of paving slabs will be required.
- A mineralite slab of the required size is laid on the floor.
- Fireclay or red solid bricks are laid out in two rows. Before the laying process, the bricks are immersed in containers filled with water. During construction, a fire-resistant mixture is used. Each row is set according to level. The result should be a monolithic base with the function of protecting the floor from fire. The finished “Podium” will not exceed 20 cm in height.
Base for a sauna stove made of fireclay brick Source prestig-dom.ru
- Using heat-resistant glue, a protective sheet or porcelain stoneware slab is attached to a horizontal brick surface, which can withstand high temperatures and looks great in the building. Assembly and installation of furnace equipment is carried out on the foundation two days after its construction.
- A steel panel is attached to the floor in front of the firebox.
The technology allows the stove to be mounted on a base made of mineralite, basalt cardboard, which is covered on top with a steel sheet or porcelain stoneware. The floor surface under the fireplace heats up much less than the walls located close to it. Therefore, neglecting fire safety rules is not acceptable.
TOP 3 popular models of wood-burning steel stoves
Varvara Terma-kamenka
Finnish steel wood-burning stove with a closed heater and a panoramic combustion door. Suitable for Russian baths, as well as saunas. You will have to add firewood from the dressing room, a unit with an external firebox. Water tank included.
The heated volume of the steam room is from 6 to 13 m³. The dimensions of the device are 39 x 71 x 65 cm. The stove itself weighs only 50 kg, plus stones - up to 30 kg.
Teplodar Rus 18 L
Another stove that is heated from the adjacent room. Among the advantages are an effective heat exchange scheme and ergonomic design. Open type heater, remote firebox.
“Teplodar Rus 18 L”
A distinctive feature is that the stove can be converted from wood to gas (the burner is purchased separately and installed without welding).
Suitable for a spacious steam room with a volume of up to 18 m³. The stove itself weighs 41 kg, and up to 90 kg of stones can be placed in the mesh. Unit dimensions 81 x 79 x 33.5 cm.
Harvia M3 SL
One of the heaviest steel stoves. Outside there is a mesh casing for laying stones, and there is also a closed heater. The firebox is remote, the door is panoramic with the “clean glass” system. There are also modifications of the oven with a blank door (without glass).
A powerful stove for a spacious steam room with a volume of up to 24 m³. The unit itself weighs as much as 170 kg, stones up to 250 kg.
Steel and cast iron fireboxes
Steel and cast iron fireplace inserts with glass doors are a combination of fireplace and stove. The configuration of the firebox in this case is very similar to the classic options, due to which the maximum amount of thermal energy enters the home. The damper and transparent door provide not only visual observation of the burning flame, but also a adjusted dosage of air necessary for combustion.
Developed fins are used on the metal body, which, together with the large area, leads to a noticeable increase in the convective heat supply to the room, compared with a brick fireplace. Such design solutions make it possible to increase the efficiency level of modern fireboxes to almost 80%. These effective, inexpensive, compact and visually attractive products are lightweight.
The presence of these undeniable positive qualities explains the high popularity of steel fireplaces. Their only noticeable drawback is the rapid cooling of the heated surface. On the other hand, cold rooms are heated at a high speed, and one stack of firewood lasts for a long time.
The degree of heating of a metal combustion surface is an order of magnitude greater than that of a thick-walled brick structure. Because of this, you need to carefully plan where to place the stove in a wooden house: placing it close to the walls is strictly prohibited. The minimum possible distances to combustible wooden structures are indicated in the accompanying documentation for the operation of the firebox. In their absence, the guideline is the building codes on how to properly install a stove, which contain corresponding regulations for fireplaces.
It is prohibited to install an unlined iron stove closer than one meter from an unprotected wooden wall. Closer placement is permitted only if there are fire-resistant heat-insulating screens on the walls. This kind of protection is available for sale in many variants of substrates for stoves in a wooden house. The simplest and most inexpensive of them is 50 mm thick stone wool, gypsum fiber boards and a 20 mm air layer. As a result, the total distance between the rear and side walls of the metal firebox and the wooden surface will reach 100 mm.
Calculation of the load on a wooden floor
Will the wooden floor withstand a brand new stove complete with stones, tanks, cladding, etc.? And given that the floor will be used in conditions of temperature changes and high humidity, it is worth taking this issue seriously.
- measuring the distance between load-bearing walls;
- load calculation;
- calculation of the optimal section and pitch of beams.
If the span length (distance between load-bearing walls) is less than 5 meters, the use of beams made of solid coniferous or hardwood is allowed. If the span is more than 5 meters, it is desirable that glued beams be used (they can withstand increased loads).
Beams are used of square, rectangular, and also I-beams (a profile combining elements made of solid wood and plywood or OSB). For a rectangular section, the optimal ratio is 1 to 1.4 (for example, 100 x 140, 200 x 280 mm). The rigidity of the beams is taken to be no more than 1 to 350 (the ratio of the deflection to the length of the beam). Recommended thickness of flooring boards is 50 mm.
Table for determining the minimum permissible cross-section at a step of 1 m
Accurate data on the relationship between beam pitch and section can be obtained using a calculator.
The recommended cross-section of beams, provided that the stove, together with the cladding, stones and other structural elements, weighs less than four hundred kilograms.
If the calculated load corresponds to the actual cross-section of the beams, you can proceed to installing the furnace. If the load is critical, it is advisable to either strengthen the beams or choose a different stove for the sauna (with less weight).
Increasing the cross-sectional area of a beam
Additional fire barriers
To protect wooden partitions, ceilings, and wood trim in the steam room, a “cut” is made from fireproof products. They lay high-quality brickwork, and the system is not tied to the furnace masonry. Cutting is carried out in the following areas:
- the chimney located horizontally passes through the ceiling. The brickwork is tied to the laying of the stone chimney;
- next to the brick stove, which will occupy space in the interior wall, fire gaps should be filled. The cutting is carried out vertically along the entire height of the heating unit and its chimney;
All gaps around the stove in the interior wall must be filled Source bg.decoratex.biz
- the heat generator is located in the bathhouse, and its door opens into the adjacent room; protective building materials are also installed around the firebox channel.
Ceramic products, metal, asbestos-cement and concrete panels are used to lay the smoke channel. They use a passage tube or install a box and fill it with non-flammable material - basalt wool. In the lower zone, the iron pipe passage unit is hemmed with stainless steel.
Installing a stove in a bathhouse on a wooden floor step by step
Metal wood-burning sauna stoves are installed in accordance with fire safety rules, as well as for the convenience of steam room visitors.
Furnace installation diagram
Fire safety requirements
Depending on the location of the firebox door, there are three possible options for installing the stove.
- The stove has a remote firebox; fuel is loaded from the street. An acceptable option for small baths. It is inconvenient because you will have to reload firewood and control traction while leaving the bathhouse, which is not always appropriate or convenient. In addition, it is not always possible to dismantle part of the outer wall.
Loading firewood into a sauna stove from the street
The firebox opens into the rest room
When choosing a place to install the stove, you should be guided by a number of rules (SNiP II-L.13-62, SNiP 41−01−2003, SNiP 2.04.05-91 section “Stove heating”).
- The distance between the closed firebox door and the bathhouse wall is from 150 cm. The distance from the other sides of the stove to walls made of combustible materials is at least 100 cm, or at least 70 cm to walls protected by a metal sheet for thermal insulation or brickwork 12 cm thick. Thermal insulation height - more than 120 cm.
- If it is not possible to maintain the distances prescribed in paragraph 1, then it is necessary to install a protective screen (dismantle part of the partition and replace it with brickwork) 25 cm thick and 120 cm high.
- If the stove is mounted together with heat-insulating panels, the recommended distance between the walls of the device and the surface of the panel is at least 50 cm. And at least 50 cm should be between the panel and the wall or partition of the bathhouse.
- The distance between the top of the stove and the unprotected ceiling is at least 120 cm.
Fireproof distances from walls to stove
Fire safety when using stoves
Stage 1. Arranging a fireproof base for a wood-burning stove
It is recommended to lay out a brick platform as a base, the size of which exceeds the dimensions of the stove by 150-250 cm in all directions. On top of the brick, it is necessary to either pour a screed made of branded cement mortar, or lay a steel sheet 1 mm thick.
Where to put a metal stove?
Ideally, you should choose a location for a steel stove after windows have been installed and doorways have been erected. Then it becomes clear how the air flows inside the room will be directed. To achieve the most efficient operation of the furnace, it should be placed where there is not too much air movement.
- Narrow rooms are not a suitable place to install a stove. According to fire safety rules, there must be at least 130 cm to the wall opposite the firebox.
- In addition, the stove itself should be 110-125 cm from the walls, and when using insulation made from non-combustible materials - 40 cm.
- It is also not possible to install a stove in a room that is too small: heating equipment that runs on wood is allowed to be installed in rooms with an area of at least 16 m2.
If the device is equipped with a hob, then you can safely install it in the kitchen. For example, among the Teplodar stoves, the Matrix, Vertical, Meteor and other models have this design. These stoves can operate for up to 8 hours on one load of wood thanks to an effective two-channel afterburner system.
Owners of two-story buildings should take into account that to heat the second floor they will need another metal stove.
Where is the best place to place the oven?
The correct layout of the bath will make it more comfortable. This applies to both the design of the room and the placement of the necessary elements inside the building, for example, a stove. The distribution of hot air inside the building, the creation of a comfortable microclimate and the safety of visitors depend on the location of the latter.
Depending on the oven model
The location of the heater depends on the type of sauna stove chosen:
- An electric heater is a continuous stove. Easy to use option. It does not require firewood, just plug the device into the power supply and you can steam. The equipment provides a choice of temperature conditions; there is no need to constantly add firewood. It can be installed anywhere in the bathhouse.
- A regular heater is a variable oven. Heated by wood. Operation requires compliance with fire safety rules, as it has a chamber with an open flame. Its location should be planned during construction. Often the structure requires a separate foundation due to its significant weight.
Electric heaters are usually used in small baths. Variable stoves are installed in spacious buildings designed for simultaneous recreation of a group of people up to 5 people.
Popular locations of the stove in the bathhouse
Let's consider how to properly install a stove in a wooden bathhouse, possible options for installing the structure:
- In the center of the steam room. Mounted in the middle of the washing room on a small separate foundation. The firebox door should face towards the dressing room, if one is provided in the building, or towards the entrance door from the street, if there is none. This arrangement will create a favorable microclimate in the room.
- Next to the internal main wall in the corner or at the entrance door. This location option is the most common. It is convenient because it can be used for buildings of any size; fuel does not need to be carried far to the bathhouse. The structure is placed so that it transfers heat to all surfaces. They are mounted along the inner wall. If the installation is carried out next to the outdoor one, then the heat will be spent not on heating the bathhouse, but on heating the street.
- Between the steam room and the dressing room. A special opening is constructed between the zones into which the stove is installed. The area occupied by the unit is usually only 0.15 square meters.
- The most convenient option involves having a separate room for installing a heating device. This arrangement is only possible in large rooms. From a fire safety point of view, this is the best option.
Base for a stove in a wooden house
When the stove has a small mass, it is necessary to slightly increase the strength of the floor. You can additionally make a flooring perpendicular to the main one. To maintain fire safety, asbestos material is laid at the installation site. The top is covered with a metal sheet. Construction can begin. If the stove is heavy, you will have to dismantle the floor.
Use of piles
General rules for bookmarking a database
If the stove is located away from the outer walls, the ground will not freeze, so there is no need to be afraid that the base will deform. A small indentation is made. There is no need to worry about soil heaving on sandy or rocky soils as long as the water does not lie too close to the surface, even if the equipment is located next to external walls.
When constructing the foundation, you need to monitor the vertical and horizontal levels. The height of the base depends on the distance between the ground and the floor. Must be below floor level, related to waterproofing. The base is covered with roofing felt so that the resulting moisture does not fall on the stove. If the base is higher, close to the floor level, dampness will transfer to the flooring.
Slab base for metal stove
This refers to a thin reinforced concrete slab. Applicable:
- concrete;
- fittings;
- filler.
Filler:
- crushed stone;
- pebbles;
- broken bricks, concrete fragments.
It is necessary that the materials are not too large, otherwise they will interfere with the installation of the reinforcement mesh.
Slab making
The slab can be selected when the ground is hard and a starting platform is needed. After waterproofing, you can begin laying the stove. If you need to raise the level, raise the base to the floor, lay out brickwork around the perimeter, the width of a brick. The space is covered with sand, and two rows of bricks in a bundle are again laid on top. Brick and cement mortar are saved.
Stone (rubble) base for a brick kiln
Large stones can be used to make a strong base for a very heavy stove. They make a hole, fill it up, tamp down the pillow, it will help the water not to accumulate. You can pour tar, mastic on top, cover it with roofing material, separating the lower wet layers. Stone masonry is laid on top of the waterproofing. The largest stones are laid around the perimeter, and smaller ones closer to the center. They try to make the outer sides even in a plane, vertically.
The structure can be erected quite high, it is necessary to monitor the dressing. After construction is completed, the concrete is given time to gain the necessary strength, and you can begin laying the stove. The top and sides of the cabinet must be coated with tar and mastic; roofing material may tear on sharp edges.
Reinforced concrete base
The design is similar to a slab, but has a greater height. To make a concrete mixture, use a recipe of 1: 3: 5: 0.5, where the following are indicated: cement, sand, gravel, water.
The ratio of water and cement should be as indicated in the diagram. Theoretically, the water-cement modulus should be 0.2, but due to the low viscosity, it is necessary to make the figure higher. An excessive increase in the number leads to a decrease in the strength of concrete, usually several times. The water-cement indicator varies depending on the brand of cement used.
Reinforced concrete base
A special feature is the use of reinforcement. Unlike the slab type, a column bond is required here. The point is the diameter of the rods. The main load in the slab type falls on the horizontal elements, while in the column type it is evenly distributed on horizontal and vertical planes.
Floor installation
When designing a device for the floor, you need to know its weight, based on which you can calculate the strength of the floors. Matching the weight of the structure and the rigidity of the installation area will prevent the floor from breaking. There are special online services that allow you to make such a calculation. All you need is accurate information about the cross-section and size of beams and joists.
Using approximate load values, we will consider options for constructing a floor covering on which the heating device will subsequently be installed.
The stove with base plate and all structural elements weighing no more than 700 kg can be installed on a wooden floor with support beams. More massive structures require additional construction of a foundation - a foundation for installation.
The following dimensions are observed when constructing a wooden base.
Step between joists 60 cm
Step between joists 1 meter
A 50 mm thick floorboard is placed on top of the log. All wooden parts of the floor structure are ideally treated with fire-retardant impregnation.
Selecting a model and installation location
Before we begin, we need to decide which model we will install. Accordingly, this choice will largely determine the location, since fireplaces and stoves in a wooden house cannot be placed everywhere.
Wood-burning structures are the most complex in equipment
To understand the main tricks, it is worth studying the table:
Variety Where can it be placed Wood/coal The most difficult case: the structures have a significant mass, in addition, when the fuel burns, an open flame is formed, which, upon contact with wood, can cause a fire. Regardless of the material of manufacture (metal or brick), as well as the shape (wall-mounted or corner), you can install a solid fuel fireplace in a wooden house with your own hands on the ground floor, on a prepared foundation, and preferably in a fairly spacious (from 20 m2) room.
Electric They are compact in size and safe to use, so they can be placed almost anywhere – as long as the power supply allows it. An ideal option if you are planning to install a fireplace on the second floor of a wooden house.
Biofireplaces combine the features of solid fuel and electric models: on the one hand, they are quite compact, which allows them to be placed almost anywhere, on the other hand, they function with the formation of an open flame. It is for this reason that portable biofireplaces are usually used on the terraces of wooden houses, and stationary models are placed with the same precautions as conventional wood-burning structures.
Biofireplaces also require a protective circuit
It should also be noted that before installing a fireplace in a wooden house, you should consider its effectiveness as a heating device. That is why they are usually placed on interior walls, at the maximum distance from window and door openings.
If you have decided on a location, then it’s time to learn how to protect the building from fire. And in the following sections we will consider the most difficult option from this point of view, namely, we will describe how to install a stove - a fireplace in a wooden house.
How to pour a foundation for a stove in a bathhouse?
If the stove weighs more than 700 kg, it places a serious load on the wooden floor structure. Without a foundation, over time the floor and stove will deform. Therefore, when building a foundation for a bathhouse, you need to pour it under the heating unit. It is better to entrust the construction of bathhouses, country houses and garden houses to professionals.
The foundation for a stove in a bathhouse without a foundation, the floor in the bathhouse deforms over time
Concrete foundations must be at the same depth, below the soil freezing level. A distance of at least 5 cm must be provided between them. This guarantees the integrity of one of them if the second begins to collapse under the influence of soil deformation.
Technology for creating a base for a metal structure:
- A pit is dug 50 cm deep. Its width and length should be slightly larger than the dimensions of the base of the metal furnace (by 10-15 cm).
- The bottom is filled 30 cm from the ground with crushed stone.
- A cement-sand mortar 1:4 is prepared.
- A mixture of several centimeters (5-10) is poured on top of the crushed stone.
- The frozen layer is waterproofed with roofing felt.
- Knead the solution with proportions 1:2.5:4 (cement, sand, gravel).
- The mixture is poured onto the remaining part of the foundation.
- The building level is used to check horizontal evenness. If there is a flaw, it is smoothed out until the solution hardens.
- The foundation is constructed 30-40 cm below the floor. If the stove is installed at floor level, then brickwork with a height of 3-4 bricks is carried out over the entire area of the foundation.
Construction of a foundation for a brick kiln is a more labor-intensive process, since it must withstand loads 4 times greater. Stages of its construction:
- A pit is dug, the depth of which is at least 70 cm, and the width is 20 cm larger than the dimensions of the future furnace.
- The bottom is lined with sand 15 cm thick, spilled with water and compacted.
- The next layer is rubble material (broken bricks and stones).
- Sand is poured onto the second layer so that all the holes between the stones are covered with it, and the sand itself covers the rubble by 2-3 cm.
- This is followed by a layer of crushed stone 10 cm thick. All layers are carefully compacted.
- The next stage is the installation of wooden formwork, rising 15 cm above the ground and corresponding to the size of the oven.
- Steel rods with a diameter of 12 mm (screed) are laid inside.
- Concrete mortar is poured over the screed to the edges of the formwork.
- After the foundation hardens, the wooden formwork is knocked down. The walls of the concrete structure are coated with tar 3 times.
Types of foundations for a stove in a wooden house
There are several types of foundations used for furnace equipment, each of which has its own characteristics, design and operation features.
When choosing a suitable foundation, consider the following:
- Installation cost – the price of building materials, installation and preparatory work is taken into account.
- Characteristics of the foundation and soil characteristics - the choice is based on the total weight of the structure, the type of soil (clayey, sandy, black soil, stone).
- Dimensions of the foundation for the stove in the house - depending on the area occupied by the stove equipment, the total weight of the structure, the required type of foundation is calculated.
Additionally, several other factors are taken into account. The choice of foundation is influenced by the time of manufacture of the foundation (in an already finished building or simultaneously with the construction of the house), the qualifications of the craftsman, weather conditions, speed of work, etc.
All existing foundations are usually classified into several groups:
- On stilts and pillars.
- Concrete bases.
The stove, subject to certain conditions, can be installed directly on the floor.
Foundations on piles and pillars
The base is made in three ways:
- Screw piles are a method that requires material investments. The advantage of using screw piles is the speed of installation. During installation, a worker drives a steel screw into the ground. The steel pillar will be the basis of the future foundation. The piles are tied together, after which a concrete pad is poured on top. The work only takes 1-2 days. You can even put a heavy cast-iron stove lined with brick on a screw foundation. The only drawback is the limited service life. The steel base rots after 50-60 years of use.
Bored piles - in this case, holes of sufficient depth and diameter are drilled with a drill. The resulting cavity is reinforced with a mesh to prevent soil from falling out. Knit a reinforcing structure. After reinforcement, the pillars are filled with concrete mixture.
Columnar piles - the process of installing the foundation is the same as in the case of using bored structures. The difference is that ready-made concrete or wooden pillars are used. Massive structures with a large weight load are installed on a columnar foundation. This is the design that is used in the construction of multi-storey buildings.
If you want to make a foundation for a stove in a wooden house with your own hands, without involving outside help, it is better to choose a pile structure, which is easy to install and does not require (with the exception of a screw device) serious material investments.
Concrete bases
The most common type of foundation used for furnace installations is a monolithic foundation made of concrete with mandatory reinforcement.
Concrete foundations are made in two ways:
- Strip foundation - a trench is dug along the perimeter of the structure below the freezing point. A metal frame made of reinforcement is installed. The structure is poured with concrete. The strip foundation of the stove cannot be connected to the foundation of the house. The foundation of the building is squeezed out of the ground in winter. The intensity of the “walking” of the walls, the rise from the ground varies, reaching 20-30 cm. If you make a common foundation, this will lead to the destruction of the brick cladding, and often to the deformation of a steel stove decorated like a brick. In any case, SNiP imposes a strict ban on making a common foundation for a stove and a residential building.
Concrete slab is another popular solution. The slab is poured with a thickness of 15-20 cm. If installed correctly, the result is a monolithic base that can withstand almost any load. To level and evenly distribute the weight, you will need to make a gravel-sand cushion under the foundation. The layer is thoroughly compacted with plenty of water. After filling, a layer of waterproofing is laid, beacons are placed, along which a concrete screed is poured. To prevent the slab from cracking, freshly poured concrete is covered with oilcloth. The base is watered for 2 weeks.
Floor placement (floor installation)
Existing building codes for installing a home heating stove in a wooden house allow the installation of equipment that does not have cladding directly on a wooden floor. When installing on the second floor, you will need to strengthen the logs with metal corners and channels.
To prevent fire, the tree is protected with a metal sheet or a clay-brick layer. Otherwise, installing a wood-burning stove in a wooden house yourself is not difficult.
Arranging the area around the stove in the bathhouse
During combustion, the stove sometimes heats up to 400 C. The heat is distributed throughout the room, and primarily affects the walls located next to the structure. To protect a nearby wooden wall from overheating, they construct protective screens or cover it with non-combustible materials.
The need for protective installations when installing a heating unit in a wooden bathhouse arises primarily if the distance from the walls to the side surface of a brick stove is less than 32 cm, and a metal stove is 1 m.
The following thermal insulation methods are used:
- Installation of protective steel or cast iron screens purchased in the store. The product is equipped with special holes for mounting to the wall, so it is not difficult to use. The structure will reduce the temperature by 80-100 C. It is installed around the stove, at a distance of 1-5 cm from the side walls.
- Construction of a brick screen. It can cover all side surfaces of the structure or be located only between the potential flammable surface and the heat source. The masonry is made from solid bricks on clay or cement. The laying thickness is at least 60 cm (a quarter of a brick); if the owner does not experience a shortage of material, they make a laying of 120 cm (half a brick). The screen is raised above the stove by 20 cm. The distance from the heat source to the screen is maintained at 5-15 cm. The same distance is acceptable from the masonry to the wall.
- Reflective trims. Installed in combination with thermal insulation materials (basalt wool or cardboard, asbestos cardboard, mineralite). First, thermal insulation is attached to the wall, and a stainless steel sheet is placed on top of it. In order for the reflection of thermal rays to be ideal, the metal sheet must have a mirror surface. Fastening is carried out on ceramic bushings. They do not heat up and provide ventilation between the wall and the insulation.
The listed methods will protect the wall located nearby from the heat generated by the stove installed both in the steam room of a wooden bathhouse and in the dressing room.
Installing a chimney in a wooden house
The combustion temperature inside the firebox of a solid fuel stove is at the level of 450-550°C. The surface of the chimney heats up to 300°C. When soot ignites, short-term heating to 800-1000°C is possible. Due to high temperatures, fire breaks must be provided when installing metal chimney pipes.
Existing PPB rules stipulate compliance with the following conditions:
- Chimney type - it is recommended to install a sandwich pipe made of stainless steel and ceramics with thermal insulation.
Breaks and thermal insulation materials - in places where they adjoin the walls, the pipe is removed from the surface by 25 cm. The walls are covered with basalt cardboard, followed by sheathing with stainless or galvanized steel.
How to properly install a metal stove in a wooden bathhouse?
Ready-made heating units are much easier to install than building a brick oven. Therefore, metal stoves are the priority choice of equipment for a bathhouse. It warms up quickly and is easy to use.
Furnace installation
Installing a stove in a bathhouse on a wooden floor requires the installation of a floor base that can prevent the wood from catching fire. A set of works is being carried out step by step:
- Marking. At the location where the heat source is mounted, a rectangle with a size identical to the base of the structure is drawn on the floor. On the side of the firebox, 50 cm is added to it, and on the remaining three sides, 10 cm.
- A heat-resistant plate is being prepared. Its dimensions correspond to the figure drawn on the wooden floor; fire-resistant material is chosen for production.
- Attach the above element to the floor with self-tapping screws.
- A brick pedestal is erected on top of the slab, on which the stove will be installed. To do this, solid or fireclay red bricks are pre-soaked in water. A platform is laid out of them in one layer. In the work, use a heat-resistant mortar for masonry and check its horizontalness with a level.
- To give the masonry an aesthetic appearance, ceramic or porcelain tiles are laid on top of it.
The structure needs to dry for 1-2 days, after which it can be used for its intended purpose.
Chimney installation
Erroneous installation of a chimney is not uncommon in practice. The result of an oversight may be the ignition of the ceiling. The main causes of fire are: overheating of the pipe, incorrect distance between the pipe and the ceiling, emission of sparks into the cracks of the chimney.
Incorrect installation of the chimney can cause the ceiling to catch fire
Installation of the pipe in accordance with all fire safety regulations consists of the following steps:
- To install a cutting box, a square is cut out in the ceiling (if the hole was not planned during the construction of the building).
- The pre-prepared box is a tin rectangle, sheathed on top and bottom with stainless steel with a hole for the pipe.
- The chimney originates in the pipe coming out of the stove. If the diameter of the main pipe is larger, it is connected to the pipe by an adapter. Then a gate is mounted on it. An adapter is taken from the main pipe and installed on the sandwich chimney. The connection must go through the hole in the ceiling. It is very important.
- The pipe is led out through a hole in the duct and roof to the street.
- The voids between the chimney and the duct are sealed with expanded clay, mineral wool or sand.
- On the street side, the area next to the pipe is coated with sealant. The fastening is done with self-tapping screws at intervals of 5 cm. The work on installing the pipe is now complete, all that remains is to install a deflector or umbrella on top.
Mounting a mounted tank
The mounted tank is mounted as follows:
- the location of the tank should be chosen so that it is located above the furnace;
- It is better to install the tank in a wooden bath on a lathing made of slats, and not directly to the wall;
- fastening is carried out from above and below onto brackets;
- the container must have 3 or 4 pipes (two for communication with the heat exchanger, the rest for supplying water);
- one of the pipes is used to fill the container with cold water (it must have a non-return safety valve);
- connection to the heat exchanger is made using corrugated steel or copper tubes, they are attached to fittings;
- one of the pipes must have a tap to completely drain the water;
- the heat exchanger fittings are connected to the tank tubes with fittings;
- if necessary, the fastening points are reinforced with clamps or sealant;
Often, bathhouse owners do not show much wisdom and make everything much simpler, and this also works.
Installation of stove and chimney
The installation of a metal stove itself is not difficult.
The main thing is to strictly follow the recommendations in the instructions supplied with the equipment, and also to align the structure at a horizontal level. In this case, the minimum distance specified above must be observed from the wall. Advice. Before installing the device in the house, it is recommended to carry out the first firing in the yard so that the thermal paint that covers the stove outside and inside is firmly fixed and loses its specific smell.
After installing the stove, the chimney is connected. The most successful option for a wooden house is a sandwich chimney. There is a heat insulator between the two layers of steel that it is made of, so the outer surface does not get too hot. Other advantages of chimneys of this type include the fact that they are not prone to condensation and less soot accumulates in them.
If the pipe is made of stainless galvanized steel, then it must be insulated with non-combustible material. But, despite the presence of insulation, the chimney, according to safety regulations, must, like the stove itself, be located no closer than 38 cm from the wall.
The rules for installing a chimney are as follows:
- In order to make chimney passages through the ceiling, a factory-made cutting (special box) is used. This type of cutting is called interfloor or attic.
- The box should be selected so that the diameter of its hole matches the outer diameter of the pipe.
- A square hole should be cut between the beams, the size of which should correspond to the square part of the cutting. You can make this hole a little larger so that you can metal it with two layers of basalt wool.
- After this, the assembly of the chimney begins. A pipe must be connected to the chimney outlet, which is located on the top or rear surface of the housing. A slide valve is mounted above, which is designed to regulate draft.
- To create hermetic connections, special heat-resistant compounds are used. If it is necessary to create a connection between pipes of different diameters, special adapters (so-called glasses) are installed. You should not make a chimney with a large number of turns - fuel combustion products will accumulate in them.
- Next, the chimney is passed through a box in the ceiling, and the space between the cutting walls and the pipe is filled with basalt fiber.
After this, all that remains is to remove the chimney through the roof. For this you will also need factory cutting, but this time for roofing. Such elements are produced with different slope angles and are selected in accordance with the angle of the roof. The technology for passing a chimney through the roof is approximately the same as for a similar operation with a ceiling:
- It is necessary to maintain a distance of 25 cm between the pipe and flammable materials.
- The chimney and the hole under it from above must be closed with a special part - a roof.
- After this, you need to put a comfrey on the pipe. This is an element that protects the chimney from precipitation.
- The areas between the rafters and the pipe should be filled with basalt wool, and a metal reflector should be attached below.
The chimney of an iron stove can be exhausted either through the ceiling or through the wall. In the second case, you need to arrange for fixing the pipe from the outside to the wall of the house to ensure its resistance to wind.
When passing through a wall, the thermal insulation of the structure is performed in exactly the same way as when passing through the ceiling. The only caveat is that a wooden wall may shrink over time. As a result, a sliding fit of the cutting must be implemented.
All these measures can be carried out on your own, but before putting the stove into operation, you will definitely need to contact the Ministry of Emergency Situations to obtain a certificate stating that fire safety rules have been complied with. However, we recommend entrusting the installation of equipment to professional craftsmen, and the tips from the article will help you monitor their work.
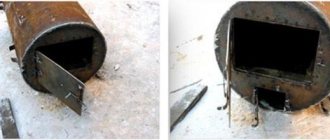
Installation of a sauna stove with a remote firebox
Sauna stoves with an external fuel channel can be made of cast iron or steel.
The design of this device differs from a conventional furnace for heating a bath precisely in the presence of a remote firebox, which can be removable - in heavy cast iron versions of products, or have an integral structure - in steel models. Thanks to this configuration of the stove, the combustion chamber door is moved into the room adjacent to the steam room or even outside. Moving the furnace firebox into the dressing room provides many advantages during operation:
- When the stove is fired, two rooms are heated at once - the steam room and the dressing room.
- It becomes possible to add firewood, constantly supporting the combustion process while the steam room is in use.
- Since there will be no need to open and close the firebox door from the steam room side, the stove can be protected with a safety barrier (brick screen), which will eliminate the risk of burn injuries during water procedures.
- Garbage, which is often brought into the room along with firewood, will not get into the steam room.
- It becomes possible to place a niche next to the firebox for drying firewood, which, of course, cannot be done in a steam room.
- It ensures that clean air is maintained in the steam room, since when the door is opened to add firewood, gaseous products of wood combustion can enter the room in small quantities.
- The absence of a firebox door in a steam room will significantly save the free space of the room, and so, as a rule, it will not be too voluminous. Therefore, it becomes possible to install the heating device in a convenient location on the wall dividing the room.
However, it must be taken into account that modern factory-made appliances are equipped with a glass cooling system installed in the combustion door. Therefore, the waiting room will not warm up properly. And in order for heat to flow more intensely into the dressing room, you will have to open the combustion chamber door slightly - this factor must also be taken into account when choosing a place to install the stove.
Prices for a stove in a bathhouse
sauna stove
As an example, the design of the Termofor Kalina Inox BSE anthracite NV PRA furnace
The remote fuel channel can be rectangular, or have a narrowed shape near the firebox. Panoramic heat-resistant glass installed in the door not only allows you to control the fuel combustion process, but also gives the design an aesthetically pleasing appearance to the fireplace. If the dressing room is used as a relaxation room, then you can install chairs in front of this “fireplace” and, while relaxing after visiting the steam room, admire the play of the flames.
The system that cools the glass also performs the function of cleaning it, so soot does not accumulate on the inner surface, and it always remains transparent.
Installing a stove with the combustion channel removed to the dressing room provides a lot of operational advantages. The disadvantages are minor, and the most significant of them is more worries when installing the device.
The fuel channel of a sauna stove can even be taken outside. This is usually done in the following cases:
- When the steam room and dressing room have a very small area.
- If the stove is planned to be heated with coal, which traditionally leaves a lot of dirt behind, and its combustion products are quite toxic.
- In the case when the bathhouse is used for commercial purposes, that is, it is temporarily rented out to strangers. And its owner acts as a stoker, who does not disturb clients with his presence at all.
In some cases, this option is also used - the combustion window is generally placed outside.
In other cases, a stove installed in this way will be extremely inconvenient to operate, especially in winter. Agree, there is little joy when you have to jump out into the street in order to add firewood to the firebox.
The only advantages of moving the furnace of a sauna stove outside are the absence of garbage in the premises and the fact that the fuel does not have to be brought inside the sauna.
Do you need a foundation for a metal stove model? This question arises for many owners who decide to build a bathhouse. Therefore, it should immediately be noted that if the weight of the heating device does not exceed 400 kg (naturally, taking into account the stone backing), and the floors are planned to be made of boards at least 40 mm thick, then it is quite possible to do without arranging a foundation. Stoves made of stainless steel have this weight, while cast iron and brick models are heavier.
If you purchase a steel model of a sauna stove and plan to install it directly on wooden floors, then the installation site must be carefully prepared.
Ceramic tiles are laid on the floors, or first a sheet of asbestos or mineral wool is laid, which is covered with a steel sheet.
The stove must be installed on a non-combustible base, the walls must be covered with heat-resistant material.
This, for example, could be a metal screen made of stainless steel. However, do not forget that a bathhouse is a room with high humidity and water can get under the flooring installed under the stove, which is extremely undesirable. Therefore, the slope of the floor in the steam room must be made from the heating device, that is, it must be in the highest place in the room. In addition, the laid and secured flooring for installing the stove must be waterproofed around the entire perimeter. Today, a large number of sealants are available in construction stores for this purpose.
If you are installing a homemade steel stove, which is planned to be lined with brick, or a cast-iron model is selected, then it is better to equip a concrete foundation for it.
The solid concrete foundation for the furnace should not be in contact with the foundation of the main building. The dimensions of the foundation in length and width must exceed the dimensions of the heating device by 150÷200 mm on each side.
If the wooden floor in the bathhouse is strong and it is planned to build a brick podium on top of it for the stove, then before starting its construction, it is necessary to take measurements. If it turns out that the distance between the surface of the stove and the ceiling is less than the required parameter of 1200 mm, then it is recommended to abandon this option.
Work on the arrangement of a concrete shallow foundation includes several stages. And they are best carried out simultaneously with the construction of the bathhouse. But sometimes circumstances force these activities to be carried out in an already erected building.
| Illustration | Brief description of the operations performed |
| If the foundation is being built in an already built bathhouse, then the first step is to mark the installation location of the stove on the floor and the hole in the wall through which the fuel channel will pass. All markings are carried out according to the dimensions taken from the stove, taking into account allowances for installing thermal insulation. Next, the required opening is cut out in the wall along the marking lines. After this, part of the wooden floor is dismantled. Then a foundation pit is dug in the underground soil. | |
| Diagram of the arrangement of materials when arranging the foundation for a metal stove in a bathhouse. The linear parameters of the foundation can be changed in accordance with the size of the selected heating device. The depth of the foundation pit for installing a metal furnace should be 500 mm. After the pit is ready, the soil at its bottom must be compacted well. Then, sand is poured onto the bottom, which also needs to be compacted - its compaction thickness should be 100 mm. The sand layer will become a good waterproofing agent for the foundation from ground moisture. Next, crushed stone is laid on top of the sand - its thickness after compaction should be 150÷200 mm. It is recommended to lay a waterproofing material on top of the crushed stone, which should also cover the walls of the pit. Dense polyethylene or roofing felt can be used as waterproofing. | |
| A reinforcement cage is mounted on top of the waterproofing material or crushed stone. For this design, a reinforcing rod with a cross-section of 7 ÷ 8 mm is suitable, which is connected to each other by a lattice using knitting steel wire. Welded reinforcing mesh, which can be purchased ready-made in the store, is also quite suitable. | |
| The concrete screed is poured flush with the surface of the underground soil or raised to the level of the bathhouse floor. If the latter option is chosen, then temporary wooden formwork is installed from the ground to the entire height of the concrete slab. A concrete solution of at least M200 grade is poured into the prepared reinforced pit. After pouring and leveling the surface of the foundation, it is left until it completely dries and gains strength - this period is at least 28-30 days. | |
| The next step is to lay two layers of waterproofing material on the concrete surface - in this case, only roofing felt is used. A brick podium is laid on top of the roofing felt, consisting of one or two rows of bricks. | |
| The result should be approximately the same design as shown in the illustration. Next, you can move on to insulating the ends of the wooden walls, that is, protecting them from the effects of high temperatures to which the furnace body can heat up during operation. |
We suggest you familiarize yourself with: How to cover a roof with slate: how to properly make a slate roof with your own hands, device
Installation of the stove can be done in different ways, depending on when it is installed. If the foundation is installed in a finished bathhouse building, then an opening is cut in the wall according to the parameters mentioned above.
Asbestos prices
asbestos
Of course, it is more convenient to install the stove first, and then start building the partition. But this happens very rarely.
In another option for performing the work, which is considered more correct, the partition between two rooms is erected after erecting the foundation, installing the stove in a permanent place and lining it with bricks. However, such installation is possible only at the stages of building a bathhouse, or if a major reconstruction of premises with a large area is being carried out.
If a factory-made heating device is installed, then it is worth carefully studying the passport attached to the product, in which the manufacturer indicates the recommended parameters for the distance of flammable surfaces from the stove. As a rule, for a unit with maximum power, the distance between the wooden wall and the stove is 250 mm if the stove is equipped with thermal insulation of the body, and 400 mm if it is not.
Lining the gap between the combustion channel and the walls of the opening with bricks
Fire safety requirements
When installing any sauna stove, it is necessary to strictly comply with fire safety requirements, since the walls of the device heat up to fairly high temperatures during its operation. In order to ensure maximum safety and not have problems with regulatory organizations, it is recommended to install the stove in accordance with the provisions prescribed in SNiP 41-01-2003 (Chapter 6.6).
- The first thing that needs to be done is to equip a reliable foundation for the main structure of the stove, which will be adjacent to the wall dividing the room. The foundation should be covered with heat-resistant material and then with metal sheet. Asbestos sheets were previously used as heat-resistant insulation. Today on sale you can find panels of pressed mineral wool, which is less dangerous from an environmental point of view, sheets of foam glass or EZHKAKH (heat-resistant structural mica plastic).
- It is also necessary to provide a metal flooring in front of the combustion door, which will prevent the wooden floor from catching fire and simplify debris removal. The size of the pre-furnace sheet must be at least 400×800 mm.
- If the partition between the steam room and the dressing room is wooden, then the opening through which the fuel channel will pass must be separated from the wood by brick or stone masonry. The distance between the stove and wooden walls should be 400÷450 mm.
In the version shown, the owner chose to fill the opening with bricks
- Provided that an opening is installed along the end part of the wall through which the combustion channel will pass, a gasket made of heat-insulating material (mineral basalt wool or cement-fiber sheet) with a thickness of 40÷50 mm, the distance between the part of the wall built from combustible material and the outer wall oven can be reduced to 250 mm. If thicker thermal insulation material is installed, the safe distance can be 125 mm.
- The distance between the ceiling of the bathhouse and the surface of the stove should not be less than 1200 mm.
- The distance from the edge of the combustion door to the nearest door must be at least 1250 mm.
- If you purchased a non-factory-made stove, or the device is independently made from sheet metal, then it is best to cover it with brick. Thus, it is possible to protect the structure of the bathhouse from fire, and people taking water procedures from burns. Factory products, as a rule, are made with double walls, between which thermal insulation material is laid or convection channels pass through.
Prices for foam glass
foam glass
We suggest you read: How to attach a cable duct to a concrete wall
About loads and rigidity
When installing a heater, it is necessary to take into account its weight and provide for fire safety requirements. If the structure is placed on a wooden floor, it must be protected from fire. An important point is the calculation of the strength of the floor.
Even a small stove with a water tank carries a serious load on the floor and ceilings
Cast iron units are especially heavy and with brick cladding it is better to install them on a foundation.
How to determine the required thermal power of a sauna stove?
The power of heating devices is measured in kilowatts. However, manufacturers of sauna stoves take a different approach - they indicate how much steam room volume this model will be guaranteed to be able to heat to a level corresponding to the required microclimate in the steam room. Naturally, subject to high-quality thermal insulation of the latter.
This is usually indicated in passports - for rooms, for example, from 10 to 16 m³.
It would seem that everything is very simple. It is not difficult to determine the volume of the steam room, and it will be just as easy to choose a model. However, the features of the arrangement of the bathhouse can make their own adjustments.
Below is a calculator that will calculate, so to speak, the conditional or reduced “volume” of your steam room, that is, taking into account all the necessary amendments. Based on this value, it will be possible to more accurately select the optimal oven.
For example, if the result is that a stove of 11 m³ is needed, then they try to choose so that this value is approximately in the middle of the range of capabilities of the purchased model. That is, say, a stove designed to heat from 8 to 14 m³.
Go to calculations