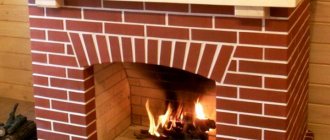
Today is a story about how he managed to install a stove and construct a chimney.
After a long search on the Internet for information about what kind of stove is needed in a country house and how to build a chimney for it, the Predatory Mouse came to the conclusion that the Breneran (Buleryan) 01 stove was suitable for his house. And he decided to install a “sandwich” type chimney.
When choosing model 01, he thought that the house had uninsulated rooms and would require additional heating. The Predatory Mouse took the stove with a reserve of power, so that it would be enough, if necessary, to heat the entire house in the winter. Therefore, I had to think carefully about where to put the stove. And after some thought, the optimal place for the stove in the house was found. Once the place for the stove was determined, he thought through and drew the location of the future chimney, which you see in the drawing.
Location of the stove in a wooden house
The specific location for installing a metal stove in a wooden house is chosen taking into account the characteristics of its operation. In this case, it is important to provide for the possibility of installing a chimney and access to the stove for further maintenance. Don’t forget about fire safety clearances - the hot surface should be located at some distance from flammable materials.
Based on which stove to install in a wooden house, work is carried out as follows:
- The iron stove that heats the air (Russian “potbelly stove” or Canadian “buleryan”) is located so as to ensure the free movement of convection currents. In particular, to heat two adjacent rooms, a metal stove in a wooden house can be built into an interior partition or air ducts connected to it.
- If a water heat exchanger is built into the furnace, then its section passing through the heater should be the lowest point of the system. Where exactly the stove will be installed is not so important. The main thing is to follow fire safety precautions.
The installation of a fireplace stove in a wooden house must be carried out in such a way that the chimney can be freely connected. In this case, it is very important to carry out all work in accordance with the safety regulations.
During the further operation of the iron stove, it will need to be serviced - cleaning the combustion chamber, removing ash, and periodically removing soot from the chimney. Therefore, you need to leave enough distance in the direction of opening the firebox door. Please note that if the stove is equipped with panoramic glass, then its installation is carried out taking this feature into account.
Fire gaps, that is, distances from heating surfaces to wooden walls, must be at least 110-125 cm. On the side of the combustion chamber door, a gap of 125 cm is left.
In addition, when installing a stove in a wooden house, it is important to choose a location in such a way as to ensure maximum heat transfer, ease of operation and maintenance of the equipment, as well as safety.
Choosing the optimal location
To select, it is important to take into account the individual characteristics of the country house:
- materials of walls and floor slabs;
- type of heating device depending on the design, size, fuel and materials from which the stoves are made;
- room size and heater power;
- number of rooms that need to be heated.
Let's look at the basic requirements in more detail.
How to choose a place to heat several rooms at the same time?
To simultaneously heat several rooms, it is better to purchase a powerful model with an installed tank for heating water and install a heating system. But this option is not suitable for a dacha. In winter, the house is used periodically; the water in the pipes will freeze and can rupture the pipeline or water container.
For a dacha, the design of panels is suitable, leading to another room, through which heated air passes and heats the room. But this option is more expensive. The problem can be easily solved. At the construction stage, you will need to decide on the location of the heater and make niches in the walls. Now, having reliably treated the walls with a layer of thermal insulation, we install the stove in the opening of the partition.
This is how we achieve heating of several rooms with 1 stove. This method is effective when arranging rooms with a small area. To heat large rooms, you will need to call an experienced stove maker who will assemble a fireplace with a heating panel.
Examples of stove placement for several rooms:
How to choose a place for the stove if only one room will be heated?
In this case, the stove is purchased taking into account a certain power. Depending on the covering of the walls and the stove, indentations from the surfaces are made. It is not recommended to install the device near the front door. The heated indoor air will leave the room, and the cold outdoor air will quickly displace the heat.
It is recommended to install the stove closer to the corner of the room, here it does not take up much space, and by making a protective layer of thermal insulation with a mirrored front side, you can install the unit at a short distance from the walls and heat the house faster.
The need for a foundation for a metal furnace
As a rule, an iron stove is lightweight and easy to install, which is why it enjoys well-deserved popularity.
However, according to SNiP standards, there are a number of conditions under which a foundation is necessary:
- If the total weight of a metal furnace does not exceed 80 kg, there is no need to pour a foundation for it. However, in this case, the fireplace in the country house is installed on a solid, non-combustible base.
- Heat-generating equipment with a total weight of up to 750 kg, in particular, medium-weight cast iron stoves, in accordance with SNiP, is allowed to be placed on a concrete pad. Although there are no strict requirements for the need for a foundation, it is still recommended due to the fairly large weight of the stove.
- Furnace equipment heavier than 750 kg - in this case we are talking about cast iron units weighing about 300-400 kg. If such a furnace is installed without cladding, then a foundation for it is not required. However, in cases where a decision is made to cover the heat generator with brick or natural stone, the weight of the entire structure increases significantly. Thus, 1 m3 of brick increases the weight of the structure by approximately 1350 kg. Therefore, the need for a foundation is calculated based on the volume of facing material.
In general, installing a stove in a wooden house with your own hands is not difficult. However, in order to provide for all the details, it is worth consulting with a specialist.
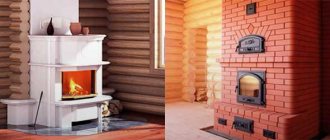
About bath conditions
More than half of the purchased ready-made stoves are installed in bathhouses . At the same time, installing a stove in a bathhouse is technically the most difficult: here the stove emits several times more heat per unit volume of the room than the heating and cooking system in the house; resp. higher risk of fire from the stove. The ceilings in the bathhouses are low, which complicates fireproofing; the rooms are cramped, which increases the risk of burns from the stove. The air temperature in the bathhouse, especially in the steam room, is high, which aggravates the effect of harmful combustion products: a dose of carbon monoxide that causes a headache at 20 degrees in the room can be lethal at 60. A burn from steamed skin will be appropriate. 3rd degree instead of 1st - 2nd dry. Special requirements in bathhouses also arise regarding electrical safety. Therefore, further material is focused mainly on sauna stoves, and what can or should be simplified for a home stove is indicated along the way.
Selection of oven
Installation of a sauna stove begins with its selection. Modern sauna stoves are far from primitive potbelly stoves made from a barrel or pipe with a box for stones. Now even experienced gourmet steamers admit that Russian steam from a good Vulcan or Hephaestus is practically not inferior to that from a brick oven. Sauna lovers have long agreed that branded Finnish sauna stoves beat the brick in all respects. But as far as the ergonomics and health-care qualities of sauna stoves are concerned, manufacturers are all limited to statements that their stove is the best, and it’s all about the price. Therefore, in Fig. a summary table of consumer qualities of sauna stoves of different designs is given. Based on it, you can choose the type of stove to suit your needs, and then see what is suitable for the cost.
Summary table of consumer qualities of metal furnaces.
Note: the special safety requirements for a bathhouse with an electric stove mean that the building must be equipped with a protective grounding loop, the stove is tightly connected to it (not through a Euro socket contact!), and the wiring to the stove must be heat-resistant and moisture-proof. The presence of sockets and other detachable electrical contacts in the steam room is completely unacceptable!
About stove materials
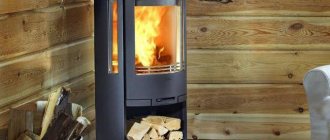
A brick sauna stove is not installed, but is built together with the sauna. It turns out to be technically possible to build it in an existing bathhouse only in some cases. In addition, a brick oven exhibits all its best qualities only in a steam room with a volume of at least 15-16 cubic meters. m, and its heating takes 4-5 hours. At the pace of modern life, this is most often unacceptable, so we take a metal stove. But it remains to decide - steel or cast iron?
A cast iron stove heats up relatively quickly and cools down for quite a long time, which is essential for a heating and cooking house stove. In the bathhouse it produces steam that is closest to traditional Russian steam. Cast iron stove approx. 1.5 times heavier than steel of the same power, but sometimes allows you to save on the weight of fire cutting, see below. As a result, it is possible to install a cast-iron decorative or heating-cooking stove in a house with your own hands, without undertaking complex and important construction work, more often than a steel one. However, a cast-iron stove, due to the low thermal conductivity of the material, is unsuitable as a heater stove, and you need to choose it carefully and with knowledge of the matter.
Let it be known to readers that cast iron is so-called. raw, intended for conversion into steel, and structural of different grades. Conscientious manufacturers do not cast furnace bodies from raw cast iron: it is very fragile and almost always cracks from thermal shock (for example, water on hot water), but only an experienced metallurgist can recognize the grade and quality of cast iron in a product by its appearance. In addition, due to the high heat capacity of cast iron, it is impossible to quickly cool an overheated stove using it. Suddenly the stove became a hotbed of fire, pouring water on a cast iron stove like a steel stove would only make it worse. A cast iron stove will not cool down instantly, but it can simply explode like a bomb, shooting hot fragments all around. However, in long-term, regular intensive fire conditions, a cast-iron stove can be more durable than a brick stove.
Consequences: it is advisable to choose a cast iron stove for regular heating of one fairly large living room or for a bathhouse with a steam room with a volume of 10-12 cubic meters. In all other cases, preference should be given to steel furnaces.
Types of foundations for a furnace
The choice of the type of foundation for further installation of an iron furnace is carried out taking into account its characteristics and installation features.
Selection factors:
- Estimate of construction work - price of materials and prices of contractors.
- Features of the soil and foundation - the total weight of the structure and the type of soil matter.
- The area of the foundation for the furnace - it affects the type and total weight of the structure.
In addition, when choosing the type of base for the furnace, you need to take into account the climatic characteristics of the region and the time of pouring, the qualifications and speed of the specialist, as well as a number of other initial conditions.
All types of foundations belong to two large groups:
- On pillars and stilts.
- Concrete bases.
In some cases, furnace equipment can be mounted directly on the floor, while not forgetting about safety rules.
How to clean a chimney
Tar in the chimney is the same condensate that forms in any stove without an insulated chimney. If the chimney is well insulated (like a sandwich), then there is no tar.
There is an old-fashioned method - for this you need to heat the stove with aspen wood, and spruce, alder, and bird cherry are also suitable. After heating with wood - “from vampire trees”, the chimney is cleaned, aspen smoke strips sticky soot from the inner walls of the chimney and pipe.
Subscribe to our Telegram channelExclusive posts every week
Column and pile foundation
The need for a columnar foundation first arose in those regions where there is a high probability of flooding or where there is no dense layer of soil close to the surface. Piles are in demand in the construction of multi-storey buildings.
There are three options for arranging a pile foundation:
- Screw pile foundation
. This is a rather expensive option, which, however, is characterized by high installation speed. In this case, steel screws are used that are screwed into the ground. They will be the basis of the foundation. At the top, steel piles are tied together and then a concrete pad is poured. The whole process takes 1-2 days.
Screw piles can withstand even heavy cast iron stoves with brick lining. True, after 50-60 years, the steel rods rot.
- Bored pile foundation
. First, using a drill, a hole of a given cross-section and depth is drilled in the ground. Its walls are reinforced with mesh, a reinforcing structure is installed and concrete mixture is poured. - Columnar pile foundation
. The preliminary stage of work is similar to the drilled base. However, in this case, ready-made wooden or concrete pillars are driven into the hole. This type of foundation is used for the construction of multi-story buildings and placement of structures with a large mass.
To install a stove in a wooden house with your own hands, it will be easiest to equip a pile foundation. It will not require significant financial costs and is quite feasible for the owner of a country cottage, even if he does not have the skills of a builder.
Please note that the foundation for the stove in the house needs to be insulated to prevent the formation of condensation on its walls for cladding. Uninsulated piles are “cold bridges” and shorten the service life of the furnace.
Based
Let’s say it’s impossible to place the stove directly on the floor. There is nothing to do, we need to lay the foundation for it. Typical diagrams of foundations for furnaces are shown in Fig. Don’t let the base for a brick stove go to the side: suddenly you will have to install a stove with an external firebox in a partition; its portal will take about the same amount of bricks as a Dutch stove of 3.5 bricks, and the requirements for uniform shrinkage of the base at the half-brick-thick portal are even stricter.
Typical foundation diagrams for furnaces
Both of these foundations have a common drawback: they require an opening in the floor. Meanwhile, installing a stove in a house, and even more so in non-residential premises, is possible without disturbing the supporting structure of the floor - if the stove is made of steel. Its requirements for uniform subsidence of the base are much more modest, and such a furnace can be installed on a pile foundation laid through the flooring. Brick cladding is not a hindrance here, because... An L- or U-shaped low structure will withstand the same tilt.
A diagram of the pile foundation of the furnace, which you can build with your own hands through the floor, is given above in the following. rice. The soil under the building should not be subsident, waterlogged, excessively heaving or peaty/silty. The first thing you pay attention to is the depth of the piles. It was chosen not only according to the standard freezing depth of the soil, but also to ensure the most uniform subsidence of the piles individually. Under a brick stove, the piles would have to be buried 2.3-2.5 m, which is unrealistic through the floor, but a metal stove on this foundation will stand securely.
Diagram of the device and procedure for constructing a pile foundation for a furnace through the floor
The second is cellulose (from the so-called ecowool) insulation. In this case, it prevents not only the floor from becoming damp, but also from ignition from sparks or coals. Ecowool is a non-flammable material. Moreover, when heated, it releases a large amount of vapor of latent water of crystallization, which is not unnecessary if there is a cavity under the furnace. Step by step, a pile foundation for a stove in an existing house is installed, as shown in pos. 1-10 fig.
Step 1
We prepare a steel supporting frame (grillage) according to pos. 1. It is better to take option B for planting it on the pile anchors: this way the piles will have to be positioned with a slight offset, but there will be no need to drill thick pieces of iron. Dimensions in plan – along the contour of the stove together with the brick lining/cladding + (7-10) cm around the perimeter.
Step 2
If the building does not have detailed and reliable construction drawings, it will be necessary to remove part of the finished flooring and, possibly, the subfloor to accurately determine the location of the joists and floor joists, pos. 2. A tedious task, but still better than excavating a room.
Step 3
We mark the places for the piles so that they are no closer than 70-80 mm to the joists and beams, and drill pioneer holes through both floor coverings, pos. 3.
Step 4
In the clean floor, use a compass drill to drill holes for the piles, pos. 4.
Step 5
We remove the clean floor and drill holes for the piles in the subfloor, pos. 5. If the subfloor for insulation is covered with expanded clay, etc., rake it to the sides and insert temporary shells made of rolled galvanized sheets into the holes. At the same step, we drill holes for the piles with a garden drill. If the house is on weak and/or loose soil (bearing capacity less than 0.7 kgf/sq. cm), you can use a TISE drill and lay a TISE pile foundation.
Step 6
We lay the pile foundation (item 6) using standard technology:
- We fill the wells with a sand and crushed stone cushion of 20 cm each. In layers of 10 cm, with a tamper, as expected.
- We insert clips made of rolled roofing material into pipes into the wells, align them vertically and cut them at the top at a level of +100 mm from the level of the finished floor. “For coolness” you can put asbestos-cement pipes on the clips, but you will have to cut them with a grinder with a squeal and a lot of dust. Piles made of steel pipes without concreting are unsuitable in this case, because too light to shrink sufficiently evenly on their own.
- We insert reinforcement cages into the well cages.
- We fill the pile cages with concrete (in layers of 15 cm with hydraulic compaction) and immediately wall up anchors made of 10-16 mm steel rod into their heads. If the rods are smooth, their lower ends must be bent in a U-shape and walled up to a depth of 15 cm. We do not bend anchors made of corrugated reinforcement bars, but wall them up to a depth of 30 cm. The upper ends of the anchors must protrude no less than the height of the grillage channel.
Step 7
Once the concrete has completely hardened (there is no need to wait for strength gain yet), we cut off the clips from the piles to the level of the subfloor and lay soaked ecowool around the piles 15-25 cm to the sides, or to the nearest joist, pos. 7. The layer of raw ecowool should protrude 6-8 cm above the joists.
Step 8
Using wet and still soft ecowool we restore the clean floor, pos. 8. Cut off the squeezed out excess insulation when dry.
Step 9
We arrange fire-fighting cutting; Coat the seams between the ceiling sheet and the piles with a solution of fatty clay and sand 1:1 or the like. fire-resistant composition. Next, we place a grillage on the anchors and weld them. We cut off the protrusions of the anchors. Then we place a steel sheet on the grillage (item 9) and weld it along the contour with clamps. From under the bottom to the corner you don’t have to cook it, it’s very inconvenient and won’t add strength to the structure. I would like to secure the steel flooring “for reliability” - you can use metal screws with conical heads on top.
Step 10
Using basalt cardboard, we lay a backing on the steel flooring for the brick furnace pad, as described above (item 10; see also below).
Furnace pillow
The brick pad of a metal furnace experiences a “thermal swing” greater than that of a brick furnace. Therefore, it needs to be laid in 2-3 rows with complete symmetrical bandaging of the seams in the row and between the rows, on the left in Fig. Bandaging a stove cushion of complex configuration in this way, especially with a portal, is far from easy. In this case, up to 2 untied seams are allowed, located symmetrically on both sides of the longitudinal axis of the pillow as close to its middle as possible; shown by green arrows in the center in Fig. An untied stove cushion (on the right in the figure) is a gross hack. After 2-3-5 years, the bricks of such a cushion can crawl out from under the stove, and cracks in it - a source of fire hazard - are guaranteed even earlier.
Correct and incorrect bandaging of masonry seams in a brick furnace pad
Waterproofing of 2 layers of roofing felt is applied to the stove cushion and again a backing for the brickwork made of basalt cardboard. The traditional option - waterproofing between the foundation and the cushion without a basalt backing - is designed for an entirely brick oven, because The cushion bricks in it begin to crumble later than the stove bricks. For a cushion under an adjustable metal stove, for safety reasons, it is necessary on the contrary, so that the pillow deteriorates faster than the stove body burns out.
Concrete base
Before installing a metal stove in a wooden house, they most often prefer to pour a concrete foundation with reinforcement.
Among its undoubted advantages are high load-bearing capacity, ease of independent implementation and low cost.
The disadvantages of a concrete foundation include the long time it takes to arrange it.
The base for a concrete stove can be made in two ways:
- Strip foundation
. According to the size of the future furnace, a trench is dug along its perimeter, deepening it below the freezing point. After installing the reinforcing mesh, concrete is poured.
Please note that such a strip base should not be connected to the general foundation of the building, since in winter it can be squeezed out of the ground. Sometimes the height of the walls raised from the ground can reach 20-30 cm, so if there is one solid foundation, the facing masonry on the stove may crack. In some cases, the metal furnace itself is subject to deformation. Be that as it may, SNiP prohibits pouring a common foundation under the stove and, in fact, the building.
- Monolithic concrete slab
. To install a fireplace stove in a country house, this method is used quite often. The thickness of the slab reaches 15-20 cm, which is enough to obtain a strong base designed for high loads.
A cushion of a mixture of sand and gravel is first poured onto the pre-cleaned area. It is watered with water and compacted thoroughly. Then a waterproofing layer is laid and beacons are placed for further pouring of the screed. At the end of the work, the concrete is covered with film and watered with water for the next two weeks. This is necessary so that the screed does not crack.
Any of the described types of concrete foundation dries and hardens very slowly. Installation of the furnace with subsequent cladding on such a base can begin no earlier than 28-30 days after pouring.
Climate
0 votes
+
Vote for!
—
Vote against!
For many people, the stove symbolizes comfort. Fire creates an environment that promotes relaxation of the soul. Recently, metal units have been in greatest demand. And the reason for this is both reliability and high technical characteristics. Like any heating device, a metal stove is installed in accordance with fire safety standards and regulations. Installation requirements in wooden houses are undoubtedly stricter. Proper installation will not only avoid accidents, but will also help maximize the efficiency of the unit. This article will talk about how to install a metal stove.
Modern heating metal stove
This equipment is widely used for heating baths, cottages, work trailers and other small areas.
Metal stove photo
Over the years of “evolution” it has undergone many changes, which had a positive impact on the following parameters and nuances:
- functionality . Today, manufacturers offer models that operate in different temperature conditions. Such parameters allow you to select the optimal microclimate;
- Efficiency The advanced design provides the ability to select or combine different fuel choices, achieving efficient heating of the room. Due to the increased firebox area, the fuel is burned completely, which in turn increases the efficiency;
- equipment. The equipment can be supplemented with a tank for heating water, which is important not only for baths, but also for residential buildings in country or garden areas;
- design. The model range makes it possible to choose a product in a stylish design. Ergonomic shapes and high efficiency – the perfect combination. Metal devices are decorated with decorative elements made of glass or forged parts.
Type of fuel for a metal furnace
This universal heating source can run on different types of fuel:
- electric models are equipped with a whole range of functions designed to increase operating comfort (remote control, panel for setting tasks, etc.). Heating elements quickly provide the required temperature. However, if there is a power outage, you will not be able to enjoy the warmth. To solve the problem, it is recommended to install a generator. The cost of such stoves is 12-15 thousand rubles;
- gas equipment , thanks to the burner and thermostat, allows you to regulate the intensity of combustion. It has a reliable security system: automatic sensors and controllers that operate under force majeure circumstances. The units are quite economical, but in the absence of natural gas it will be necessary to purchase liquefied propane-butane. The price varies between 15-17 thousand rubles;
- wood stoves are the most popular. This factor is due to simple maintenance and repair, as well as affordable fuel. There are models on the market that imitate a fireplace. The equipment warms up the room quite quickly. Chimneys work to completely remove combustion products. The cost of such heat generators starts from 12 thousand rubles;
- furnaces fueled by fuel oil, diesel fuel and a special distilled composition are characterized by a high degree of safety. In addition, such devices are economical due to the raw materials used. Some models are equipped with a toggle switch to switch from one type of fuel to another. The simplest units will cost only 2,000 rubles.
Choosing a metal stove for your home
A metal stove should be selected based on indicators such as:
- heating rate of a certain area;
- the maximum and minimum temperatures that the equipment can maintain;
- size of the firebox and the unit itself;
- metal alloy used for manufacturing;
- door modification;
- ease of operation and maintenance.
The equipment mainly available on the market is made of cast iron, black and stainless steel. By size it is divided into:
- mini-ovens for heating rooms up to 12 sq.m.;
- standard ovens to maintain temperature for 12-24 sq.m.;
- large furnaces capable of heating air in areas over 24 sq.m.
For cladding, ceramics and soapstone in their various modifications are used. Such materials increase the initial warm-up of heating equipment, but significantly reduce the unpleasant burning heat and increase the heat transfer time.
In some models, stone cladding plays only an aesthetic role, without in any way affecting the physical and technical characteristics of the devices. Decorative panels can be removable, so it will be easy to dismantle them and install products with a new design, radically changing the interior of the room.
Place for installing a metal stove with your own hands
- The technical characteristics of the heating unit are of great importance, but its location is no less important. After all, heat transfer is carried out not only by convective air masses, but also by radiation emanating from the walls of the device.
- If a brick oven produces weak heat and its walls do not normally heat up above 90 degrees, then the metal product emits rather harsh radiation and the walls of the structure heat up to 500-600 degrees.
- The installation location is determined both during the design of the premises and after the construction of the house or bathhouse. The main criterion is the location of window and door openings. Only in this case can you predict in which direction the cold air currents will move.
- Before installation, the working space for fuel should also be planned. The type of fuel does not matter; it is important to first calculate the path of the carrier and its storage near the heating unit.
Fire safety
Knowing and observing fire safety measures, it will be possible to install the stove in rooms built from any materials, including wood. Although both brick and block buildings are at risk of fire. Therefore, strictly follow all requirements.
- The unit is installed on a floor made of non-combustible materials. This could be a regular concrete screed, metal sheet, ceramic tile, etc. The edges of the surface should protrude at least 50-70 cm from the device body.
- The walls adjacent to the stove and nearby furniture are insulated with heat-resistant material, such as asbestos sheets or super-insulation, in this way the required distance (1 m) from the wall to the rear wall of the cabinet can be reduced to 20 cm.
- There should be at least half a meter between the equipment and wooden surfaces (walls or furniture), optimally 60-70 cm.
- Much attention is paid to the arrangement of the chimney system. Use additional protection elements that prevent the pipe from clogging and prevent birds from building nests, which is especially important for vertically located channels.
- The distance between the ceiling and the upper part of the heating unit body must be at least 1.2 m, and from the firebox door to the opposite wall - 1.3 m.
- To avoid accidents, especially if there are children in the family, the equipment is fenced with a decorative “fence”.
- Some models provide for the installation of ducts in the walls to heat adjacent rooms. In such cases, heat-resistant finishing materials should be used. Recommendations are described in detail in the instructions supplied with each unit.
Preparing the floor and walls before installing a metal stove in the house
- Walls protected with insulating materials do not look attractive. Therefore, they are most often decorated with ceramic tiles, and floor slabs from the same collection will help maintain the “comfort corner”.
- Ceramics are laid immediately on a concrete floor, and if it is a wooden base, then a glass-magnesite, plywood or plasterboard sheet is first laid. The material is screwed directly to the floorboards with self-tapping screws. The surface is treated with primer and left for a day until completely dry.
- Tile adhesive is applied with a notched trowel; this tool will allow you to achieve the same layer thickness. The first row is laid as evenly as possible; a level is used here to level the surface both horizontally and vertically. The quality of the entire surface depends on how flawlessly the row is laid out.
- Ceramic products are mounted without seams or with them. The last option will help hide layout errors, respectively reducing or increasing the distance between them.
- After 2 days, the construction crosses are removed and the seams are filled with grout mixture. To transition from tiles to the main floor material, decorative thresholds or corners are used.
- In the same way, the installation of tiles on the walls is carried out. Heat-resistant mastic is applied to the ceramic in five points. The bottom row will not have to be adjusted horizontally if the floor tiles were installed according to all the rules.
- It is better to cut products to size using a stencil made of thick cardboard. The edges of the masonry are edged with a special profile, combined with a threshold or plinth.
Installation of a metal stove in a wooden house
Depending on the model, one or another type of connection and assembly of elements will be required. Each manufacturer tries to present equipment with a minimum set of parts. All installation information with detailed diagrams is included with the heating unit.
- In most cases, the equipment only needs to be installed in a prepared location. The difficulty of installation lies in the correct connection and correctly located outlet of the smoke exhaust duct.
- The chimney can go horizontally or vertically. Thanks to a large set of pipe elements, its exit can be carried out at different angles. It is worth noting that the exit through the wall is gaining popularity, but this direction of the channel is not suitable for all stoves.
- For compact models, double-walled stainless steel pipes with basalt wool insulation are used. Such products are characterized by less condensation and soot deposition.
- The preparation of holes for the pipe is carried out immediately before its installation. To do this, assemble a smoke exhaust duct and calculate its exit point. The hole diameter must comply with the manufacturer's recommendations.
- If there is a ready-made chimney, then the pipe is passed through the shaft. If the diameters do not match, special adapters (glasses) are used. Complex channel direction options should not be used. Numerous turns will serve as accumulation points for fuel combustion residues.
- The chimney begins to be assembled indoors. A pipe is fixed to the outlet of the housing, which can be located on top of the housing or on its rear part. A gate is installed above, which serves to regulate traction.
- If the channel runs at a slope, then a half-bend with the required degree is used. Heat-resistant materials are used to seal connections. If necessary, a so-called “glass” is installed, which connects pipes of different sections.
- A metal plate is mounted at the entry point of the chimney in the wall or ceiling. A technical hole equal to the diameter of the channel is cut out in it. This element can be made in the form of a square flange. The height of the sides must correspond to the thickness of the interfloor ceiling or wall.
- The resulting “box” is attached to the surface, and a chimney is passed through the hole (from the street to the room). The empty space between the flange walls and the double-wall pipe is filled with basalt wool. The double-walled channel is connected to the adapter (glass) using clamps.
- When the chimney exits into the wall from the street side, a tee is installed on the pipe, from which a vertical channel will go. Its reliable fastening will be ensured by wall brackets. To protect against leaves and dry branches, the head is equipped with a deflector. This element will not allow birds to build nests at the end of the pipe.
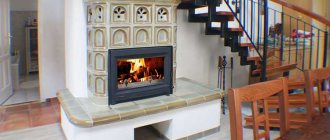
Brickwork for a metal furnace
A metal stove, for all its advantages, produces radiation that is too harsh, which does not allow you to breathe freely in its immediate vicinity. The solution to this problem is to line the equipment with solid brick masonry.
- Before work, you need to make sure that the floor can withstand an impressive weight, sometimes reaching up to half a ton. When marking, a gap of 3-8 cm is maintained between the unit body and the future wall.
- A metal sheet 2-4 mm thick is laid on wooden floors, which in turn is covered with asbestos. The width of the lining is taken based on the thickness of the bricks themselves. If the base is made of concrete or ceramic slabs, then there is no need for preparation.
- The walls rise to the height of half a brick. The solution is mixed using clay mixed with sand; its thickness should be of medium density. The work is carried out according to all the canons of ordinary brickwork, that is, with observance of leveling along the planes and bandaging the seams.
- In the second row, technological holes are made on all 3 walls, approximately half the size of a brick, for high-quality air exchange. They also leave holes for the blower, door and other structural elements of the oven.
- When the height of the wall reaches the top of the firebox door, corners of their metal are placed on the brick blocks, which will distribute the load generated by subsequent rows. To decorate the top, different options are used, for example: left open or made in an arched form.
Cost of work in specialized companies
- If for some reason you decide to transfer all of the above actions to the shoulders of professionals, then installing the equipment will cost 7-10 thousand rubles. Installation work in wooden houses will be a little more expensive. This is due to additional insulation arrangements.
- The cost of laying a chimney duct through interfloor ceilings and roofing will range from 25 to 40 thousand rubles. depending on the complexity of the work being carried out. If the chimney goes along an external wall, you will have to pay about 5-10 thousand rubles for installation, where the final cost will be determined by the length of the pipe.
- It is, of course, up to the owner to decide whether to save on work and install the heating unit on his own or to seek help from specialized organizations. The main thing is that the installation of the stove itself and the smoke exhaust system is carried out in accordance with fire safety standards.
Compliance with the rules will help to avoid dire consequences; we are talking not only about the possible loss of real estate, but also the health and lives of family and friends.
Installing the stove on the floor
As already mentioned, a metal or cast iron stove can be installed in a wooden house without first pouring the foundation, if its weight together with the facing material does not exceed 750 kg.
According to building regulations, it is allowed to install a fireplace on a wooden floor if it is not lined. For installation on the second floor of a building, load-bearing structures must first be strengthened with a channel or metal corners.
To protect the wood from fire, a metal sheet or a layer of brick is placed under the stove. This process does not present any additional difficulties.
The instructions for heating devices always describe in detail the technology for their installation and provide recommendations for connecting to the chimney.
Requirements for installing a brick kiln
First of all, it is important to decide on the installation location of the unit at the stage of pouring the general foundation of the building. Brick units will require a separate base for them. And it’s better to do it right away. Otherwise, you will need to tear down the floors and make a pile foundation with a concrete slab.
The best option for installation is the kitchen. This design can be made small in size or a Russian stove with a stove bench can be laid out. The choice depends on the size of the room and financial capabilities. When pouring the slab, it is important to take into account the increase in size by 150 mm on each side of the furnace walls. But you will need to take into account the dimensions of the brick chimney and make a foundation for it.
A brick stove for a summer residence is the best option if the dimensions of the kitchen and its constant use allow. During long breaks and the heater being in a damp, unheated room, cracks may form in the solution. The stove will need to be heated, after finding the place where the smoke passes, cover it with a solution of fireclay clay.
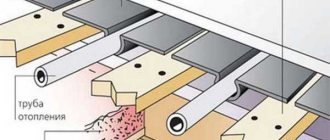
Installation of a chimney in a wooden house
When fuel burns inside the fuel chamber of the stove, a temperature of 450-550 ℃ is reached, while the chimney heats up to 300 ℃. If a fire occurs as a result of soot accumulation, the temperature inside the chimney may briefly reach 800-1000 ℃. In this regard, when installing steel chimney pipes, fire breaks must be observed.
To understand how to properly install a stove in a wooden house, you should be guided by the following PPB:
- It is recommended to use a ceramic and stainless steel sandwich pipe with a layer of thermal insulation as a chimney.
- Near walls, the pipe should pass at a distance of 25 cm from them. The walls themselves should be covered with basalt cardboard with galvanized or stainless steel sheathing.
- The hole in the ceiling for the chimney to pass through the floor slabs must be sufficient to leave 25 cm on each side from the pipe to the combustible material. The resulting gap must be filled with basalt insulation. If desired, you can install a factory-made ceiling trim.
The chimney can pass both inside the building and along its external wall. Inside the house, it is necessary to ensure high-quality insulation of the pipe where it passes through the ceiling and roof. From the outside, the pipe must be carefully fixed to the wall of the building so that it does not blow away by the wind.
Installation of brick structure
If a choice has been made in favor of a classic stove, then it should be remembered that construction must not only meet safety requirements, but also certain technical requirements. Even before the development of informatization of society, it was believed that such work was inaccessible to people who did not have special training. Therefore, the profession of a stove maker was considered one of the rarest and most sought after.
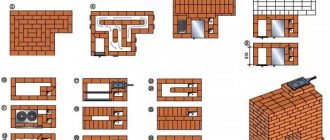
Today it is easy to find step-by-step instructions that will help you get a functional device with your own hands. However, compared to the installation of ready-made devices, the construction of a brick stove will take longer. We list only the main stages, since detailed instructions are available in the sections called “ready-made projects”.
Work begins with determining the dimensions of the structure. The area of the foundation will depend on them. After pouring the base, using a special ordering scheme, the furnace body with its main components is laid out. To appreciate the work of the professionals who shared all the information, you need to know that depending on the area of the room, each oven has its own dimensions. Calculations are made of parameters such as the height, width and depth of the firebox, body dimensions, chimney height, and area of the smoke channel.
Today, few novice masters engage in complex calculations, since all data is presented in ready-made tabular form. Laying out each row, we get a formed ash pan, firebox, smoke tooth and smoke collector. This is just a simple diagram of a fireplace; the stove has a system of channels for the chimney. In these channels, hot air transfers the maximum possible share of energy to the stove body. It is almost impossible to complete the construction of this part without a diagram.
Fire safety rules when installing a stove
According to fire safety standards, before installing an iron stove in a wooden house, care must be taken to protect the floor and walls made of flammable materials from fire.
For this use:
- fire-resistant heat-insulating materials mounted on the walls and ceiling in the area where the stove is located;
- flame retardant impregnations and mastics.
Compliance with fire safety standards and the use of fire protection equipment is the main condition for the safe operation of solid fuel equipment.
Features of operation of potbelly stoves
To assemble an efficient and fireproof chimney duct for a metal stove, the following nuances must be taken into account:
- The efficiency of the stove is extremely low - no more than 50%. Accordingly, half of the heat generated by burning wood is lost through the chimney.
- The walls of the flue heat up considerably - up to a maximum of 400 °C, the average temperature is about 200 °C.
- Contact with cold outside air causes condensation to form inside. Its quantity depends on the temperature difference between the exhaust gases and the environment.
- Soot settles on the channel walls. The more condensate is released, the faster the soot layer grows.
- With periodic firing, an ice plug gradually freezes in the area of the head, blocking the passage and reducing the force of natural draft. With each subsequent ignition, the stove works worse and begins to smoke into the room.
Examples of incorrect stove chimneys - burnt-out galvanization and a pipe clogged with soot
Abundant moisture condensation is promoted by operating a solid fuel heater in smoldering mode. Closer to the head, the pipe warms up weakly, which is why the water released from the air does not have time to evaporate. The problem is aggravated by humidity and low quality fuel burned in garage and country stoves, which produce a lot of soot.
The correct chimney pipe for a potbelly stove minimizes the following problems:
- reducing the amount of condensation and soot is achieved through external insulation of the area running along the street and unheated rooms;
- thermal insulation also prevents the upper part of the flue from freezing;
- installing a chimney in a wooden house involves protecting structures from fire;
- The efficiency of the stove can be increased and the temperature of the pipe reduced by organizing heat removal in various ways.
These measures are taken as a whole. Removing heat from the iron chimney increases the efficiency of the furnace and reduces heating of the exhaust channel, and the insulation resists moisture condensation and soot deposition.
Protective cladding for walls and ceilings
The walls directly adjacent to the stove, as well as part of the ceiling along the passage of the chimney, are subject to significant thermal loads.
Therefore, before installing a stove in a wooden house, you need to fulfill a number of prerequisites:
- The ceiling lining is made of non-combustible material. Wooden or plastic panels are not used. It is best to purchase gypsum fiber boards treated with gypsum putty for painting.
- The walls must be protected with a layer of basalt cardboard and covered with a sheet of steel. As an option, you can use ready-made decorative stainless steel screens. These products are able to provide safety and are distinguished by external beauty. In addition, the walls can be plastered with a layer of 3 cm or more, and also lined with brick (read: “How to line a metal stove with brick in a house - a step-by-step guide”).
Fire safety rules for installing iron stoves in wooden houses are described in more detail in SNiP 05/31/2003 and SP 118.13330.2012.
How to build a stove for a summer house with your own hands
After the foundation is prepared, it is necessary:
Start laying out the oven
Row 1 receives special attention, since the shape of the future structure depends on it. Markings are made with chalk, after which they begin solid masonry.
Next they move on to the 2nd row, which differs from the first in that it is laid out taking into account the blower door. The 3rd row is mounted taking into account the arrangement of the ash chamber. 4 and 5 begin to form a firebox and are laid out with fireclay bricks. For 6, similar building material is used. The base of the firebox is laid along with it.
Rows 7, 8 and 9 form the firebox itself. 10 plays the role of covering the oven. 11 is organized taking into account the installation of the hob. Laying out rows 12 to 16 represents the construction of chimney channels. 17 and 18 cover the hob.
19 and 20 provide for the installation of a door through which the oven will be cleaned. Rows 21 to 23 are made in accordance with the chimney diagram. 24 and 25 are laid out taking into account the installation of the metal sheet. A valve is installed on row 26. 27 and 28 are necessary for arranging the chimney opening.
Photo 3. Option for arranging a brick stove for a summer residence. In total it includes 43 rows.
Perform cladding. This procedure begins after the structure is completely laid out. Use decorative stone, ceramic tiles or red brick
During this step, special attention is paid to the fact that any material that is applied to the external part of the structure negatively affects the heat transfer
Dry the oven. This stage is necessary, since a lot of moisture from the cement mortar remains in the masonry. To do everything correctly, open the firebox door and leave it for 10 days. If the construction is carried out in the summer, then drying occurs on its own. In winter, the use of a fan is mandatory.
Attention! Strictly follow the sequence of steps described above, and the oven will turn out to be of high quality and durable! A properly prepared foundation and high-quality masonry guarantee a long operational period. After laying out, there is a need to protect the structure from environmental influences.
To do this, the external surfaces of the structure are faced with ceramic, clinker bricks or decorative tiles. Such a measure will not only protect the device, but also give the stove an aesthetic and unique appearance.
After laying out, it becomes necessary to protect the structure from environmental influences. To do this, the external surfaces of the structure are faced with ceramic, clinker bricks or decorative tiles. Such a measure will not only protect the device, but will also give the stove an aesthetic and unique appearance.
Possible difficulties
There are situations when the owners of a country house want to heat the room as quickly as possible, but nothing works out for them. It takes at least 3-4 hours for the air in the house to heat up. This problem is typical for all brick kilns. The heating process is accelerated, making the brick walls thinner. This is advisable if a small room is heated. A large amount of external cladding, such as tiles or decorative stone, worsens heat transfer.
A brick oven is not capable of heating rooms located at a relative distance from it. This problem cannot be solved by adjusting the design of one device. To ensure that the air is heated evenly throughout a large house, 2-3 stoves are installed at once in different parts of the building.
Over time, the structure is destroyed with some probability. This is due to shrinkage and seasonal soil movements.
To avoid this phenomenon, the foundation of the stove itself should not be connected to the foundation of the house.
It is important to separate these two constructs and prevent any dependency between them
During operation, deformation of the structure occurs. This happens because when heated, the fireclay brick used to lay the firebox tends to expand. To avoid such an undesirable phenomenon, when laying, a gap of 5 mm is left between the ceramic and fireclay bricks.
A serious problem during operation is the varying degrees of thermal expansion of the building materials that make up the furnace. This problem is solved by laying asbestos cord between the metal and brick components.
The destruction of masonry is also an unpleasant moment, indicating the use of low-quality clay. To avoid such a situation, building material of river origin is used, which has lain in the open air for at least 24 months.
Treatment of wood against fire
Additional means of protecting wooden structures located in the immediate vicinity of an iron stove are fire-retardant impregnations and mastics. Beams, load-bearing structures, floors and walls adjacent to the furnace are subjected to this treatment. Mastic has a higher level of fire protection, and the impregnation is almost colorless.
Fire retardant treatment can be carried out by both representatives of the Ministry of Emergency Situations and the owners of a wooden house. In the latter case, before starting to operate the stove, it will be necessary to obtain a certificate from the inspector of the Ministry of Emergency Situations about the compliance of its installation with the requirements of the safety regulations.
All leading European and Russian manufacturers of solid fuel stoves describe in detail the rules for installing equipment and fire safety requirements in their technical documentation.
Features of metal stoves
Metal stoves are designed specifically to equip a house, cottage or cottage with a constant source of heat without spending a lot of time and effort. However, you can fully enjoy the benefits that such a stove provides only if it is installed correctly.
- A large selection of models: from stoves of traditional design to technologically complex options with two- and three-turn fireboxes.
- Characterized by moderate cost.
- They heat up quickly, which allows you to make the room temperature comfortable in a short time.
- Long service life. If handled properly, a metal stove will last at least fifteen years.
- Compact dimensions and the presence of a hob in many models.
- Installing a stove in a wooden house does not require much time and effort.
It is worth saying that metal stoves can be additionally equipped with large panoramic glass and also perform a decorative function, such as the stoves of the Matrix, Meteor, and Vertical series. In this case, when choosing a place to install them, you need to take into account that the door should be in the viewing area.
Materials, components and tools necessary for work
Here are the materials you will need to make a standard brick oven of this type:
- stove brick (red): 60 pcs.;
- fireclay bricks: 37 pcs.;
- clay-based solution: 20 l.
Tools for laying a stove.
- doors for the firebox and ash pan;
- grates or solid grate;
- flap;
- cast iron stove with burners.
The master should have the following tools in his arsenal:
- building level and plumb line;
- rule;
- trowel (a tool for applying and leveling the solution);
- hammer-pick (this tool is convenient for chopping bricks);
You will also need a tape measure or folding meter.
A short historical excursion
Initially, a “potbelly stove” was a name given to a steel stove of a certain design, the creation of which took place during the dramatic years of the Civil War for our country. It is not known exactly which of the Russian engineers came up with a very simple, but very effective steel furnace, relatively easily made in a handicraft way from more or less available materials. During the times of “war communism”, after the urban economy with centralized heating in large cities collapsed, this tiny stove, which could be installed almost anywhere in a “bourgeois” apartment densely packed with house committees, saved many lives. By the way, the statement that the stove got its name due to excessive consumption of firewood is a stupid legend born on the Internet. In fact, the potbelly stove is very economical for its type. In conditions of a severe shortage of coal and firewood, the owner of a walnut set by master Gumbs had the opportunity to survive a terrible winter, using the precious furniture as firewood. The name of the furnace was determined by the fact that at first it became widespread among “former” engineers, office workers, and intellectuals who did not emigrate from the country. That is, according to the concepts of the proletariat, “bourgeois”.