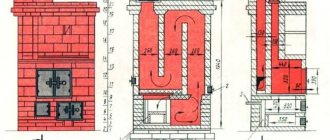
Warm floors are an invention of the 20th century. Our great-grandfathers did not have electric heating cables or gas boilers. However, they came up with their own heating method. To do this they used the walls of buildings. When making masonry, they left channels in them for the movement of hot furnace gases.
Today there is no need to resort to such tricks. You can make heated floors in a wooden house with minimal effort and money.
Choosing a heating heating system is very simple:
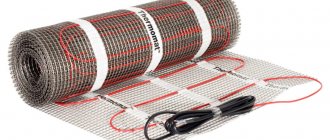
- Electrical cable or mats with flat current-carrying conductors;
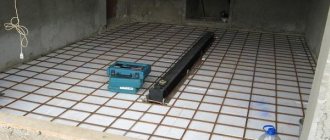
- Warm floor based on plastic pipes with liquid coolant.
Both heating options have earned positive reviews. They are equivalent in comfort and heat transfer, but not the same in energy cost. Electricity is significantly more expensive than gas, so heating cables for heated floors are best used in small spaces: bathrooms, kitchens and hallways. A liquid system made of pipes, a gas or solid fuel boiler is optimal for bedrooms and living rooms.
A lot has been written and said about the fact that heated floors are better than radiators.
We will only note its most important advantages:
- Optimal heat distribution. The comfortable temperature zone coincides with the living space (from the floor surface to a height of 1.7 meters). When the batteries are running, the air near the ceiling warms up the most.
- A radiator heating system activates dust movement to a greater extent than a warm floor.
- From the point of view of interior aesthetics, heated floors are superior to radiators.
Warm water floor
In a wooden house you can make warm water floors.
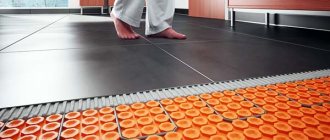
They require a good foundation. Floorboards may not withstand the load on them from heating elements and concrete screed, on which a water floor is usually installed. To make the structure lighter, the heating cable (pipes) is placed in an “air cushion”. A warm water floor consists of hollow tubes through which hot water subsequently flows. It gives off heat to the floor and makes it pleasant to walk on.
In this case, seamless plastic, metal-plastic and metal pipes with a diameter of 16 mm are used. They are installed in increments that average 20-30 cm and are connected to a central heating system or an autonomously operating boiler with a pump.
The technology for installing a warm water floor consists of the following operations.
Thoroughly clean the boards of dust and debris, seal the cracks and cracks with wood mortar, knock together and strengthen the wooden floorboards. The floors are impregnated with an antiseptic, primed, and covered with a waterproofing compound. A heat-insulating fabric, for example, Penoferol, is laid on the subfloor, which is stapled onto wooden boards
It is important that the top layer is metallized. If this is not the case, then you should use foil. Then the pipes are laid and secured, connecting them together into a single system. Next, in the lower part of the room, a special damper tape is glued along the entire perimeter
During operation, the heated floor will heat up and expand. This may cause the concrete to crack. This tape will protect you from this. Next, pour the concrete screed, trying to hide the pipes, but not allow too much thickness (3-5 cm). This will make the wooden floor structure lighter.
In the house, such a floor can be made in any room. Concrete is an excellent conductor of heat. The water in the tubing system does not need to be heated to a high temperature. 40 degrees is enough. Even with such heating, it will be comfortable on a warm floor. Thanks to this device, the heat from the pipes will be reflected in the foil and transferred to the floor covering.
The length of one closed circuit recommended by experts should be no more than 80-100 meters. In rooms with an area of more than 30-40 m2, 2-3 circuits should be made. Otherwise, the liquid will cool quickly. For example, in a room measuring 6x6 m, pipes are laid in increments of 20 cm. The length of the circuit, taking into account the length to connect to the boiler, will be almost 100 m.
Laminate, linoleum, carpet and even tiles can be used as finishing material. If in the case of electric heating it is impossible to create a heavy load on the surface, then with an installed water system there is no need for this. Here you don’t have to specifically design the arrangement of furniture and furnishings.
A warm water floor can be made without a concrete screed, using a dry method. However, this method can lead to heat loss, since wood does not conduct it well. To avoid this, take the following steps:
- reduce the pitch between water pipes;
- create reflective surfaces (deflectors).
Warm floors in a wooden or stone house are an important part of the overall improvement. Thanks to it you can create a favorable atmosphere in your home
Materials and tools
Installing a heated water floor in a private house using the dry method requires the purchase of the following materials:
- solid or liquid fuel boiler, gas (an electric boiler is inferior in economics to cable heated floors and infrared film);
- circulation electric pumps - due to the internal resistance of the pipes, the movement of the coolant due to the pressure difference in the system is impossible;
- expansion tank;
- Mayevsky tap for removing air when airing the heating system;
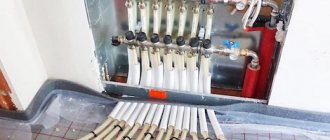
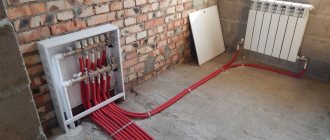
- distribution unit (collector);
- safety valve;
- pipes with special fasteners;
- fittings for polypropylene pipes or coupling-press for metal-plastic;
- antifreeze if no one lives in the house on a permanent basis during the winter;
- roll waterproofing in case of pipe leaks;
- foil vapor-permeable heat-insulating material. When purchasing simple insulation, you need food foil;
- metal diffuser made of galvanized steel or aluminum;
Diffuser.
- polystyrene plate with bosses for laying pipes;
- set of wooden slats.
If you want to save money, a slightly different list of materials is possible. But we will talk about this in the process of reviewing the material.
You can't do installation work with your bare hands. You need tools and equipment (you can buy them, borrow them from friends and acquaintances, or rent them). According to the technology, the set includes:
- level - allows you to carry out work in one plane;
- roulette - nothing without it. You will have to measure a lot;
- wood hacksaw - useful when laying pipes on beams or on a slatted system;
- grinder - will help in cutting pipes. Here she is unrivaled;
- set of wrenches;
- adjustable wrench. Sometimes they indicate that one adjustable wrench is enough. But that's not true. Anyone who installed such a system with their own hands knows about this;
- soldering machine - required for cross-linked polyethylene pipes;
- Screwdriver Set.
Some specialists take a portable gas burner with them, which in some cases significantly speeds up the progress of work.
Calculation of the number of pipes
The number of pipes depends, first of all, on their diameter. And not because a larger amount of coolant liquid is pumped through a larger pipe, which means less is needed. The point is the size of the circuit, which is limited by the internal resistance of the pipe walls. In plain language, this means that a pump of any power cannot pump water through a pipe of infinite length.
There is always a “locked loop” effect. Thus, through a ⌀16 mm pipe, an electric pump can pump liquid over a distance of only 80-100 m (depending on the pipe material). In turn, the size of the pipe affects the laying step: a thinner pipe can be bent 360° with a smaller radius. Here the laying step will be smaller. Naturally, for a thicker pipe this step is greater.
Taking these nuances into account, heating engineers proposed the following formula for calculating the number of pipes:
N = S/L x 1.05 + (M x 2) where:
- N—number of pipes, m;
- S—heated area, m2;
- L — pipe laying pitch, m (optimal distance between pipes is 20 cm);
- M—distance from the circuit to the collector, m;
- 1.05 - safety factor for radii and connections.
The calculation can be carried out using a simplified formula: multiply the heated area by 5 - SNiP requires laying 5 m of pipes per 1 m2 of room area.
The second point taken into account when purchasing pipes is the material from which they are made.
Kinds
The design of a heated floor is a combination of heating components that are located under the floor covering and evenly heat its entire surface. Today there are two types of heated floors:
- electrical - heat is transferred from heating the conductors;
- water. Heat is supplied from heated water, which is filled with metal or plastic pipes. This flooring option cannot be installed in apartments, but it is perfect for country houses, as it has a number of advantages.
Electric heated floors include a heating element - there are cable, film and thermomats.
They differ from each other in the installation features and the level of energy consumption, which manufacturers are trying to reduce more and more each time, and they are achieving their goals.
Water floors also differ in installation technology:
- concrete technology - heating parts are hidden under a monolithic concrete screed;
- laying - several layers of different materials are laid.
Lightweight construction for wooden floors
If wooden floors are installed, then it is impossible to install a concrete pad, since such a floor will not withstand heavy loads. In this case, the sequence of work will be slightly different from those given earlier. There is no need to pour a layer of concrete screed, but high-quality insulation is still required.
The placement is made between the logs, but for this it is better to use mineral insulation. It is also possible to install it on an old rough covering, but then it is recommended to use polystyrene foam, whose density will be 30 kg per cubic meter. This material is often used for private houses. To prevent the formation of condensation, an additional layer of vapor barrier is laid. In this case, the heated surface will transfer heat to the floor, and not to the subfloor.
What is better for a private home?
Owners of private houses have the right to independently choose the type of heating and water supply. Unlike apartments, where the use of water-heated floors is impossible, everything is permissible in your own home. You can heat the room with radiators, underfloor heating, or use a combined system.
A traditional heating system includes the operation of a boiler and a battery - radiators. It is also sometimes necessary to use a convector, thermal panels and other additional elements. This technology provides a good effect both during normal rotation of water and during operation of pumps.
The main advantage of this device is the simple installation and maintenance of the main pipeline. If you decide to use radiators as the main source of heat, then the only problem you will encounter is creating openings in the walls for the pipe to pass through.
A heated water floor in a country house is connected to the heating system according to a similar scheme, but has more advantages compared to radiator heating. A warm floor allows heated air to heat a room of any size, even a large area. And the convector heats the room unevenly, raising warm air upward. Moreover, the water system is much more economical in terms of energy consumption.
Another main advantage of a heated floor is that it does not take up space in the room; all its elements will be carefully hidden under the floor covering. Purchasing materials for its installation will cost less than materials for radiator heating. In addition, the convector dries out the air, but the warm floor maintains optimal humidity in the room.
Preparation, thermal insulation and work with the rough foundation
Installation of a heating system is carried out only after a series of preparatory work, which is aimed at revising the existing support-bearing system, adjusting or completely replacing various elements, protecting and insulating the supporting structure.
Preparation begins with “opening up” the existing floor cladding and rough base. Next, the old heat- and waterproofing layer is dismantled and the load-bearing elements are cleaned of associated dirt, mold and mildew.
After cleaning, a visual inspection is carried out to determine the extent of possible damage. For fairly rotten beams, they should be completely replaced. For small flaws, partial replacement is performed by cutting out the affected area and installing an “insert” of new material.
In case of severe distortions and blockages, the load-bearing supports should be leveled by constructing special linings, additional fixation and reinforcement with metal corners.
To avoid repeated rotting and damage to the supporting elements, the beams are treated with special antiseptics or a deep penetration primer. Next, you should decide which way the heated floor will be installed, how and with what material, additional insulation of the sub-base will be performed.
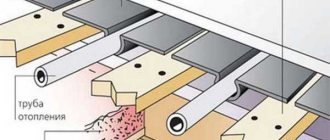
For floor construction with a load-bearing beam pitch of up to 60 cm, it is possible to carry out installation work on the existing structure. To do this, cranial bars are mounted at the bottom of the beams, which will act as supports. Boards are laid on the cranial bars, which will serve as a rough base.
To treat wood against possible formation of mold and mildew, use an antiseptic for interior work.
If the installation of cranial bars is not planned, then the installation of a rough base can be done by fixing the boards directly into the load-bearing beam from the side of the subfloor or basement. Fixing the bars can be done at different heights, which are determined by the thickness and material used to create thermal insulation.
Next, all parts of the mounted structure are again treated with an antiseptic. A layer of vapor barrier in the form of a vapor barrier membrane is laid in the space between the support joists. A thermal insulation layer 15-20 cm thick is laid on top of the membrane. For this, you can use mineral wool, expanded polystyrene or penoplex boards.
The space between the thermal insulation and the primary floor must be at least 8-10 cm. In addition to the gap, it is advisable to provide a ventilation system, which will be made in the form of holes or small windows in the basement. To blow directly through the construction “pie” itself, in the rough foundation, for example against a wall, it is recommended to leave unsewn areas.
For floors with a pitch of load-bearing supports of more than 60 cm, it is recommended to carry out similar actions with the only difference that the installation of the skull blocks can be done a little higher, since the laying of the floor, in this case, will be carried out on DSP, chipboard or plywood fixed on top of the support beams. Thermal insulation is laid in a similar way. Additionally, another layer of vapor barrier membrane is laid on top of the insulation.
Material on the topic: Do-it-yourself floor insulation in a private house.
Features of heated floors in a wooden house
Accordingly, all layers of the “pie” will be laid on the support beams: subfloor, vapor and waterproofing layers, finishing treatment for laying the floor covering and the cladding itself. Naturally, among all these layers there will be a heating system. The underfloor heating system is laid on top of the rough base with an emphasis on preparing various protective and insulating layers for the system elements.
To install a warm floor in a wooden house with your own hands, you can use one of the following methods:
- A combination of dry and concrete screed. This is a universal technology that involves laying two types of screed at once, which allows it to withstand heavy loads on the floor. It can be used for a wide variety of heating systems. The dry bulk part of the screed allows for increased hardness and strength to protect the heating elements of the heating system.
- Liquid screed over existing floors. This is perhaps the most difficult method, as it requires careful preparation of the wooden beams. Concrete screed is highly valued due to its thermal insulation properties and increased heating efficiency of the entire system as a whole. It is most advantageous to use such a base in rooms with high humidity, cold and heavy flooring.
- Free installation with ventilation gap. It is used exclusively for heating equipment as an auxiliary system in relation to the main heating of the house. In combination with ventilation gaps, a powerful heating system cannot be used; additional holes as air outlets will reduce the efficiency of the system.
- Application of reflective plates. This option is a compromise if you cannot do without pouring a concrete screed. The plates are used to reflect the flow of thermal energy, increasing heating efficiency.
Conclusion
Any of the options described and shown above is guaranteed to be suitable for arrangement in a wooden house. It all depends on the specific conditions; the main thing for you is to determine the requirements and capabilities. Those who still have questions can feel free to write in the comments, I will help in any way I can.
If you don’t want to mess around, you can simply lay a heating cable between the joists on the insulation.
Features of laying electric heated floors on a wooden base
The popularity of installing electrical cable mats on wooden floors is explained by the fact that in this case there is no need to tear off previously nailed boards.
To do this, use one of the following methods to install heated floors on a wooden floor:
- Heating cables are laid on the wooden floor inside pre-sawed cutouts. The standard depth of these niches is 20 mm. Laying a cable heating system on a wooden floor requires relatively little material and time costs.
- On top of a wooden surface. To smooth out the unevenness of the base, plywood is laid on top of the floorboards. After laying the heating mats, you can use any of the listed finishing materials - laminate, parquet, linoleum.
Carrying out work using the example of a water heating system
You can install water heated floors in a wooden house in a variety of ways, using a variety of materials, etc. To reduce the load on the underfloor heating system, it is recommended to use polystyrene or ready-made modules. It is this method that will be discussed further.
For proper installation you will need the following materials:
- polyethylene film 0.2-0.5 millimeters thick;
- polystyrene boards with grooves (thickness 0.3-0.5 centimeters);
- aluminum distribution plates up to 0.5 millimeters thick;
- gypsum fiber sheets with beveled edges 1 centimeter thick;
- self-tapping screws 1.6 centimeters long and 3.5 millimeters in diameter;
- damper tape 5 centimeters thick;
- PVA glue.
If all materials are purchased separately, then it is very important to purchase polystyrene plates with grooves for inserting aluminum plates, and the plates themselves must have notches to simplify joining of the sheets.
All equipment for a heated floor system should be purchased from one manufacturer, in one place, and only on the recommendation of a specialist. It is worth understanding that the heating system is an individual design, depending on the characteristics of the room.
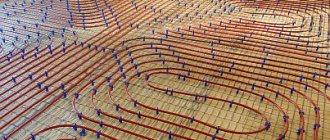
The heating circuit can be assembled from polyethylene and metal-plastic pipes. Before installation begins, the configuration of the heating system should be clearly formulated.
Laying can be done in a snake or in a spiral. Both methods have both advantages and disadvantages, but spiral laying is more practical in terms of uniform heating. It alternates between “cold” and “warm” circuits. The interval between contour lines does not exceed 30 centimeters.
Installation is carried out as follows:
- After creating the rough flooring, the entire contour of the room at the junction of the floor and walls is glued using damper tape. Fix it with PVA glue. Then the floor surface is thoroughly cleaned of dust, dirt and debris. Polyethylene is laid out on it with a 10-15 cm spacing on the walls.
- Then polyethylene mats are laid using the “joint to joint” method. If you are laying the heating circuit with a snake, then you can use a simple mat with grooves for straight installation and a bend near the wall. If the type of spiral is chosen, then you can purchase profile mats or mats with “bobs.” It is advisable to draw a laying diagram in advance in order to complete this stage much faster.
- Aluminum plates are laid according to the same pattern, taking into account the pitch between the pipeline lines. They are adjusted using special notches.
- The pipes are laid in the grooves of the plates in increments of no more than 30 centimeters so that the room is heated evenly. Near the walls, you can reduce the step by half, since this part of the room is the worst in terms of thermal energy loss.
- Then the place in the room where the distribution manifold will be located is prepared. It is advisable to connect the entire system with the help of a professional. Once the connection is completed, the system is tested at twice the standard pressure. If there are no leaks or breaks, and the heating in each section of the circuit reaches the required temperature, then the installation was completed correctly.
- The completion of the installation of the heated floor is the laying of a polypropylene backing and gypsum fiber sheets in two layers. It is desirable that the sheets have a 2-centimeter chamfer. The sheets are fixed together with PVA glue applied to the chamfer, and are also secured to the base using self-tapping screws.
- Then the base substrate is laid and the floor covering is laid on it.
In fact, laying each layer is not difficult. Professional help is required only when connecting the entire heating system to the manifold cabinet, since plumbers do not make mistakes.
Installation of wooden floors with electric heating
Electric underfloor heating in a house can be installed in two ways:
- install heating mats;
- Place a heating cable on the floor.
In the first case, you can do the work yourself; installing a heated floor is easier and faster. The floor rises no more than 3 mm. This means it is ideal for rooms with low ceilings. However, such a heated floor system is characterized by low power, so it is used only as an additional source of heat.
When laying the heating cable, the floors are raised by more than 30 mm. It is not recommended to install them yourself under a wooden floor. It is advisable to consult a specialist.
Both types of heating can be done under any floor covering.
To install infrared mats, take the following steps:
- prepare a wooden base: eliminate floor unevenness, significant defects, prime;
- lay a layer of heat-insulating material;
- spread strips with heating elements evenly;
- install a heated floor temperature sensor;
- fix the cable;
- spread a thin layer of leveling mortar over the mats;
- then lay the flooring or lay tiles;
- Be sure to install a floor heating thermostat.
If you plan to lay tiles on boards with warm electric heating, it is recommended to apply leveler in 2 layers.
The heating cable is usually laid on a concrete screed made on a reinforcing mesh. It can be done over wooden floors. It should be taken into account that the floors will become higher by about 30 mm or more.
- a thermal insulation sheet or a heat-reflecting substrate is placed on tightly lying boards without obvious defects;
- then they throw the reinforcing mesh;
- a heating cable is attached to it with plastic stitches;
- concrete solution is poured on top and distributed in an even layer;
- after it hardens, waterproofing is spread;
- Next, they place a layer under a certain floor covering: under the tiles - glue, under the laminate - underlay.
In addition, you should install a temperature sensor in the corrugated tube and a thermostat.
There is another option for laying a warm electric floor on a wooden base: in a concrete screed created on top of the boards, on a mounting tape.
During installation and subsequent operation, it is important to follow safety rules, since electricity can harm people’s health and property.
Follow the instructions. Do not change the length of the cables on your own. Observe the temperature in the room: it should not be lower than -5 degrees. Before turning on the system, it is important to ensure that the screed is completely dry. The underfloor heating cable should not be located under heavy furniture.
Among the many advantages of an electrically heated floor, there are disadvantages of such a device. The main thing is high energy consumption during operation. If there is a need to create warm floors in the house, it is worth calculating everything several times and determining the possible benefits
It is important to find out the total cost of the system and electricity costs
Complicated method
Infrared heated floors
The system described above becomes more efficient, but also more difficult to install due to an increase in the number of functional elements.
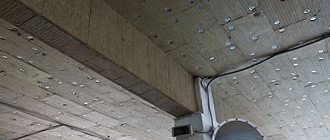
It all starts with a heat-insulating layer, but the top is covered with aluminum foil. The use of this material increases the degree of heat reflection, which determines the concentration of the generated heat and its direction into the room. If it is not possible to cover the entire surface with a single sheet of foil, then you will need to additionally use double-sided adhesive insulating tape to connect the cut pieces.
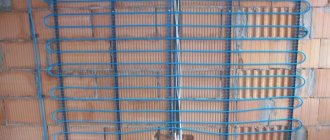
Next, a metal mesh is laid, usually used to reinforce screeds on wooden joists, in order to strengthen the structure being created. A modern warm water floor on wooden logs involves the use of not only pipes, but also a heating cable. The use of this element in combination with polyethylene pipes is highly effective. Such a heating circuit can be heated much higher than the temperature of the coolant in the main heating system of the house. Also sometimes they make a heated floor on the ground in a private house, which is a pretty good option.
Autonomous control of the temperature of the coolant in the heating circuit of the heated floor is carried out using its own sensor, installed in a corrugated tube and connected in a specially designated place. In addition, the overall heating system has a number of different sensors. They concern not only the warm floor, but also the main heating circuit.
Basic requirements for installing electric heated floors
Wood is a natural material that is highly flammable. Considering that an electric heated floor works on the principle of thermal radiation, which means that the cable heats up during operation, it is necessary to strictly follow the rules of electrical installations.
Scheme of floor installation on a wooden base
- Strict adherence to electrical installation rules will eliminate the possibility of wooden floors catching fire. In the absence of special skills, installation of electric floor heating options should be entrusted to specialists.
- The electrical cable should be laid on wooden floors, previously protected with metallized plates. In this way, it will be possible to avoid its contact with the tree.
Performing a screed
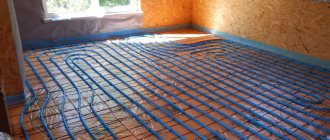
If, according to a preliminary assessment, it is possible to make a reliable warm water floor in a house not using joists, but with a screed, then you can also perform this operation yourself.
Screed for heated floors in the house
- Laying waterproofing on a wooden floor, then thermal insulation with a top metallized coating, which will act as a heat reflector. This step is not needed if the heated floor is installed on the second floor.
- In any convenient way, pipes are laid on a pre-spread reinforcement mesh with an average pitch of 200-300 mm. If the room is large and the estimated length of the pipeline exceeds 100 meters, it is advisable to make two or more circuits so that the water does not cool down above the standard temperature.
- A damper tape is placed along the perimeter of the walls, designed to maintain the integrity of the screed during thermal expansion.
- Working with a screed, the minimum recommended thickness of which is 5 cm, begins with preparing a solution, which can be purchased ready-made.
- Using a level, marks are made on the walls, connected by a thread stretched between screws.
- Beacons are displayed, which can be cut from timber or profile.
- The concrete mixture is leveled with a rule so as to slightly cover the beacons, and polished with a trowel.
- The screed needs 12 hours to set. To obtain working strength, it will take several days, during which the surface is sprayed with water.
The finished concrete surface must be sanded again with a trowel, and the finishing coating can be installed.
Requirements for floors under heated floors
Some tips for safe operation
When planning the installation of heated floors, do not forget that neither electrical cables nor water pipes should be laid under heavy pieces of furniture. Also, you should not install heated floors in close proximity to a wood-burning, gas fireplace, stove or other heating devices.
For rooms for various purposes, you can program different temperature conditions, for example, in the bathroom and living rooms it will be comfortable at 22-24°C, and in the kitchen and corridor 20°C is enough
Practical nuances:
After completing the repair, you should leave the heating system on and maintain the same temperature for 3-5 days
This precaution will allow the entire floor “pie” to be heated evenly and thoroughly and ensure reliable operation of the system. At the beginning of the heating season, you need to properly prepare the floor heating system for operation. To do this, you should increase the heating degree by 5-7 units every day until the temperature reaches the required value.
This approach will avoid sudden temperature changes that can damage laminate and other materials. Similarly, the heating is turned off during the warm period. Do not forget that film infrared floors do not tolerate moisture well. Therefore, it is not recommended to install it in rooms with a humidity level above 70%, and after wet cleaning, wipe the laminate dry. The optimal temperature for heated floors is considered to be within 20-30 degrees.
And lastly, do not cover the heated laminate flooring with carpets or other furnishings that interfere with the effective distribution of heat.
Underfloor heating under tiles
How to install heated floors Review of methods for installing heated floors
Cable laying diagrams.
If you need to install a heating system under the tiles being laid, but you do not have the opportunity to raise the floor, it is recommended to use a heating cable laid in a mesh specially offered for this purpose.
A cable with a diameter of 2.5 mm is laid in a so-called mat having a width of 0.5 meters and a length of at least 4 meters. The power of such a cable per 1 m2 is 100 W, which allows for comfortable heating of the tiled floor. In this case, additional thermal insulation is not laid, otherwise the solution connecting the tiles will lose strength due to overheating.
The single-core heating cable is well shielded and is not afraid of water. The so-called “warm mat” is laid on the base. If it is necessary to turn the cable, an incision is made into the mat mesh.
After the system is practically installed, a floor temperature sensor is placed in it, placed in a corrugated protective tube. After this, the installed thermostat is connected to the cable and to the sensor, and a tile is placed on top of the solution.
For identification, each type of cable has an alphanumeric marking and also differs in color. The power range of thermostats included in the system is up to 3.5 kW.