Underfloor heating systems have become very popular among the population today, as they allow for more efficient heating of houses and apartments. With proper installation and operation, such heating can completely replace standard heating from radiators, but they are still mainly used together. Warm water floors are connected in different ways. Today we will tell you how to make a heated floor from heating in a private house. This scheme is useful when everything is already installed and working, but a decision was made to add heating.
How to make a heated floor from heating in a private house
Construction of a water system
Making a warm water floor in a bathroom with your own hands is a more difficult task, but why not try to cope with it... We have to assemble a structure from pipes and connect them to a source of hot water.
Metal-plastic and polyethylene pipes are suitable for the pipeline. Both materials have flexibility and low hydraulic resistance.
Thorough theoretical preparation
One heating circuit can cover an area of up to 20 square meters. meters, which is enough for a bathroom, but if the floor is planned to be divided into autonomous zones, then water must be supplied to them through a distribution manifold.
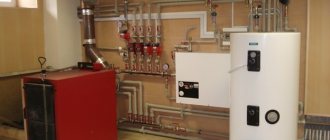
Assembling the manifold consists of connecting all its sections with a pump and mixer, installing thermometers, taps, and air vents. After this, the assembled distributor can be mounted on the wall and pipes can be connected to it
The collector must have flow regulators. With the same water supply to circuits of different lengths, they will heat unevenly. A longer circuit will heat up worse. Moreover, the flow of water in it may even stop due to strong resistance. To eliminate these troubles, flow regulators in the manifold are used.
A mixer is also a necessary thing. The maximum heating temperature in the floors is 50°C; water is supplied to the heating radiators at higher temperatures. If you drain water from the general heating system into the floor, then it must be diluted with cold water to the desired temperature, which is what the mixer does
A number of strict conditions in order to proceed with installation:
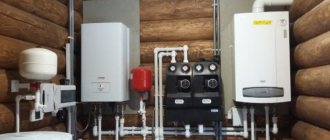
- The presence of a closed-type heating system using a circulation pump.
- A double-circuit boiler must have a power reserve.
- All work is carried out with the heating system completely turned off.
The pipes must be freed from coolant.
In the thickness of a warm floor, one can distinguish the obligatory functional layers:
- base;
- hydro- and thermal insulation;
- pipeline made of durable pipes;
- concrete screed or gypsum fiber;
- decorative floor covering.
In wooden houses, you can also make a water floor, but you should worry about reliable waterproofing. It needs to be done in several layers, this is the only way the wooden base of the floor will last for many years without repair.
Step-by-step guide for installing a water floor
The construction of a water system is a cycle that includes standard types of work.
Stage 1. Clean the floor and, if necessary, remove the old covering.
Stage 2. Waterproofing the floor. We lay a waterproofing film on the floor. Preferably in one piece, but if there are several strips, then they should be laid overlapping and the seams should be joined with a blowtorch. The waterproofing material should also cover the surface of the walls (up to 10 cm upward).
Stage 3. Fill the rough screed with a mixture of expanded clay and cement (3-5 cm thick). Dry thoroughly (up to a week), sprinkling the surface with water in the first days to prevent cracks.
Stage 4. We insulate the surface with foam plastic, polystyrene or other similar material. We spread polyurethane with a foil reflective coating on top. We seal the joints with tape. Now the heat from the pipes will be directed only towards the room.
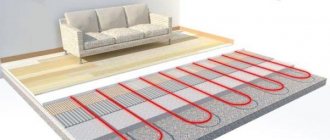
Stage 5. Lay the pipes. We bend them according to the developed diagram, maintain 15-20 cm between the pipes. We fasten the resulting curved structure. We connect the water supply pipe to the flow distribution manifold.
Laying pipes in a “snake” pattern is the most common. An alternative is snail laying. The first option is easier to install, but provides uneven heating. In the second option, the heating is generally more uniform, but there may be cold areas of the floor, since the return turns lie between the supply turns
Stage 6. Turn on the coolant supply and check for water leaks in the system.
Stage 7. We make the second screed with the same solution as the rough one. If unevenness of up to 5 mm was allowed in the rough screed, now we pre-install beacon slats to perfectly level the surface.
One of the purposes of underfloor heating screed is heat accumulation. With a thick screed near a water floor, heat accumulation is higher
The finishing layer of screed takes 5-7 days to dry - the same as the rough layer. After complete drying, you can begin finishing the floor and laying floor tiles.
Installation Guide
Installation work on constructing a water floor in a private house with your own hands is a step-by-step process.
5 key rules for installing water heated floors
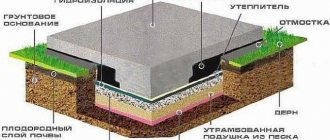
Subfloor
It is better to start constructing a heated water floor at the construction stage of the building. If there is no foundation in the house, and the structure is being installed on the ground, you must first pour a sand “cushion”. The sand must be compacted well, and a plastic film laid on top of it as waterproofing. After which, you can start pouring the cement screed.
To install a subfloor, you can buy a ready-made mixture or prepare a solution yourself. Since the base for the floor requires a level surface, it is better to fill the surface yourself using beacons.
To do this, piles of mortar are made over the entire area of the room with a certain step, and metal profile beacons are installed in them. At this level, the screed is poured and leveled. Only small differences are permissible; if there are protrusions of 1 - 2 cm, they should be sealed.
When installing a water floor on the ground, heat loss will be higher, so the coolant circulating through the main must have a higher temperature.
If a warm water floor is installed on a finished base, it must be cleared of debris and cracks and depressions must be repaired.
Waterproofing
Before you begin laying the waterproofing material, you should beat off the stripes on the walls - the level of the finished floor. Then remove the debris that was caused by this work, and only then proceed to waterproofing.
Thick polyethylene film or glass insulation is suitable as vapor and waterproofing. The waterproofing is laid overlapping each other and the walls.
When using film, the joints between the strips are taped. If stekloizol is used, then the places where the material is applied must be lubricated with bitumen mastic. Only after it has completely dried, glass insulation is laid down, and the joints are sealed using a gas torch.
For your information! Bituminous mastic is toxic, so work should be carried out with open windows.
Installation of damper tape
The main purpose of the damper tape is to compensate for the thermal expansion of the screed. Its standard thickness is 5 mm, and its height is from 10 to 15 cm.
Tape is applied around the perimeter of the room; it should be located above the concrete screed. Its excess, after pouring the screed, will need to be cut off with a knife.
Laying thermal insulation
Thermal insulation boards are laid tightly and joined together with side grooves. Installation begins from the far corner of the room. When using extruded polystyrene foam, the sheets are laid with the marked side up.
The slabs are fixed using disc-shaped dowels in the corners and center, and the seams are taped. If it is necessary to install a second layer of insulation, the laying direction should be changed.
To avoid damaging the slabs during installation, you need to walk on them on thin boards.
For your information! If large gaps form between the sheets and the wall, they can be sealed with scraps of insulation or blown out with foam.
Marking and laying pipes
When using heat-insulating material with markings, the process of laying the heating element is simplified. If there is no such label, you need to make it yourself. To do this, marks are made on the surface of the slabs using a marker, taking into account the laying step of the contour. According to the marks, a pipe laying line is marked with a molar thread, which is then drawn with a marker.
Before installing the pipeline, the manifold cabinet is installed and all connecting valves are prepared.
The rules for laying the water circuit are as follows:
- 20 meters of pipe are unwound from the bay, it is better to do this using special equipment so that the product does not break;
- a heat-insulating sleeve and connecting fitting are put on the end;
- the end is connected to the collector;
- the contour is laid according to the markings and diagram made;
- pipes are secured with harpoon clamps;
- The pipeline is laid in such a way that the second end returns to the collector; it should also be connected to it.
Important! The size of all hinges must be written down on the opposite wall.
If there are transit pipes that pass through the walls, then they should be additionally insulated.
Installation of reinforcing mesh
To add strength to the structure, a reinforcing mesh is laid on top of the heating circuit. A suitable option is a metal mesh with cells 10 by 10 cm, and rods 3 mm thick. It is also possible to use a plastic mesh model. The mesh sheets are fastened to each other using wire.
System pressure testing
Before you start pouring the concrete screed, you need to check the operation of the system - do a pressure test. This activity must be done, because if the system leaks after pouring the screed, it will be difficult to fix the problem.
To do this, the line is filled with water and left for a day, while the pressure is set to 5 bar. If a leak is detected, it is sealed and the process is repeated. If during this time the pressure decreases, this indicates the presence of problems with tightness, which should also be eliminated before pouring the screed.
Laying cement screed
When starting to install a screed in a private house with your own hands, you need to increase the pressure in the circuit to 5 bar. And also, you first need to install beacons, the process of concreting on them will be easier.