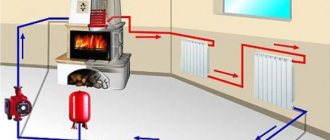
The main goal when building any house is to create warmth and a cozy atmosphere in the living space. An excellent solution for private homes to achieve a comfortable environment is the installation of heated floors on the ground. In addition, this is also an opportunity to save money, since a connection to the oven is available.
A ground floor is a floor structure that is laid inside a strip foundation. There are no load-bearing elements - columns or walls. The ground floor does not fit on the foundation slab and is strongly related to the properties of the soil and groundwater, the flow level of which must be taken into account (at least 5 meters from the surface).
The peculiarity of such floors is that the creation of this system is allowed only at the time of construction of the building, and only on the ground floor. Installation of this type of heating is not possible during renovations when the building is already in use.
Risk of cracks
When using the traditional wet type of screed, it is very important to prevent cracks from occurring. Their appearance can lead to many negative consequences:
- It will become impossible to uniformly warm the room, which will negate the advantages of a modern heating system;
- uneven heating of floor areas will lead to overheating of individual thermal elements and their subsequent failure;
- may get hurt.
To prevent the occurrence of cracks when making screeds with your own hands, you must:
- correctly observe the proportions of the solution, as well as the drying mode;
- used to increase the elasticity of the composition;
- strengthen the structure with reinforcement or;
- install between the wall and the screed.
Damper tape or low-density foam can be used as a damper. Its main task is to compensate for the expansion and contraction of the material as a result of temperature changes.
Preparatory work before installation
Before installation and choosing a laying method, it is recommended to assess the condition of the soil. For example, in some areas, logs can be laid directly on the ground, but first lay waterproofing underneath them. It is this device that allows a wooden floor to last for decades. In some cases, it is better to additionally use crushed stone and sand, but sometimes even this is not enough. So, a video on the topic:
Since there are no specific instructions for matching the characteristics of the room and installation methods, it is best to use the best option that is suitable for any conditions, even for places with high humidity.
To this day, the most win-win option is a wooden floor in a private house on a cement-sand or concrete screed. Such a floor can act as a rigid base or waterproofing. But the main point will still be soil planning. To be able to regulate the consumption of building materials, the soil is thoroughly compacted. And already on compacted soil you can pour sand 20 mm thick or more. Waterproofing is laid on top of the sand, which can be cellophane or roofing felt.
Scheme of installing a wooden floor on the ground on logs (with heaving soil)
Types of insulation
When preparing the base for a heated floor, thermal insulation material plays an important role. When choosing it, the characteristics of the room and the type of base are taken into account.
The bulk of insulation has the same degree of thermal conductivity, but its thickness should be selected individually.
Let's look at the most common types of thermal insulation.
Expanded polystyrene and foam plastic
The production technology of polystyrene foam insulation is the formation of channels in the texture of the material for air movement. The products are durable and can withstand heavy mechanical loads. Foam insulation is lighter, it “breathes” well - it allows water vapor to pass through better.
Penoplex is available in different sizes: 120 X 240 cm, 50 X 130 cm, 90 X 500 cm. These products differ in density: polystyrene - 150 kg/m³, polystyrene - 125 kg/m³. Since foam plastic is less dense, it is deformed under physical influence, which reduces its thermal insulation properties. Therefore, it is more often used when laying between joists.
Cork
Natural material, the main raw material for production is oak bark, so the product is expensive. It is produced in sheets and rolls, but the characteristics are the same, the only difference is in thickness.
Cork gasket is:
- low thermal conductivity;
- waterproof;
- elasticity;
- light resistance;
- fire safety;
- resistance to temperature changes;
- chemical resistance.
If funds allow, this substrate is the best option - it saves heat resources.
The material does not shrink or deform under mechanical stress. Mold does not form on the cork and does not attract insects. The only negative is that it steals the height of the room.
Mineral wool
A long-known type of insulation with increased fire safety. Available in slab form, which is convenient for installation. In the presence of an aluminum substrate, the useful coefficient of mineral wool increases several times, even when installed on the ground.
The structure of the material is rigid, so it is not susceptible to chemicals. In addition, it retains heat well and absorbs noise.
Despite many advantages, there are also disadvantages:
- contains toxins and carcinogens;
- Mineral fibers are hygroscopic and require protection from moisture.
Foamed polyethylene
Today, penofol is often used as thermal insulation. The thickness of the product reaches 3 - 10 mm, the surface is foil with reflective properties. This layer eliminates the need for waterproofing material.
Foamed polyethylene is:
- with one layer of foil - grade A;
- with two - B;
- self-adhesive (foil on one side, self-adhesive base on the other) - C;
- combined (foil on top, special film on bottom) - “ALP”.
All of these insulation models are excellent for preparing the basis for a water-heated floor. It should be said that this material absorbs moisture, which leads to a decrease in thermal insulation properties.
Thickness and horizontality of the screed
One of the most important parameters of a screed for heated floors, which raises the most questions when doing work with your own hands, is its. It has certain requirements:
- The screed must have the same thickness over the entire area of the room. Only if this condition is met is uniform heating of the material and high-quality heat transfer possible. Therefore, it is unacceptable to start work if there are unevenness and differences on the subfloor - in this case it is first leveled.
- The coating should not be too thin, because in this case the heating will be uneven and only certain zones will be heated. A thin layer will not accumulate heat and will cool quickly. Too little thickness can lead to cracks.
- The layer should not be made too thick, otherwise it will retain heat inside without letting it out.
For a warm water floor, the standard thickness of the screed is 6.5–7 centimeters, of which there is a layer 3–5 centimeters thick above the pipes.
For an electric heated floor using cables, the thickness should be 2.5–3 centimeters, for a film type heater – 1–1.5 centimeters.
The horizontality of the surface is critical for a water heating system; when using electric heating elements, a slight slope is acceptable.
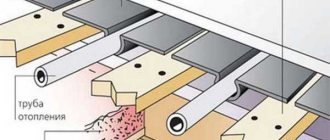
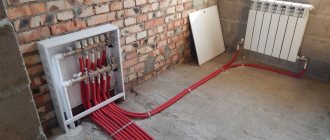
Installation of heating circuits - step-by-step instructions
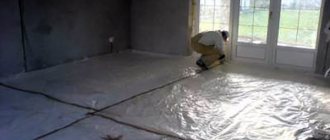
First of all, the base is covered with a waterproofing film with an overlap of 15...25 cm on the walls (thickness of thermal insulation + screed). The overlap of adjacent panels is at least 10 cm, the joints are taped. Then the insulation is tightly laid, the seams are filled with polyurethane foam.
Next, let's look at the points on how to make a heated floor yourself:
- Cover the walls with a damper strip to the height of the monolith. Place the waterproofing overlap over the expansion tape.
- Mount a distribution cabinet with a pump and manifold inside.
- Lay out the circuit pipes according to the diagram, using a measuring tool and observing the laying interval. Immediately bring the ends of the loops and connect them to the comb.
- Attach the pipe to the thermal insulation by inserting plastic “harpoons” in increments of 50 cm. If the structure of the insulation does not hold the clamps well, before rolling out the pipelines, place a metal mesh and tie it to it with clamps.
- Install expansion tape on the expansion joints, as shown in the photo. The latter are installed along the boundaries of concrete monoliths, between individual heating circuits and in doorways.
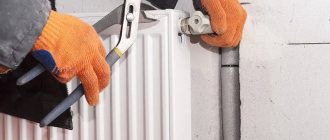
- Lay the lines to the radiators by wrapping the pipes with heat-insulating sleeves. The connections to the comb should also be insulated - in this place the loops are located too close, there is absolutely no need to heat the floors in the corridor.
- Connect the collector to the heating network of a private house, supply electricity to the cabinet for the circulation pump and other automation (if available).
The passage through the deformation joint - it is better to cover the pipes with covers or wrap them with insulation
After assembling the system, you need to fill the contours of the heated floors with water and check the tightness of the joints by pumping up a pressure of 2-4 bar (focus on the response threshold of the boiler safety valve). The technology for filling and releasing air from each TP loop is described in detail in the next material.
It also doesn’t hurt to start the boiler, warm up the heated floors without screed, and visually verify the correct operation of the system. How to install underfloor water heating is shown in the video:
What is a floor screed
This question is often asked by people who have never encountered renovation and construction. In general, a screed is a cement-sand mixture, which is the basis for covering the floor. Or it may already be a finishing floor covering, such as in industrial and industrial premises. Most often, the screed is made directly on the floors or on the insulation layer.
Floor screeding in an apartment is carried out in order to level and add rigidity to the floor surface, in order to increase waterproofing and thermal insulation. Also in order to create the necessary slope for water drainage, if necessary, and in order to hide communications in the floor, that is, pipes, wires, electrical wiring.
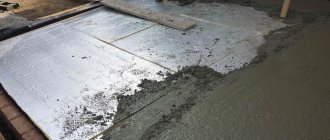
Litter layer
When the thickness of the bedding layer is 4-5 centimeters, it can be considered load-bearing. It is created by pouring a cement-sand screed over a layer of coarse crushed stone using concrete grades B7.5 or B10. This layer will act as a surface level regulator (for more details: “Pouring a heated floor - how to make a screed correctly”).
To prevent the mixture from spreading, the surface is limited using slats. It is necessary to wait until the screed hardens and hardens, while moistening it regularly. A modern alternative to pouring mortar is the use of profiled membranes, the use of which reduces the time for laying the layer.
Types of screeds
There are few of them:
- Wet. It is made on the basis of cement mortar.
- Dry heated floor. This option has become used very often, as it eliminates the appearance of dirt and problems with the contacts of the electric version of the heated floor. In addition, this option allows you to lay tiles or other finishing material the very next day. Naturally, such a screed must be properly arranged.
These options have their advantages and disadvantages. However, you need to choose a screed taking into account the characteristics of the room, the design of the heated floor, as well as the time allotted for repairs. will suit your case, it's up to you to decide.
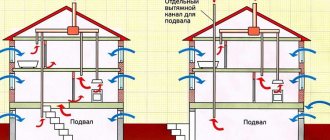
Regulations
- SNiP 2.03.13-88 paragraphs 2.144-1/88 (nodes 63, 69, 75, 81, 87), 2-244-1 (nodes 140,147,149, 160, 161).
- Design of heated floors: DIN 18560 and SNiP 41-01-2003.
©Opolax.ru
Articles on the topic
- Three applications of heating cable: heating of roof, floor and pipes
- Warm floors and furniture in the room: the effect of warm floors on furniture
- Concrete and floor heating systems
- Manifold cabinet for water heated floor
- Warm floor laying system: features of device and application
What is screed made of under heated floors?
To correctly and effectively make a screed for a heated floor, you need to know what to make it from. In the classic version, it is cement-sand, but this does not mean that only cement and sand are required for its production. Very often included in screeds for heated floors
special plasticizers are added, and expanded clay or crushed stone is added to save cement. Then the screed turns out to be concrete, and the cement content in its composition can be different, taking into account the future floor covering. There are no strict approved standards for the composition of the screed. However, it is generally accepted that the proportions of the components of a conventional screed for heated floors are as follows: sand - 3 parts and cement - 1 part, and water is added until a solution has the consistency of liquid sour cream. PVA glue is mainly used as a plasticizer; it is used at the rate of 1 kg of glue per 1 bag of cement.
Other proportions for screeds
, depending on the future use of the floors.
The ratio of shares between the components can be as follows - for one share of cement, five shares of sand and water (0.7 shares) are added, if, after hardening,
parquet, laminate or tiles will be laid the floor screed solution If soft materials (carpet, linoleum) are used as flooring, then the proportions may be different: cement - 1 part, sand - 4 parts, water - 0.7 parts. When crushed stone is added to the mixture for screeding a heated floor, then the ratio between the components will be as follows: cement - 1 part, sand - 3 parts and 5 parts crushed stone. To prepare such a mixture you will need water, usually up to half the weight of cement. Installing a heated floor screed can be done much easier and faster if you use special ready-made mixtures. How to properly use ready-made mixtures is described in the instructions supplied with them.
What should be the thickness of the screed?
The screed under the heated floor must be done correctly. The thickness of the screed is a very important parameter. It depends on what finishing materials you choose. If the thickness is taken into account incorrectly, the heating will become uneven and the heating itself will be ineffective.
So, if you need to level the rough base or eliminate serious horizontal differences on it, the thickness of the screed will be about 5 cm. At the same time, you can lay heat and waterproofing under it. A layer is poured on top of the insulating elements, the thickness of which should be at least 2 cm. In this case, it will be possible to begin installing the heated floor only after 28 days. All manipulations can be done with your own hands.
The thickness of the screed also depends on what kind of mortar you will use. If it contains cement and sand, then in general there should be a layer of 5 cm above the heating structure. If you decide to add a plasticizer to the mixture, the thickness of the screed can be reduced to 2-2.5 cm. However, in this case you will have to use reinforcing mesh or reinforcing compound. Otherwise, the layer thickness will be 3 cm.
If the heating structure is made of pipes, then the height of the “pie” will be about 8.5 cm. This size is unacceptable if the house has low ceilings. In addition, you also need to consider where the apartment is located. If it is located on the lower floor, then the thickness of the “pie” can be 11 centimeters.
If you do not want to make too large a screed, then it makes sense to arrange. In this case, its thickness will not exceed 3 cm. Although, when using special plasticizers, this parameter can be reduced to 2 cm. In this case, overheating of the elements is excluded.
A screed under a heated floor can be built very quickly with your own hands.
It is important to prepare and pour the mixture correctly
Mistakes when preparing the foundation
Non-experts make a number of mistakes when preparing the foundation:
- the most common is when the screed is laid in a snail shape, this option leads to poor heating, since there is a cold return;
- the wrong insulation is selected - not of the appropriate thickness;
- the laying step is not calculated correctly - this can lead to a “zebra” effect;
- · the thickness of the concrete layer is not the correct one - it should be at least 7 cm.
If you plan to install a heated floor in your house or apartment, then you need to approach the choice of the type of base responsibly. The efficiency of the heating system depends on how correctly you prepare the base and follow the technology for pouring the solution.
Technology and installation of a wooden floor in a private house with your own hands, installation procedure
Today, natural materials are at the peak of popularity. A special place is occupied by wood, which is an environmentally friendly building element and is perfect for arranging floors. Very often you can find a wooden floor in a country house. Despite the fact that laying the floor is the most important moment in construction and renovation, you can refuse the services of specialists and make the floor in a private house with your own hands. But this requires maximum effort and attention. The floor must be reliable, strong and durable, so you should take seriously the study of flooring technology.