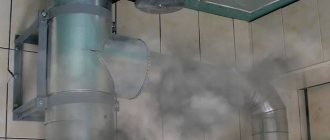
If properly arranged, there should be no condensation in the ventilation system: warm air, according to the laws of aerodynamics, moves from the room to the outside, taking with it droplets of moisture. But often during operation of the ventilation system, a certain amount of moisture accumulates on the inner surface of the air ducts.
Condensation in the ventilation system is the result of increased air humidity combined with a malfunction of the system, as well as improper operation of residential premises.
This is far from a harmless phenomenon. In addition to violating sanitary and hygienic standards and the risk of respiratory and allergic diseases, condensation has a destructive effect on the internal surfaces of engineering structures, so it is better to get rid of moisture in the ventilation duct.
Causes of condensation
Unlike ordinary premises in apartment buildings, there are many more reasons for the occurrence of this unpleasant phenomenon in individual buildings. First of all, this is incorrectly performed or insufficient insulation of various surfaces. Moreover, we are talking not only about floors, but also about walls.
The second and most common reason for the formation of moisture droplets on various surfaces will be poor ventilation of the premises. In an effort to insulate the house as best as possible, many do not pay attention to proper air exchange, which leads to the formation of a very humid atmosphere indoors. Naturally, moisture will settle even on not too cold walls and ceilings.
Another culprit for condensation will be a simple roof leak. At the same time, if you do not take care of solving this problem in time, you can not only get a problem with humidity, but also lose the insulation, since it will get wet over time and lose its properties.
Often suspended ceilings are installed in such houses. This is a very beautiful finishing option and not too expensive. However, condensation may form under a suspended ceiling in a private house due to lack of air exchange, especially if the space between the main ceiling and the stretched ceiling is large.
Where and how to insulate correctly
Moving on to the question of how to properly insulate ventilation, you need to understand that much will depend on the insulation used and its thickness.
Traditionally, ventilation insulation was carried out with glass wool or mineral wool. Today, the range has expanded due to the appearance on the market of so-called shells. These are cylindrical pipes consisting of two or more segments. They are simply placed on the air ducts and secured with tape or wire. Shells are made from the same mineral wool, polystyrene foam, polyurethane foam and other foamed polymers. It is necessary to combat condensation in ventilation from the position of accurately identifying areas. If we talk about a private house, then this is an unheated attic. At the same time, the shortcomings can be eliminated very simply - completely thermally insulate air ducts, valves and other equipment, if provided for by the system design. If the ventilation wiring is located under the ceiling, and it, in turn, is insulated along the attic floor, then thermal insulation of this area is not necessary.
There is a way to remove condensate from ventilation when non-insulated areas are equipped with special devices called condensate drains. That is, the condensate formed in the system is collected in this device and removed outside. This option is effective in terms of protecting interior spaces from damp smudges on the walls and drops from ventilation grilles.
Methods for eliminating condensation
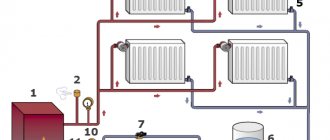
High humidity in the room disrupts the microclimate of the house: mold forms, an unpleasant odor appears, and structures are destroyed. In a private house, methods of dealing with condensation involve insulating the ventilation duct using thermal insulation materials, removing condensate by reconstructing the system, and installing fresh ventilation. Every owner of a private home can solve the problem with his own hands.
Insulation of the ventilation duct
When insulating ventilation pipes, it may be necessary to dismantle a wall or non-load-bearing structure. This kind of dismantling of partitions is most often done in the kitchen or bathroom area, and less often in residential areas. The dismantling process greatly facilitates the approach to the ventilation duct. Insulation of the ventilation duct begins with the selection of the type of insulation. The surface of the pipe leaving the heated room is insulated with a material at least 1 cm thick. The chimney head is equipped with a deflector, which improves draft and protects the air duct from the penetration of moisture from the atmosphere.
The most effective and inexpensive thermal insulation materials include:
- polystyrene foam, polypropylene foam, polyethylene foam insulation;
- mineral wool;
- roll insulation;
- PPU shell.
Insulation of the ventilation duct
Condensate removal
If it is not possible to insulate pipes with thermal insulation materials, you can resort to reconstruction of the ventilation system. The process consists of several stages:
- Disassembly of the outer duct pipe.
- Rotate the pipe 90 degrees.
- Installation of an additional pipe leading to the roof.
The part of the pipe turned down will serve as a drain for condensate.
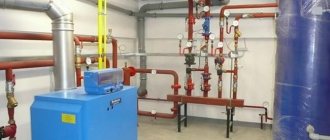
Forced ventilation
An outdated ventilation system creates a number of problems. An exhaust fan provides the necessary circulation: the extracted air picks up microscopic drops of moisture. In the event that insulation of ventilation ducts and reconstruction of the system does not produce results, it is advisable to install fresh air ventilation with preliminary conservation of the old structure. The process takes place in two stages:
- The air duct of the old design is closed with a plug.
- The window or wall of the kitchen area is dismantled and an exhaust fan is subsequently installed.
Fresh and clean air in a private home can be achieved by installing wall supply valves. They crash close to heating radiators. Thanks to the supply valves, cold air flows coming from outside are heated and do not have a significant effect on the temperature in the room.
other methods
These methods of dealing with condensation require time and significant financial investments. However, at home you can reduce humidity in other ways:
- ventilate the room several times a day;
- do not dry wet laundry in living rooms (a balcony, an insulated basement, or a drying machine are suitable for the drying process);
- purchase an air conditioner that dries the air;
- check the foundation for defects through which ground moisture penetrates.
Air conditioner installation
Most expensive method
In the event that the methods described above do not lead to positive results, you can resort to making a new ventilation system with muffling of the old ventilation system. Typically the biggest source of evaporation is in the kitchen, so this is where it is recommended to install an exhaust fan. To carry it out, you can disturb the load-bearing walls or use a window, which is the easiest installation method.
Such a fan extracts air from the kitchen and other rooms, but it is worth taking care in advance to solve the problem of the influx of air mass in order to avoid disrupting the air circulation. You can open the windows in all rooms or use special supply valves for the walls. Since they can be installed behind heating equipment, they are not only practical, but also completely invisible.
The most expensive method is a new ventilation system
The cost of all the necessary equipment is not high, and you can buy it in virtually any specialized store. However, installation work, plugging the existing ventilation system, and punching through load-bearing structures and walls are currently expensive. To calculate the cross-section and count the required number of holes, you need to contact an organization that carries out such work at a professional level.
Condensation in the ventilation system can create a huge number of problems, so to get rid of it in multi-storey buildings, collective coordinated actions of all residents are required. Only in this case can positive results be achieved, because the ventilation system is a single organism, the failure of any section of which can negatively affect the operation of the rest.
How to identify the problem
The presence of condensation is indicated by areas of rust on metal parts
Typically, filter ventilation is a complex technical device with many branches. It is not always possible to disassemble it and see where the drops form for a number of reasons. In this case, you have to approach the problem indirectly - look for signs of a defect on the outside.
The first sign of water formation on the walls of a metal channel may be areas of rust. If the shaft is covered with insulation, wet areas will still appear, making the insulation material itself wet. In this case, the damaged material is removed and a new one is put in its place.
Another potential problem area may be a section of ductwork that extends above the roof covering. In order to save money, they do not always organize insulation in this place, which often leads to icing of the material.
An ancient but effective way
It is better to prevent a problem than to solve it later. Condensation is an unpleasant thing. Vapors settle on the walls of the ventilation pipe, and the wind blows raindrops inside. Even the cap is not a hindrance to him. The temperature difference between inside and outside leads to the formation of moisture. What to do?
Please note that water droplets collect at the end of the ventilation duct. There the steam cools, condenses and begins to flow down
To avoid this problem, it is enough to perform some steps during installation:
- The part of the pipe that goes out onto the street is joined to each other, against the “wool”.
- Place a tee at the bottom with a conical plug with a hole made.
Moisture will flow out through this hole.
Mushrooms for roof ventilation
This means that you will have to work on the arrangement of this unit with a competent specialist and provide the same 40 mm for ventilation gaps, and do not forget about the perforated soffits in the eaves area. And the insulation layer itself must be laid precisely along the rafters and under the sheathing (counter-lattice) when installing the tiles. Then nothing will drip onto the insulation and dampness will not take you by surprise.
All these methods will prevent constant dampness and thereby extend the life of the floors, and will ensure dryness and comfort in your home. Among other things, the arrangement of the attic can take up to 20% of the total cost of the house, so it is more profitable to do everything wisely from the beginning than to work on mistakes later.
In private homes, attics play a special role. As a rule, they are used for storing rarely used household equipment, seasonal clothing, family “antiques” that are difficult to get rid of for one reason or another, for storing canned or dried vegetables. Often the room under the roof is converted into a recreation room, mini-gym or workshop. In fact, there are quite a few ways to use additional square meters and each owner fills the space at his own discretion. But so that things do not deteriorate and become saturated with the smell of mold, and the structural elements of the building do not feel the harmful effects of moisture, well-organized ventilation throughout the attic will be required. It will help create an optimal microclimate and ensure proper thermoregulation.
What causes condensation to appear?
Such ventilation will definitely produce not just condensation, but water will pour in.
Condensation is the formation of moisture on the inside of the pipe. Drops of water seep through numerous joints, as a result the walls and ceilings will be constantly wet. In winter, the gap in the pipe may disappear due to water freezing, so there will be no air circulation in the ventilation duct. The reasons why ventilation leaks in a private house are as follows:
- lack of thermal insulation on ventilation pipes;
- improper insulation of pipes was performed;
- During the installation of ventilation, defective materials were purchased;
- poor insulation of floors and walls, ice;
- the house was built on a wet foundation;
- water in the basement of the house;
- ventilation pipes become clogged with debris over time;
- faulty water supply in the house;
- temperature difference outside and inside the house;
- incorrect installation of the hood.
The reasons may also be constant sources of fumes - drying wet clothes in the house, features of the area where the house was built, for example, near a lake or river. In any case, if it drips from the ventilation, then it is necessary to take action.
How to get rid of condensation in a ventilation pipe
The steam trap should be located at the lowest point
One of the effective methods of getting rid of excess moisture is to equip the system with condensate drains. The mechanism of these devices is designed in such a way that it allows you to capture water that flows down the walls towards the slope.
Essentially, a condensate trap is a tee with a cone-shaped container, cut into the bottom point of the line in the horizontal section and at the base of the 90-degree turn when moving from the horizontal direction vertically upward. This method will get rid of moisture and sediment that gets into the canal during rain.
Next, you just need to go through the entire area at a given frequency and drain the liquid from the catchers. Automatic drainage can be achieved by equipping each steam trap with an electric valve.
Chimney design requirements
Compliance with the requirements of the rules and regulations during the construction and operation of the smoke exhaust system will extend its service life, including by minimizing the formation of condensate:
When the pipe is positioned vertically, horizontal sections no more than a meter long or inclined sections, but without sharp corners, are allowed. The internal surface of the chimney must be smooth, without protrusions, cracks or other irregularities. It is not allowed to reduce the diameter of the channel compared to the outlet pipe of the heating unit. The ability to clean the chimney is an important requirement when constructing a chimney. To ensure good draft and free removal of combustion products, the height of the pipe must take into account the height of the roof of the heated building.
REASONS FOR CONDENSATION IN A COLD ATTIC AND THE CONSEQUENCES OF ITS FAILURE ELIMINATION
The main reason for the appearance of a large amount of condensation on the inner surface of the roof structure was the complete lack of ventilation in the attic. The roof was completely devoid of any means of entry of fresh outside air: there were no dormer windows, no ventilation windows in the gables, no vents in the roof eaves, no ridge aerators. The lack of ventilation led to an increased content of water vapor in the attic air and, as a result, condensation on the coldest surfaces (see the article “Formation of condensation. The physical essence of the process”).
Failure to eliminate condensation in the attic leads to serious consequences: moisture and loss of heat-protective qualities of the insulation in the attic floor and destruction of wooden rafters:
The consequences of condensation on wooden rafters in a cold attic
In the photo: a) – destruction of the rafter system from moisture condensation, b) – frozen condensate on the rafters in winter.
Why does condensation form?
This phenomenon is a normal, natural process that occurs when warm air collides with a cold surface. Moreover, due to the large temperature difference, moisture in the air condenses and appears in the form of drops on the surface of the glass.
- Dormer windows are in fact part of the roof and are used in rather extreme conditions. Cold rainwater flows down them and snow lies on them, which leads to a significant cooling of the surface of the outer glass. If the double-glazed window is single-chamber, it cannot interfere with the cooling of the inner glass;
- Add to this the fact that warm indoor air tends to rise upward, where it will certainly meet cold glass, and you will inevitably get condensation.
You also need to take into account that warm air from all over the house rises to the upper floor.
Condensation formation is promoted by:
- increased humidity in the room;
- lack of natural and forced ventilation.
There is the concept of “dew point”, which clearly demonstrates the dependence of temperature and humidity indoors on the temperature outside the window. Take a look at the table, which has a temperature scale on the left and an air humidity indicator on top. Normal parameters for a person’s comfortable stay in a room are temperature in the range of 18-25°C and humidity in the range of 40-60%. To determine at what temperature condensation will appear on the window, you need to find a mark on the left, for example, 20°C, and a humidity value on the top, for example, 50%. The number at the intersection of two indicators corresponds to the dew point value. That is, when the glass unit “cools” to 9.3°C and below, condensation forms. In addition, the cause of window fogging can be:
- Incorrect design of window slopes. The lower slope of the attic window must be strictly perpendicular to the floor surface. While the side slopes should be turned in relation to the double-glazed window in the direction of increasing the angle of 90 degrees, and the top slope should be located parallel to the floor plane. This ensures proper circulation of warm air, which is not blocked from below, and is slightly delayed from above, thereby helping to warm up and dry the glass surface;
- Violation of the integrity of the vapor and waterproofing or the absence of one layer can lead to moisture from the outside settling on the insulation and penetrating into the room. The following sequence will be correct - waterproofing under the roof, a layer of thermal insulation material, a vapor barrier layer;
- Insufficient insulation of slopes can lead to cold air penetrating into the gaps between the frame and a thin layer of insulation;
- Violation of installation technology resulted in the formation of cold bridges. This will be indicated by the formation of ice on the window;
- And the last thing is the defective glass unit itself. In this case, condensation forms and accumulates between the glasses. Such a double-glazed window must be subject to free replacement, which must be mentioned in the product warranty card.
Proper organization of insulation
Pipe insulation eliminates condensation
The subtleties of insulation of a particular filter ventilation system depend on the material, cross-section of the ventilation hole and type of insulation. Until recently, the main insulation that was used everywhere was different types of mineral-based wool and glass wool. Today there is much more choice. Shell insulators - cylindrical spans consisting of two halves with different internal diameters - are becoming popular.
Removing condensate outside the ventilation ducts
Condensate collection in vertical and inclined sections of air ducts is carried out in their lower part. On horizontal air ducts, condensate collection can be organized almost anywhere, except for areas laid in the walls.
A tee socket is installed in the ventilation pipe so that the outlet is directed downwards. The outlet is equipped with a special container - a condensate collector.
You can find various types of condensate collectors for ventilation on the open market. They differ in design and materials of manufacture. They can be transparent, which makes it easier to control the filling, but are more often made of stainless or galvanized steel.
When filled with condensate, containers with a screw-on lid are emptied manually, which is not always convenient. Moreover, at an outside air temperature of -20º C and below, condensation forms especially abundantly and the container is filled in a short period of time.
Before installing a container for collecting condensate, determine the lowest point in the air duct system, but if they are horizontal, installation of the condensate collector is possible in almost any convenient place
In this case, a conical condensate collector-watering can would be a good option. It is easy to attach a hose to it and drain the condensate into the sewer. If it is necessary to organize liquid drainage in a hard-to-reach place, a model with a watering can is also used.
When organizing the collection and removal of condensate, the configuration of the ventilation system is taken into account. With multiple turns of pipes, you will have to install not one, but several condensate collectors.
Sorbents - moisture-retaining substances - also help to collect and remove condensation. They have the form of cassettes and are installed in the filtration section of the supply air duct. Periodically, the sorbent must be removed for drying, after which it is again ready for use.
Removing condensate is considered a temporary measure, primarily due to the possibility of ice jams forming in winter. Insulation of veterinary ducts helps to radically solve the problem.
Condensation in pipes
The physics of this process consists in the precipitation of moisture, which is in a dissolved state in the air, on surfaces that have a lower temperature. It is necessary to get rid of such a harmful factor immediately after its appearance, since water leaks can damage finishing materials, cause the development of fungus, destroy building structures or cause corrosion of metals. Prolonged exposure to mold spores that are aggressive to the body can lead to the development of respiratory diseases, pneumonia, and allergic reactions.
The causes of condensation are:
- Absence or insufficient thermal insulation of ventilation ducts in the room;
- Significant temperature difference in the room and in the places where the ducts are laid. This can be observed especially often in winter, in attics.
- Operational disturbances in the operation of the ventilation system. Blockages, deformation, and failure of equipment can cause a decrease in air exchange flow.
- Miscalculations at the design stage of the ventilation system, improperly installed ventilation or low quality equipment that is not capable of delivering the required performance.
- Problems with the building itself - close groundwater, flooded basements, constantly wet foundation, poor quality of insulation of the entire house.
Arguments for internal and external insulation
Insulated pipes for ventilation are either internal lining or external insulation. Each method is characterized differently.
Insulation on top of the ventilation duct will also protect the structure from external influences
Interior finishing:
- It is more difficult to carry out work inside the air duct, but the insulation itself is protected from external temperature and mechanical influences;
- laying the layer inside will lead to a reduction in the useful working cross-section of the air duct, which requires preliminary work to increase it;
- the interior decoration must be sealed and vapor-tight so as not to absorb moisture from the air;
- the surface of the insulation should not be rough, so as not to interfere with the movement of air through the pipe.
It is easier to install external pipe protection, but also only in a vapor-tight design. At the same time, it is necessary to consider how to insulate the exhaust ventilation pipe rising above the living space, and what kind of water barrier to construct. The outer protective shell should protect exhaust structures from mechanical damage
An important requirement for insulation is non-flammability, because When there is an open fire and contact with air oxygen, the degree of ignition of the insulation increases significantly
External insulation does not affect the size of the internal cross-section of the ventilation duct and does not require its expansion. And pathogenic organisms (viruses, bacteria), which often occupy the inside of the walls of air ducts and, being insulated, are protected from unfavorable conditions, do not take root in the insulation layer on the outside.
Ventilation arrangement
This is a necessary measure, even if high humidity is not that much of a concern. This is due, first of all, to safety rules, because many substances hazardous to humans are stored in the garage. If the garage is equipped with a cellar, it is necessary to consider two systems independent of each other; there should be no air connections between them.
How to make a ventilation system with your own hands:
- You will need two pipes of the same diameter. One serves to supply air from outside, the second removes fumes from the room.
- The location of the supply pipe should be approximately 20 - 25 cm from the floor. To improve traction, it runs slightly at an angle.
- The exhaust outlet must be done directly under the flow, because warm air will accumulate there. To enhance air communications, it is necessary to bring the end of the pipe to a height of approximately 1 - 1.5 meters above the garage roof.
- Be sure to consider a mesh at the outer ends of the ventilation pipes to protect against rodents and precipitation getting inside.
- If natural ventilation is not enough to organize normal air exchange, small fans must be installed at the ends of the exhaust and supply pipes. This will significantly increase traction and promote air flow at any time of the year.
- A combined ventilation system involves the use of both options, but it is also better to make special plugs at the ends of the pipes to prevent excessive freezing of the room at subzero temperatures.
Properly organized ventilation will not allow moisture to accumulate on the walls and ceiling. If your garage already has air ducts, you should check their condition regularly. It may be necessary to install additional pipes, or increase the diameter of existing ones. Don’t forget about the grate at the exit to prevent debris, sediment or unwanted “guests” from getting inside. At the upper end of the exhaust pipe it is necessary to install protection from rain and snow, otherwise the effectiveness of ventilation will be very doubtful.
Solving the problem of odors in the kitchen with the help of a hood
Are there strange odors that appear out of nowhere? No problem with the hood. They have several types and have their own competitive functional features. To equip high-quality ventilation in the kitchen, you first need to decide which hood is right for you?
Kinds:
- Wall hung - one of the most popular models, installed between a wall cabinet and a gas stove;
- Island - ideal for a kitchen with an island. Suspended from the ceiling. Can be installed in any room;
- Corner – mounted in the corner of the room;
- Wall-mounted – mounted on the wall above the stove. The models have a variety of colors and designs. You can choose an option for any interior design;
- Built-in – placed in a table or cabinet. Visually does not spoil the full design of the room. Easily fits into any interior design and does not stand out.
Types of work:
- Flow hood removes contaminated air masses into the ventilation shaft. This is the choice of most buyers, since, according to experts, it is the safest and most effective;
- The circulation hood draws air into its own structure and cleans it with the help of filters. The clean air is then released back into the room. An air duct is not required for installation.
Hood power calculation
Having decided to make proper ventilation in the kitchen, each person resorts to the issue of choosing the power and installation technology of the structure. For proper operation, you must calculate the required power for the hood. It depends on the area of the room and has a simple formula:
Power = area * room height.
Using this formula, you can easily obtain the required data and choose the right ventilation device.
Hood installation
For quality work, it is recommended to go a long way, but in this case the operation of the device will be correct and effective:
- Mount the case on a cabinet for comfort. It is good to secure it in the cabinet, and fill the remaining openings with polyurethane foam;
- Place the cabinet under the hole;
- Remove the cabinet from the wall to cut the hole;
- For high-quality work, it is recommended to take a modern foreign-made tool. With its help you can carefully make holes.
Next, you need to connect the equipment and start working:
- Install the corrugation and holes. At the top of the cabinet its shape should be square;
- Trim the corrugation without leaving large reserves;
- Hang the cabinet in its place on the wall;
- Treat the joints with a sealant;
- Connect the corrugation to the ventilation shaft;
- Secure the hood;
- Connect the ventilation shaft to the air duct.
It is important to perform each step in accordance with safety precautions. If you have never encountered such questions, we recommend that you contact professionals who can competently calculate and install ventilation in any room of your apartment.
Remember, the slightest inaccuracy can lead to improper operation of the hood.
It is important to ensure a normal level of electrical safety. During cooking, grease splashes may enter the hood, which may cause a short circuit and fire.
Safety is in your hands and should never be neglected! Otherwise, you risk harming the health of not only yourself, but also all residents of the apartment building.
The procedure for installing thermal insulation outside
The most economical thermal insulation material for a private home is time-tested mineral wool. It comes in rolls of various widths and can have one or two outer foil layers.
Thermal insulation material is installed on the ventilation pipe with an overlap so that there are no unprotected areas left; the joints at the top are taped
When determining the thickness of the heat-insulating layer, they are guided by SNiP 2.04.14–88. Heating engineers perform complex calculations taking into account the diameters of the pipes and the thermal conductivity coefficient of the heat-insulating material used.
They take into account the average annual air temperature and even possible heat loss through joints and fastenings, as well as other parameters, most of which can be found in reference books and the above-mentioned SNiP.
If we talk specifically about mineral wool, then when insulating ventilation systems in private houses located in central Russia, roll material 100 mm thick is usually used. You can buy mineral wool 50 mm thick and wrap the pipe twice.
To determine the required width of the insulation, measure the diameter of the pipe and add the thickness of the mineral wool multiplied by two to the resulting value. Multiply the resulting amount by 3.14 (Pi).
When starting work, prepare in advance a rubber spatula, a construction knife, a stapler, aluminum tape 7-8 cm wide, a marker and measuring tools - a square, a ruler and a tape measure (preferably metal). Be sure to wear protective clothing.
To work outdoors, choose a day without precipitation. Otherwise, the mineral wool may get wet. The roll is unrolled, marked and cut to obtain the required size. The foil is separated along the edge so that the pipe can be wrapped with mineral wool overlapping and the connecting seam can be covered with a foil layer.
In hard-to-reach places, a modern type of heat insulator is used - the so-called shell, which must be selected taking into account the outer diameter of the pipe
Then the connecting seam is fixed in increments of 10 cm using a stapler and taped along its entire length. To fix the insulation to the pipe, both special fasteners and ordinary wire are used.
To protect the joints of the air ducts, the insulation is cut into fragments of the appropriate shape and size. Don’t forget to clean the pipe of any dirt before insulating it.
Insulation can also be done using segmental insulation. The monolithic casing has the shape of a pipe and is threaded onto the air duct. It is used mainly during the installation of a ventilation system from scratch.
Having measured the geometric parameters of the air duct, select a casing that is suitable in size and stretch it along the entire length of the pipe. Foil is wound over the top and secured with stainless steel or copper clamps.
The collapsible shell consists of two half-cylinders, which are applied to the pipe on both sides and fixed. In areas running through the wall, it is difficult to wrap the pipe in roll insulation, but putting on the shell is much easier. The collapsible shell can be placed on an existing air duct.
Basic troubleshooting methods
Insufficient traction
The following signs (one or more) may indicate a malfunction in the air exchange:
- the room smells of dampness, rot or diaper rash;
- on the windowsill, walls, in crevices, mold begins to actively multiply, fungus is visible, which concentrates both in open areas and in hard-to-reach places (under the baseboard, behind cabinets, carpets and peeled wallpaper);
- condensation is visible on the surface of the walls, wallpaper and even on furniture;
- the rooms are constantly cool, damp and musty feel;
- the supply of oxygen ceases to be replenished, which is expressed in rapid breathing of residents and a desire to go outside;
- extraneous sounds are heard in the ventilation system in the form of hum, noise, creaking;
- There is a burning smell coming from the air duct.
The premises are usually made as airtight as possible. The natural ventilation system works through cracks in doors and windows. Decorative grilles are used to cover large gaps. If the exhaust hood is difficult, which is forcibly installed in the bathroom, kitchen, or toilet, the reasons may be corrosion in the system and compromised integrity of parts.
To eliminate the problem, you need to replace damaged soft inserts and wafer seals. In this case, it may be necessary to replace air duct elements with visible defects. To achieve tight connections, they need to be adjusted.
Attention The problem may be increased resistance of the branch channels. Contaminants can accumulate in the air duct, causing filters to be ineffective
Maximum cleaning of the ventilation duct from debris will be required. It needs to be dried well and washed from dirt. Sometimes it's better to replace it with a new one.
Noise
Loud noise from the ventilation duct is evidence of clogged valves. There may be other reasons for increased noise:
- Small insects, rodents and even birds can enter the pipeline. The problem is solved by installing a protective mesh on the outlet pipes. It is secured with self-tapping screws.
- Noise can occur due to insufficient lubrication of moving parts of the equipment and, finally, due to strong wind. At least 4 times a month you need to remove the grill and lubricate the moving parts with a special lubricant.
- To get rid of wind noise, you can wrap the pipe with soundproofing material. You should choose a reliable one that is not affected by temperatures and moisture. In addition, you can install several silencers that will absorb extraneous sounds.
The noise can be mechanical or aerodynamic. The first appears due to poor depreciation, unsatisfactory condition of components, friction and violation of balancing parameters. The second is as a result of the operation of electric motors and fans (read about how to repair a kitchen hood motor with your own hands here). The following actions will help reduce noise:
- install the fan on special vibration-isolating bases;
- balance rotating elements and parts;
- firmly fix movable valves, gate valves and clamps;
- install a removable soundproof casing;
- You can insert tarpaulin pads or rubber ties between the duct and the fan;
- Lining the internal surfaces of air ducts with durable materials that absorb sound (mineral felt, fiberglass) will also help;
- You can lubricate the moving parts of the compressor.
Tip An effective way to dampen vibrations is to install a concrete frame around the roof duct. If technical reasons do not allow such an operation to be performed, the channel is wrapped with insulation.
Filter system
Filters can constantly become clogged with dust, small debris and kitchen grease.
It is important to carry out routine cleaning every 4-6 months. If the filter system is completely clogged and prevents the air duct system from functioning normally, then you need to perform the following actions:
- prepare a stable stepladder, table or chair and put on protective gloves;
- Having removed all the ventilation grilles, they need to be thoroughly cleaned and washed with detergent;
- when parts are worn out, which will be visible at first glance, they are replaced with new, higher quality ones;
- use a spatula to clean the inner walls of various types of settled dirt;
- you need to act very carefully so as not to damage the surface of the protective mesh.
The deep channel needs to be cleaned well. To do this, use a long stick with a hard base wound around its end, preferably a damp terry cloth. You need to move inward gradually, with rotational movements. At the end of the work, a final draft check is made with a sheet of paper or an anemometer.
Here
Questions and answers
Let's answer a few typical questions cellar owners ask.
What humidity should be in the cellar?
If you're storing canned food in it, the answer is simple: less is more. But when storing vegetables, the optimal range is 80-95%: they should not only not become moldy, but also dry out.
What temperature should the cellar be in summer?
No higher than 12 degrees. If on hot days the thermometer creeps up from this mark, it makes sense to take care of the thermal insulation of the upper part of the room.
What should be the temperature in the cellar in winter?
Steadily above zero. The reason is obvious: jars of home canning can burst with ice, and crystallization of water in fresh vegetables, to put it mildly, will not improve their taste.
How deep should the cellar be?
Ideally, its ceiling should be below the freezing level. With proper thermal insulation of the entrance, the temperature in it will always be equal to the ground temperature, and the problem of condensation simply will not arise.
Features of insulating the air duct from the inside
It is necessary to insulate all air ducts located outside heated rooms, including areas in the walls. It is possible to insulate both external and internal surfaces of air ducts.
If insulation is carried out from the inside, already at the design stage it is envisaged to increase the cross-section of the air duct in accordance with the thickness of the heat-insulating layer. Otherwise, its throughput will decrease.
Mineral wool fibers are strengthened using adhesives. This is necessary to prevent the fibers from peeling off under the influence of a stream of air. The adhesive used for this purpose should not affect the level of fire resistance of the insulation and its environmental friendliness.
In order not to reduce the aeration properties of the ventilation duct, it is better to carry out insulation from the inside according to the “pipe-in-pipe” scheme. This is how sandwich pipes for chimneys are made. If you don’t have the time or desire to make them yourself, you can buy them ready-made
Thermal insulation laid on the inside should not increase aerodynamic resistance, slowing down the movement of air masses. That is, it is necessary to make its surface smooth.
Due to the additional requirements for internal thermal insulation, its use is often impractical. Including if it is necessary to insulate an already built ventilation system with a given cross-section of air ducts. In such cases, the air ducts are insulated from the outside.
Pipe insulation: priority of work
- The ventilation pipe is wiped dry.
- The selected insulation is tightly wound around the problem area of the pipe and fixed.
- Insulation materials, which are shaped like a pipe, are cut along the entire length on one side.
- Then you should put it on so that all areas fit tightly, it is necessary to achieve complete tightness.
- Only then is the cut seam sealed with glue or tape.
Important! If the insulation does not fit tightly, the condensation in the ventilation pipe will wet the thermal insulation. This will lead not only to the formation of mold and a damp smell, but also to rust - soon the pipe will have to be replaced.
The appearance of moisture in double-circuit boilers
In addition to the chimney, condensation can occur in the water pipes of 2-circuit gas boilers. It's all about the temperature difference, due to which the pipe can rust and fail.
The problem may occur for one of the following reasons:
- Ventilation is not working correctly (the exhaust power is insufficient).
- The climate in the room is unfavorable - the humidity level is consistently exceeded.
- The equipment operates in an incorrect (erroneously calculated) mode.
Unfortunately, the features of the boiler do not allow you to completely get rid of condensate, but insulating the pipes and insulating the chimney can reduce the rate of moisture accumulation.
Conducting a test
How do you know if your exhaust pipe is working properly? Can we hope that she will save her household from troubles? It's simple, do the following test. Close windows and doors tightly. “Arm yourself” with toilet paper, you will need a small piece. Bring the paper close to the hood. Observe what happens to the leaf. He fell? This means the system has failed.
In apartment buildings, this test can also be used to check ventilation communications. It happens that the paper flies off the grid with force during the test. This means the following: it is not fresh air that enters your apartment, but exhaust air from your neighbors.
This is important to know! Some homeowners think the best ventilation is air conditioning. They are mistaken, because the “device” will not provide you with a flow of air from the street, but will only cool the existing air, which may not be entirely healthy. This is not to say that air conditioning is evil; on the contrary, this unit is useful, but it cannot become an alternative to ventilation: these systems have completely different functions.
Reasons for system damage
Most people, even after moving to a new place of residence and living there for years, often do not think about any pipes laid inside the walls. Often they only find out that there is a ventilation duct in their home when something bad happens to the hood. And then they wonder for a long time why this very disaster happened. And it could happen for several reasons:
- The main reason for the appearance of condensation is a sharp difference in temperature, the collision of cold air flows from the street and warm, humid indoor air. The greater the temperature difference, the more the pipes “cry”. It’s not for nothing that people usually start complaining about condensation when they turn on the hood in the off-season.
- The system was designed incorrectly from the very beginning and malfunctioned, which is why condensation began to form. Typically, moisture appears due to weak exhaust or insufficient air flow, due to which water vapor is retained in the pipe and settles there in droplets.
- The reasons may lie deeper in an oversight during the construction of the house. The foundation is damp or the walls and floor are poorly insulated.
- Another version is excess humidity in the room.
- Condensation forms in response to home flooding or a water supply break.
- Condensation appears if the thermal insulation of the pipe is poor. The situation described in the first paragraph occurs - a clash of temperatures, a conflict between the cold of the pipe and the heat of the air passing through it.
- The problem with the hood is that it is clogged. Over time, dust and other debris gets inside the channel, its amount increases until it becomes an obstacle to air exchange. Place a piece of paper on the ventilation grille - if the channel is not clogged, the paper will adhere tightly to the grille due to the air flow. Worst of all, if the piece of paper suddenly flies off the grille, it means that exhaust air is coming into the house from the neighbors.
By attaching paper to the ventilation grille, you can check the operation of the exhaust system
New ventilation
If it was not possible to remove the condensate either with the help of drainage or with the help of insulation, only plugging the old one and installing a new ventilation will help. Forced ventilation is installed in rooms with the highest humidity: kitchen, bathroom, toilet.
Installation of forced ventilation is carried out in rooms with high humidity (for example, in the kitchen)
How to block the smell from neighbors?
The appearance of an unpleasant odor from the air exchange system can be due to various reasons. Professionals recommend finding out and eliminating them, rather than dealing with the consequences. For example, when a hood is installed near the entrance to a room, moist air is blocked. As a result, unpleasant odors and mold may appear.
When figuring out how to quickly stop the smell from the ventilation system, it is important to understand that the measures must be comprehensive, otherwise you will soon have to deal with the problem again
No. 1 - installation of a supply valve
After installing plastic windows, the natural flow of air into the apartment is practically excluded. As a result, the rate of gas exchange sharply decreases, waste products are not removed, and the microclimate in the apartment worsens. Installing a supply valve on a window or wall will help partially solve the problem.
The user can choose the simplest device or purchase an automatic system. It will not only provide air supply to the room, but also heat it up. If there is a supply valve, you will not need to open the windows every day. In this case, the amount of air entering the room will be quite sufficient.
Installing a supply valve will be a simple solution that will provide sufficient flow of fresh air into the apartment and help solve the problem associated with a decrease in the rate of gas exchange
A wide variety of models and a flexible pricing policy will help you choose a supply valve that meets the customer’s needs and budget.
No. 2 - installing a fan in the bathroom
The smell from the bathroom ventilation is easily eliminated after installing an exhaust fan.
Manufacturers offer three device options:
- centrifugal;
- axial;
- centrifugal-axial.
Fans have design features and differ in power. Their installation is relevant when the dimensions of the ventilation pipe exceed 3 meters.
Installing a fan will speed up air exchange, solve the problem of high humidity after bathing, and also eliminate unpleasant odors
When choosing a suitable model, you should not settle for overly powerful options. At a high intensity of air intake, a rarefaction effect may occur, which negatively affects health
Tags
the appearance of condensate in the Condensate in the appearance of condensate elimination of condensate Removal of condensate the appearance of condensate the appearance of condensation. But condensation is formed in the ventilation system non-operation of the ventilation system Supply ventilation clogging of ventilation ducts in the ventilation. where the ventilation system of pipes section of the pipe or operation of the ventilation system clogging of ventilation ducts where the ventilation system to the ventilation ducts.
insulate the wrong ventilation channel outside heating
Expert advice
What should I do to prevent condensation from occurring?
Experts in this field give some useful advice:
- when installing horizontal sections, it is necessary to observe the slope of the air ducts towards the street, otherwise water collects there and flows into the room;
- be sure to install a condensate drain;
- the upper end of the ventilation pipe must be protected by a visor or deflector;
- it is necessary to insulate all sections of ventilation ducts passing through unheated rooms and the street, as well as the additional devices and accessories included in them.
Installation Features
Important! For correct and high-quality installation, you must have experience in installing intra-house communications. If you lack experience, we recommend turning to professionals.
If you decide to install the structure yourself, the following reminders may help you:
- With a wide cross-section of pipes, air circulation is better (recommended minimum diameter is 14 cm).
- Short channels must be made wide enough.
- To maintain draft force, all air ducts in the house must correspond to each other.
- It is better to use the same type of thermal insulation and pipes.
- Forced ventilation should be installed when natural heat exchange is disrupted.
Insulation installation process
Video: an effective way to insulate a chimney
Types of exhaust ducts: advantages and disadvantages
When choosing a kitchen hood pipe, you need to consider the following parameters:
- Material cost;
- Pipe diameter and its compatibility with the hood and ventilation shaft;
- Possibility of installation of the structure;
- Technical characteristics of the pipe - noise insulation, resistance to pollution;
- Appearance of the product and the possibility of its camouflage.
Having decided on these points, you can easily come to the choice of the most successful ventilation pipe option for the kitchen hood.
In this section we will look at the types of kitchen hood pipe materials used as an air duct. Each material has its own advantages and disadvantages, which can affect the choice of buyers.
Plastic air ducts for exhaust hoods
Plastic air duct pipes have a rigid structure and a smooth surface. They can be made in the shape of a cylinder or rectangle. A round section is more preferable in this case, since it creates better traction inside the pipe. However, rectangular models fit better into the interior and can be hidden behind a kitchen set.
When installing plastic pipes, you should take care of purchasing adapters and clamps, as well as hermetically sealing all parts of the structure. Working with the material of the air duct itself is not difficult - the pipe can be cut with a simple knife.
A plastic ventilation duct in the kitchen has a number of advantages:
- Resistance to dirt and ease of cleaning both inside and outside the product;
- Neat appearance. If necessary, you can paint the structure to match the kitchen or disguise it;
- Low noise levels;
- Resistance to external factors - humidity, heat, mechanical damage;
- Long service life - 10 year warranty.
Among the disadvantages of such systems are:
- High price compared to other materials;
- The complexity of the installation process and the need to purchase components for connecting the pipe.
Corrugated air duct
Corrugated pipes made of lightweight aluminum are often used for hoods. Outwardly, they resemble a soft metal accordion. Such models are sold in the form of lengths that can be stretched to the desired size - so this material is very profitable. It is also worth noting that the corrugation can be laid under any bend, if this does not interfere with the draft inside the air duct for the kitchen hood.
The advantages of a corrugated air duct can be determined in several points:
- Ease of installation - the pipe can be cut anywhere and easily connected with a special fastener;
- No corners in the pipe that can block air flow;
- Low cost.
There is also a significant disadvantage of using corrugated metal:
- Unattractive appearance. In most cases, in a home kitchen you will need to mask such an air duct;
- Rapid contamination of the internal parts of the pipe - dirt accumulates in the folds of the corrugation;
- When stretching an accordion, it is impossible to return it to its original appearance.
Calculation of duct diameter
In addition to the material from which the pipe is made, the key point in its purchase and installation is the calculation of the required diameter of the product. The air vent must be tightly and hermetically connected both to the hood and to the opening of the ventilation shaft of the house, where the polluted air will be discharged.
Incorrect calculation of the pipe diameter can lead to reduced efficiency of the hood and air duct in the kitchen. The noise levels will increase, the load on the joints of the structure will increase and the efficiency will decrease. This can also lead to complete breakdown of the exhaust system, as a result of which it will have to be replaced.
Therefore, the installation of an exhaust duct should begin with selecting the exact diameter of the ventilation pipe. To do this, you need to calculate the dimensions of the hood pipe (it is indicated in the instructions for the device) and the diameter of the home ventilation duct. Ideally, the cross-sectional size of the pipe should exactly match the outlet openings of the ventilation elements. If the air duct is smaller in size, you will have to buy parts for the connection and ensure complete tightness of the system.
There are standard dimensional grids for ventilation pipes of different shapes:
What to do if the chimney pipe is leaking
Yes, it will not be possible to completely protect against moisture on the walls of the channel, but at least it is possible to reduce the volume of its occurrence, albeit at the stage of building construction and roofing. But what if the house is not new (for example, you bought it from someone), has been in use for a long time and already has this problem.
There are effective measures, and it is quite possible to take them even on your own. Below we will tell you several ways, but first answer a simple question: what are you going to heat with?
Focus not only on the price of the combustible material, but also on its environmental friendliness (after all, the health of you and your loved ones depends on it), cost-effectiveness of consumption and, attention, its natural humidity. After all, fuel oil or gas contains a lower percentage of water than wood. Also, consider how easily the fuel absorbs liquid.
Any wood must be dried before use; peat or coal is strictly prohibited from getting wet.
Also, consider how easily the fuel absorbs liquid. Any wood must be dried before use; peat or coal is strictly prohibited from getting wet.
Now let's move on to ways to fix the problem.
Pipe cleaning
How to avoid excess moisture and deal with condensation in the chimney? Remove soot in a timely manner. Because it settles on the walls of the channel, making the surface rough, and thereby worsens the draft - flue gases are retained in artificially created “depressions”.
The amount of soot depends on the fuel used and the design of the system. With a coal stove there will be a lot of it, with a gas boiler - not enough. But she will still be there
Therefore, it is important to clean the inside of the canal at least twice, and preferably three times a year. Choose any convenient method, mechanical or chemical, only in the first case act carefully so as not to damage the walls, and in the second use environmentally friendly and not too aggressive compounds.
Insulation
It is important to prevent the formation of excess condensation in the chimney even at the stage of building a house or bathhouse. For these purposes, it is necessary to use an insulated structure, namely:
- single-wall chimney in an insulated shaft;
- double wall chimney.
How to get rid of condensation in a chimney chimney if it is constantly cold? It is necessary to insulate it using modern thermal insulation materials. If you have a brick chimney, the best option to prevent condensation is to line it with a stainless steel sandwich.
Protecting the canal from precipitation
Achieved by installing components - you need to install:
- condensate drain for the chimney - a container for collecting condensate, usually made of stainless steel; such an element should be placed below the pipe so that it can be easily emptied if necessary;
- deflector (umbrella with wind protection) – installed at the end of the chimney (a cone is pre-attached to the sandwich), prevents precipitation from entering the pipe;
- visor - with or without a weather vane, in the shape of a mushroom (hippable roof), with an opening lid or not; but in any case it will protect from direct precipitation - raindrops and snowflakes.
These elements stabilize the draft, eliminate the possibility of blowing in and make the appearance of the roof more modern and aesthetic.
Installation of a walk-through collector
In the chimneys of gas boilers, condensate often forms in horizontal sections of the pipe. In order to solve this problem, a collector is installed as a pipe segment, to which a 90° angle is attached so that the chimney is inclined towards the boiler. This is done so that moisture flows down into the condensate trap.
Why does the check valve sometimes not work and close?
On the kitchen side, a check valve is mounted on the tee. In the factory version it will be quite long. In this case, it is better to shorten it so that this “gun” does not stick out too much.
The valve is inserted inside a section of a standard air duct d-125mm, and this air duct is put on and siliconized onto the tee.
If this whole structure seems too cumbersome to you, and the protruding pipe with the valve is not very aesthetically pleasing, you can do it a little differently. You make the air duct not with a round pipe, but with rectangular channels.
In this case, you install the above check valve on a straight section, as close as possible to the turn.
You can't achieve a factory connection here, so you'll have to farm collectively. Buy a rectangular tee with a round outlet on one side. Next, this round timber is cut off and a check valve is glued in its place.
The valve is placed strictly at an angle (2 degrees). Otherwise, it will open every once in a while or not open at all.
Many people have encountered this problem and easily solved it this way.
The damper itself is also mounted with a vertical deviation. The upper turning point, based on the hour dial, is at 13.00 (1 o'clock), and the lower one is at 17.00 (5 o'clock). This is if your flow direction is from right to left.
Otherwise, the circle is placed at the 11 o'clock - 7 o'clock position.
For more reliable operation and stable opening of the damper, you can stick some kind of weighting material (no more than 2 grams) on one side. Glue it close to the edge.
By the way, do not throw away the previously cut round pipe. It is tightly inserted onto the valve from above, after which a decorative grille diffuser is mounted on it.
What nuances might there be with this method? If your hood stands exactly above the entrance to the ventilation shaft, and the duct pipe goes straight, without any turns in the horizontal plane, then the valve installed on such a straight section does not work normally, at least at 1st speed.
You will simply have nowhere to get the increased pressure to close it. The air will fly through this “turn” in a straight line. You definitely need an angle.
The valve cover and its rotating mechanisms are easy to clean and do not be afraid of them becoming overgrown with grease. For this to happen, you will have to fry huge wild boars on the stove and stew them in your oven for several hours a day, no less.
If you don’t want to see a protruding “hollow” under the ceiling at all, then, as an option, you can install a tee so that the middle elbow rests against the wall, otherwise, where the valve is located, it would look to the side. In this case, also close the hole with a decorative cover.
Everything will look much nicer. However, due to the additional rotation, the performance of natural ventilation will deteriorate slightly. And the grill will reduce it by another twenty percent.
In addition, it will no longer be possible to clean the channel by hand or with a vacuum cleaner. But many do this deliberately and even hide the entire structure in a wooden or plastic box.
As they say, beauty requires sacrifice.
Possible ways to prevent deficiencies
Insulated pipes have no disadvantages that would affect operation.
However, it is worth considering that several steel layers will be heavier than corrugated or polymer insulation. However, the installation quality is not affected by the installation process, so this characteristic is rarely taken into account.
If you have any doubts about the cost, you can make a simple calculation: compare the difference between insulated structures with the sum of the costs of pipe sets, insulation with waterproofing and the cost of fixation means. If the difference is small, you need to choose a material that is easier to install.
Characteristics of insulation
The choice of material for thermal insulation of ventilation pipes is carried out according to the following criteria:
- thermal conductivity;
- vapor permeability;
- resistance to various reagents;
- temperature limit;
- compliance with sanitary and hygienic standards
Each insulation for ventilation pipes has both its advantages and disadvantages, which are determined by its structure and technical parameters.
Mineral wool
It belongs to the traditional type of insulation and has good thermal insulation properties. In addition, mineral wool and other fibers are among the most affordable materials. However, when using it for internal insulation, a seal will be required, and for external insulation, reliable protection from moisture will be required.
Mineral wool with foil outer layer
Foamed polyethylene
Available in the form of shells that tightly fit the surface of the pipes, or in rolls. It is durable, long-lasting, affordable, resistant to moisture and chemicals. In addition, foamed polyethylene is not only a good insulator, but also helps to significantly reduce vibration of air ducts.
Expanded polystyrene
It is characterized by resistance to moisture, prevents the appearance of microorganisms and corrosion. This provides reliable protection of the metal from destruction, so polystyrene foam is used not only to insulate air ducts, but also to insulate the gas pipe.
Using shell-shaped insulation, you can provide access to the ventilation pipe for repair work.
Expanded polystyrene shell to protect ventilation pipes
Polyurethane foam
It is produced in the form of a shell and in many respects is the same as expanded polystyrene, but is more resistant to fire. Therefore, polyurethane foam will be a reliable barrier in the event of a fire and will not allow the fire to spread.
Ways to solve the problem
In order to neutralize condensation, solving the problem in a record short period of time, it is worth adhering to a certain scheme, namely: establishing the correct operation of the entire structure with air channels, neutralizing problems and defects and shifting the dew point outside the premises.
For a small cottage or your own home, the problem is easier to solve than for residents of new buildings with a large number of apartments. It is enough to simply wrap the pipes with a layer of special insulation. It is also necessary to equip the head with a deflector or umbrella, which will prevent moisture from entering the insulation. The process of insulation in apartment buildings begins with studying the exit system and the location of the air duct. On the roof or attic there are usually special buildings in which ventilation ducts from the entire riser are collected.
Insulation of the ventilation pipe
In air ducts that are made of asbestos with cement or galvanized, the space between the channels acts as a “meeting point” of warm air masses with cold street air, which is the cause of condensation.
- Between these channels it is worth constructing special spacers on which the suspended formwork will be located. The gaps are filled with a pre-prepared solution. This method, even if it does not provide insulation to the air duct, will significantly reduce the penetration of cold air masses directly into the ventilation channels.
- All flaws, defects and cracks of brick pipes, inside of which the air ducts are located, are sealed with cement mortar.
- The next stage is insulation of the structure. When using any insulation (plate or roll), the pipe should be insulated and a special metal box placed on top of it. Depending on the budget and requests, you can provide the surface with a painting mesh with further plastering.
Advice: today, the best insulation for ventilation ducts are those made on a mineral wool basis, which have incredible resistance to fire and are not afraid of moisture and mold. They are best used for private and apartment buildings.
Air flow table
| Duct parameters | Air consumption (m³/h) at air speed: | ||||||
| Round duct diameter | Rectangular duct dimensions | Duct cross-sectional area | 2 m/s | 3 m/s | 4 m/s | 5 m/s | 6 m/s |
| 80×90 mm | 72 cm² | 52 | 78 | 104 | 130 | 156 | |
| Ø 100 mm | 63×125 mm | 79 cm² | 57 | 85 | 113 | 142 | 170 |
| 63×140 mm | 88 cm² | 63 | 95 | 127 | 159 | 190 | |
| Ø 110 mm | 90×100 mm | 90 cm² | 65 | 97 | 130 | 162 | 194 |
Why choose plastic pipes for ventilation?
Plastic pipes have virtually no mechanical load on the supporting structures of the building
The air exhaust structure can be made of polypropylene, polyethylene, polyurethane or polyvinyl chloride pipes. Ventilation made from PVC pipes is the most popular of the listed types. It can be installed quickly and does not require any special skills. Plastic pipes have many valuable characteristics:
The pipe composition is easily assembled using connecting parts (fittings). Their diversity makes it possible to arrange an air duct of any shape. Moreover, its sagging does not exceed 4%. You can always choose the desired section size from the standard range (mm): 100, 125 or 150, 200. But there are also non-standard (non-standard) sizes. The inner surface of the pipes with a minimum degree of roughness does not allow pollutants removed from the air to settle on the walls in the form of deposits.
Construction of a new ventilation system
Due to errors in design and installation, if low-quality pipes are used, all measures to combat condensate may be in vain.
In this case, it is economically feasible to shut down the old one and install a new ventilation system that would cope with its functions of removing contaminated air and supplying fresh air masses.
Design is carried out only after analysis of air exchange processes and calculations in accordance with the standards specified in SNiP, based on the characteristics of the ventilated premises and the number of residents. It may be necessary to abandon natural ventilation in favor of forced ventilation by changing the configuration of ventilation ducts and installing equipment for heating the supply air.
Conclusions and useful video on the topic
Often, manufacturers and companies that sell products post reviews and installation instructions online so that fewer questions arise and it is more convenient for users to operate the purchased equipment.
Video #1. Installation instructions for Siemens recirculation models:
Video #2. General information on hoods:
Video #3. Comparative review of built-in models and “visors”:
Video #4
Household hoods without an air duct are an excellent option for providing ventilation in the kitchen if the ventilation duct is not functioning well or there is simply no way to connect to it.
When choosing equipment, be sure to study the technical specifications, and during the installation process follow the manufacturer’s recommendations. A hood installed in accordance with all the rules will provide a pleasant and comfortable atmosphere in the apartment.
Would you like to share useful information about installing and using a ventless hood? Have you ever installed the device yourself? Please write comments in the block below, share useful information and photos on the topic of the article, and ask questions.