Types and features of laying stove panels
The designs of the shields differ from each other in the type of smoke circulation channels and can be channel or bell-type. The duct smoke circulation system is similar to a labyrinth with the same cross-section along its entire length. In a bell riser, individual planes are connected by channels, while the inlet and outlet openings are made narrow to slow down the movement of gases.
In modifications with a summer mode, in the warm season, flue gases are directed directly into the chimney, and in winter - into smoke circulation channels that heat the walls. The direction of gas flows is controlled by valves. To remove soot, cleaning holes must be made in the lower part of the building.
As a rule, heating panels are placed in half a brick to obtain thick walls that accumulate heat. The principle of laying an extension is no different from building a furnace. For work, ceramic solid bricks and heat-resistant masonry mixture or clay mixed with sand are used.
The first row is always made of solid brick. The foundation is poured together with the stove or separately, but professionals recommend choosing the first option. The riser and the furnace array can be a single structure or not have a bandage, which allows you to dismantle and rebuild one of the buildings without touching the second.
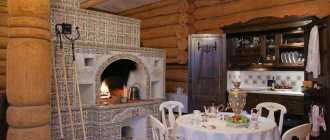
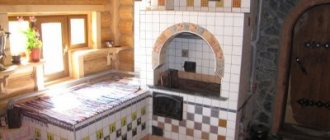
This is what a cooking stove with a heating shield looks like
There are schemes of heating and cooking stoves with a shield, which provide an additional firebox designed to heat the extension without heating the stove - this option is convenient for quickly warming up the room in damp, but not very cold weather. For heating two or three adjacent rooms, more complex corner panels have been developed, which are part of the partitions. Sometimes corner models are installed in one large room to increase heating efficiency.
Swedish stove named after Ryazankin: diagram, description of the model
A combined heating model with a hob is an ideal solution for installation between the kitchen and the living area of the house. And if a stove for cooking is placed on the kitchen side, then a fireplace is often installed on the living room side. An important advantage of the design is the rapid heating of the surface.
This wood burning stove measures 102 x 89 cm (base) and 217 cm (height without chimney). If you decide to also install a fireplace, then please note that its portal protrudes another 13 cm. The power, or heat transfer, is 3000 kcal/hour.
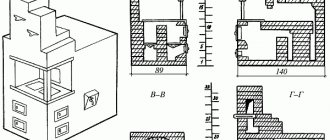
The layout of the “Scotland” brick stove is more complex than the previous heating design. Therefore, if you decide to build it yourself, but do not have enough experience, it is better to first fold it without using a solution to make sure that you understand the order correctly. In addition to ordering, be sure to keep a sectional plan of the structure in front of your eyes so that you can clearly see all the internal channels.
Among the “pluses” we name efficiency and expanded capabilities (heating and cooking).
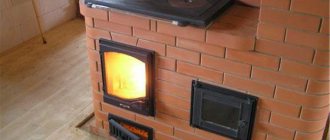
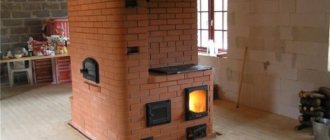
Budget heating and cooking stove
Appearance of a country stove with a stove and a shield.
This simple model works in winter and summer modes. In the summer, the shield channels are closed with a valve located in row 7, and hot gases are released directly into the pipe. For construction you need the following materials and stove equipment:
- 290 pieces of red ceramic bricks,
- grate bars 24*25 cm,
- combustion door 25*18 cm,
- blower door 13*13 cm,
- kitchen cast iron stove with burners 72*29 cm,
- three valves 13*13 cm.
Layout diagram of the first nine rowsMasonry from 10 to 21 rowsTop rows of masonry
Choosing a model is a delicate matter...
Appearance, of course, is not the only parameter by which a stove design is chosen. Much more important is its heating capabilities.
Think in advance about how the structure will be located, taking into account that its side walls give off much more heat than the back and front, if only because they are often larger in area.
If the house is small, then the optimal place for installation is at the intersection of the walls. That is, such a stove, firstly, will partially replace load-bearing walls, and secondly, heat all rooms at once.
The size, or more precisely, the surface of the stove must be calculated from the characteristics of the room that will be heated. For example, a non-corner room inside a house requires a smaller stove than a room with one or two external corners or a hallway with the same area of the premises.
You can calculate the required stove surface area yourself, but it is better to play it safe and at least resolve this issue with the help of a specialist.
Popular heating models are “Dutch”, “Swedish”, “Russian”, as well as Bykov, Kuznetsov and Podgorodnikov stoves. Also, for country houses, fireplace stoves with two fireboxes are often allowed - a fireplace and a stove.
A simple stove with a shield at the end
The shield is placed not only on the side, but also at the end of the structure. This option is considered the simplest and is ideal for a summer kitchen or a small country house. The model presented in the first diagram does not have a blower; it works on the “Dutch” principle - air enters the combustion chamber only through the cracks in the door. If necessary, the height of the riser can be easily increased or decreased by adding or reducing several rows. Through holes under the stove - trenches - increase thermal efficiency and increase fire safety.
Stove with an end shield: 1 – shield, 2 – shanks, 3 – plate. Section of a country hearth and the principle of gas movement. Row diagram of a heating and cooking stove. Final rows.
Based on this simplest model, an improved design with a grate and a blower was developed. In this scheme, the first continuous row is laid directly on the foundation.
Improved model with a blower Arrangement with a blower and grate Continuation of the diagram
To build one of these modifications you need to purchase:
- 220 pieces of red brick,
- combustion door 21*25 cm (for a model without a blower with holes),
- plate 41*71 cm,
- valves 13*13 cm,
- grate and blower door (only for the second option).
Based on the same scheme, a kitchen assistant with a water heating tank and an oven was also developed.
Kitchen stove with hot water tankModification with oven instead of tank
Stages of work
Before starting work, you must purchase a pick, plumb lines, a ruler, a level, a tape measure and a square, a cord, a hammer and a combination trowel, which is used to remove excess mortar.
The material for constructing a standard heating panel and fittings will require fire bricks (about 310 pieces), about 6 buckets of clay and about 4 buckets of sand, 1.5 meters of waterproofing roofing felt, 3 special cleaning doors, a 20-centimeter grille for ventilation and 3 pieces of valves (smoke) measuring 13x13 cm.
As mentioned above, the shields are erected on the foundation. Therefore, the process begins with the arrangement and waterproofing of the base.
Construction of the foundation
The solution in the foundation is leveled using a level, without reaching approximately 10 cm from the floor. A brick is placed on the dried layer, the base of the structure is treated with waterproofing material, and the outline of the unit is outlined. Then a second layer of brick is laid, finally comparing it with the floor level.
The basic algorithm for laying the foundation is the same for arranging a heating panel of any configuration.
Laying a shield without an autonomous firebox
Row 1 – completely lined with bricks. The 2nd and 3rd rows are laid following the order. At the level of the 4th row, 2 clearings are installed and a window is left among the bricks for further connection with the shield. On the 5th row, the same work is done, but attention is also paid to bandaging the seams of the stove. The 6th row is placed, not forgetting to leave 2 channels.
- Starting from the 7th, including all remaining odd rows (up to the 25th), lay out the bricks in order, leaving 3 channels.
- Starting from the 8th and including all even rows, they act strictly according to the order scheme.
- At the level of the 10th, 11th, 17th, 23rd and 24th rows, a different masonry is used, which ensures a stronger connection of seams.
- In the 10th, 18th and 24th rows, do not forget to put the valve on the right.
- At the level of the 21st and 22nd layers, a samovar is installed, which will be blocked on the 27th row, which combines the 2 left channels into one common one.
- A reliable latch is placed on the 28th layer, and the 29th is laid out in accordance with the order, not forgetting about the dressing.
- On the 30th row, the channel on the left is blocked, and the valve is reinstalled.
- The 31st and 32nd rows should provide ligation of seams and overlap with a thickness of 3 rows.
- The levels of the 33rd, 34th and 35th layers are laid based on the order, and on the final - 36th row, care must be taken to leave channels (ventilation with smoke).
Arrangement of the shield with an autonomous firebox
This scheme is more complex and provides for the possibility of separate combustion of the shield and the stove. Here you will also need much more material than with a simplified version of the shield.
After the foundation is securely installed, the first two layers are laid, following the ordering pattern. 3rd row - similar, but with an ash pan, which is needed for the firebox.
https://youtube.com/watch?v=nj24EqaYTEw
- The 4th layer is quite important: 2 valves are installed here (for winter and summer), as well as doors (blowing and cleaning) in the amount of 4 pieces. Similarly on the 5th row, but here they additionally bandage the seams.
- On the 6th level they install an oven with a water-heating box, and also reduce the size of the channels and block the doors.
- On the 8th layer, doors are installed: a large one for the stove and a small one for the shield.
- The 9th and 10th rows are laid according to the diagram, but on the 10th row a steel seal is laid over the oven structure.
- On the 11th row, the upper edge of the oven is smeared with clay, and the doors are also blocked.
- The final row is the 12th, serves to strengthen the frame and install cast iron flooring.
The need to heat rooms around the clock prompted the creation, instead of a standard potbelly stove, of a highly efficient heating panel that has excellent heat capacity and guarantees comfort both when preparing food and when staying in the room.
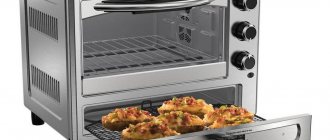
Iron cooking and heating stoves have one undoubted advantage - compactness. Such a unit will not take up much space in your home or country house. In order to increase the efficiency of steel and cast iron stoves, a brick heating panel is used.
Attaching a shield to a metal furnace
Modern heating and cooking stoves made of cast iron and steel can also be made more efficient by attaching a brick shield to them. This simple move will allow you to add a heating wall to the convection oven and reduce fuel consumption. Construction in this case comes down to laying a riser with smoke circulation, to which the chimney of a metal heat generator is connected. If there are two rooms in the house, then the heating panel is installed in the wall between them.
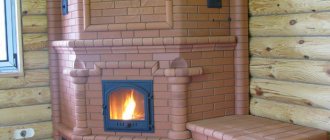
Cast iron wood stove with brick backsplash
More complex designs of heating and cooking stoves with a shield include a stove bench, a drying chamber, an additional firebox and other details that make the home functional and comfortable. However, each additional module increases the weight of the building and fuel consumption. We recommend that you coordinate any selected project with a specialist in order to finalize it to suit the needs of a particular home.
Materials
The list of necessary materials for heating furnace operation consists of:
- 1 firebox door, 21x25 cm;
- 1 ash door, 14x25 cm;
- 3 cleaning doors, 12x12 cm;
- 550 red bricks;
- 1 oven, 45x25x29 cm;
- 1 grate 20x30 cm;
- 1 valve 25x13 cm;
- 1 cast iron stove with 2 burners, 41x71 cm;
- 1 hood damper 13x13 cm;
- 30 fireclay bricks ША-8;
- 1 steel corner 45x45x700 mm;
- 1 steel corner 45x45x905 mm;
- 2 steel strips 50x5x650 mm;
- 1 drying shelf 190x340 mm;
- 1 sheet of drying chamber covering 800x905 mm;
- 1 sheet of pre-furnace 500x700 mm.
When choosing materials, you need to pay attention to some nuances. The first concerns the thickness of the oven walls. If it is small, the walls will quickly burn out and unexpected repairs will occur. If they are too thick, then heat removal and heating will occur slowly. The consequence is underburning, soot deposition and deterioration of efficiency. The same requirements apply to the hob. It is best when it is cast from cast iron or special steel.
The weak point of any Swedish stove is the firebox door. Due to the very high temperature in the firebox, the door quickly becomes loose and in some cases falls out. A standard sheet metal stamping product is not suitable. To avoid premature repairs, experts recommend choosing a cast door . It should have mustaches that are embedded in the masonry.
If there is no choice, and you have to buy a stamping door, then you need to strengthen its structure with four pieces of annealed wire . The diameter of the material should be 3-4 mm. Length up to 70 mm. The wire is welded to the door frame. The formed mustache must be spread to the sides and embedded in the masonry. This will save you from unwanted quick repairs.
Classification
Thermal shields are divided according to several features:
- Wall thickness;
- Design or installation features;
- Configurations
Each of the above features divides the design into several more types. For example, the thickness of the walls can be either half a brick or a quarter. The first method is perfect for those who want to work with the stove for a long time and not be afraid of fire during prolonged use. In structures with thin quarter-brick walls, the main feature is that they cool much faster.
Design and installation features also have their own divisions. There are two main types of structures: bell and channel types. In the first case, one or two surfaces are combined according to the cap principle using channels. The operating principle of this design is simple. The hot air will remain in the upper part of the structure until it begins to cool. After the air in the hood cools, other hot air will take its place.
The channel type is simpler than the bell type. This case implies the same diameter in the pipe and the presence of jumpers in certain places of the structure, which allow you to regulate the heating or cooling of the surface.
The configuration of the shield is divided into straight and angular. Each configuration has its own advantages and disadvantages that affect the functionality of the shield. However, it has been noted that the corner design is used much less frequently than the straight type. This may be due to the fact that the corner structure is more difficult to construct. At the same time, it can save space, which will be an excellent solution if the room in which the shield is located is small.
Classification
As a rule, the shield operates from hot gases emitted by the stove's hob. But in some cases, an individual firebox can be built into it.
The result is a design in which the heat circulation does not depend in any way on the plate.
By wall thickness
Shields are of the following types:
- with thick walls (laid in half brick);
- with thin walls (laid in ¼ of a brick).
The option with thick walls is advantageous in terms of low flammability and if the stove is expected to operate for a long time.
The second option requires stricter compliance with fire safety rules, since the structure is heated not partially, but completely. In addition, these panels are laid on a waterproofed foundation. And if they decide to decorate them with tiles, then this must be done during the construction process. Such furnaces must be equipped with a metal shell - a casing.
The heating panel must be adjusted differently to operate in summer and winter. This allows you to use only the cooking surface of the stove in hot weather without heating the walls, and in winter to achieve the maximum possible heating. The principle of operation looks like this: in the summer version, the smoke passages are blocked by a valve, as a result of which only the stove is heated, and in the winter, the valve is moved back, which gives an impetus to heating the entire surface of the shield.
By design
Also, depending on the design and installation features, shields can be:
- Bell type. This unit consists of 2 vertical brick surfaces connected by channels. Once inside the special hood, the heated air is retained there and effectively heats the room.
- Channel type. It involves the operation of a winding chimney with a metal pipe of the same diameter. In this case, jumpers must be installed to prevent the entire surface from heating up in the summer.
Basically, the shields have a straight configuration, but sometimes they can be angular.