If you are building a house and want to give it the charm of a Russian hut, a stove with a stove bench is the best solution.
If you are building a house and want to give it the charm of a Russian hut, a stove with a stove bench is the best solution.
Structurally, the stove consists of a firebox
, niches for storing dishes (
cold stove
), and an adjacent stand for hot pots and pans (
hearth
), niches for storing firewood (
guardianship/ovens
), a kind of oven for cooking and baking bread (
crucible
), chimney,
roof ( beds)
.
The lower part of the crucible is called under
; it is built at an angle to make it easier to place heavy dishes with dishes inside.
Above the pole there is an over-pipe
and
a chimney
, which is always equipped with a valve -
a view
.
In modern, modified designs of Russian stoves, such shortcomings as: uneven heating have been eliminated; high fuel consumption; duration of heating of the furnace.
Why are Russian stoves so popular?
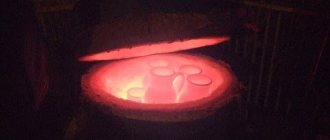
The incredible “survivability” of the Russian stove lies in its functionality - it is used both as a cooking unit and as a heating unit, and the latter, contrary to popular belief, is by no means a primary function. In its simplest form, the design is a very deep fireplace, essentially a large firebox with a chimney.
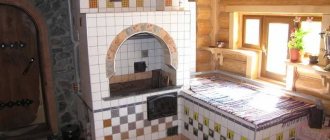
Russian stove of traditional design
Thanks to the thick walls and massive roof, the heat-storing ability of the Russian stove can be the envy of any other solid fuel unit. The same factor also plays into the benefits of efficiency. The structure can remain warm throughout the day, so it does not require a lot of firewood to maintain the temperature within a comfortable range. Here it is impossible not to mention the extremely convenient design with a bed or bed.
The design of the Russian stove is also unique in terms of creating culinary masterpieces. The wide temperature gradient of the firebox is very convenient to use during cooking. If it is necessary to obtain rapid heating, the cast iron with its contents is moved closer to the hearth. If it is necessary to reduce the intensity of boiling, then it is moved to the periphery, closer to the sides. By the way, the Russian stove has a unique ability that no other heating and cooking unit has. The walls and roof of the furnace, heated to a high temperature, are able to maintain a very high temperature even after the fuel has completely burned out. The infrared rays emitted by the surface allow you to bake or simmer foods for a long time, obtaining an incomparable taste and a golden, appetizing crust. The advantage of this method of cooking also lies in the fact that it does not come into contact with either fire or a gaseous environment, so there can be no talk of any carcinogens.
Today, the Russian stove is an extremely functional heating device with a hob, water heater and a place to relax
Modern heating devices can be classified according to the presence of one of the following characteristics:
- The presence of a slab and a flood. The hob is built directly into the body of the stove, creating a so-called hearth, which was made blind in the canonical model.
- Placement of a fireplace on the back side of the stove, which opens into the adjacent room. The practicality of this method is extremely high, since with two heating devices there is no need to construct separate chimneys and foundation slabs.
- Attached to the stove is a coarse or trestle bed. They still, as before, increase the comfort and convenience of the heating device, although the dimensions of modern stove beds cannot be compared with the dimensions of traditional stoves, which were designed for 3-4 people.
The integration of the stove into the array of the Russian stove not only expanded its cooking capabilities, but also made it possible to heat the side heating shield and the lower part of the structure . Based on this factor, units with side heating are distinguished, which are used to heat the next room, as well as heat generators with bottom heating. The presence of a flood in the latter makes it possible to warm up the walls that are below the level of the hearth. Due to increased heat transfer, it becomes possible to heat a room of increased area without the need to expand the dimensions of the device.
Bottom heating significantly increases thermal performance
Advantages and disadvantages (table)
| pros | Minuses |
| High efficiency - from 50 to 70%. | The ability to operate only on fuels that do not require increased air flow. It will not be possible to convert it to gas or fuel oil. |
| Safe design. | Cumbersome design. Additional load on the floor - it can only be installed on the first floor. |
| Undemanding to materials - when building a furnace, you can only get by with brick, sand and clay. | After cooling, the unit requires a long warm-up. |
| Uniform heat transfer. | Ineffective smoke circulation - due to miscalculations in construction, the heating device may smoke. |
| Durability. | Inconvenience when cleaning the firebox from ash. |
| Possibility of heating the adjacent room. | |
| Convenience and comfort of a bed. | |
| The surface of the bed can emit infrared energy for a long time, which has an excellent therapeutic effect. |
In addition, a Russian stove will require the owner to be able to handle a grip, a frying pan, pots and cast iron, and not every modern woman will like this. If you are ready to put up with minor inconveniences, then this literally fabulous unit will be able to thank the owner not only with warmth and delicious food, but also with healthy sleep, as well as wonderful healing procedures.
See also a step-by-step guide to building a Dutch oven with your own hands:.
Device and design features
Built according to all the canons, the furnace has many structural elements.
Schematic representation of the main parts of a Russian stove
- Sub-bake. The recess at the base of the stove is intended for storing and drying firewood. Today, many owners refuse the oven to simplify and reduce the cost of the design and do it completely in vain. It is impossible to find a more convenient and practical place for fuel.
- A stove is a cold niche for storing dishes.
- The pole is a flat horizontal surface in front of the crucible. Here you can leave food pulled from the fireplace so that it remains hot for a long time. There are designs of stoves in which a hob is installed in this place.
- Pod or flank - the bottom of the furnace (cooking chamber) located at a slight slope to the hearth. Deviation from the horizontal towards the outlet makes it easy to move heavy cast iron.
- The crucible is a space inside the furnace that simultaneously serves as a firebox and a cooking chamber. As in the case of the finial, the ceiling of the furnace has a slope towards the exit. This allows you to trap hot gases under the roof, so they have time to warm up the array of the heating device. Between the hearth and the hearth there is a bend, or a bend, a kind of transition zone between the horizontal sections of the furnace with different temperatures.
- Overpipe is the same as high. In a Russian stove, this is a smoke collector located above the hearth. Behind it begins a chimney.
- A samovar (also known as a dushnik) is a narrow channel leading directly into the chimney, which is intended to connect the samovar pipe. Modern stoves do not have a choke.
- Vertical flue above the pole
- A view is a hatch that completely blocks the chimney. Through the view window there is access to valve 10, which regulates the draft in the furnace.
- Chimney valve.
- Bed.
Another illustration clearly shows the structure of the internal chambers of the structure. The stove, which can be seen in the lower picture, is intended for drying fruits, mushrooms and berries. As you can see, the thickness of the walls between the niche and the furnace is no more than a brick, which actually turns the stove into a kind of modern oven of Swedish wood-burning heat generators.
The structure of the internal space of a Russian stove
The combustion unit, which is a kind of recuperator, has a huge impact on the performance of the heating device: the incoming air flow is heated by flue gases. Mixing does not occur due to different densities of gases, and experiments have shown the absence of turbulence even at the interface between two gas flows. To avoid turbulence, the surfaces of the heel and fold are made as smooth as possible. Otherwise, turbulence will carry away some of the oxygen, which will increase the gas-generating ability of the heating device.
The oxygen entering the furnace supports intense combustion of the fuel. In this case, the heated gases rush to the roof of the furnace. Thanks to its inclination towards the mouth and a small threshold, which prevents the free escape of gases to the high, two stable zones of gas circulation are created. It is in them that the whole power of the Russian stove lies, but to form vortices you must strictly adhere to the basic dimensions.
In addition, the rotating flows retain unburned particles in the high-temperature flame zone for a long time, thereby increasing the completeness of fuel combustion. The heated roof and walls of the cooking chamber actively radiate energy in the infrared range, uniformly heating what is being cooked in the crucible. As for the crimp, it not only acts as a thermal economizer, but also allows you to keep food hot all day. To do this, it is enough to block the chimney and close the mouth with a wooden damper.
Thanks to the smoke circulation features, the stove remains warm for a long time
As you can see, the smoke circulation of a Russian stove has a minimal temperature gradient. The constancy of the temperature of the heated gases, as well as their constant circulation in the working area, leads to the fact that the smallest particles of fuel burn in the crucible without any residue. And here another important advantage of such a simple but carefully thought-out design appears. The fact is that ash is, of course, present in the heating unit, but with regards to soot and soot, they practically do not settle on the walls of the stove - you will only have to clean it a few times in its entire life.
Our website contains a large number of instructions for self-installation of stoves of various designs and complexity, including the Kuznetsov stove:.
What does it consist of?
Before you start laying a Russian stove, you need to understand what it consists of. Due to some names, it is not clear to modern people why they are needed, we tried to figure it out.
- Podpechek is a small niche at the very bottom. Used to dry firewood.
- Opeche. It can be called the foundation. In the old days it was covered with boards. In modern construction, it is made of stone or concrete. Above is located below.
- Under is the bottom.
- The pole is a small niche in front of the crucible. Traditionally used for cooking and heating food.
- The crucible is the heart of the furnace. This is the place where heat-resistant dishes were placed and food was cooked.
- The burnt area is a place where burnt coals were raked. Located on the side of the pole.
- The pole window is the hole located directly above the pole.
- A stove is a recess in a stove. There may be several of them. Traditionally used for drying small wet items.
- A small door leads into the chimney and is used for cleaning it.
- Hailo is a smoke passage located between the mouth and the pipe, necessary for proper smoke circulation.
- View - this is used to cover the pipes after heating to preserve heat.
- The valve is a metal plate for regulating draft.
- The pipe is designed to allow smoke to escape.
- Cutting is a thickening in the wall of the pipe where it passes through the ceiling, in order to prevent fire.
- Mirror – side wall. Sometimes she goes into the next room to better heat the house.
- The mouth is the entrance to the furnace, covered with a valve.
- The valve is a metal lid that closes the mouth.
- The vault is a furnace ceiling, made in the form of an arch on the furnace floor.
- Lounger - located above the arch. The warmest and most comfortable place in a Russian hut.
In addition, the oven can be equipped with a heating element. A separate firebox allows the stove to operate in 2 modes - winter and summer.
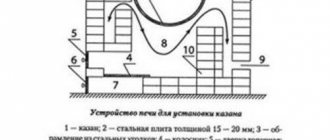
The bottom line is that in winter mode, the smoke travels a greater distance and transfers heat to the walls of the stove, thereby heating it up more and heating the room better. In summer mode, smoke is released directly into the chimney along the shortest path, thereby making the house less hot, but you can still cook food. In the figure above, yellow indicates the path of smoke from the firebox to the chimney in summer, and red from the firebox to the chimney in winter.
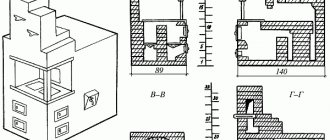
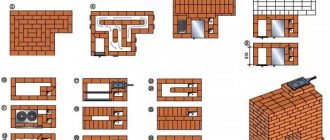
Dimensions, drawings and orders
There are many options for Russian stoves. We present drawings of some of them as an example.
Photo gallery: examples of drawings and procedures
Russian stove: drawings and orders
Drawing of a Russian stove with bottom heating
Drawing of a Russian stove with a hob
Drawing of a Russian stove with a stove bench
Today we will not dwell on simple designs. Our goal is to build a practical and functional unit with a hob and a water heating tank that will satisfy any owner of a country home. Below you can see its drawings and procedures, and in the future we will provide complete instructions for making the stove, arranging the chimney and the procedure for putting the unit into operation.
Drawings and instructions for a Russian stove (photo gallery)
Drawing of an improved Russian stove Drawing and ordering
Order of the Russian stove: 1 - 24 row
Order: 25 - 31 rows
Ready oven
Laying 7-10 rows
The seventh row is laid out in the same way as the fifth, squeezing the butts of the side walls under the heel. The eighth row is formed according to the same principle as the sixth. This is where the creation of the foundation for the pole begins, which includes three rows of full-size interlocking bricks. The countdown starts from the frontal plane of the unit.
The ninth row repeats the location and shape of the bricks of the seventh row. The base of the pole continues to be laid out on it. It is formed above the arch of the substructure, forming a continuous lining. When laying out a Russian stove with flooding, the order must be followed exactly, otherwise the design will turn out to be unreliable.
The corners of the tenth row are laid out from 3/4 bricks, the sides from full-size spoons, and the back from full-size bonded bricks. The front part of the structure is laid with three rows of full-size bricks deep. As a result, each row should have 7 bricks laid flat. As a result, a special plane is formed - a sixth. The space created between the back wall and the pole must be filled with gravel, sand and clay.
Tools and materials
To build a Russian stove with your own hands, you don’t have to buy any special tools. However, prepare everything you need in advance - this will save time and help you organize your work correctly. Here's what you'll need first:
- A pair of different sized stainless steel trowels.
- Jointing for seams, if this type of finishing is planned.
- Mason's hammer-pick.
- Rubber mallet.
- Angle grinder (grinder) with cutting wheel.
- Electric drill with a set of drills.
- Tool for monitoring the accuracy of masonry (level, plumb line, square and mooring cord).
- Scissors for working with metal.
- Containers for mixing the solution.
- Mesh for sifting clay and sand.
- Roulette.
- Pliers.
Today you can find furnace castings of any type and functionality on sale.
List of materials:
- Red brick (grade no lower than M-150) – 1900 pcs.
- Sand - 300 kg.
- Clay (as thick as possible) – 250 kg.
- Basalt cardboard or other non-flammable sealant.
- Ruberoid for moisture insulation of the foundation.
- The hob is two-burner, dimensions 400x700 mm.
- Fire doors with dimensions of 250x210 mm and 250x180 mm.
- Grate 200x280 mm - 2 pcs.
- Grate 250x380 mm.
- Smoke damper 180x260 mm.
- Cleaning doors 130x130 mm - 2 pcs. and 130x200 mm - 1 pc.
- Blower door - 250x150 mm.
- The furnace damper is 380x450 mm.
- Water heating tank 120x280x500 mm.
- Steel corner with shelf 60 mm - 1.5 m.
- Sheet metal 5 mm thick.
In addition, it is necessary to take care of the materials for building the foundation - crushed stone, sand, cement and boards for arranging the formwork.
Construction of the stove
If you want to buy a mini Russian stove, you can order an individual project specifically tailored to your needs. To build a Russian stove “Ekonomka”, you can hire a master, or you can do it on your own. Keep in mind that you will spend significantly less money if you build a mini Russian stove with your own hands. The stove will serve you for many years, provided, of course, that you take care of its condition.
If you are an experienced builder or simply confident in your abilities, you can work without using drawings. However, it is better to have on hand a ready-made drawing of a Russian mini-stove, developed by a good craftsman. And remember that the structure must be installed on a solid foundation - made of stone, wood, concrete or brick. It is not always possible to get by with just reinforcing the floor. So before starting work, thoroughly study the basics of building the unit.
Materials and tools
If you have finally decided that you can do it yourself, then first of all you need to purchase red brick. 750 pieces will be required.
You also need sand, asbestos or felt, clay.
Construction cannot be done without roofing felt for waterproofing.
Separately, you need to purchase valves for the stove, two grates, combustion and blower doors, a cast-iron stove made for two burners, a valve for the ventilation duct and a damper.
You will also need consumables. These are steel products - wire, sheets, angles. You will need nuts, washers, nails.
Don’t forget about the tools: spatula, trowel, drill with mixer. Additionally, have buckets or tanks and a sieve on hand. To ensure the oven is level, use a level.
The next stage is the actual work on laying out the mini-stove.
You can make a stove or without a water heating box Having prepared the necessary materials and tools, strengthened the floor or made a good solid foundation, you can begin construction.
The oven should be laid out in rows.
Arranging a mini Russian stove without a water-heating box
The very first row includes the laying of the unit wall. The stitches need to be re-tied. This stage must be carried out using whole bricks, and the middle can be laid out in halves.
The next rows from the second to the fifth are the vent for both fireboxes. The doors are installed at the same time. You also need to lay out the columns. Lay a brick partition on them. Its thickness should be half a brick.
The sixth row of the design includes grates in both fireboxes. Above the additional firebox grate, the front and rear bricks are pressed together into a cone.
The seventh and eighth rows - the doors of the main and additional fuel chambers are installed. The masonry of the main firebox expands towards the partition.
The ninth row is a narrowing of the channel masonry from the main firebox. Dilation of the septum.
The tenth row is characterized by the construction of the hearth. A channel is left near the back wall along the cooking chamber, approximately 8 cm wide.
The eleventh row is the second row of the hearth. The doors of the main and additional fireboxes must be closed. On the front side we secure the masonry with steel corners.
In the twelfth row, the channel is blocked by a cast-iron stove with two burners.
The thirteenth and fourteenth rows are placed according to the drawing.
Fifteenth row - strip steel connections are installed between the side walls and secured with washers and nuts. If the brow is not covered by an arch, it is covered with a strip of steel 4x1x85 cm. The back and side walls of the cooking chamber are laid out brick thick with the lower part beveled to a cone.
The sixteenth row is the overlap of the forehead, the continuation of the connections along the width. The wall thickness of the cooking chamber is the size of a brick.
The seventeenth row - installation of connections along the side walls (as in the 15th row). A base for the cross-pipe made of strip steel is installed on the front and sides. Grooves are made in the brick for the steel strips. A supporting metal stand is installed in the corner.
The eighteenth row is the first row of the masonry of the cooking chamber, which has the shape of a vault. The vault rests on the bricks of the 16th row, inclined inward; pieces of bricks in clay mortar are placed under them. The pole is overlapped, and steel strips are placed at the base of the overtube. Four holes measuring 7 x 12 cm are left in the front part of the arch.
Preparatory activities
At the pre-construction stage, a site for building a furnace is selected, a reliable foundation is installed and a working solution is prepared.
Selecting a location
The installation location of a Russian stove primarily depends on the characteristics of the room. In a wooden house, an air gap of at least 40 cm wide must be maintained between the heating device and the walls of the building . In addition, areas with high heating temperatures must be additionally protected with non-combustible materials, for example, basalt cardboard slabs. It is also important that at the same time access to the side surfaces of the heating unit is maintained, which is necessary for their periodic inspection. If you plan to install the stove in a wall between two rooms, then protect the opening with brickwork, separating it from the wood with a gasket made of non-combustible material.
Options for possible location of the stove in the house
It is best to place the heating unit in such a way that it can be heated from the kitchen or veranda, and a stove bench or fireplace can be brought into the living room or bedroom.
Construction of the foundation
Since the Russian stove is a large, massive structure, its base must ensure the stability and reliability of the entire structure. To arrange the foundation, you need to dig a pit with a depth of 0.5 to 0.7 m. Naturally, in loose and unstable soils this parameter will need to be increased.
A cushion of drainage materials is constructed at the bottom of the pit. To do this, the hole is filled with a 150–200 mm layer of sand, which is carefully compacted and filled with water for better compaction. The sand is covered with crushed stone, small rubble or broken bricks on top, raising the bottom of the pit by another 100–150 mm. The surface is additionally treated with a tamper, after which it is leveled with a thin layer of sand, which is also subjected to spilling.
Foundation design for a Russian stove
A cushion of sand and crushed stone is covered with moisture-proof material, on top of which formwork made from edged boards is installed. To avoid cement leakage through the cracks of the box, its walls are covered with polyethylene.
Concrete for the foundation should have the following composition: 1 part M-400 cement, 3 parts sand and 5 parts crushed stone or other filler . The solution is brought to the state of thick sour cream, after which it is poured to half the height of the formwork. After this, the concrete is bayoneted and a reinforcing mesh is laid on its surface. Next, the frame is filled to the edge with concrete and the surface is leveled using a long rule.
The concrete base is left to stand for several days until the concrete sets thoroughly, after which it is covered with roofing felt.
How to prepare the solution
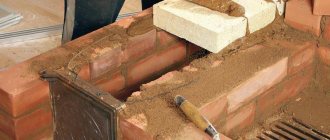
In order for the work to be enjoyable, the masonry mortar must be soft and elastic. This will make it possible to completely fill the seams and not use excessive force when laying bricks. In addition, the mixture should not crack when drying, which is actually not so easy to achieve. The fact is that there is only one way to avoid surface cracking - by equalizing the parameters of thermal expansion of the masonry mortar and brick. Of course, you can purchase a special mixture for laying stoves at a hardware store, but a real Russian stove should be made from environmentally friendly materials, right? And an inexpensive traditional composition of clay and sand is perfect for this role.
The quality of the clay mortar has a decisive influence on the strength of masonry joints
A certain difficulty arises in selecting the correct proportions, which is associated with the different fat content of the clay. Want to know the secret to non-cracking mortar? It is quite simple - you need to take the most fatty clay possible, adding up to 3 parts of sand to it .
To prepare the solution, the clay is cleaned of foreign components, lumps are kneaded and soaked in cold water for 24 hours. After this, mix it thoroughly with sand, bringing it to a semi-liquid consistency.
To prepare a solution with an optimal composition, make several miniature batches with different sand contents, recording the proportions on paper. After this, flat cakes are formed from each sample, which are left for several days until completely dry. The best composition is considered to be the one that cracked the least during the drying process.
Do not prepare too much solution. The fact is that when settling, it will be divided into components: the sand will settle to the bottom. Repeated mixing of the clay composition cannot be avoided, and this is all an unnecessary waste of time and effort.
In our next material you will find a step-by-step guide to building a Swedish stove with calculations and order:
Preparation of the solution
When mixing masonry mortar, clay with a low sand content is used - fatty clay and sand in a ratio of 1 (g) : 2 (p). The clay is first soaked in water for a day, then rubbed through a sieve in order to remove foreign inclusions from it. The sand must be dry and must also be sifted. Water must be added to the mixture in such an amount that the finished solution has the consistency of thick sour cream.
However, the purchased clay may differ slightly in fat content. Therefore, it is better to first carry out a test batch in a small portion in three versions and make flat cakes from these compositions. Which of the samples will have fewer cracks after three days, that version of the proportions of the components should be taken as the basis for the production of the entire volume of the masonry mixture.
Chimney installation
The chimney required for the operation of a Russian stove is absolutely no different from the chimney of any stationary solid fuel unit, be it a “Dutch”, “Swedish” or some new-fangled bell-type stove, calculated using computer modeling. The design and arrangement of the chimney can be taken from the drawing below.
Chimney device for a Russian stove with orders
During the work process, we recommend following a few simple rules:
- The design and installation location of the pipe for removing combustion products must comply with the standards of the current SNiP.
- At the point of transition from the ceiling to the attic, the pipe should thicken.
- The lower part of the chimney is placed on the same solution as the stove.
- The internal cross-section of the smoke duct must correspond to the power of the heating device.
- Above the roof, the chimney is built using a mortar with the addition of cement.
- The places where the pipe passes through the ceilings are insulated using non-flammable and waterproofing materials.
During work, the geometry of the structure and the deviation from the vertical are constantly monitored using a level or plumb line.
Possible difficulties during manufacturing
When constructing a furnace, difficulties and incomprehensible moments very rarely arise. Quite a lot of questions arise for novice stove makers at the preparatory stage, when drawing up a drawing of the product.
For adequate heat transfer, the height of the ceiling must be taken into account, but the ceilings in each house are different, therefore, when working with a preliminary drawing of the building I.V. Kuznetsov proposed the following calculation scheme: per 1 sq. m. in warm weather, 0.5 kW is released, and in cold weather - 0.76 kW. The material from which the firebox is made is taken into account. Steel sheets burn out quickly; for long-lasting use, it is better to purchase material made of cast iron.
When purchasing material, many questions also arise. There are special formulas that allow you to count the number of bricks in a row. But unfortunately, the error in them is as much as 15%, so it’s easier to count the bricks of one row manually and multiply by the number of rows.
Methods for finishing Russian stoves
Decorating a Russian stove is done in several ways:
- jointing of brickwork;
- plastering;
- finishing with ceramic tiles or tiles.
Joining on brickwork is the simplest method, which is quite good for modern interiors. The main thing is that this method of decoration should be planned from the very beginning, since the aesthetics of the structure directly depends on the quality of the material and the neatness of the masonry. As a rule, facing bricks with smooth side walls are used for laying external walls.
If the goal is to build a Russian stove according to ancient canons, then it must be plastered with a special clay mortar with the addition of chaff. After drying, the outer surfaces are covered with a solution of white clay in water. Such whitewashing is an environmentally friendly coating that is safe for others. In addition, thanks to it, the basis is prepared for the final finishing - painting. The patterns that cover the walls of the stove can repeat a national ornament or scenes from fairy tales, represent floral curls, stylization of Gzhel, Khokhloma, etc. - it all depends on the created mood and preferences of the owner. A wide selection of plaster mixtures allows you to replace the old composition with a more modern “bark beetle” or “lamb beetle”.
For finishing with ceramic tiles, only heat-resistant types of tiles are used - terracotta, majolica, heat-resistant clinker or porcelain stoneware. In addition, Russian stoves are often lined with tiles. Note that although decorating with ceramic tiles is one of the most beautiful and practical methods of finishing, after it the arrogance and luxury of the “Dutch” begins to be visible in the design, and not everyone will like this.
How to decorate a Russian stove (photo gallery)
Decorating with painted ceramic tiles Laying tiles can be done not continuously, but in wide decorative stripes
Tiles finishing
A stove lined with tiles often begins to resemble a stylish “Dutch”
The traditional finishing method is whitewashing
Painting is a traditional way of finishing a Russian stove
If you plan not to embroider the masonry, but to cover it with ceramic tiles or plaster, then be sure to attach a metal mesh to the surface of the walls. Otherwise, the decorative finish will fall off when the structure heats up.
Ordinal description of the masonry of the RP with a fireplace.
Once again I want to remind you that the order of the furnace is not an engineering drawing and only shows the order of masonry, the location of the channels of the valves and other elements of the furnace. Proper bandaging is done by the stove maker himself on site each time differently, depending on the location of the stove in the space of dimensions and deviations of the brick and seams, on the choice of the shape and size of the stove fittings and the method of finishing the stove.
The Russian stove never went out at all. It slowly warmed up in its corner during industrialization, electrification, gasification, and was always the object of close attention of specialists due to its remarkable qualities. Nowadays the Russian stove is experiencing a rebirth; a significant role in this was played by its economy, omnivorousness and the ability to build with your own hands - no expensive materials or complex industrial equipment are required. What is it good for, what are its secrets, where can and cannot be built?
The procedure for putting the heating device into operation
Having built a stove, in no case should you rush to try its heating capabilities to their full potential. It must be handled with care and precision, since with intense heating, the walls located closer to the hearth will dry out much faster than distant surfaces. The difference in thermal expansion of wet and dry materials is quite significant, so there is a danger of cracks appearing at the boundaries of the seams. To avoid trouble, all oven openings are opened and dried under natural conditions for two weeks.
Due to the need for long-term drying of the furnace, it is recommended to begin its construction in the warm season.
To speed up the process of removing moisture or when drying a structure in unfavorable weather conditions, a fan heater or a powerful electric lamp can be placed in the furnace and firebox. In this case, the oven doors are closed and the channels are left open.
The fireplace is lit only after the walls have completely dried.
The furnace is fired only after the pre-drying period has been completed . To do this, during the first two days, no more than 3–4 kg of firewood is placed in the unit, adding 1 kg of fuel every day for a decade. The readiness of the furnace for full operation is judged by the absence of condensation on the internal surfaces of metal parts. The heating device is tested several times at half power, after which the operation of the unit is checked at maximum mode. During “break-in”, be sure to inspect the surfaces of the walls for the appearance of cracks and their possible increase. The defects that appear are repaired only after the stove has been heated at full strength several times.
Safety precautions
Improper handling of the stove can cause a fire. To avoid such trouble, it is recommended:
- do not allow the use of other types of oils, except for used engine fuel;
- do not start up faulty equipment;
- do not allow the unit to be installed in a garage that does not have a ventilation system;
- do not leave the room if the stove is working;
- do not allow fires to start if there is no smoke exhaust duct;
- the hole to the burner must not be blocked;
- Oil should not splash onto a hot surface.
Important! The stove can only be used by adults. Children and animals should not come close to the unit
Ignoring safety precautions may cause a fire.
The video of making a stove during testing for a garage provides additional information on the construction of a heating unit:
Some tips for safe operation
- After a long period of inactivity, be sure to check all visible surfaces for tightness of seams. Any cracks that appear must be repaired with clay mortar.
- Before each fire, check for draft. If smoke from the furnace enters the room, the stove must not be used under any circumstances. Perhaps one of the valves is closed or the chimney needs to be cleaned.
- You can close the view only after the firewood has completely burned out.
- It is recommended to remove soot from the internal surfaces of the stove at the beginning of each season. In fact, the stove gets dirty very little and after construction it will not require cleaning for several years. However, it all depends on the smokiness and quality of the fuel used.