When the question arises about heating a small country house, the best solution would be to build a stove. This is economical and practical, since the heat transfer of properly built brick stoves is at least 90 percent.
Brick kilns have lived up to their purpose for many centuries. And no matter how its design changes and improves, the basic requirements for it remain the same. This is safety in use, ease of use and the ability to keep warm for a long time.
If you really want to, it’s not difficult to build a mini brick oven with your own hands.
What are the benefits of small wood-burning stoves?
The advantage of a small stove is that it occupies a very small area with high heat transfer. For a country house, bathhouse, or outbuildings, a mini stove burning wood and coal is ideal. There are minimal building materials, but if you put a hob on top, you can cook food and heat water. Even today, brick heating and cooking stoves remain quite popular. The most important thing is that making it will not be difficult for a novice master. Having an ordering diagram in front of your eyes, you can put together a mini oven with your own hands in literally one daylight hours. You just need to first prepare all the necessary tools and building materials.
Compared to a “potbelly stove,” a brick mini-stove for a wood-burning cottage looks aesthetically pleasing. Subsequently, it can be decorated with tiles, and it will not only warm, but also decorate the country house.
Sometimes its design is combined with a fireplace, and this will become a mini fireplace stove. You can immediately build in a tank for heating water or provide a niche for drying vegetables and fruits.
There are a lot of options for brick kilns. But these are more complex designs, and you need to start building a mini-stove for your summer house with your own hands from the simplest model.
Advantages and disadvantages
Advantages of mini-ovens:
- small dimensions allow installation in small rooms, taking into account the recommended distances from the walls without loss of total area;
- quality and compliance with fire safety standards make them safe for installation in wooden garden houses;
- in winter, the stoves can be easily dismantled and stored in the pantry to prevent theft;
- the quality of the materials allows the devices to easily withstand long-term interruptions in operation and being in a damp and unheated room;
- stoves – small fireplaces cost significantly less than large models. Therefore, you can buy them and enjoy the sight of a burning fire;
- simplicity of design and a small amount of materials allow you to make such devices yourself;
- With a little imagination, you can make such a little thing into an interior decoration item for your home.
The only disadvantage that can be highlighted is that little firewood can be placed in a small firebox, therefore the burning time of the firebox is reduced. This can be inconvenient, especially if you need to add fuel at night. Otherwise, the advantages of small structures are undeniable.
Required Tools
You need few tools; they can be easily purchased at any hardware store:
- trowel, or as it is also called, trowel;
- convenient hammer-pick;
- building level;
- roulette;
- plumb line
In addition, during the work you will need:
2 buckets (for water and solution), a construction sieve, a trough where to sift the sand.
Calculation of basic parameters
Bricks
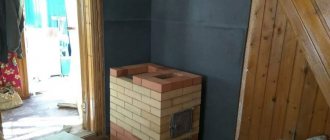
To calculate the required amount of material for a country stove, you can use the diagram below, which shows the bricks in each row of masonry. The image shows that the width and length of the future building are the same, so the design of the stove will have a square shape.
The small size of the structure is convenient for construction in the countryside
According to established standards, a single red brick has dimensions of 250x120x65 mm.
Standard Material Size
Knowing these parameters, it is not difficult to calculate the length and width of the building. Let's substitute the values: 250+250+120=620 mm - the size of one of the sides of the furnace.
To build a furnace, you will need 300 bricks, excluding damaged material.
Foundation
Construction of a brick kiln for a summer cottage requires the installation of a foundation. For this, a slab base is used. The length and width of the foundation must be made 150–200 mm wider than the furnace parameters, and its thickness must be at least 150 mm. Let's substitute the values: 620+200=820 mm - this is the length of one of the four sides of the base.
Having these parameters, it is easy to calculate the area of the furnace base. To do this, you need to apply the formula for finding the area of a figure, which looks like this: S=a², where “a” is the size of the sides of the figure being studied. Let's substitute the values: 820·820=672400 mm² or 0.6724 m².
To find out how much concrete mixture is required to fill the base, you need to use the geometric formula for determining the volume of a cube, which looks like this: V=h, where “h” is the length, width and height of the foundation. Let's substitute the values: 0.82·0.82·0.15=0.10086 m³.
Armature
The concrete base of the furnace must be reinforced with metal rods 10–12 mm thick. To do this, the reinforcement is fastened in the form of a lattice, with cells measuring 10x10 cm. To calculate how many linear meters of reinforcement are required to make the reinforcing mesh, it is necessary to determine how many rods are needed for the width and length of the structure. Since each rod is located at a distance of 10 cm from each other, you need to divide the length of the base by the width of the cell: 0.82:0.1 = 8.2 pieces.
It is also necessary to take into account that you will need a mixture for laying bricks.
The thickness of the adhesive layer between bricks should be at least 15–18 mm.
The foundation has a square shape, so the perpendicular side of the lattice will have a similar number of rods. Let's add these values: 8.2 + 8.2 = 16.4 pieces of reinforcing rods. Now let’s set the total length of the metal rods: 16.4·0.82=13.448 linear meters of reinforcement, rounded to 13.5 m.
Construction materials for mini ovens
First you need to prepare the clay. To do this, fill it with water and leave it like that for about a day. You can speed up the process by thoroughly kneading it every five to seven minutes, preferably using a drill mixer, for an hour. Strain through a sieve. The sand also needs to be sifted first.
To fold a mini heating stove, which will take up an area of 0.4 square meters. meters, you will need:
- 20 liters of solution;
- 60 pieces of red stove bricks;
- 38-40 pieces of fireclay bricks;
- firebox door;
- ash door;
- grate;
- hob;
- chimney damper.
Doors, grill and hob must be cast iron.
If you do without fireclay bricks, then it will be a mini-stove model that burns wood rather than coal. Red brick, even of the highest quality, will collapse over time due to the high temperatures created by coal fuel. In general, to make a mini Russian oven with your own hands, you just need to follow the recommendations.
Converting a stove into a fireplace
The very first thing you need to do before installing a new fireplace is to prepare a future drawing. All sizes must fit the old foundation.
Converting a stove into a fireplace takes place in several stages:
- The foundation of the furnace is strengthened with waterproofing. Roofing felt is used as a waterproofing material. Several layers of material are laid on a clay-cement mortar.
- The next step is to install the base under the fireplace. You can build a new foundation or install a stove if it is in excellent condition.
- The firebox is made according to new drawings, since the stove combustion hole is not suitable for the fireplace. To create a base for the firebox, the structure is lined with brickwork around the circumference.
- The firebox itself is being built. The walls must be made vertical. It is advisable to check the clarity of the lines of the future side walls of the firebox using a building level.
- Correct calculations are also important at the chimney construction stage. It is laid out using brickwork. Every few rows you need to remove excess solution from the inside of the chimney, as soot may subsequently remain on them. Because of this, the chimney will have to be cleaned frequently.
The air duct can be made not only from brick. You can consider the option of a sandwich pipe, the streamlined shape and smooth walls of which do not prevent smoke from escaping from the fireplace.
Location and foundation preparation
The best location for such a stove, if the dacha room consists of one room, is in the center. In other cases, you need to focus on the partitions or the intersection of interior partitions. It is imperative to take into account fire safety rules.
A foundation is not needed for a structure of this size. However, it is necessary to put a thick, durable board secured with joists at the base, and a fireproof layer on top. This can be an ordinary asbestos cement sheet.
Then a waterproofing layer of polyethylene and roofing material measuring approximately 80 by 55 cm is installed. A thin layer of sand is poured.
Features of the construction of small country fireplaces
When choosing the optimal size of the structure, it is necessary to take into account the area of the room, the wishes of the owner himself and, of course, be guided by the general fire safety requirements. There is an established standard to ensure correct use and maximum operating efficiency.
Let us dwell in more detail on each of the elements of the device and their technical characteristics.
Firebox
The standard size of the opening in the firebox of a mini-brick fireplace is 50x40 cm. Of course, you can choose the parameters as you wish, but you still shouldn’t go beyond the designated limits.
Firebox
The depth of the firebox should reach 30 cm or more, which is necessary for the safe operation of the chamber. Some experienced craftsmen in this case use a little trick: they make a protrusion in the firebox of the upper beam bridge by about 5-6 cm in relation to the vertical axis. In this case, the depth of the combustion chamber will be less than 30 cm.
Walls and heat transfer
The small fireplace has two heater channels located on the side walls. They provide increased heat transfer. When wood burns in a fireplace, cold air from the room enters the channels of the 2-3rd level, heats up there and returns to the room through the holes in the 13-14th row.
The procedure for laying a brick stove with your own hands
The next stage is the construction of the stove itself:
- In the first row the solution is not used. 12 pieces are laid strictly horizontally on the sand. A blower is placed on the clay-sand mortar. The door is wrapped with asbestos cardboard and wrapped with cord. Fastening is done with wire.
- Then lay the second row.
- In the third row, lined with refractory bricks, strictly above the ash pit, a grate is placed.
- The bricks in the fourth row are placed on edge.
- A stand for the partition is provided in the chimney. The back wall is laid out without using mortar. These bricks will then need to be removed. Then they install the furnace door, wrapping it with asbestos cord. A couple of bricks are temporarily used for fastening. Secure with wire.
- The fifth row is laid out flat, like the fourth.
- The bricks of the sixth row go on edge.
- The bricks in the seventh row are laid flat again. For inter-row bonding, you need to start with a brick, chopped off three-quarters the size. Having placed two bricks edgewise, they begin to build the back wall.
- The eighth row will close the firebox door. To direct the fire to the center of the hob, the brick is placed at an angle. Tightness is ensured using a wetted asbestos cord.
- The ninth row is also laid using asbestos cord. The peculiarity of this row is that it is shifted back a little so that the door remains open.
The beginning of the chimney is formed in the tenth row. There will be a place to attach the iron pipe. In the eleventh row, a chimney damper is installed. At this stage, step-by-step instructions will be useful - how to fold the stove with your own hands, which will help you not get confused in the details.
Drying the oven and first start-up
After the last brick takes its place, do not rush to light the stove; this will not be done soon.
To prevent this from happening, you need to dry the oven. The slide valve and the blower open. The air flow generated by the draft will promote the evaporation of moisture along the surface of the masonry. It is recommended to close the gate and door at night. The procedure should be repeated until moisture stops forming in the pipe.
All that remains is to dry the solution along the depth of the masonry. To do this, you will have to start starting the oven. The device is heated in small portions of dry wood, adding 1 kg of fuel every day. After the mass reaches 20 kg, a test burn is performed at maximum power, after which the condition of the masonry and seams is inspected. The absence of cracks gives a start to the full operation of the fireplace stove.
Closing events
Three more rows of brickwork are made to connect to the pipe. Having removed the “knockout” bricks, the furnace channels are immediately cleared of construction debris. The perimeter of the structure is carefully covered with a plinth.
Whitewashing or lining of the stove is done after test firing.
Only after the whitewashed or tiled mini-oven is completely dry can it be used. In order for a mini stove for a summer house to please you for a long time, you should not rush to light it. Let it sit for a week or two with the doors open.
It is not recommended to use coal right away; you need to give the stove time for initial heating with the help of wood chips.
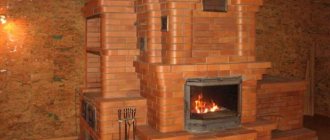
The comfort of a country house built far from gas supply networks is unthinkable without a stove. In the cold season, it gives us pleasant warmth, relieving the air of dampness.
The market today offers customers all kinds of designs of metal “stove stoves”. Despite this, many summer residents prefer the classic version - a heating stove made of brick. Its advantages are obvious: due to its large weight, it accumulates a lot of heat and releases it for a long time, warming the room well.
Possible problems
Water circuit for heating
Small-sized brick stoves for the home are recommended to be built in a small building or temporary shed. For example, such buildings with a heating structure can be built next to the main cottage. Such a structure is ideal for supplying heat to a small area to which it is impractical to supply central heating, including a workshop.
Before starting construction, you should familiarize yourself with common mistakes:
- Brickwork is carried out without tying the seam to seam.
- The use of metal plates or elements in areas of contact with fire.
- The location of the brick in the pipe on the edge.
- Cladding without taking into account the degree of expansion of materials.
- Incorrect insulation of lumber.
- Incorrect placement of the oven on the base.
A small brick building for heating is relevant in the country house, house and garage. Depending on the purpose, the size and location for installation are selected.
How to build the simplest brick oven?
First you need to decide what you want to get from your future stove. If you only need to heat the rooms, and use bottled gas or electricity to cook food, then choose an option without a stove and oven. Anyone who loves soft healing warmth chooses the option with a bed.
For regular cooking of large quantities of food and pet food, a simple oven with a hob will be just right.
We will look at three examples of stoves with step-by-step guidance on how to lay them:
- Simple direct flow;
- With hob;
- Heating.
Let’s say right away that you cannot expect high heat transfer from a simple design devoid of gas circulation. For this reason, such stoves are installed in garages and other small rooms with an area of no more than 16 m2.
We will consider this option so that beginners get their first simple lesson in practical masonry.
Such a stove does not require a strong foundation. Having poured large crushed stone in a layer of 15-20 cm, filled it with cement mortar and leveled the surface, after a couple of days you can begin laying.
Stove dimensions in plan: width 2 bricks (51 cm), depth 2.5 bricks (64 cm). Since there is no blower chamber in it, holes for air intake are drilled directly in the combustion door.
The procedures for this design are simple. The main condition during work is to ensure that the seams are bandaged so that the top brick covers the seam between the two lower ones.
On the eighth row, the firebox is narrowed, using halves and “three-quarters” - ¾ of a whole brick. The exit from the firebox is thus obtained with a cross-section of 1 brick (125x250 mm).
The next row (ninth) is laid out in the same way as the seventh, using a whole brick.
After this, the brick tier is placed on the edge flush with the inner edge of the bottom row. The new tier is laid flat, using two whole bricks and four “three-quarter” bricks. In this way, the smoke channel is again narrowed in order to trap gases and increase heat transfer.
On the next tier, the stones are placed on edge. A brick is placed in the middle of the smoke channel. In this way, the oven is raised another five rows (one tier on an edge and a brick in the middle, the other tier flat).
The remaining four tiers are laid flat. With the last two rows of masonry, the smoke channel is narrowed to a size of 12x12 cm (half a brick). At this level, a smoke damper is placed in the furnace. A steel pipe is inserted into it from above.
Device Features
The functioning of the structure is carried out according to the channel principle, when the distance of passage of heated gases is deliberately extended. For this reason, they give off more heat to the body of the structure. There are simply no special physicochemical and thermodynamic nuances, so it is almost impossible to disrupt anything in the system. (See also the article Heaters for the garden: features.)
Modern small-sized stoves for summer cottages of this type are the predecessors of medieval analogues that appeared on the territory of what is now the Netherlands. The small dimensions are explained by the cramped quarters of that time. It was necessary to create a relatively small but effective heating system.
The device of the oven measures 89×63.5 cm.
Initially, designs were made with a firebox that had a solid bottom, but over time a vent was added underneath. The individual chambers began to be separated by a grate. When arched vaults fell out of use, even low-skilled craftsmen began to build systems.
Oven with hob
In the simplest version, this design has small dimensions (width 2 and depth 3 bricks - 78x53 cm). However, even in such a limited area it is possible to place a single-burner stove.
Work goes smoothly when you have everything you need at hand.
Therefore, purchase the following materials and accessories in advance:
- Solid red brick – 107 pcs;
- Blower door – 1 piece;
- Grate – 1 piece;
- Single-burner cast iron stove – 1 piece;
- Fire door – 1 piece;
- Pipe valve – 1 pc.
Fire bricks are not needed for a wood burning stove. Buying it is a waste of money. But red should be chosen carefully, discarding cracked and uneven ones.
Preparation of the solution
The masonry mixture is made by mixing four parts clay with one part water and adding eight parts sifted sand. The normal consistency is determined simply: the solution easily slides off the trowel, leaving no drips on it. When laying, it should not leak out of the seams.
The volume of the mortar is determined based on the amount of brick. With an optimal seam thickness (3-5 mm), one bucket is enough for 50 pieces.
Having prepared the masonry mixture, you can begin laying the foundation. Its width is made 10 cm larger than the width of the oven. The height of the foundation is selected so that the bottom of the first row of bricks is at floor level.
If the underground is deep enough (50-60 cm), then there is no need to dig a hole for the foundation. It is enough to make formwork on the ground with a plan size of 76 x (51 + 10 cm). Two layers of roofing felt are placed on its bottom to protect it from moisture. Having laid the concrete, it is given a week to gain strength, after which they begin laying.
The dimensions of the stove with hob we are considering are 3 x 1.5 bricks (76x39 cm).
Expert advice: lay out each new tier of brick without mortar (dry). After adjusting the bricks to size, you can begin laying.
The first row is placed on a layer of clay mortar (4-5 mm). Having leveled the base, lay out the second one, leaving space for the blower door.
Before installing the door, you need to screw a soft wire to it and put its ends into the seams for better fixation.
To compensate for the thermal expansion of the metal, a gap is left between the door and the brick. Before installation, its frame is wrapped with wet asbestos cord.
The third row is laid by overlapping the seams of the second. At this level, a grate is installed in the firebox.
The fourth row is placed on the edge, observing the ligation of the seams, and the walls of the combustion chamber are formed. Behind it will be the first and only smoke circulation (see section A-A in diagram No. 2). To clean its bottom, a so-called knockout brick is placed in the rear wall without mortar, which is periodically removed to remove ash. Inside the chimney, two stands are made from pieces of brick to support the internal partition.
The stones of the fifth row are placed flat, leaving space for the firebox door. In the back of the stove, in order, we see the walls of two smoke channels. During work, their surface must be thoroughly cleaned with a wet cloth to remove any clay protruding from the seams. This is an important condition for ensuring good traction.
Helpful advice! When focusing on the order drawings, do not forget to look at the two sections of the stove. They will help you better imagine its design and not make mistakes when laying out the bricks.
Having raised the masonry up to the eighth row, they close the furnace door, placing wire in the seams to secure its frame. At the same level, in the back of the fuel chamber, a brick with a beveled end is placed - a smoke tooth. It improves heat output by preventing flue gases from quickly escaping into the chimney.
Masonry technology
Before you line the fireplace-stove with bricks, you need to draw up a diagram. It reflects all the necessary elements in the right places. Construction takes place in several stages:
Base. We dig a pit and fill the bottom with crushed stone. The formwork is constructed using planed boards, and the pit itself is filled with cement. After 3-5 days the work continues. The brickwork is covered with roofing felt. Now the bottom row of bricks is laid out. Next, drawings play a big role. In agreement with them, the remaining bricks are laid out and the casting is installed. In order for the brick to have better contact with the mixture, it is soaked in water. The order is of great importance. Stick to it and you won’t have to redo the work. The inner sides of the furnace are smoothed during the process so that combustion products do not subsequently settle there. Now the chimney
It is important to remember fire safety measures here. The fireplace stove should dry naturally
This takes literally a few weeks. During the period of active drying, the oven is heated
Do this until all seams are the same color.
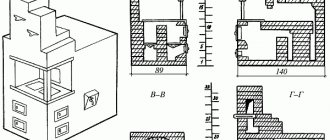
Heating stove
Now let’s see how to build a brick stove with your own hands, designed to heat a small country house.
Its dimensions:
- width – 2 bricks (51 cm);
- depth - 3.5 bricks (90 cm);
- height – 2 meters 38 cm.
For construction you will need the following materials and accessories:
- Red solid brick – 390 pcs;
- Clay - 9 buckets;
- Sand - 18 buckets;
- Grate (25x40 cm) – 1 piece;
- Fire door (20x30 cm) – 1 piece;
- Blower door (14x20 cm) – 1 piece;
- Cleaning door (14x20 cm) – 1 piece;
- Gate valve - 1 piece;
- Pre-furnace steel sheet (50x70 cm) – 1 piece;
- Roofing felt for waterproofing (100x60 cm) – 1 pc.
Sequence of work
The first row is the base of the oven. It should be laid out especially carefully, checking the horizontality using a level.
The corners are the hardest part for beginners. To ensure that they are even, we recommend immediately installing four template posts on the edges of the masonry. They can be made from planed boards, knocking them down in pairs at right angles.
By installing such “formwork” from floor to ceiling, you can easily create ideal angles.
On the second row, two bricks with a beveled edge facing into the ash chamber are laid at the end of the furnace. The laying of the third row begins with the installation of a blower door, fixed with wire in the seams of the side bricks.
Rows 4 and 5 continue to form the walls of the ash chamber. In the sixth row, they begin laying the walls of the fuel chamber and install a grate in it.
At the level of the 7th and 8th rows, a combustion door is installed. At the back of the chamber, beveled bricks are placed to improve traction. The ninth row covers the firebox door.
From rows 10 to 16, the fuel chamber and vertical smoke exhaust duct are being laid. On the seventeenth, a cleaning door is installed in the oven.
Rows 18-30 form smoke circulation channels. They need to be laid out as evenly as possible, rubbing the inner walls with a wet cloth.
Rows 31-32 form a vault covering the oven.
33 and 34 form the chimney.
Having finished laying, the stove is left for a week with the doors and pipe open to dry. After this, a test fire is made, burning small portions of wood chips, branches or straw.
The problem of heating country houses and country houses is associated with the lack of a central supply of coolant and gas. Many have already become disillusioned with metal potbelly stoves, but a small brick stove - built with their own hands - gives comfort and warmth, which cannot but rejoice.
Even the smallest brick stove can not only warm up a house, but also decorate it.
What should it be
It would seem that there is nothing easier than replacing the suitable surface of a brick oven with a metal insert with your own hands, getting a stove for cooking. In reality, everything is much more complicated. A stove is a complex device, and the thermophysical processes occurring in it depend on the correct arrangement of its elements.
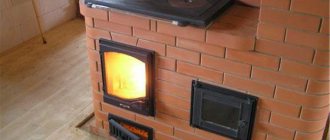
There are special requirements for furnaces of this type. On the one hand, it must effectively accumulate heat in the thickness of the brickwork, on the other hand, it must take a significant part of the heat to heat the hob . In the summer, when heating the house is not required, the hob should warm up quickly with economical fuel consumption.
Requirements
Theoretically, the hob can be made from any material that can heat up to high temperatures when the stove is fired. In practice, they use cast iron plates with holes covered with a removable lid.
This design allows you to create zones with different temperatures on the stove.
The thermal conductivity of cast iron, unlike steel, is not very high, so you can heat food on the plane of the stove, as well as cook or stew it over low heat.
And by removing the ring from the hob, you can achieve direct heating of the cookware with an open flame, which allows you to quickly boil water or fry food in a frying pan.
The most practical are the burners shown in the photo, consisting of concentric rings of different diameters - they can be adjusted to the size of the bottom of the cookware.
In addition, the gaps between the rings compensate for the thermal expansion of cast iron that occurs when overheated, and the plate can withstand multiple heating and cooling cycles without damage. Solid cast iron stoves are less reliable and require more careful firing.
Where can I buy a hob for a stove and at what prices?
Materials
Which brick is preferable for laying a stove equipped with a hob? In most cases, on the ordering diagrams of stoves for a home, cottage or bathhouse, you can see two types of bricks: regular solid ceramic and fire-resistant fireclay - it is most often indicated in yellow. From fireclay bricks, they lay out with their own hands those parts that experience the greatest thermal loads during combustion : the firebox and the roof of the furnace, part of the smoke channel directly after the combustion chamber.
The main difference between fireclay bricks is its increased heat capacity . It is able to accumulate and release the resulting heat for a long time more efficiently than ceramic. For laying a heating stove, and especially a sauna stove, this is an undeniable plus.
But if the stove is used primarily as a cooking stove, then the increased heat capacity of fireclay is rather a disadvantage: it will absorb a significant part of the heat, and cooking will take more time.
In the summer it will be impossible to cook on such a stove - the room will become hot and stuffy.
If the stove is used primarily for cooking, it is recommended to use a minimum amount of fireclay bricks!
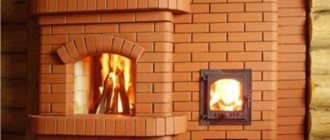
Brick stoves for country houses
Advantages
A small brick stove for a dacha does not take up much space compared to traditional Russian stoves, while retaining most of the advantages for its owners.
In the last two or three decades, modern metal stoves have taken an undisputed monopoly in individual construction. This is caused by a number of factors:
- Relatively cheap compared to brick stoves and fireplaces;
- Easy to assemble and install;
- Short deadlines for installing the heating device at the place of final use;
- High efficiency and firewood savings declared by the manufacturer;
- The apparent complexity of building a brick kiln and the difficulties associated with finding a worthy specialist in this field, the fear of independently building such a monumental object;
- No need for complex roofing work when installing a chimney pipe;
- Relative compactness, which is important for a country house;
- An advertising campaign by manufacturers of metal furnaces, claiming their undeniable advantages.
However, once the owner of a metal device once finds himself in a room equipped with a stone stove, his views change radically.
It is impossible to deny the fact that the heat produced by such a stove is incomparably more comfortable and pleasant. The room is easy to breathe, has a pleasant smell, a special atmosphere and comfort.
The photo shows a small brick oven for the home. Isn't it beautiful?
The food cooked in a stone oven is also different. The special temperature regime, the taste of smoke and the oven effect give it a unique taste and aroma.
In addition, there is a lot of data on some of the healing properties of thermal radiation emanating specifically from brick stoves and fireplaces, warm clay heated to 70 - 75 ° C. Let's not go into the jungle of physics and biology, let's note the fact itself.
So, the advantages of a brick kiln, collected in a single list:
- Huge heat capacity and inertia of the device. It is enough to heat such a stove once, and it will continue to radiate heat into the room for a long time. Even in severe frosts, the number of fireboxes does not exceed two per day;
- The stove does not overheat from the outside, and it is impossible to get burned on it, which is extremely important for families with small children;
- The oven does not dry the air the way its metal counterparts do;
- Thermal radiation is much softer, not as aggressive and heavy as from steel and cast iron surfaces;
- Firewood consumption is less (a controversial opinion, but many owners agree);
- Incomparably longer service life;
- The smallest brick stove creates more coziness and comfort than the largest metal stove;
- Easily allows you to heat large volumes of water, and if you install a coil or register, there will always be warm water;
- In the oven and firebox you can bake large quantities of bread and other flour products, as well as prepare porridge and other dishes;
- Even small brick stoves look great and decorate the interior, creating an inexplicable comfort and special ambiance in the room.
Advice! Any wood-burning heating device is a potential source of danger because it produces carbon monoxide. Therefore, you should not take on complex large stoves, but a small brick stove with your own hands is a very real option.
Naturally, nothing is ideal or absolute, so it is necessary to talk about the difficulties and disadvantages of stone heating devices.
Flaws
It is believed that cats sense bad places and avoid them. They apparently approve of brick kilns.
Since we have listed the advantages of brick stoves, let's be fair and remember the disadvantages. We do not conduct an advertising campaign, so we are not afraid of objective assessments.
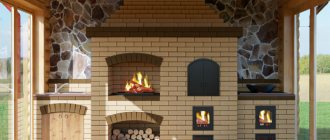
Types of fireplace stoves
The design discussed above is the simplest implementation of the idea of a fireplace-stove. In fact, there are much more efficient and functional structures that combine a separate fireplace and stove, install a hob, oven or heat exchange niches, etc.
Fireplace stove with bench
Fireplace stove with bench
A massive structure with a heated lounger or stove is not suitable for every home. For example, for a summer house it will be too big, since it will occupy a significant area of the room. If you install such a unit in a country house, you can achieve amazing comfort: such a design just begs to be installed in a living room combined with a kitchen.
Wall fireplace stove
A wall-mounted fireplace stove will save space in a small room
This design can be built in a small house to heat two adjacent rooms. As in the design discussed above, heating units can be heated separately. In this case, the fireplace can be used to quickly and comfortably heat a large room, while the heating of the back wall during operation of the stove will work to heat the bedroom. The disadvantage of this design can be considered the absence of a hob, which, however, is compensated by the compactness of the structure.
Square fireplace stove with stove and oven
Multifunctional fireplace stove with stove and oven
A multifunctional heating device installed in a large room can divide it into several zones. On the side of the fireplace, you can create a cozy homely atmosphere for relaxing and gathering with friends, while the area adjacent to the stove can be used for cooking and other household needs. Fortunately, for this purpose the fireplace stove has a large hob and a spacious oven. The shelf above the fireplace can also be used to the maximum - it is convenient to dry fruits, mushrooms or medicinal plants on it.
Construction of a country stove made of bricks
Order drawings for masonry with explanations.
We will need clay-sand mortar, building brick (double sand-lime brick M 150 will not work, we need clay), trowel, bucket, mixing trough, plumb line, level, asbestos cord, fireclay brick, doors, valves and other oven fittings, galvanized steel wire, hammer with pick, grinder with disc for concrete.
The oven will take up 0.4 m², and its weight will be insignificant, so you can do without a foundation. If your floor is weak, then it is better to make a screed under the masonry.
So, laying a small country stove step by step:
- On the place chosen for the stove we place roofing felt or glassine measuring 530x780 mm for waterproofing;
- Pour sand one centimeter thick on top and level it;
- According to scheme No. 1 (the figure at the beginning of the paragraph), we lay out the first row of bricks without fastening them together, and level it using a level;
Lay out the first row.
- Apply a thin layer of clay mortar. We take the blower door, wrap it with a double layer of asbestos cord and secure it with twisted wire.
- Lay out the second row of bricks.
Second row with door.
- We take fireclay bricks and lay out the third row. After its formation, we install the grate. We maintain gaps for thermal expansion of materials of up to 1 cm.
We lay out a row of fireclay bricks with space for the grate.
- Using a brick placed on an edge, we lay out the fourth row. Inside the chimney duct we make supports for the internal partition. We place the “kick-out bricks” of the rear wall without clay with a slight protrusion outward.
- We install the combustion door, pre-wrapped with asbestos. We fasten it with twisted wire and temporarily fix it with two bricks: we put one on the back of the butt, the other on it and the door on top.
We install the combustion door.
- We lay out the fifth row flat along the contour of the fourth, and the sixth on the edge. We wipe down the chimney walls with a wet rag.
We secure the door with wire.
- We lay the seventh row flat from three-fours (we cut off 3/4 of the whole brick with a grinder) to connect with the eighth row. The back wall is on the edge again.
We cut the bricks with a grinder.
- In the eighth row, we close the firebox door with two bricks above it. We install a beveled brick above the firebox to center the flame under the burner.
Cover the combustion door.
- We place the ninth row offset back (slightly) to keep the door open. Before laying, we lay out wet asbestos cord to seal the joints of the brick and the hob.
- In the tenth row we begin the formation of a chimney, which will gradually expand backwards. We will make an attached pipe, so as not to displace the center of gravity of the structure, or a mounted one made of light iron.
We begin to form the pipe.
- In the eleventh row we lay a valve, seal it with an asbestos cord coated with clay.
There will be a valve here.
- Next comes a quadruple chimney, which is connected to a light metal pipe.
We continue the chimney to the joining point.
- Now we take out the knockout bricks and clean the lower part of the chimney from debris.
We bring the chimney under the pipe.
- We close the gap between the first row of bricks and the floor with a metal L-shaped sleeve and nail the baseboard.
- We whitewash the stove or cover it with stove varnish, seal all the joints between the metal and the brick. Metal parts can be painted with black fireproof paint.
We whiten and decorate the stove.
- We make a test fire with paper and small branches, then give it 2 weeks to dry.
As you can see, all the manipulations are not so difficult to do on your own. Material and labor costs are relatively small, and the construction does not take up much space.
At the same time, we received a heating and cooking device that will perfectly heat a small country house, give your cooking a unique taste and aroma of smoke, and create a pleasant atmosphere and comfort.
Advice! If there is an opportunity to invite a person more or less experienced in the stove business, at least as a consultant, be sure to take advantage of it, since building stoves from a book is quite difficult, it’s better to see it once.
Let's start from the foundation
The main rule when building a fireplace: the foundation must be made reliable. This means that it is erected separately from the building, otherwise uneven shrinkage will lead to cracks in the fireplace walls. There will be a safety hazard, as the combustion chamber and chimney duct may be damaged.
When the structure is placed next to a load-bearing wall, a layer of sand is poured between the foundations of the house and the fireplace. The upper level of the foundation is compared to the floor.
The digging into the ground is not made too deep. If the soil is mobile, you should make a sand and gravel layer at least 50 cm thick. It will play the role of a compensator during the capillary rise of groundwater. This is a kind of waterproofing of the base and fireplace walls.
M150 concrete is used for pouring. Reinforcement is required. The formwork will be strong if it is made of boards or plywood, fastened with self-tapping screws. According to the parameters, the foundation should be larger than the structure itself, at least 0.1 m on each side. The fireplace drawing usually indicates the required foundation parameters.
It is necessary to lay roofing material on top of the concrete, which will prevent moisture from being “pulled” from the soil. After this, you can make markings and begin laying, strictly adhering to the diagram.
Swedish order
Before you correctly assemble the stove and the brick stove itself, you need to thoroughly understand the order of the entire heating and cooking structure being created. At the same time, the Swedish fireplace stove is popular among homeowners and stove makers in Russia. Its design was developed by A. Ryazankin.
One of the variants of the “Swedish” stove heating design Source 2stiralki.ru
See also: Catalog of companies that specialize in the design and installation of fireplaces and stoves
The Swedish fireplace stove, designed by Ryazankin, has a simple layout. This compact heating and cooking design heats up quickly and features an oven. In addition, the design of the stove allows it to function like a fireplace. This option is great for heating 2 rooms. Although in fact there are a huge number of modifications of the Swedes.
Most professionals are familiar with the Ryazankin stove design. Therefore, they will always help and tell you how to lay a brick stove in a country house step by step for beginners. The order itself looks like this:
- The base of the furnace structure is the first row of bricks made of 34 elements.
It is created on a pre-prepared foundation, which is pre-coated with 2 layers of roofing felt or other similar waterproofing.
For any of the options in the Swedish stove, the 1st row consists of brick blocks tightly laid together Source 1-teplodom.ru
The use of a large amount of brick implies its dense installation. In other words, a specialist creates a kind of slab from it, in which there will be no smoke exhaust holes or any chambers. This so-called stove base will increase the reliability of the entire structure. However, it is laid out exactly along the horizon within the previously designated angles on the waterproofing.
On a note! A specialist first carries out dry, step-by-step laying of a brick stove for a home. Only after this does a professional use a mortar to fix the bricks.
- For the subsequent, second row, use 30.5 bricks.
They are also placed close to each other. In other words, they create a continuous plane. Where the fireplace will be, the craftsman attaches metal brackets. They are usually made from reinforcement. They are necessary so that in the future it will be possible to secure the fireplace grate by welding.
One of the options for a fireplace grate attached to pre-installed brackets Source kuznia-diadi-vani.narod.ru
On a note! If a specialist uses a grid with brackets in his work, then he fixes it on the masonry while creating the second row.
- To lay the third row you need 19 bricks.
They begin to create combustion walls and channels for the movement of combustion products. At the same time, do not forget to leave openings where doors will later be installed to ventilate and clean the interior of the stove.
On a note! The master always provides a minimum of 17 cm between the oven and the smoke channel, which will be formed in the vertical direction.
The cleaning and venting doors are also installed at this stage of work. They are attached using wire by twisting it. In this case, such fasteners are embedded between brick rows.
Cleaning and blowing chamber (position 2 and 3) in the furnace masonry, where the corresponding doors are subsequently installed Source ahbanya.ru
- Laying the fourth row when installing a stove is carried out using 18 bricks.
With their help, all cleaning and blower doors are thoroughly secured. In this case, the seams between the rows may turn out wider, because there is still wire here.
- For the next, fifth row, use 24 brick blocks.
When a specialist places them above the blower chamber, then he first makes grooves in them. They are needed to secure the grate. At the same time, the master prepares a place for the oven. It is usually a metal box. To mount it, the height of the front bricks must be 2.5 cm.
Important! The installation of a stove in a private house made of brick with a stove is carried out using heat-resistant fireclay blocks. They are used for laying out firebox walls.
Kiln fireclay bricks Source taldom.favoright.ru
On a note! The oven metal box is installed in its place only after it is lined with asbestos. The material creates a gap that will allow the material to expand when heated and maintain its integrity.
Additional requirements for choosing a furnace
Since we suggest doing everything yourself, rather than buying a ready-made stove in a store, when choosing the required design, we recommend paying attention to the following parameters:
- Easy to use . The heating process should be a pleasant and uncomplicated task that every family member can handle.
- Economical . This point is especially important if you plan to use only this stove to heat the house on an ongoing basis (in winter). In this case, one unit of fuel will provide maximum heat transfer.
- Simplicity of design . If a person who does not have experience in masonry takes on the construction of a complex model of a device, difficulties may arise that will subsequently lead to incorrect operation of the stove.
- Appearance . The design of the structure should please the eye and create coziness in the room, so it is worth paying special attention to the quality of the brick.
- Presence of a water circuit . It is known that even a small heating stove with a built-in heat exchanger for heating the coolant is much more productive than other models without this device.
When choosing a heating stove, you should consult with a qualified stove builder. He will tell you which configuration to choose and what you should pay special attention to.
Selecting a location
Before you begin construction, you should decide where the stove will be located. If there is only one small free area in the house, there is nothing you can do about it. But to obtain maximum heat transfer, it is recommended to place the stove in the central part of the house or room. Thus, none of its elements will touch the street wall, and accordingly, warm air will not escape outside. In addition, when adjacent to the supporting structure, temperature changes may occur, which negatively affects the durability of the heating device and the operation of the chimney.
FAQ
Question: Is a 14x14 chimney section sufficient for this project? Answer: The device power is 1760 W. With this parameter, the chimney cross-section is quite sufficient.
Q: On what mortar is it better to lay fireclay bricks? A: It is recommended to use a ready-made mixture for refractory masonry, which is sold in any specialized store. As a rule, the packaging contains instructions for its use. You can use a regular solution, but it is recommended to add fireproof mortar to it in the amount indicated on the package. There may be pieces in it, so you should either sift it or grind it further.
Q: The power of such a stove will not be enough for a 6x6 m house consisting of three rooms? The walls are made of adobe blocks or frame-panel. In winter, the average temperature is -10 °C, but there are frosts and up to 35-40 degrees below zero. A: For such conditions this will not be enough. You need to use something the size of a Swede.
Q: If the oven is extended by four meters, stretching the hood higher, will it function normally?
A: In practice, it has never happened that the furnace was extended to four meters. The design, of course, provides for a change in height due to the upper cap, but 4 m - this needs to be tried.
Q: Is it possible to make a stove without a foundation by placing it on the floor? A: The weight of the structure excluding the pipe is almost 1.5 tons. See for yourself whether the floor can withstand this.
Q: Can the height be reduced? A: This can be done using rows 19-22 and 27-30. If any two consecutive levels are removed from the presented range, the design will not be broken.
Q: Tell me, will this stove be enough to heat two rooms (20 m² and 15 m²)? A: It all depends on how well the house is insulated and at what outside air temperature you will heat it. If you are going to live in this house in winter, it is better to choose a larger stove.
Q: What is the advantage of having 2 dampers? Is it possible to leave only the top one to simplify the design? A: Two valves hold heat better. You are allowed to place one, but it must close tightly.
Q: Can these ovens be made entirely of refractory? Will it be possible to lower the firebox and what will this affect? A: Laying a furnace from refractory bricks is possible. There is no need to make the firebox lower. In this case, the fuel may not burn completely and soot will form.
Q: How is the difference in size between regular and fireclay bricks resolved? A: Due to the better geometry of the refractory material, the seams are thinner when laying. This hides the difference in brick sizes.