Russian stove: drawings of brick stoves
Previously, such designs were found in every home, but nowadays they are already a rarity. Despite this, a Russian stove can successfully fit into the interior of the room. Also, Russian brick stoves are not only a heating device - they also have a hob. To lay the stove you will need the following materials:
- solid red brick – 1610 pieces;
- view for a valve measuring 0.3x0.3 meters - 2 pieces;
- dry clay solution in dissolved form;
- samovar 14x14 centimeters - 1 piece;
- flap 43x34 centimeters - 1 piece.
Several ways to remake
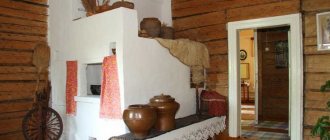
If you received a stove as a dowry when you bought a house, then most likely you have no idea what internal structure this device has. Therefore, there is no way to do this without partial disassembly. To determine which elements can be left unchanged and which need to be modified, begin to disassemble the stove carefully, removing each brick. The material that remains intact can be reused, so it is recommended to fold it separately.
Already passing several rows will give a complete picture of the structure of the smoke channel. At this stage, you will have to determine whether you will leave the chimney in the same form or build a fireplace version, which is a regular vertical channel.
By comparing the diagram of the actual device with the most suitable fireplace design, decide which part of the masonry will remain untouched. Evaluate the possibilities of modifying the rows and then begin cleaning all cavities of the body. It is much easier to clean the stove in a disassembled state than in an operating one.
Restored brick building
Each brick should be cleaned of old mortar and soot. If necessary, you can use water. These bricks are most likely unsuitable for laying outer layers, as modern materials are more aesthetically pleasing and attractive. But when installing a chimney, they will be indispensable.
If it is impossible to understand the diagram and after partial disassembly the picture does not become clearer, you will have to continue to disassemble the stove. If there is a lot of damage in the masonry, then repairing them may be more time-consuming and expensive than building a new fireplace. This idea forms the basis of the second method of converting a stove into a fireplace. It will be necessary to disassemble the oven completely to the bottom rows of the base
Dismantling must be carried out with extreme caution, since soot contacted with the skin and respiratory system causes irritation.
When disassembling the stove, you should not regret the design. With a lot of cracks it would cause a lot of problems. The very existence of the foundation and foundation is a huge legacy that the fireplace stove has left behind. Having carefully examined the condition of the base, you can carry out installation work on it. But verification is not just about integrity control. Using a level, you need to make sure that the plane is horizontal.
7196f3e665317c6c8bc3485445b7def9.jpe
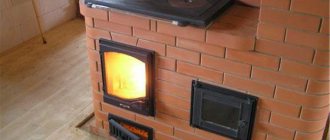
The remaining foundation marks the boundaries of the fireplace complex. With such dimensions it will be possible to build not just a decorative element, but a real functional fireplace with a hob for cooking. In addition to the fact that the firebox will need to be made according to the dimensions calculated from the parameters of the room, immediately focus on the location of the chimney so that it comes out as close as possible to the existing hole in the roof of the house.
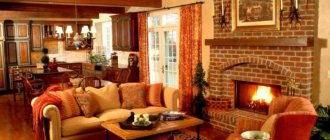
A fireplace made from a stove with its complete or partial disassembly can radically change the style of room layout. In some cases, the furnace undergoes minimal changes. They mainly relate to the size of the firebox. Then it makes sense to preserve it in its original form, decorating it with folk art paintings. Naturally, modern materials are used for this, which do not leave marks and retain their appearance after long-term use.
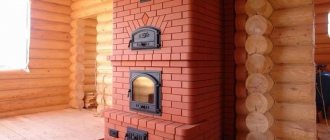
It should be noted that with the help of such solutions, two important tasks can be solved: installing a fireplace and preserving the memory of Russian craftsmen in the house. After all, the Russian stove differs from the designs of other countries in the presence of a stove bench. This bench can be left for decoration, or it can be turned into a working fireplace unit.
Buslaevskaya stove: projects
The design has a built-in hood. The oven is small in size. It is ideal for any private home, as it allows you not only to heat the premises, but also to cook food. Despite its compact size, the stove heats spacious rooms well, which is why there are ready-made designs for houses with a stove. Special schemes for laying brick stoves will help you complete the work without carrying out complex calculations. For installation you will need the following materials:
- doors - firebox (0.2x0.25 meters), VK (0.39x0.5 meters), blower (0.14x0.14 meters);
- refractory - 43 pieces;
- solid brick – 382 pieces;
- oven-cabinet 28x33x50 centimeters;
- cast iron stove 0.7x0.4 meters with burners (removable rings of different diameters);
- valves - steam exhaust (12x13 centimeters) and smoke (12x25 centimeters);
- grate - grate 30x20 centimeters;
- corner - three equal-flange blanks 1 meter long and 45x45 millimeters in size;
- steel - piece 0.3x0.28 meters;
- strip - 4 pieces of meter (4 graph paper), 0.25 meters (2 graph paper), 0.35 meters (3 graph paper);
- cast iron plate – 0.4 x 0.25 meters; 40x15 centimeters.
Projects for brick stoves of this type look like this:
- Full row.
- Blower door.
- Window opening for cleaning.
- The bottom of the oven is lined with refractory, three sides are lined with iron.
- Installation of the combustion door, grate, refractory under the firebox, cleaning cover, ash door.
- Installation of DS.
- Laying refractory on the edge around the door.
- Laying according to the scheme.
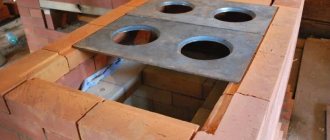
- The oven is top coated with clay (1 centimeter), the heater is covered, and a stove with burners is attached.
- Installation of smoke circulation with cleaning windows, the stove is not laid. Subsequently, the brick is placed on its edge.
- The cleaning is overlapped, channels are created, and 25-centimeter strips are laid.
- The cleaning is completed and the fastening wire is installed.
- The cap is installed.
- Installation of the VK ceiling, while the hoods remain.
- The stoves are laid out according to the diagram.
- The small stove ends in sheet iron, the masonry is done in the same order as a brick stove.
- The cleaning hole of a large stove is laid out, the edges of the side walls of the channels are cramped.
- Laying protrusions.
- The projections are duplicated and the corner is installed.
- The BP chimney is closed in the same way as row 19.
- A three-row neck is made, the size of the chimney is reduced to a section of 26x13 centimeters for the top valve.
- A chimney is created with grooves on this and subsequent rows.
The dimensions of the structure increase when using clinker facing bricks, so using them instead of solid material is not recommended. When finishing with tiles, durability is ensured (the material lasts for decades), in addition, it can be dismantled for cladding other heating structures.
Required thermal insulation materials
Stone wool 50 mm thick serves as a fire shield between the chimney and other building elements. It is necessary to take this moment responsibly, especially when it comes to transition nodes in the areas of interfloor and attic floors.
The fireclay core and facing parts are sometimes separated by basalt cardboard, which has low thermal conductivity. Thanks to this thermal insulation layer, the temperature of the working core is maintained and the outer part of the fireplace does not overheat.
The tightness of the junction of metal elements to the brickwork is ensured using sealants that can withstand high temperatures. If this is not done, there will not be good draft in the chimney, which means the performance of the heating structure will decrease.
Ordering a sauna stove: diagrams
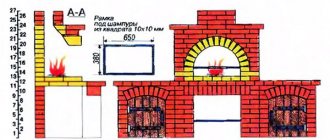
Designs of brick heating stoves show the location of fireclay and clay bricks in each row.
Explanations for the order: 1st, 2nd row. A blower is created (a window for air supply), and a dressing is used. 3. A window is left for the main chimney. 4. The damper and ash pan door are installed. 5. The grate and firebox are mounted, and the refractory is subsequently laid on them. 6. The shape of the chimney and firebox is repeated, and doors are installed. Rows 7-11. The firebox ends on the 11th row. Rows 12-14. The heater box is installed. 15-16. The shaft expands and becomes half similar to the 6th row. 18. The cleaning door is installed. 22.23. The shafts are combined, and the edges of the bricks are ground down. Then the shaft above the heater is completely blocked, leaving only the chimney.
Frame structures can facilitate the installation process. In this case, brick is present only in the outer walls, and all internal elements are welded from metal. This can speed up the process of laying the stove.
Types of fireplace stoves
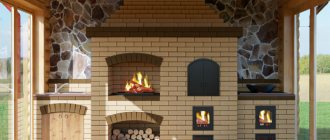
Structures suitable for summer cottages made of brick, wood, foam blocks or other material are intended for heating and cooking. How can you make a cozy fireplace out of an existing stove? In the form of a partition between the recreation area and the kitchen! The layout of the system is selected according to the layout of the home:
- buildings in which there are no load-bearing walls between the living room and the kitchen. It would be appropriate to build a stove or fireplace from high-quality brick in a corner location. The stove is placed near the kitchen, and the fireplace system is oriented at 45 degrees in the living room. Fireboxes are installed on the front or opposite walls;
- in rooms with uneven floors and an already equipped foundation, you can convert the stove into a fireplace using channels. A structure that is light in weight is installed near the cutting of the walls. Consoles balance the load on the base;
- During the construction process, the country house is supplemented with closed fireplace structures. In the middle of the large living room, systems are installed on chain fastenings.
The shape of the product is subject to the style of the room. The U-shaped structure will emphasize the classic solution, and the D-shaped structure will give the space a country flavor. Rectangular or semicircular options are typical for design in the spirit of Art Nouveau.
Recommendations from professionals
To get a good result, it is important to adhere to the basic recommendations of professional craftsmen when constructing a structure:
- When purchasing a brick, it is important to carefully examine all its contours. High-quality material should not have burnt or underbaked fragments.
- When laying the foundation, you need to make a fairly deep pit. Specific dimensions are determined by the weight of the future structure.
- When laying the first row, each brick must be carefully positioned using a level.
- When preparing the solution, you must first mix cement with sand and then add clay. The finished composition should have a uniform texture and no lumps.
- In order to correctly arrange the individual elements in each row, you need to draw up a detailed laying diagram in advance.
- The entire progress of work must be monitored at all times using a building level. This will help prevent distortions in the structure.
It is recommended to sort the bricks in advance into whole, halves or quarters. This is required to speed up the process.
A brick fireplace stove is considered a very convenient and beautiful structure. It performs a number of functions and plays the role of an excellent decorative element. If you have the necessary skills, you can make the design yourself. To do this, you should strictly adhere to the basic recommendations of professional craftsmen.
Can a fireplace be installed in any room of the house or are there restrictions?
There are a lot of restrictions. It is not allowed on the second floor (usually the ceilings are not designed to support the weight of even a small fireplace), in a regularly shaped room with an area of at least 20 square meters with three-meter ceilings, so that the volume of air is sufficient for normal combustion. But a fireplace that is too small will not be able to heat a large room. For masonry fireplaces there is a rule:
area of the combustion window = 1/50 of the area of the room.
The firebox window should “look” into the middle of the room.
Advantages and disadvantages
Fireplace stoves for brick houses have many advantages:
- High efficiency. The design quickly heats the room.
- Variety of functions. The stove and fireplace can be used separately or simultaneously. For this purpose, the design includes a rotary gate. The use of special valves allows you to select the required option.
- High efficiency. Its value reaches 80%.
- Easy to maintain. This is due to the presence of an ash pit with doors under each firebox.
- Long period of operation. This applies exclusively to high-quality buildings.
A properly designed fireplace stove can literally transform a room. To do this, you need to make a drawing and think over the configuration of the structure.
The fireplace stove will become a real decoration of the home