The housekeeper stove is essentially a modified concept that is familiar to everyone - Russian. The difference lies in the combustion chambers; if the Russian device has one chamber, then the housekeeper is conventionally divided into two halves: one of them consists of 2 heating chambers of different sizes. The upper part has a kitchen stove and a vault. From this article you will learn how to build it yourself, based on the drawings and recommendations of experts. You will also be informed about the main functions and technical characteristics of fireboxes.
Device and functions
Depending on the thickness of the seams, the dimensions are approximately 1400 * 890 * 2240 mm. Outstanding features are the ability to warm up over the entire height, starting from the floor. The temperature spread will be only a few degrees. In addition, there is an attempt to implement several advantages at the same time.
The presence of a cooking chamber is like in an ordinary Russian one - two fireboxes of different power, a cast-iron stove, ventilation and moderate dimensions. For cooking, use the crucible and both fireboxes. Moreover, the first one is used in the summer, avoiding unnecessary heating of the room. The greatest thermal efficiency is achieved when using the main firebox, and the second firebox can be heated or heated. You can install a water heating box, the device will change.
Schemes of potbelly stoves
The main advantage of a rectangular stove
, unlike oval products made from pipes or gas cylinders, lies in a larger heated surface area, so its efficiency will be much greater. The optimal size for a potbelly stove is 800x450x450 mm. A stove of this size will not take up much space and will easily fit even in a small room.
An important difference between the Loginov stove
is the presence of two plates (
reflectors
) in the upper part of the combustion chamber.
Since the path of gas movement
increases, the heat transfer of such a potbelly stove is significantly higher than that of a conventional metal stove.
Advice
. If you need to reduce the size of the Loginov oven, then it is advisable to change only its width. If the length and height of the structure changes, its efficiency may decrease significantly.
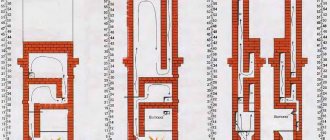
Detailed diagram of Loginov's potbelly stove
Main differences
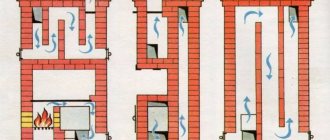
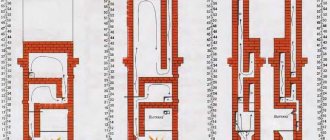
Both lower combustion chambers (2 and 3) have their own grates and doors, above them there is a cast-iron plate (5), with concentric rings. Combustion products move along the path: a small firebox, a large one, after the heating and cooking chambers. Access to the space, called the pole, is open from two sides. The hanging corner of the over-pipe is supported on a support made of an angle or pipe (11). To strengthen the outer pole, a metal corner is used, which is called earthenware (4 and 10). A 25th corner of 3 mm thickness is used, which, like the doors, it is advisable to wall up in the seams using wire. The cooking space can be closed with a damper (12) with a handle.
On the front side there are valves to close the smoke and ventilation ducts in the pipe. The latter begins above the hearth, making it possible to remove odors arising above the stove and ventilate the room. The heating cavity is divided into two sections. The partition (16) consists of 3 separate columns, forming the so-called undercuts (20), measuring 12 by 21 cm and a solid wall. The hot smoke, passing through both sections, cools down and exits into the hearth slot (15), into the cooking space. Passing and heating it, the gases move to the forehead, where they go into the pipe.
Preparatory work
So, now you can begin the preparatory work. At this stage, we need to take all measurements and purchase construction (and finishing, if necessary) materials.
The building material that we need to carry out the corresponding work should be selected based on the dimensions that were given, and taking into account the two heating chambers. We will need the following materials:
- Brick (red, fireproof) - approximately 750-800 pieces.
- Clay solution for fastening - approximately 35-40 buckets.
In addition, we need to purchase stove appliances. Don't forget that you can use old appliances, which can be borrowed from an old unit or found in an old shed. Reviews from owners who made the stove with their own hands speak about this.
- There are two grates, but of different sizes (180 by 250 mm and 120 by 140 mm).
- Fire door (any size according to your wishes, but also in quantity of two pieces).
- Blower door (preferably small).
- Cast iron stove.
- Chimney damper.
- Valve for ventilation.
- Wire (the more, the better). For the above dimensions, about 10 meters are needed. Wire thickness 6 mm.
But that is not all. Do not forget that additional materials are also needed. For example, it is also necessary to purchase strip and carbon steel. You will also need round steel, which can also be purchased at a hardware store in your city. And also do not forget about the stove damper, the size of which you will have to choose yourself.
But you can see how to carry out all the installation work yourself in the video we provided.
Rules for long-term use
I would like to dwell, so to speak, on the future of your unit. There are several rules that must be followed so that the housekeeper’s oven can please you for a long time with its continuous, and most importantly, uninterrupted operation. First, remember: you cannot melt both firebox compartments.
Secondly, the doors (furnace and ash room) of the room that is not working should be tightly closed, almost hermetically, pay attention to this. Thirdly, the unit damper must also always be closed
Fourthly, do not forget that before opening the damper, it is necessary to ensure that the ventilation duct extends. And finally, fifthly, the cooking chamber and stove can only be used after ten minutes from the start of the unit’s combustion. Don't forget the simple rules - enjoy the operation of the unit. Accuracy and attentiveness will allow you to save the stove for quite a long time, and you will save your finances and nerves.
As a result, I would also like to note the functionality of this heating stove, because now you can not only heat the room you need, but also cook food with it.
- DIY Slobozhanka oven
- How to repair cracks in a furnace
- Laying a wood stove for a home or cottage
- Long-burning heating stoves for summer cottages
Ordinal masonry plan
In the first layer, the bricks along the perimeter are taken whole, but the middle can be filled with halves and broken bricks.
In the second, partition columns, cleaning windows and a vent for the larger firebox should be installed. It is better to trim the lower edges at the exit of the ash pan for ease of cleaning.
Third layer - the door of the filled ash pan and the door are installed. To increase the volume, you can lay the ash pan of a small firebox, or you can do this in the next row. (cleaning doors are not shown on the diagram)
The fourth is installing a small firebox door. We block the cleaning holes. If you decide to replace the doors, leave the windows open until the end of the masonry. At the end of the work, you can finally clean the remaining clay and lay it in the protruding halves. It will be easy to find the holes using the protrusions.
Fifth - the barrier of columns becomes solid and connects to the walls. The door of the large blower is covered, and the perimeter of the large blower is reduced before installing the grate. At this point, under the partition, there should be openings through which smoke will flow from the first section to the second. To increase the mass accumulating heat inside, the partition is lined with bricks lying lengthwise and crosswise.
The sixth layer will be laid on all the grates, and they will overlap slightly. It is advisable to make the front and rear overlap of the small grate beveled, this can be seen in the diagram. Thus, the coals will roll towards the center, which will make it easier for even wet wood to burn in a small firebox.
In the seventh, a large door is installed, and in the 8th, a small one is installed, and with the help of cut ribs, an expansion of the chimney is formed towards the heating partition.
In the ninth, the outlet from the firebox narrows, hanging over the previous river.
In the next step, the exhaust path is blocked from above, along with half of the heating chamber. In fact, this is the first layer of the double bottom of the crucible itself. We leave the gap open, through which the smoke will enter the cooking area. It will stretch from one wall to the other, and will be a quarter wide. The side section shows that the underside consists of two layers laid flat. It is supported by the masonry above the folds. When using it for cooking, it should be heated like a Russian one, cleaning the underside if necessary. If the main firebox is lit, the cooking chamber and stove can be used. It is noteworthy that a smaller firebox burns fuel more energetically, while being less demanding on it.
Next, you can block the firebox doors and lay a second solid layer, leaving a gap.
12 – place the cast iron plate on a thin layer of clay, and strengthen both edges of the pole with a metal corner. Conditional “cheeks” are laid.
The 13th and 14th are completely unsophisticated, the linkage is being made. In the next step, for reinforcement, tapes or wires with washers or threaded ends at the ends are laid in longitudinal layers along the edge. The forehead itself is covered with a metal corner, and not with an arch for simplicity. The lower ribs, which form a narrowing, can be trimmed off.
The 16th is laid in the same way, but this time the reinforcement is done across, and the forehead is overlapped along the metal. The second row of narrowing lies rough.
17 - very similar to 15 and also has a metal fastener. The top “faience” is installed on a pipe or other support. When starting to design the vault, it is easier to start laying it at an angle rather than cutting off each edge. The shape itself should be chosen as a dome, due to its geometric strength. At the same time, it is still advisable to strengthen the supports of the vault by laying additional rods or tape, like the sixteenth. Fill the voids remaining between the wall and the dome with adobe, consisting of thick clay mixed with fragments and sand.
This is exactly how it is recommended to lay the 18th row. Under the tray side of the first stones of the vault, adobe is also laid, and the first units are laid on the metal reinforcement of the cross-pipe.
The 19th closes the vault, but retains four or more openings that subsequently flow into the collection path of the 20th. He is the mentioned collecting channel and narrowing of the over-pipe. Its width is reduced from 25 cm to 18 cm, and the right corner is laid with a lock.
In the 21st, the prefabricated one takes on a form that unites it with the overpipe. A ventilation hole of 7 by 25 cm is immediately laid.
In the twenty-second, the section decreases, it is better to cut off the ribs. The ventilation duct becomes half a brick.
23 – there is a shift to the rear wall.
24 – the ventilation valve is installed.
25 and 26, prefabricated, narrows and turns into a smoke one.
27 – smoke valve.
28 – paths are being merged.
29 – the ventilation part is covered with metal strips.
30 – 33 a three-row plug is placed above the ventilation duct, in accordance with fire safety requirements. The chimney acquires a cross-section the size of a brick.
The profile of the latter goes up to the ceiling, after which a fluff is arranged to pass through the ceiling. The wall thickness of the fluff can be no less than one and a half bricks and rise above the level of the attic floor by 25-30 cm. The pipe can be extended from other materials, but be sure to use fireproof insulating materials. I would like to warn you about the presence of orders on the network that have errors. You should first understand the logical compatibility of the entire masonry.
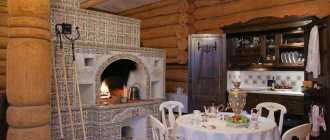
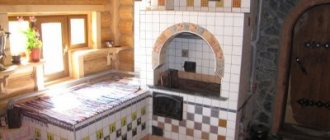
Design features of the furnace
A distinctive feature of the housekeeper's stove is its small size. The width of such a device is usually no more than one meter, and the height is up to two meters. Thanks to these parameters, the installation of furnace equipment can be carried out in rooms with a small area.
The structure of the housekeeper is almost the same as that of a traditional Russian stove. The main distinguishing feature is the presence of heating in the lower part of the structure, which makes it possible to completely warm the air in the room. The heating and cooking device operates using various types of fuel.
The structural feature of the housekeeper's oven is:
- Two separate fireboxes. One combustion chamber is used for both heating and cooking. The second is only a cooking one, which is used in the summer. The fireboxes have separate ash pans, ash pans and grates located parallel to them. The fuel compartments are connected into one chimney, which allows the gases to escape together. The doors of the combustion chambers are located on adjacent walls of the furnace.
- Cooking panel. The housekeeper stove has a large cooking chamber in which the horizontal cooking baffle is not adjacent to the back wall. This leaves a compartment that allows hot gases to enter before exiting through the chimney system into the cooking chamber.
- Inspection grooves. There are four recesses in the design for cleaning the chimney channels of the firebox.
An example of a Russian housekeeper stove.
The stove is equipped with two hob burners. The device can be supplemented with a special box for heating water.
Foundation
The integrity and strength of any structure largely depends on the foundation. As in most cases, it should be laid under it to a depth of about 50 cm. The dimensions are increased by 10-25 cm on each side and standard layers are filled. Sand, crushed stone and crushed with a rammer, spilling with water. Filling with cement with rubble stone or other filler. Dry and hard soil will allow the use of more intact bricks and chips, provided there is good waterproofing. If the soil is pliable, then a more rigid base is needed, possibly with reinforcement.
How to build a Russian stove with your own hands: main stages
First of all, you should prepare all the required materials:
- fireclay and red bricks;
- sand, clay;
- roofing felt;
- doors and smoke valves;
- asbestos cord;
- grate.
Tools you will need:
- level, tape measure, square;
- construction pencils;
- rubber mallet;
- container for preparing the solution;
- drill with mixer attachment.
Laying a stove with your own hands - how to lay a stove correctly The entire process of erecting a heating structure consists of the following main stages:
- They choose a project for a Russian stove with drawings that indicate the dimensions (read: “Diagrams and drawings of brick stoves - correct masonry”). Then they determine the place where the structure will be installed and assess the condition of the soil.
- Laying out the foundation. To do this, they dig a pit and put sand and crushed stone on the bottom. The mixture is compacted and poured with a concrete layer. They do waterproofing. It is worth noting that you can make outdoor stoves with your own hands using the same method.
- The rules for making a Russian stove with your own hands provide for the preparation of high-quality masonry mortar. The main trick is that you need to choose the right ratio of clay and sand (usually 1:2). But it should be remembered that clay can have different qualities. After the solution is prepared, it must be checked for “fat content”. For this purpose, roll the ball and hit it hard on the floor. If it crumbles, it means that the solution contains sand in excess. If the ball has survived, then the consistency of the composition corresponds to its purpose.
Materials
The composition of the mortar on which the masonry will be laid cannot be underestimated. Naturally, the easiest way is to buy a proven dry mixture for masonry. But if you are forced to save, you will have to study ways to determine the fat content of clay and the mixtures necessary for masonry. Don't miss the fact that you will need three different formulations:
- Durable, heat-resistant using fireclay, in the area of fireboxes.
- Moisture-chemical resistant, lime for smoke passages and pipes.
- Durable and at the same time elastic, clay for the base.
Methods for determining the fat content of clay by dried balls, the degree of sticking on a stick, or by throwing cakes are easy to find on the Internet. The thickness of the seams should be within 3 - 4mm. The masonry will be more stable, and the solution will have much less chance of crumbling.
Brick should also be given its share of attention. Not every clay one is suitable. In short, a truly suitable one can be determined visually by the way it is produced.
What tools are needed?
To build a heat source at home, you need to prepare a basic set of tools:
- hammer-pick;
- Master OK;
- rule;
- grinder, cutting wheels for stone, metal;
- measuring instruments - building level, ruler, square, plumb line;
- carpentry tools to assemble the foundation formwork;
- wooden arrangement;
- several containers and devices for mixing the solution and breaking up the clay.
For construction you will need bricks and a sand-clay mixture for mortar. The amount of material should be based on the scale of the work. You will also need stove fittings - a blower, combustion and cleaning doors, grates, a smoke damper, a hob.
Molding technologies
- semi-dry pressing
- plastic molding
- slip casting
- raw atmospheric drying, etc.
- We are interested in the second option. It can be distinguished by the expressive marks of cutting raw materials, transverse marks and grooves on the edge called the bed. This molding is similar in appearance to clinker molding. However, it is heavier and more expensive, making it less attractive.
- From clinker you can make a base for a heavy structure or a mini-oven, which will have good thermal inertia.
- At the preparation stage, it is worth sorting the stone by quality, smoothness and integrity. Use all the rejects on the base and lower layers. The spoon surfaces that will be inside the channels can be further processed by grinding off irregularities or protruding small fragments.
- During the installation process, each unit must first be soaked in water for about 20 seconds.
- Of course, places exposed to high temperature loads should be lined with fireclay. These can be the walls of the firebox, the beginning of the smoke channel and the partition. Purchasing fireclay now will not be a problem.
Drying the lined stove
After completing the masonry process, the stove cannot be heated at full capacity immediately, since in this case it will dry unevenly and unsightly stains will appear on the surface of the walls. In addition, the mortar at the seams may crack, and the walls will depressurize.
To prevent this from happening, the oven must undergo a natural drying process for 10 ÷ 12 days. In this case, all latches and doors must be opened. In order to create favorable conditions for drying the furnace structure, in this case, an ordinary electric light bulb of 200 ÷ 250 W can be placed in the cooking chamber for the entire drying time.
After completing the first stage of drying, you can move on to forced measures - start heating the stove with a small amount of firewood, with the smoke valves open, but with the fireboxes closed.
The stove is heated for 7 ÷ 10 days according to a special system: in the first two days only 3 ÷ 4.5 kg of firewood is used for heating, every day adding 1 ÷ 1.5 kg of fuel to the initial amount, and so on throughout the entire forced period. drying.
If, after a long drying period and carrying out a control fire, minor cracks still appear in the seams between the rows of masonry, do not rush to repair them. They need to be monitored during the heating season. During this time, they will either stop in one position or expand a little more. Only after the end of the heating season can repairs be carried out, repairing all the defects that have appeared.
Using the "Economy"
For predicted results of use you should know:
- You should not light both fireboxes at the same time, since the performance of the larger one can lead to smoking of the smaller one through the stove rings and door leakage.
- If a fire is lit in the main firebox, the small door and the vent should be closed tightly. You will avoid rapid consumption of firewood and will be able to regulate combustion.
- During combustion, the damper must be closed, and when opening, the ventilation valve must be opened. This minimizes the possibility of smoke and gases entering the room.
- Effective use of the “crucible” is possible after a good warm-up. You can put the dishes on the stove after 5-10 hours. For baking, you will need to determine the heating of the surface of the hearth. If a pinch of flour thrown on it turns brown, the temperature is right. White or black color will indicate overheating or vice versa.
Recommendations for use
The stove does not require maintenance. To avoid undesirable consequences, you must follow the rules for using a mini-oven :
- You cannot fire two fireboxes at the same time. In this case, the ash and combustion doors of the unused firebox must be tightly closed;
- Do not use flammable liquids such as gasoline or kerosene for kindling;
- keep the heater damper closed. If there is a need to open it, then first you need to open the ventilation duct valve;
- monitor the amount of ash. Remove it in a timely manner, otherwise there will be no fuel savings, because it will absorb heat and the heating of the rooms will deteriorate. It is better to do this procedure at least twice a week;
- you need to let the fuel warm up well for ten minutes, and only then start cooking food in the oven;
- It is not very practical to use paper for kindling - it burns quickly. It’s better to put wood chips or birch bark in the oven;
- Check periodically for any cracks in your stove. If any are found, they need to be repaired. If the damage is significant, then major repairs will have to be made. A clear indicator of a problem is a decrease in the heating temperature produced by the stove. The house has become colder - inspect the stove;
- It is preferable to carry out repairs in the warm season, when the stove is not used for heating;
- Before burning fuel, you need to close the doors of the ash pit and fireboxes;
- you need to clean the chimney in a timely manner;
- It’s better to start heating the stove during the day, then by the evening the whole room will warm up;
- It is preferable that the fuel be dry. And to ensure that it is not exposed to moisture and water and does not become damp, store it in a specially designated place. It should be dry and closed;
- It is desirable that the logs are approximately the same thickness and length. This is necessary because thin ones burn too quickly, and thick ones, on the contrary. The house will not be heated well enough in this way;
- stack the logs not randomly, but in a certain order. First, rake the coals with a poker closer to the door. Place a log across it. Then thinner firewood is laid obliquely, and thicker firewood is laid on top of it.
Firebox
To test fire the stove, fill the firebox completely with dry wood, open the firebox door, the ash pan door and the ash pan doors. The air damper is also open.
We light the firewood, after the large logs begin to burn normally, close the doors and ash pans and check the performance of our homemade “Housekeeper”. Do not use firewood with a humidity level above 20% - this will lead to frequent cleaning of the chimney from a thick layer of soot.
To clean the pipe, use a cable with a brush attached. By passing one end into the chimney. Having brought it outside in the firebox, simply stretch the brush along the entire length of the pipe. But before this operation, we recommend removing or covering things and furniture with film. This operation will have to be performed at least once every 30 days.
When doing work with your own hands, treat it with full responsibility. Comfort and coziness in your home depends on this.
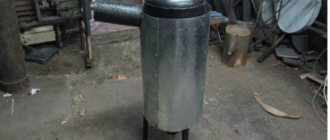
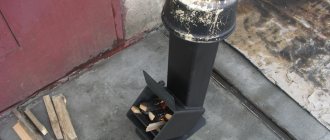
The main stages of making a potbelly stove
1. All the details are marked on a sheet of metal: 6 steel rectangles for the walls of the oven, 1 rectangle for creating a smoke reflector, plates for the grate and latch for the door. 2. Cut
sheet metal can be found at any metal depot.
The guillotine, unlike the grinder, allows you to cut (chop) it more accurately. In this case, there will be no need to do straightening (alignment of sheets).3. The furnace body is made in the form of a rectangle. Their sides are joined together at an angle of 90° and welded together. Welding the box
4. To avoid mistakes, the oven box is first only tacked by welding in several places, and only then, after checking its horizontal and vertical positions, its seams are welded.
Important! All connections in the body are thoroughly welded; To check the seams for leaks, you can coat the joints with chalk or kerosene. 5
Welding seams are cleaned with a wire brush.6. The internal space of the potbelly stove is divided into three parts: the firebox, the smoke circulation chamber and the ash pan. To separate the firebox from the ash pan, a grate is laid between them, on which the fuel will be placed. To do this, at a height of 10-15 cm from the bottom of the stove, 5x5 cm corners are welded on the sides and on the back of the box, on which the grate will be located
5. Welding seams are cleaned with a wire brush.6. The internal space of the potbelly stove is divided into three parts: the firebox, the smoke circulation chamber and the ash pan. To separate the firebox from the ash pan, a grate is laid between them, on which the fuel will be placed. To do this, at a height of 10-15 cm from the bottom of the stove, 5x5 cm corners
, on which the grille will be located.
Advice.
It is better to make the grate from 2-3 detachable parts. Otherwise, when replacing a burnt grate, it will be difficult to remove it from the firebox.
7. The grate is welded from thick steel rods or strips 30 mm wide. They are attached to 2 stiffeners - rods with a diameter of 20 mm. Since the grates burn out over time, it is better to make such a grate removable.
Manufacturing of grate
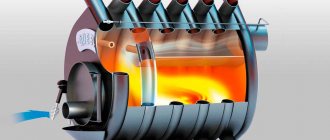
8. At a distance of 15 cm from the top of the box, two strong rods are welded, on which one or two removable reflectors
– thick-walled sheets of metal that will delay the flow of hot gases and send them for afterburning. However, they should not completely block the oven. To allow hot smoke to enter the chimney, an indent of about 8 cm is made from the front (for the first sheet) and back of the stove.
Diagram of the passage of gases in a simple potbelly stove and stove with an installed reflector
9. Next, the upper part of the box is welded, and then a hole for the pipe
.
Pipe hole
10. The front part of the stove with holes cut in it for the firebox doors and ash pan is welded last. 11. The size of the firebox door must be sufficient to allow fuel to be added and grates to be changed without effort. The hole for the ash pan is made a little smaller. 12. The hinges are welded first to the door, and then to the body of the potbelly stove. They can be bought ready-made or welded from two tubes of different diameters. Door handles can be made from a strip of metal or rod.
Welding the door
Important! When attaching the doors, you should fit them to the body as tightly as possible; To do this, they are straightened (leveled) and cleaned with an emery wheel. Wedge latches closing the doors are adjusted to the body as tightly as possible
13. You can cook food or heat water on such a stove. To do this, a hole of the required diameter is cut in the upper part of the box. Stove burner
, which will be inserted into this hole, can be purchased at any hardware store.14.
For ease of use, the structure is installed on legs
or a welded stand made of pipes.15.
The chimney pipe is connected to the stove using a sleeve
.
16. To insert a damper
to regulate the smoke output, two holes are drilled in the pipe. A metal rod is inserted into the holes and bent at 90°. A metal “penny” is attached to it in the center of the pipe - a gate, the diameter of which should be slightly less than the diameter of the pipe itself by 3-4 mm.
Gate valve for adjusting smoke output
Varieties of options
During the existence of the Russian stove, quite a lot of variants of its design appeared, which differ from each other in some design features. The first most obvious design element that immediately catches your eye is the type of bed - they come in different sizes or shapes:
- with transverse beds located behind the mouth with a pipe. This is a typical option, which provides two beds at once;
- with a longitudinal type of bed, when it is located behind the firebox. This makes the bed wider, and also provides additional storage space for various equipment.
Obvious differences may be different options for the inflow device:
- the classic inflow is located on one side;
- a firebox with a fireplace allows you to combine a stove with a fireplace, while the fireplace can be brought into another room.