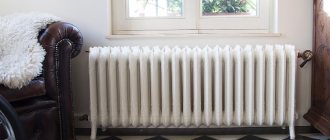
One of the main factors of comfort in winter is warmth in the house; only a complete ascetic would argue with this. Unfortunately, radiators do not always provide the required level of heat, so today we will tell you how to increase the efficiency of a heating battery, in other words, how to increase its efficiency so that the apartment becomes warmer.
Introduction
For quite some time now, in the field of air cooling systems for central processors, we have not seen any innovations or truly interesting solutions to increase efficiency while reducing noise levels. So manufacturers have to update their cooler lines and attract potential buyers in other ways, in particular by equipping devices with two fans at once. This trend has indeed been observed recently, since this is the simplest and, as you probably understand, inexpensive way to increase efficiency without significantly affecting the final price of the product. In particular, Thermaltake, having previously shown at CES 2013, in March of this year announced four new coolers of the NiC (Non-interference Cooler) series, three of which are equipped with two fans. Phanteks, a less prolific company in this regard, has also released a new product, which also has a pair of fans in its arsenal. There are other companies that have recently added coolers with two “turntables” to their product range. That is, it is quite possible to talk about a peculiar fashion for two fans in processor coolers. We will find out how all this turned out using the example of the Phanteks PH-TC12DX and Thermaltake NiC C5 coolers.
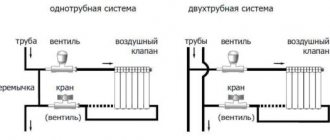
Combined air-heating system
Typically, heating with warm air and ventilation are two different circuits that do not intersect with each other. However, in some cases the ventilation and heating systems can be combined.
The first option is compact installations of domestic industry. The heat source in this case is the combustion of diesel fuel and electricity. So, the fan is activated, which ensures the injection of heated air.
Combined air-heating system
Such installations and their analogues are most often used in garages, small workshops, and small industrial facilities as a system for periodic use. But in order to heat and ventilate a residential building, such devices are uneconomical.
Models and their differences
The models of such devices differ from each other mainly only in the size and power of both the heating element and the fan. The power range is very wide and can vary from 2 to 90 kW, creating an air flow with an intensity of one to several tens of thousands of cubic meters per hour. Thanks to this variety, many models with low power are quite suitable for use at home, since in any case they provide significant savings, because electricity is consumed only to ensure the operation of the fan.
Therefore, a small fan heater with a water heat source is best suited if standard devices are not enough to heat an apartment or office in winter, since even a large number of such devices will not create a high level of electricity consumption. Moreover, it is precisely thanks to saving resources that you can, if necessary, buy a larger number of devices in case of a breakdown of some part or another unforeseen situation.
Based on the housing design, fan heaters are divided into two types:
- floor;
- wall-mounted
Wall-mounted models are equipped with a special mounting console, which allows you to adjust the vertical position of the device and direct the hot air stream in the desired direction. There is nothing complicated in installing such fans; you just need to fix the console on the wall with anchor bolts and connect the water circuit to the device itself.
If you have minimal technical knowledge, you can do this yourself, without calling a specialist. Floor-standing options do not require fixing or fastening; a connection to the water supply is enough for them, so they can be installed in any part of the room and, if necessary, easily moved to another location. The price of wall-mounted and floor-standing models is practically the same and is determined mainly by power rather than by design features.
Some industrial models can be connected to both hot and cold circuits simultaneously. A water fan heater with two circuits can work both for heating and cooling a room or a separate part of it. The cold circuit is connected in the same way as the hot one, from the central water supply. The price of such models is slightly higher, but it is better to buy just such a device than separate heating and cooling systems for the room.
Heat insulation screen
The best option for increasing battery efficiency is to install a foil heat-insulating screen behind the radiator. It should be 5–10 cm larger than the battery perimeter. The screen can be white (aluminum color) or black. The first reflects thermal radiation towards the room, the second heats up itself and transfers heat to the room, plus it prevents the radiator from heating the wall.
Be sure to install the screen with a thermal insulation layer against the wall. The optimal fastening option is liquid nails. Cut the screen to size, apply drops of liquid nails to the back side and attach the reflector to the wall. The temperature increases by 2-4 degrees, depending on the number of sections and the coolant supply level.
Water heaters with fan
Asama Trade LLC supplies climate control equipment manufactured in accordance with modern energy efficiency requirements. We offer water heaters with a fan (water heat guns), which are designed to maintain the required temperature conditions in production, warehouse, agricultural and administrative premises, trading floors, offices and residential buildings. The peculiarity of water heaters with a fan is that they can quickly and evenly heat a large volume of air, including in buildings with high ceilings.
Show by: products
Add to cart In cart (open) Buy in one click Compare product Compare (open)
Type: Wall mounted room thermostat with fan speed controller
Temperature setting range: +10 to +30 °C
Operating temperature range of the device: from 0 to +40 °C
Speed adjustment: Yes, three-stage
Country of manufacture: Poland
Warranty period: 1 year
Add to cart In cart (open) Buy in one click Compare product Compare (open)
Heating power: 9.6 kW
Air exchange: 1200 m³/hour
Maximum jet length: 8.5 m
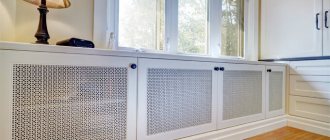
The nuances of choosing a grille
At the moment, there are many different types of convection grilles for window sills on sale.
Before choosing the appropriate option, buyers first of all measure the following 2 parameters: the length of the window sill and the length of the battery under it.
The best option is to buy a product the same length as the battery under the kitchen or room window. Moreover, on 1 window sill you can mount either one long convection grille or several shorter products.
Also, when purchasing a product, you should keep in mind the live cross-section of the grille - the total area of the ventilation holes. For most grilles, this indicator is 0.42-0.6, which allows you to quickly restore natural air circulation in the house.
You should not buy ventilation products with large holes. In this case, small crumbs may fall from the window sill onto the floor and radiator or dust may settle on them.
However, if you don’t put anything on the window sill itself, then you can safely buy a grille with a live cross-section of up to 0.9. This product allows more air to pass through and more effectively prevents the formation of condensation.
You can also buy a window sill with a built-in ventilation system. However, in this case, you must first adjust the length of the window sill board to the size of the heating radiator under the window - they must match.
Window sills that are too short with a built-in ventilation system do not completely eliminate fogging of windows, and such a purchase becomes useless.
Before buying a grill, you need to choose the right color. Ventilation brass or other products can blend in with the window sill or, conversely, stand out sharply.
Residents often like contrast more than a combination of shades that are similar in color, because in this case the ventilation does not spoil the interior, but fits organically into the decor.
Window sill grilles made of plastic are considered the most convenient, cheapest products that can be easily installed in a window sill. However, they quickly fade under the sun's rays.
As a result, aluminum products are considered the most practical. They do not fade in the sun and are inexpensive.
Blowing batteries with a fan
I’m making repairs, I’m going to sew up the radiators (by adding ventilation grilles), naturally, the heat transfer will worsen. To improve heat transfer, I plan to blow the batteries (if necessary) with built-in fans. Are there any prohibitions on this? After all, with effective airflow, I can take more than calculated according to the project. I pay for heat according to the norms, there is no separate meter, apartment 15.
You won’t get much more - the room is rated at 20*C - you won’t heat it up to 40.
20 doesn't always happen. I plan to tie the fans to a sensor and set the system to 22 degrees. There is also a sensor for the battery, so that it doesn’t thrash in vain when the heating is turned off. Although. What prevents it from being used as a fan in the summer, if necessary. Plus, of course, dust filters.
They will make noise. They will disturb sleep.
Plumbing work Moscow and region
3-4, depending on the length of computer batteries. I have tons of them. Plus reduced power supply, 9 volts, to reduce speed. In this case, a jet stream is not needed. We get a stream of warm air, something like a fan heater. Maybe it will add comfort? Then, the heat distribution throughout the room is more uniform. Electricity consumption for the battery is 20 watts, not much. It will not work all the time, but when the temperature in the room drops. The fans themselves have a large gap between the blades, which will ensure natural air convection when turned off. fans.
Place your bet with confidence. The PTE states that the return line can be lowered as much as desired. Thermal engineers will only thank you, especially if the heating is steam. When you write the story, please take pictures. I really want to take a look and maybe take it into service.
yes, but here you just shouldn’t forget that if the supply of coolant to the radiators at some point becomes lower than planned and the fans are running, then I think this will not add heat since the accumulative effect will be blown out ahead of time
you need to think about which radiators for this scheme it is more correct to use cast iron or aluminum, for example, the rate of heat transfer and cooling is different for them
I have not encountered any prohibitions regarding fans. They also produce convectors with fans.
2sansei I’ll put a sensor on the air temperature and on the temperature in the battery (a cheap option is some diodes in reverse connection), I’ll make a circuit so that the fans spin when the air temperature is below 22 degrees, plus the temperature in the battery is higher than the air temperature, for me it’s not difficult. My batteries are cast iron. About the air flow. I think it's better sideways, i.e. It's warm up there anyway.
2a-xel-1 I’ll definitely take photos, but the results may not arrive in time, it’s not known when it will become warm and the radiators will be turned off, but I have the ceilings first, then the casing of the radiators.
Yesterday I installed 4 fans on 2 brackets, on top of the batteries, connected them (however, I couldn’t find a powerful power supply, due to repairs somewhere in the boxes, which is weak, it dropped to 8V). I liked the effect, warm air comes out, something like a heater. True, all this is still purely for testing; after sewing, a full-fledged airflow will form. There is no sound at 8V. The power consumption of one fan is 1.5 W, four - 6 W. You can leave it on without any problems, without worrying about electricity bills, you don’t even have to worry about electronics, just a switch. If anyone wants to repeat this, work more carefully with 220V, after all, the battery is grounded, it is better to put the trans in a separate box, further from the battery, only 12V is connected to the battery. My 12V wiring will be done from the ceiling. I plan to mount the fans on top, directly on a narrow grille, through pads made of foamed polyethylene, so that together with the grille I can get a filter between the fans and the grille, for which I will use non-woven material (I don’t know what it’s called, it’s in stock), There is also a narrow grille with a filter on the bottom of the box. I will cover the wall behind the radiator with a heat insulator and foil, so why heat the street. It is better to use acrylic putty for the seams of the structure; it will not create dust on the back side of the plasterboard structure; treat the sections with a primer.
Photos in the studio. So, does the air flow go down?
Security requirements
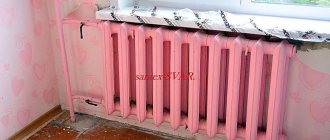
You should not buy a radiator with a ventilation system for less than 2 thousand rubles. Such a device is most likely of low quality. In addition, there are rules that must be followed when operating an oil heater:
- Avoid contact of the power cord with the hot body of the device. High temperatures can melt the insulation.
- It is better to refuse the extension cord, since it will not withstand a large load.
- Do not install an oil radiator in rooms with high humidity, such as a bathroom.
- Horizontal and inclined position of the device is not allowed.
- The switched-on device must be kept at some distance from objects and furniture.
- You cannot store an oil-type heater in a cold room - in a garage or on a balcony, as the heating system will fail.
It is also necessary to remember that you need to disconnect the heater from the power supply only using a special handle. It is strictly prohibited to unplug the cord from the outlet!
Acceleration of the heating battery
Off-season. It's cold outside. Utility workers, fagots, waste heating. The batteries heat up at half power. Dubak at home. The bald cat is freezing and suffering. How long?! Do you think I ran for an electric heater? Hell yeah! Our method is to accelerate the heating battery.
So, according to the standards, each room must have a certain number of heating radiator sections. The quantity depends on the footage. The average power of one section of a cast iron or aluminum radiator is about 200W. But this is passive heat transfer, and heat can be forcibly removed! This is what we'll do
▌Loot the loot!
If the battery is warm at the output, it means there is somewhere to grab more energy. There is potential for overclocking! And good overclocking is unthinkable without good cooling! Therefore, we move behind the coolers.
I decided not to worry and bought the cheapest coolers. 40 rubles each. Regularx 80x80x25. They are exactly the width of the radiator section. I took a dozen at once:
Then I connected them with zip ties into a powerful battery:
To connect I used plastic ties:
It's fast, simple and reliable. If you tighten it well, it will be like cast.
Then we connect all the propellers in parallel. If there is a yellow wire, bite it off and throw it away. This is a speed sensor, we don't need it. And we connect all the red ones together with the red ones. Black with black.
All that remains is to hook up the connector:
If there is no connector, then it doesn’t matter. You can stupidly twist the wires with the power supply.
And take the power supply from the router. You can take absolutely any block. If only it gave a current of 1A and the output voltage was constant, i.e. DC. The voltage itself can be from 5 to 15 volts. The higher the voltage, the more efficient, but the noisier. At 15 volts, the battery turns into a powerful fan heater, pumping the room in a matter of minutes.
I took it to 5 volts. It was simply at hand. With it, the coolers rotate barely, they are almost inaudible, but the battery is enough for this.
I used plastic ties to put everything on the battery
Connected the power... Let's go!
Yes, they need to be hung in such a way as to ventilate the radiator as efficiently as possible. My radiator has parallel fins inside. Air moves along them from bottom to top by convection. That’s why I installed the fans so that they accelerate this convection, blowing from bottom to top.
A cast iron battery may have a different optimal location. For example, blow from the side or front. In general, look and decide for yourself. The ideal option would be to completely cool the battery to room temperature.
And, of course, you can not fence the battery with coolers, but take a regular household fan and direct it to the radiator. The effect will be no worse.
This battery also has a nice bonus. If you are not the last participant in the heat chain, then your vile neighbors who listen to music loudly or stomp over your head will freeze the hell out along with the cockroaches!
The same method can be used to increase the power of electric radiators. Of course, they will not consume less electricity - the law of conservation of energy is unshakable. With forced pumping they will simply stop turning off. But there is also a plus in this, firstly, the radiator will not be so hot, it will be more difficult to get burned. And secondly, the load on the power grid will be much lower, the machines will not be knocked out in vain. After all, a constantly working 800W radiator is much less hardcore for wiring than a 3KW monster clicking back and forth like an iron. And in terms of output power they will be approximately equal.
Z.Y.
This creative was born when the CS complained to me on ICQ that his ass was freezing. So he was sent for coolers and after a small upgrade of the radiator, Africa finally arrived in his apartment. Here are his photos.
This is such bullshit, kids. Cold batteries and a warm apartment for you
How to embed a grille into a window sill: instructions
Installing a plastic grille into a plastic or chipboard window sill is quite simple and anyone who knows how to work with a grinder and a jigsaw can handle this process. In this case, the scope of work will be approximately as follows:
Make markings on the window sill - circle the bottom of the grille with a pencil. To make the lines even, correct them using a regular school ruler. Using a grinder or jigsaw, make cuts along the marked lines. Remove the cut out portion of the window sill. Use sandpaper to sand the cut areas, removing sharp burrs.
Carry out the work carefully, without scratching the window sill board itself. Insert the grille into the slots so that the blinds “open” towards the window frame and warm air is directed onto the glass. The grille can be glued with polymer glue. But, in order not to complicate its care, it is recommended not to strengthen it in this way.
Such installation is not mandatory and therefore its implementation depends on the preferences of the customer. Before final installation of the ventilation grille, collect dust from cutting holes with a vacuum cleaner.
You can install a ventilation grille in a window sill made of plastic or wood with your own hands. Stone, concrete and other window sills are best left to qualified specialists.
We make a convector from an ordinary battery
Water heating radiators, or simply batteries, used in centralized heating systems, distribute heat throughout the rooms using the principle of passive convection. This approach is very irrational in terms of heat loss, especially if the radiator is located in the corner of the room.
For this reason, there are convection radiators equipped with a fan that improve heat distribution throughout the room by accelerating air circulation between the battery sections.
In this master class I will show you how to upgrade a regular battery to a convector battery with your own hands.
Step 1: Fan Assembly
I took 4 fans Brushless DC Cooling Fan 7 Blade 24V 120mmx120mx25mm
.
This type of fan is very quiet and was a good size for my battery. A combination of 4 of these fans is enough to cover the entire length of my pipe.
Fan characteristics: - 7 plastic blades - speed 1600 rotations per minute - air flow 58 cubic meters. ft/min.—noise 38 dB.—power: DC 24V, 0.20A
These fans cost me 1,200 rubles including delivery. Structural strength is provided by cable ties that pass through holes in the corner of each fan and connect them together.
Step 2: Connecting the Wires
The fans use standard 2-pin connectors, just like motherboards. They hold copper cables well. You can also combine 2 connectors with a small piece of cable by inserting one into the back of the other.
This will help reduce the number of cables connecting the fans to the power supply. The power supply is connected by a 2-wire AC cable on one side and DC cables from the fans on the other.
The photo does not show the switch and the standard plug at the end of the AC cable. I took the power supply like this - 24V Universal Regulated Switching 25W Power Supply
.
Step 3: Check the fans are working
I connected the fans and checked their operation before installing them under the battery.
Step 4: Legs and other finishing touches
I equipped my fans with 4 legs from angle iron cut into 15cm lengths. Then I simply placed the section under the battery. As a result, I got excellent heat distribution throughout the room, with the help of almost silent fans consuming a total of 24 W:
— fans: 4*0.2A*24V=19.2 W—power consumption: 80% of the total supply—total power: 19.2/80%=24W
This is how I pumped my standard hot water radiator up to the convection radiator.
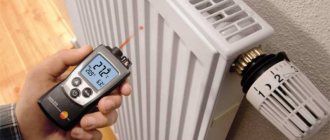
Temperature sensor.
To determine the effectiveness of one or another method of blowing the battery, it was decided to measure the difference in coolant temperatures before and after the central heating battery.
In fact, I started by measuring the battery temperature at different points, but I was unable to process the data obtained.
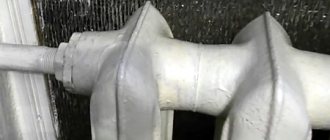
For this purpose, two identical temperature sensors were manufactured based on KMT-17 semiconductor thermistors.
And this is how the sensors were attached to the steam heating pipes. To improve contact with the pipe, the thermistor was lubricated with heat-conducting paste KPT-8.
To reduce the measurement error introduced by air flows, the sensors had to be additionally insulated with foam tape.
Thermaltake NiC C5 CLP0608
As we already mentioned in the introduction of today’s article, Thermaltake has released four coolers of the new NiC line. Model C5 (CLP0608) is the oldest and most expensive of them. The NiC (Non-interference Cooler) series of coolers is designed specifically for systems with memory modules equipped with high radiators, which have recently become very popular.
The box, made of thick cardboard, is no less informative than that of Phanteks. Here are technical specifications, a description of key features with photographs, and a list of supported platforms.
Inside the cardboard box there are soft polyurethane inserts in the shape of the cooler, in which it is fixed. Accessories are sealed in a separate box. These include steel guides and a set of fasteners, a plastic reinforcing plate, as well as instructions and thermal paste.
The Thermaltake NiC C5 costs $5 more than the Phanteks, which is $55. The cooling system comes with a three-year warranty. Country of origin: China.
Thermaltake NiC C5 is a bright and catchy mid-sized cooler. The red fan frames contrast with the black impellers and black plastic “shells” that cover the radiator.
You simply can’t help but pay attention to such a cooler. Its height is 160 mm, width is 148 mm, and thickness is only 93 mm, which is really not much for a cooler with two fans.
The fans are set to blow-in and blow-out and are secured in plastic shells that leave the sides of the radiator open...
...as well as its top and bottom in the heat pipe areas.
The radiator itself is made of 52 aluminum plates 0.4 mm thick, pressed onto heat pipes with an interfin distance of 1.7 mm.
The area of this radiator is slightly larger than that of the Phanteks PH-TC12DX - it is 5780 cm2.
Five six-millimeter nickel-plated heat pipes are soldered to the base in grooves in which they are laid without gaps.
The nickel-plated copper plate measures 40x40 mm and has a minimum thickness of 1.5 mm (under the tubes) and is perfectly polished.
However, unlike the Phanteks base, its evenness leaves much to be desired. The bulge in the center of the base did not fail to affect the usefulness of the contact between the cooler radiator and the processor heat spreader.
Two fans of standard size 120x120x25 mm rotate synchronously and are equipped with a speed controller.
It is installed on a short cable extending from the three-pin connector for connecting fans to the motherboard.
In our opinion, this method of adjustment is inconvenient, since to change the fan speed you will have to open the system unit case each time. As for the fans themselves, they are interesting in the shape of the blades, consisting of two sail-shaped halves.
The description of Thermaltake NiC C5 does not explain this solution in any way, which is strange, because marketers are so fond of such “features”. In our opinion, these blades are made to increase the pressure of the air flow pumped between the fins of the radiator, because the NiC C5 has a relatively dense air flow.
The fan speed can be adjusted from 1000 to 2000 rpm. Maximum airflow is stated at 99.1 CFM, static pressure is 2.99 mm H2O, and noise levels should range from 20 to 39.9 dBA.
The 40mm stator sticker shows the name of the fan model and its electrical characteristics.
With 3.8 W stated in the specifications for each “turntable,” one fan consumed a little more than 4 W, which is twice as much as Phanteks. But the starting voltage turned out to be slightly lower - 3.8 V. Cable length - 300 mm. The bearing is ordinary - sliding, with a standard service life of 40,000 hours, or more than 4.6 years of continuous operation.
The installation procedure for NiC C5 is described in detail in the instructions, but in our case - for a platform with an LGA2011 connector - it is no different from installing the Phanteks PH-TC12DX.
Once installed on the board, the distance to the bottom edge of Thermaltake NiC C5 is only 36 mm.
However, as we mentioned above, it is narrower than most other dual-fan coolers, so it is unlikely to interfere with the installation of RAM modules with tall heatsinks.
Thermaltake is only 3 mm taller than Phanteks, so it will most likely fit into narrow system unit cases without any problems.
Well, in our opinion, it looks more attractive. However, it depends on the taste and color, as they say...