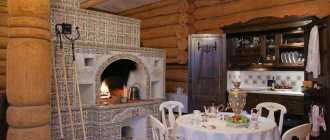
The advantages of the Russian stove can be listed for a long time: it warms, feeds, and provides a warm bed for sleeping. But in a small house there is not always enough space to accommodate a bulky structure. Master stove makers came up with a smaller copy - a mini Russian stove built with their own hands is not inferior in function to a full-fledged design.
For those wishing to try their hand at the stove business, we suggest considering one of the options for constructing a mini-stove with procedures and a description of the technologies. If you enlist the help of an experienced craftsman, you can independently build a beautiful, efficient, useful heating unit that will last for decades.
Features of a mini Russian stove
The mini Russian stove is really small in size, the dimensions of such a standard model are no more than 1x1.3 m, and therefore there is a place for it even in a one-room building with a small area. This device does not have a bench, but it has two fireboxes:
- the first - a large firebox is located closer to the front wall. It is used for heating in the autumn-winter period and for baking various dishes;
- the second is small, located behind the first, closer to the back. It is used for cooking during warm weather seasons. In this case, less fuel is consumed, and cleaning and maintenance of the device is easier.
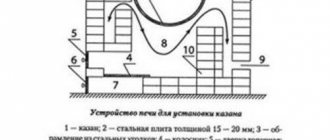
Combustion chambers are needed not only for cooking various dishes, but also for heating the room. During the heating season, only one of them can work or both chambers can work simultaneously. Fuel can be added directly through the cooking section.
Such a stove also has its own peculiarity: internal channels, which are designed to supply hot gas to the fuel chambers and remove carbon monoxide to the street. During the combustion of the furnace, all flue gases flow from the larger firebox into the 1st compartment of the heating chamber.
Then they pass through the 2nd compartment and, bypassing the underside, move to the back wall of the cooking section, burn there and at the same time heat the stove. The smoke formed during this process, through four passages located at the top of the cooking section, enters the collection channel, and from it into the chimney.
A small firebox does not have special channels for removing smoke; gaseous substances from it pass into the main combustion chamber, and only then go outside.
The small Russian stove also includes a ventilation duct, which is closed as necessary using a valve.
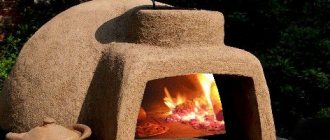
An example of a small Russian stove
Correct operation
To use the device correctly and safely, the following rules must be observed:
- Carefully monitor the condition of the chimney and clean it from ash in a timely manner.
- Before each kindling, check the quality of the draft - this will help prevent smoke from entering the room.
- If the stove has not been used for a long time, a thorough inspection is carried out for damage and cracks.
- You should not light a stove while intoxicated or very tired; it is not recommended to leave small children alone near a burning stove.
Precise construction and compliance with all operating rules will ensure high-quality operation of the stove, efficient heating of the house, and the preparation of delicious traditional dishes.
Materials and their quantity
To build a small Russian stove with your own hands, you need the following building materials and stove fittings:
| No. | Name of materials | Unit measurements | Quantity |
| 1 | Red fire brick | Thousand PC. | 0,75 |
| 2 | Oily clay | kg | 150 |
| 3 | Washed river sand | kg | 300 |
| 4 | Grate bars | PC. | 2 |
| 5 | Gate valve | PC. | 2 |
| 6 | Firebox door | PC. | 2 |
| 7 | Blower door | PC. | 2 |
| 8 | Door for cleaning hatch | PC. | 3 |
| 9 | Hob | PC. | 1 |
| 10 | Asbestos cord | m | 16 |
| 11 | Wire | m | 6 |
The nuances of drying a lined stove
The laid oven should dry well.
There are several nuances:
- drying is necessary even before the construction of the chimney;
- You cannot fully heat the stove right away - there is a risk of loss of tightness and the appearance of streaks;
- drying should be natural for at least 10 days, with doors and valves open;
- The first times you need to heat it carefully - use little wood, open the smoke valves and close the fireboxes;
- For 1-1.5 weeks, the stove is heated every day, starting with 3-4 kg of firewood and increasing their amount daily by 1-1.5 kg;
- a full-fledged firebox is permitted when, after 2 hours from the start of the firebox, there is no condensation at all on the metal elements.
List of tools
To make work easier when laying a Russian stove with your own hands, you need to prepare working and measuring tools in advance. The working tool set should consist of:
- bayonet shovel;
- containers for preparing masonry mixture. It should be wide enough and have low sides;
- a shovel and two metal sieves with mesh sizes of 2x2 and 1x1 mm. This tool is used to sow clay and sand;
- trowel - a special trowel, which is used to take the mortar and distribute it among the masonry elements, and also remove excess mixture that protrudes beyond the seam;
- hammer - pickaxe. They can be used to divide a whole brick into several parts and trim the resulting surfaces;
- jointing, which helps to seal masonry joints and give them the desired shape;
- scraping - a rubber plate with a handle. It cleans the internal surfaces of the masonry from excess mixture and seals the seams in hard-to-reach places;
- saws - grinders. It can be cut more accurately and bricks can be adjusted for laying curved structural elements;
- rules - for leveling the upper plane of the foundation.
Control of vertical and horizontal masonry joints and geometric parameters of the entire furnace structure is carried out using:
- bubble level;
- plumb line;
- square;
- roulettes.
Construction techniques
Opeche
The wooden guard supports a stove weighing up to 1600 pounds (approximately 750 kg), i.e. small or medium without baking. It is made in the form of a log house with two belts, backfilled with rubble and a flooring made of beams. The flooring is covered with felt, properly soaked in a liquid solution of fatty clay, and roofing iron is applied over it.
Arches and vaults
Arches and vaults are laid out from an ODD number of bricks on formwork on wooden templates - circles. First, a life-size cross-sectional drawing of the arch is made, then the castle bricks are hemmed onto the wedge. A do-it-yourselfer need not try to lay out a vault with a direct lock or without a lock; not every experienced mason can do this.
Next, the circles are prepared taking into account the thickness of the formwork boards and the vault is laid on them without a lock. Then you need to thickly lubricate the grooves of the locks with the solution and insert the locks into the groove. The next stage is to gradually hammer the locks into place one by one and in several passes. You can't get by with a mallet; you have to use a log. But you can’t beat like crazy; you need to use the inertia of a heavy log, and not the force of a sharp blow.
The quality of the vault closure is controlled by squeezing out the mortar sausages from the seams: it should be more or less uniform over the entire surface. The thick solution flows slowly, so you need to take breaks between passes. The result is a prestressed structure; Only such a vault will last for many decades.
Material consumption
The classic Russian stove described above, depending on the size, requires approximately the following amount of materials:
- Small - 1500 bricks and 0.8 cubic meters. m of solution.
- Average - 2100 bricks and 1.1 cubic meters. m of solution.
- Large - 2500 bricks and 1.35 cubic meters. m of solution.
Possible difficulties
When building it yourself and lacking experience, it’s easy to make some mistakes:
- Use of low-quality materials - cheap bricks often have defects or crack when heated to high temperatures.
- If you do not soak the brick before construction, it will draw moisture from the mortar, which will lead to uneven drying and deterioration of the strength and tightness of the masonry.
- The seams between the bricks are filled unevenly and not tightly enough - this later leads to a violation of the seal.
To avoid these and other mistakes, before starting work, it is better to seek advice from an experienced specialist.
Preparation of the solution
When mixing masonry mortar, clay with a low sand content is used - fatty clay and sand in a ratio of 1 (g) : 2 (p). The clay is first soaked in water for a day, then rubbed through a sieve in order to remove foreign inclusions from it. The sand must be dry and must also be sifted. Water must be added to the mixture in such an amount that the finished solution has the consistency of thick sour cream.
However, the purchased clay may differ slightly in fat content. Therefore, it is better to first carry out a test batch in a small portion in three versions and make flat cakes from these compositions. Which of the samples will have fewer cracks after three days, that version of the proportions of the components should be taken as the basis for the production of the entire volume of the masonry mixture.
Swede with a bed: order
Even a non-professional with minimal skills and experience in this field can assemble such a Swedish stove with a stove bed with his own hands:
- First of all, we will need to build a separate foundation, since the structure has a large mass, despite its average dimensions;
- Next, we begin to lay out the part in which the firebox is located;
- The hob is laid on 11-12 rows;
- Row 18 is reinforced with metal corners.
You can familiarize yourself with this order in more detail in the presented photos, as well as using these explanations:
- Main sliding smoke channel;
- Sliding mechanism used in the summer;
- Fireproof ceiling divider;
- Cast iron cooking surface;
- Grate;
- Door for the combustion chamber;
- Blower flap;
- Cleaning door;
- Corners and strips made of steel;
- Cooking compartment;
- Pechurki;
- Chamber blind compartment;
- Bell mechanism;
- Winter chimney horizontal system;
- Vertical chimney system for the hob;
- Ventilation compartment;
- An inlet into which heated gases rush (used in winter mode);
- The place where gases enter the chimney system;
- Entry type hole;
- Bypass;
- Temperature type gaps.
Calculation and production of the foundation
Even a small Russian stove needs a solid foundation. Simply reinforcing the floor will not be enough; you need to build a structure from small reinforced concrete blocks, stone, or pour a reinforced concrete slab. It must be separated from the foundation of the house. To determine the depth of the support, it is necessary to assess the type of soil, its level of freezing and the height of soil water.
Expert opinion
Nikolay Davydov
Stove maker with 15 years of experience
For example, in the Moscow region, the soil freezes to about 1.4 meters in winter. This means that the foundation for the furnace must be no less deep. The width and length must exceed the dimensions of the base of the stove body by at least 15 - 20 cm.
Thus, for a small Russian stove of this model, the dimensions of the foundation will be as follows:
- width - 130 cm;
- length - 150 cm;
- height - 160 cm.
Accordingly, to construct a monolithic slab, 3.0 m3 of concrete will be required. You can buy it at a factory with BRU or make it yourself by purchasing for these purposes:
- cement M400 - 0.97 t;
- sand - 1.6 m³;
- crushed stone - 3.2 m³.
The work itself is carried out in the following sequence:
- dig a pit with a depth of 1.75 - 1.8 m;
- compact the bottom and pour a 15 cm layer of crushed stone;
- install formwork from unedged boards with the laying of waterproofing material along its internal surfaces;
- install a reinforced frame from two rows of metal mesh with a cell size of 15x15 mm, which are connected to each other by vertical sections of reinforcement;
- pour the concrete mixture into the formwork with layer-by-layer compaction using the tamping or bayonet method to remove air bubbles;
- level the upper plane of the structure.
The formwork can be dismantled after about a week, and further waterproofing work is carried out after 25 - 28 days, when the concrete has gained full strength.
Do it yourself or order work
Does it make sense to take on such complex work yourself? How much does the work of an experienced and reliable stove-maker cost? If 100% of the cost of materials, as is customary in general construction work, then it is not that expensive.
By no means, not twice as much against the material. You can come across offers to build a stove for 20,000 rubles, but this is obvious nonsense. Let's try to figure it out ourselves.
Russian stove with stove
A stove maker works in mid-latitudes for six months, and always with an apprentice. Considering their employment at 100% of working time, the salary of a master at 25,000 rubles, and an assistant at 15,000, and the work completion time is 7 working days (this is a completely realistic period), we find that a simple stove will cost no less than 45,000 rubles, and a Russian stove with a stove and water heater (see figure) at 55,000-60,000 rubles.
But in a week it will be possible to heat it. There is only one condition: the master must tell where, when and to whom he has already installed the stoves, and they must be inspected personally. Good masters always stock up on recommendations, and if they hesitate and mumble, it’s better to turn to someone else.
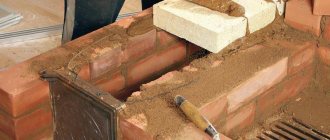
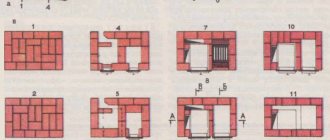
Laying order of rows
Before laying, the brick is placed in water for 2-3 seconds. Then a solution is applied to its surface and tightly seated in the intended place in the design of the Russian mini-stove, according to the order developed at the project stage.
Order of a small Russian stove:
Rows 1-9
Rows 9-16
Rows 17-24
Rows 25-33
After the waterproofing of the foundation has been completed, a layer of sand 1 cm thick is poured onto the top layer of roofing felt, and then, according to the procedure for a Russian mini-stove:
- lay the 1st row of bricks dry, without using mortar;
- from 2nd to 5th - lay the ash pans of both fireboxes and install their doors;
- 6th - install grates for two fireboxes;
- 7th and 8th - install firebox doors. The masonry of the main combustion chamber expands towards the partition;
- 10th - erect under and form a channel 8 cm wide near the rear wall of the body along the cooking section;
- 11th - continue laying the hearth, closing the doors of both fuel chambers;
- 12th - lay a cast iron slab;
- 13th and 14th - continue laying according to the order;
- 15th - form the cooking section, install connections from a steel strip between its side walls;
- 16th and 17th - continue to form the cooking section;
- 18th – the pole is covered, four passages measuring 70x120 mm are left in the front part of the arch;
- 19th - a collection channel is formed, the opening of the overpipe is narrowed;
- 21st - lay the foundation of the ventilation duct;
- from 22 to 24 - reduce the cross-section of the collection duct, increase the size of the ventilation duct and install a valve on it;
- from 25th to 27th - change the shape of the chimney, install a damper on it;
- 28th and 29th - connecting two vertical channels into one horizontal passage with an L-shape, covering this channel with strip steel;
- 30th - corresponds to the drawing;
- in the 31st and 32nd - they lay out the roof;
- in the 33rd - a chimney is installed.
The chimney of a Russian mini stove is made of solid bricks on a mixed type of masonry mixture, which includes cement, clay and sand. All its internal surfaces should be smooth, and there should be no voids at the seams. This will reduce the amount of soot and resins accumulating on its walls from the inside. The masonry itself is made in one brick with a seam thickness of no more than 10-12 mm.
This is what the oven will look like (roughly, minor changes in order):
Front view
Back view
Left view
Right view
Drying
Before use, a new Russian mini-brick stove must be heated in the drying mode, that is, with a small amount of firewood. During this time, the water that got inside the walls during the laying of the structure should evaporate. When burning in the drying mode, the doors of the combustion chambers and the damper on the chimney must be open. The result of high-quality drying will be the absence of damp spots on the masonry and condensation on the smoke channel valve.
Choosing an order
A stove with a stove bench is, first of all, a correctly chosen scheme and order. It depends on it how effective, useful and safe such a heating device will be installed in the house.
A large, spacious lounger warms up well and transfers some of the heat into the room
A large open hearth partially performs the heating function and is intended for cooking
It’s interesting to know: such a brick structure, powered by wood, can have either small dimensions, a bench and combustion chamber, or a more complex structure. The second type involves building a stove with your own hands, additionally equipped with an oven and hob.
Stoves with a stove bench and a hob can also be used for comfortable rest, drying berries, mushrooms, clothes, and shoes.
In addition, brick stoves with a stove bench provide more efficient, uniform heating of rooms. The best heating units are those based on combustion chambers equipped with a long-burning function. Also, long-burning fireboxes belong to the category of the most efficient and economical in terms of consumption of firewood and other types of solid fuel.
Option for beginner stove makers: a stove with a cast iron firebox
A mini-brick oven can be built with your own hands based on a ready-made cast-iron firebox. Cast iron fireboxes are durable - they do not crack or burn out. This option is more suitable for beginners, since the design already includes all the basic elements. The combined stove heats up quickly and cools down for a long time, thereby significantly increasing the efficiency of the fireplace. If desired, you can choose a fireplace-type hearth with a fireproof glass door - this model will not only heat, but also decorate the room.
How to fold a stove with your own hands: step-by-step instructions (video)
A Russian stove in a country house is a stylish and efficient design that allows you to simultaneously heat a fairly large room and cook food in several modes. You can lay out a brick oven for free – with your own hands. To do this, you need to approach the work responsibly: calculate the dimensions of the furnace, draw a drawing and draw up the order of the structure. When carrying out masonry, you should take into account the recommendations of experienced stove makers. And then you will be able to make a reliable and durable new structure and replace the old stove!