A little about heat engineering and radiator grilles
Even if radiator grilles are needed for decoration, do not forget that radiators are needed to heat the room. Any screen reduces heat transfer, even the most delicate and thin. Another question is that one will reduce the amount of heat transferred by 10-15%, and the other by 60% or even more. You probably don't want to sit in a nice but cold room, so when choosing a decorative grill, you should also consider how the heat will spread.
Heat Spread
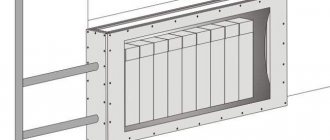
The principle of heat transfer from a grilleless radiator is shown in the figure. The main idea is that air should flow from below, pass through the battery, heat up, and rise. This is how our heating works. Keep this in mind when choosing a grid or screen. For normal air circulation, there should be a gap at the bottom, and there should be no lid at the top. As a last resort, the lid should have a large perforation area.
Not a bad option: large holes allow air to move freely
But if you look at many decorative nets, you can immediately tell that the room will be cold. This is especially true for box-shaped radiator heating grilles, which have walls on all sides. If they're very delicate, like the photo above, there aren't as many problems, but if they're solid wood (like the photo below), with little to no drilling or minimal holes, be prepared for ineffective heating.
The top of the battery is covered with a durable layer of wood without holes
Wood, of course, is an aesthetic material, but it has a high heat capacity. Until the wood heats up, the room will be cold. And since the array is located above the radiator and there are no holes for circulation, the radiator under such a grille will be warm, but the room will be cold.
Interesting design options for battery screens: photo ideas
In addition to the technical side of the issue, the aesthetic side is no less important. There are grille and screen options that are more of a design element rather than a technical detail. Some of them are in the photo.
The decorative panel that covers the radiator itself looks like the work of an avant-garde sculptor. It looks like a chest from a fairy tale. This is made using laser cutting. The openwork always looks attractive.
Option for designing grilles for heating radiators in a modern style Making lighting is an original idea
Repeat the pattern on the wallpaper - a stylish solution Make not just an added box, but a functional thing
Glass screens can have any design, be it a landscape, an ornament, even your personal photo
A stylish version of a metal screen for rooms in minimalist and high-tech styles
Tasks and materials
Most often, grilles on heating radiators are installed for decoration: not all heating devices look attractive, but grilles are sometimes very beautiful. The second job that battery shields often perform is to cover sharp and hard edges. This is relevant in families with children, especially if old cast iron accordion-type radiators are installed. Their shape is thermally dangerous and their appearance is unattractive; they are appropriate only in loft-style rooms.
Grilles for heating radiators are made from different materials:
- Metal battery panels are produced in large quantities. They are made of thin steel sheet, which is then coated with paint. For the most part, they are inexpensive, but they also look mediocre. The duration of the operation depends on the quality of the paint. Powder glazes are preferred. They last longer and remain attractive for decades. From the point of view of the effect on heating, metal screens for heating radiators are the best choice. The metal heats up quickly and then begins to radiate heat. So the option is cheap (usually) and does not greatly affect the ambient temperature (if there is perforation).
The most common shape and design can be anything - Forged grilles are very beautiful. But the forging is too thin, so some kind of background is needed, and it is often done in contrast to highlight the brighter forged elements. To ensure normal air circulation, it makes sense to create a “backdrop” from a perforated sheet. The forging is very beautiful
- Wooden gratings and screens. Wood has always been and remains a premium material. The high plasticity of the material allows it to be produced in various styles and shapes. And although there are inexpensive wood products, they look great. But, as mentioned above, a radiator covered on all sides with wood transfers little heat into the room.
The tree always looks solid - MDF and HDF. Laminated sheet materials are used for production. It must be said that binders are not used in the production of MDF and HDF. The softened wood fibers are pressed, which releases lignin, a natural binder found in wood. Lignin and adhesive fibers. So both of these materials are completely safe. If we are more or less familiar with products made from MDF, then HDF is an unknown material for many. It differs from MDF only in the pressing. It is molded at higher pressure, resulting in a very thin (3-4 mm) but more dense and uniform material. HDF holds its shape well, because perforated grilles for heating radiators are often made from HDF. From the point of view of their effect on heating, they are slightly better than wooden ones: the layer is thinner, the perforation is usually larger.
Decorative perforated grids for batteries are usually made of MDF and HDF - Plastic. Plastic products are most often used in bathrooms and toilets. This material is the most hygienic; it can be washed an unlimited number of times. For production, heat-resistant plastic is used, which is not afraid of heating up to 60-80 ° C. If the grill slats are installed at an angle, as in the photo, the heating will work efficiently. Air flows freely through the cracks. It all depends on how the coating is made. Plastic washes well, is durable and unpretentious
- Glass screens for heating radiators appeared several years ago. They are not ideal in terms of heating, but they look attractive. They are made from special tempered glass, opaque or with a printed pattern.
Glass radiator shield
Used in the manufacture of decorative grilles for heating radiators and from more exotic materials. For example, bamboo and rattan. Such products are more demanding on the interior and are rare.
Rattan screen on wooden frame
There are also combo grids. Most often there is a wooden frame on which some kind of decorative mesh is stretched. Bamboo and rattan braids are often attached to such a frame. MDF and HDF panels are usually mounted on a wooden frame.
Types and forms
In addition to different materials, radiator grilles come in different designs. All this together creates a huge number of options.
- Flat screens. Most often used if the radiator is installed in a niche. In this case, the flat panel is attached to bars fixed around the perimeter of the niche. In addition, glass screens for batteries also have this shape, but are attached to special pins embedded in the wall. This type of decorative grille for heating radiators is also called “facades”. Flat screens are installed if the radiator is hidden in a niche
- Hanging screens. There are two types: With a top cover. They are usually used on accordion-type batteries if the radiator protrudes beyond the window sill. The shape of the cover is made so that the grille holds onto the radiator without any problems.
- Without cover. Clings to the upper battery collector using hooks that are attached to the front panel. Hanging grilles
These are only the main types of screens and grilles covering heating radiators. Fantasy is limitless, there are very interesting models, but they are most often made by craftsmen with their own hands.
Homemade screen - an original idea
Price often plays an important role when choosing a screen for a radiator. The range of prices in this segment is more than significant - from 230 rubles for a metal hinged screen, to 8,000 rubles for a glass one. Some prices are shown in the table.
| Radiator grille material | View of the grille on the heating radiator | Dimensions (height*width*depth) | Price | Color |
| Sheet metal, thickness 0.7-0.8 mm | Hinged screen for a cast iron battery | 27 cm * 29 cm * 15 cm | 230 rub. | White |
| Sheet metal, thickness 0.7-0.8 mm | Hinged screen for steel radiator | 44 cm * 39 cm * 15 cm | 250 rub. | White |
| Sheet metal, thickness 0.7-0.8 mm | Hinged screen for a cast iron battery | 61 cm * 49 cm * 15 cm | 280 rub. | White |
| Sheet metal, thickness 0.7-0.8 mm | Hinged screen for steel radiator | 53 cm * 49 cm * 10 cm | 350 rub. | Beige |
| MDF | Facade (flat screen) | from 1500 rub | 7 shades of lamination | |
| MDF | Box | from 2300 rub | 7 shades of lamination | |
| Glass | Screen | from 8000 rub | matte, no pattern | |
| Powder coated metal | Wall mounted with one side | 60 cm * 40 cm * 15 cm | 1790 RUR | colors upon request |
| Powder coated metal | Wall mounted with one side | 70 cm * 60 cm * 15 cm | 2050 rub. | colors upon request |
| Powder coated metal | Wall mounted with two walls | 60 cm * 40 cm * 15 cm | 2340 rub. | colors upon request |
| Powder coated metal | Wall mounted with two walls | 70 cm * 60 cm * 15 cm | 2600 rub. | colors upon request |
| Natural wood | Pristavnoy | from 6200 rub |
Design
Screen design is an important factor. But in order for the chosen option not to reduce the functions of the radiator battery, it is necessary to take into account some conditions:
- the base at the front should conduct heat well;
- infrared rays should not remain in a confined space, but should effectively penetrate the room;
- the internal surface of the structure should be dark, since heat absorption and heat removal will be better in this case;
- the color of the outside does not affect the quality of heat transfer - you can choose the most suitable shade in the interior of the room;
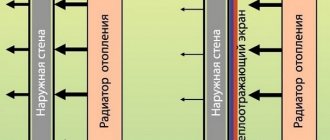
- A special screen with film will facilitate the high-quality redirection of heat inside.
This accessory has foam insulation. This element eliminates heating of the external wall at the radiator mounting points. Without heat redirection, heat transfer is significantly reduced in some designs. It is recommended to place heat-reflective pads on the wall itself behind the battery. Decorative grilles are installed in front of the battery.
From an efficiency and design standpoint, a solid panel with small vents at the bottom and top is a bad option.
The small openings of such a hinged lid will restrict the flow of convection currents. If this protection option is installed, heat losses will increase, which means the cost of heating the medium for heating the room will increase.
An accordion-type protective frame would be acceptable, but also not a very effective option. Despite the fact that it is made with wide slats, it is closed at the top and sides with large shelves. There will be good heat dissipation only on one side - direct infrared rays will not help block the cold coming from the window.
From a design point of view, the model looks aesthetically pleasing if it is made of wood. The top of the shelf is convenient for placing indoor flowers. But the option with a grill is no better due to the poorly organized flow of hot air.
The optimal radiator is one that simultaneously directs heat upward and dissipates it into holes around the edges. As a result, the cold from the window will be blocked, and the flows passing through straight slits will heat the room.
Sometimes radiator grille options are complemented by a visor. It is convenient when the radiator is located under the window sill. A thin strip of steel or MDF option will prevent heat buildup and redirect it inside.
Another impressive improvement is the thermal injection device. This helps redirect the heat accumulated between the installed furniture and the appliance. The effect of the device is especially noticeable when the devices are operating in winter mode.
The ideal element grid includes the following improvements:
- foil thermal insulation fixed from the inside;
- special visor on top;
- special devices are installed on the sides;
- carved grilles with large perforations in the form of a front panel.
The structural properties of screens and grilles are related to their design characteristics.
There are several types:
- Box. Used when it is necessary to close pipes as well as the radiator.
- Hinged screen with top visor. Perfectly camouflages a battery that does not have a window sill, if the radiators are not recessed in a niche.
- a folding open screen is required for radiators installed in a wall or placed under a window.
- Flat grilles are needed for radiators that are located inside niches or simply mounted on the wall.
Tips and tricks
Properly installed foil material behind the radiator will definitely increase heat transfer. To decorate the device in a children's room or bedroom, it is better to use lattices made of natural bases. For example, it is worth considering wooden or MDF options. A good solution would be to make your own structure from old furniture.
It is important to understand that the main types of batteries emit two types of heat:
- radiant;
- convective.
The first option refers to the type of direct infrared rays. Low-temperature media produce zero levels of this energy. However, when the battery temperature is above 60 degrees, the value of radiant energy cannot be discounted - it is this part of the heat that is lost when installing radiator grilles.
Screen grilles also degrade the converter component. However, the right choice of decor option can reduce losses to zero.
An alternative way to decorate batteries looks great - decorating with paints: you can apply a design to the radiators using oil watercolors. To create the image of a 3D part, patterns are applied not only to the radiator itself, but also to the wall.
As a result of creating such a work of art, the front part of the radiator battery (for example, cast iron) and the vertical parts conventionally represent one plane.
The selected version of the radiator grille should not only be beautiful and reliable, but also easy to disassemble. Repairing or replacing a heating device should not be complicated by installing a radiator grille. Radiator protection looks interesting when it is in harmony with the general appearance of the interior - this design should not stand out against the background of the general environment.
It is undesirable to clutter the decorative screen with furniture, since in this case not only the heat exchange regime will be disrupted, but also the beauty of the decor will go unnoticed. The screen, in particular its façade, must have perforations - the holes will ensure the best air circulation.
Installing a grill requires compliance with certain standards. For example, the permissible minimum distance from the radiator should be 3 cm. You need to add 10 cm in width, and about five cm in height. Thus, the grille for a standard radiator (80 cm high and 200 cm long) will have dimensions of 85x220 cm. If side parts are provided, their width should not be less than 30-40 cm.
Of the presented products with standard parameters, a metal product 900x2000 mm or a wooden analogue with identical dimensions, but with a slightly higher price, can be considered a suitable option.
To learn how to assemble a decorative screen for a radiator, see the following video.
MDF heating radiator grilles
In stores you can find a wide variety of shaped MDF grilles. You can choose the appropriate model and hole size. The MDF panel is inserted into a wooden frame. If the radiator is located in a niche, an MDF grille will also be a good solution. You can make rings on one side and clamps on the other. This will make it easier to access the radiator.
It is difficult to make such meshes yourself, so it is better to order them from a professional. Without much skill, you can create simple screens; for this you will need:
- Thin wooden slats;
- Several blocks for the frame;
- Puzzle;
- Series of nails;
- Lacquer finish.
Before installation, the slats are cleaned and their width is brought to the same size. The mesh should not be larger than 5 * 5 cm. When the lattice is woven, cut off the protruding parts of the slats. The grille can be made both on the front and side walls of the radiator. The rods are ground and a frame is made from them. After fixing the frame, the grille is attached. The resulting screen is colored.
Option number 2: Practical drywall
The second most popular material for decorative screens is plasterboard. It is easy to process, is not afraid of heat and is relatively cheap.
To build a grille, you first need to take measurements and perform simple markings: on each side of the heating radiator, draw lines for mounting the box with an indentation of 7 cm. Then cut out the frame strips from the metal profile - their width should be at least 5-6 cm. You will need 5 profile elements: two side, top and two protruding. Moreover, the latter need to be made the longest - to create the depth of the box, they will have to be bent twice.
When the planks are ready, use self-tapping screws to secure them to the previously marked lines: first the top, then the side ones. Next, carefully bend the long guides at an angle of 90 degrees twice: you should get U-shaped parts. Then use self-tapping screws to fix their edges to the side planks to form a prototype of a protruding box.
Dimensions
The easiest to install are metal grilles. A variety of models allows you to choose the right option for any interior.
Metal mesh is difficult to make yourself. It is not difficult to purchase a suitable option for your existing battery - the dimensions of the products are usually standard. There is a wide range of options on the market, varying in both size and cost.
The following sizes generally predominate (indicated in millimeters): 400×600, 400×900, 400×1200, 400×1400, 400×2000, 600×600, 600×900, 600×1200, 600×1400, 600×2000 , 750×600, 750×900, 750×1200, 750×1400, 750×2000, 900×900, 900×1200, 900×1200, 900×2000, 900×900, 900×1200.
For some interiors, products are made to individual measurements, for example, when a panel surrounding a window sill is required. If an exclusive battery is installed in the apartment or its location does not allow the installation of a standard design, then it looks interesting.
PVC products are produced entirely on this base or on a metal frame. Both options are more affordable than all-metal grilles. The standard options offered by the markets have the following general values (given in millimeters): 600x300, 600x600, 600x900, 600x1200, 600x1500.
Wooden products for radiators will add special comfort and coziness to your apartment. The architectural style of such elements is different - it largely depends on the type of wood from which the product is made. Standard dimensions for height and length are as follows (indicated in millimeters): 600×1300, 700×1300, 750×1300, 800×1300, 900×1300, 950×1300.
Finished factory products are coated with several layers of paint, but even with this treatment, the meshes are often susceptible to extreme temperatures. The grids are not suitable for all types of batteries. Sometimes the best option would be screens consisting of a wooden frame with a carved MDF panel stretched over it. Such products look very attractive and are even cheaper than their wooden counterparts. Their heat transfer is comparable to metal products.
Manufacturers offer a variety of model options to choose from. It is better to choose grilles with ornaments that have large holes in them.
Glass panels are typically flat screens attached to the wall using anchor bolts. But these screens are not suitable for all types of panels.
Another disadvantage of glass screens is the limited selection of standard colors, although custom-made products have a variety of decors. The cost of glass options is cheaper than their wooden counterparts. Approximate dimensions are similar to wood products.
Glass products are easier to care for, but wooden panels are more convenient to install yourself.
Option #1: Available PVC
Despite the relatively low cost, PVC boasts very high-quality characteristics: it is heat-resistant, not afraid of moisture, easy to maintain and, most importantly, durable. The only obvious disadvantage of the material is the possibility of deformation as a result of even household mechanical shocks. But there is a way out: the plastic can be protected with steel supports to increase the strength of the screen.
PVC gratings are made according to a simple scheme:
- Take measurements: calculate the height, width and depth of the radiator to be decorated and add an average of 4 cm to each parameter - this is necessary for the free circulation of air masses.
- Using the obtained dimensions, cut out the component parts of the box from plastic: the front, two sides and the top. For work, you can use a jigsaw or a regular hacksaw.
- Drill holes in the front and back panels for air outlet.
Advice. Don't skimp on the holes: the more there are, the better the warm air moves around the room, providing high-quality heating.
- Using nails and steel corners, connect all parts of the box into a single structure.
- Install the screen to the radiator and fix it to the wall using self-tapping screws.
How to install correctly?
Any work related to the installation of devices requires the preparation of the necessary tools: tape measure, hammer, drill, ruler and pencil.
You may also need accessories:
- hardware fastening;
- screw nails;
- regular nails;
- special corners;
- gusset;
- special glue.
The classic grille looks like a three-sided box with legs at the bottom. All parts are attached according to the pattern that the manufacturer usually supplies with its products. According to the diagram, it is more convenient to fix the products, and then hang the finished version on the battery.
Integrating the structure with corners will give it greater rigidity. You can also use plain wood glue.
Curtain wall fasteners are installed in the wall - usually two holes into which dowels are inserted are sufficient. Self-tapping screws are needed to fasten the side walls, which often do not have the necessary holes for pipes. If necessary, they can be measured with a ruler and marked with a pencil. It is more convenient to cut holes with a jigsaw. But if you don’t have a power tool, you can use a regular hacksaw.
Dowels or special hook-shaped anchors are inserted into wall anchors. It is more convenient to attach the screen with the box to hooks.
The front panel is fixed with small nails. Sometimes, to improve the appearance, the frame includes a framing frame that is secured to the frame with adhesive. Sometimes homemade screens are covered with wallpaper to match the main one.
A removable battery screen is considered an excellent solution. This makes it easier to clean the radiator if necessary, and also makes it easier to access the valves with which you can regulate the temperature. Before drilling holes for hangers on the screen, it is better to mark their position with a pencil: only after determining the exact location should you hang the screen in a permanent place and screw in the mounting screws.
It is worth considering that the heat-reflecting screen behind the radiator must exactly match the dimensions of the box or external screen hanging in front of the battery.
The heat-reflecting substrate is glued to the wall with the film facing out. Other tips and tricks may be helpful for screen installation work.
For example, you can make the simplest version of a radiator grill yourself. For this, chipboard is useful, which can be painted and varnished. For the screen itself you will need a grid of sheets. To make it, you need to measure both sides of the insulation, then add about 5 cm to the resulting height and about 10 cm to the width. The front frame can be cut from a prepared chipboard sheet.
To build the side walls, you need to measure the depth of the radiator and add about three centimeters to the resulting distance. It is necessary to take into account the height of the structure, also taking into account the overlap. The top must correspond to the floor depth measurements.
Parts should be cut only after all measurements have been taken. The prepared parts are easily connected with furniture nails or wood glue. The mesh façade should be similar in size to the frame.
Unsightly edges of MDF can be decorated with a plastic profile. In some cases, ordinary bars are suitable as the side walls of the screen - they do not require additional fastenings. For frameless screens, anchor pliers are more suitable.
It is even easier to install a screen made on special legs. During further operations, this design will not seem reliable. However, this option will be produced faster, and the costs of its implementation will be low.
Due to the fact that the structure on legs will not affect the air circulation inside the structure, this option is often recommended for installation in rooms with insufficiently heated radiators.
Making a decorative screen with your own hands
The technology for making a plasterboard box is quite simple. If you prepare the material properly, you can give it a marketable appearance that will not differ from that produced on professional equipment.
To make a box you will need the following tools and materials:
- plasterboard sheets;
- metallic profile;
- jigsaw;
- metal mesh or wooden grid (for thermal “windows”);
- PVA emulsion (2 or 3 l);
- self-tapping screws, screws, dowels;
- Decoration Materials.
To increase thermal conductivity in the box, you can use fragments in the form of blinds - this looks aesthetically pleasing and ensures air circulation.
A small number of holes or their incorrect distribution can lead to heat loss (it goes back through the pipes) or the formation of condensation in the upper part.
Step 1: Preparing the Drywall
First you need to measure the battery and cut out the parts. It is necessary to add 7–10 cm to the width, and 3–5 cm to the height. The depth of the upper wall (if any) should be increased by 3–4 cm. It is recommended to roll the cut sheets of drywall with a needle roller from the wrong side. You don't have to buy it, you can rent it.
Then the blanks are impregnated on both sides with PVA emulsion. This procedure must be repeated twice.
Impregnation with emulsion in combination with the work of a needle roller gives the following effect:
- The thermal conductivity of drywall improves.
- The material impregnated with the emulsion does not dry out due to constant heating.
- The paint lays down in a more even layer, no need to putty.
- Cutting the processed material with an electric or manual jigsaw is more even, without chips.
Aerobatics is to make a sheathing from strips of drywall, which are glued together with PVA glue.
In addition, on the advice of the experts, you can stick a shiny, reflective material, such as foil, behind the battery. This will also increase the heat transfer of the radiator.
Step 2: Assembling the product
The frame of the product is assembled from a metal profile. The racks are connected with metal corners.
Then drywall is attached to the frame with self-tapping screws. The entire structure is checked using a building level.
A hole is cut out in the designated place, then a metal mesh (or several, depending on the size of the entire product) is attached to the glue.
Step 3: Decorating
You can choose your own decor options. If you don’t want the battery to stand out from the general background, you can cover the box with the same wallpaper as the walls
If, on the contrary, you need to focus attention on this element, you can paint it in a bright color
Plastic grilles for heating radiators
PVC is considered an inexpensive material and is also often used to create gratings. Its main disadvantage is considered to be instability to mechanical damage. When using PVC, measurements are made especially clearly; the box near the battery is very quickly deformed and loses its decorative properties.
When making a plastic mesh you will need:
- PVC;
- Cutter;
- Drill;
- Set of self-tapping screws;
- Corners for fastening.
Following the above rules, measure and cut out the necessary parts from plastic. Use a drill to drill holes in the plastic panel. The more holes you make, the better the air circulation will be. Connect all structural elements with corners and screws, secure the mesh to the wall.
How does the screen affect the heating process?
In pursuit of the external beauty of the product, one should not forget about its functionality - the screen should not interfere with effective heat exchange in the room. Do not be afraid that after installing the grille on the radiator, heat will be retained, which will provoke an increase in home heating costs. If you select the right design, such problems will not arise. Moreover, with the help of a special layout and configuration of the screen elements, you can even increase the amount of incoming heat.
The larger the holes, the more efficient the heat transfer
If you understand the operating principle of a standard heating radiator, then there will be no problems with choosing the correct design of a decorative screen.
Operating principle of a heating battery
When heated, the heating radiator transfers heat into the room as a result of the movement of heated air masses (convection process) and through direct thermal (infrared) radiation.
The principle of operation of the radiator
The effectiveness and priority of each of the two thermal energy transfer options may vary. This is influenced by the design of the radiator, the temperature of the coolant and air in the room, and the presence of obstacles in the path of heat flow.
So, at not too low temperatures, cast iron batteries give off heat according to the principle of convection, but after the coolant temperature rises to 70 degrees and above, heat is transferred using infrared radiation.
Main methods of heat transfer
Conclusion. Maximum efficient operation of a heating radiator can be achieved with efficient heat transfer using both methods.
So, in order to ensure free air circulation, the converter radiator is equipped with a grille that does not have an upper horizontal panel.
Warm air distribution
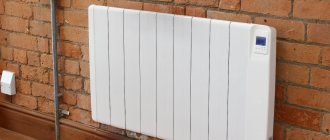
Prices for popular models of heating radiators
Heating radiators
What to consider when choosing a grate
The main rule that must be observed when choosing a grille is that its design should not interfere with the free circulation of heated air and the passage of infrared radiation . This is possible if the front panel of the grille is equipped with a sufficient number of holes, amounting to at least 50% of the total area, and the free passage of warm air is ensured above the battery.
The holes at the top should not interfere with convection
It is also recommended that the material used has excellent thermal conductivity and allows air to flow freely into the room. If the inner surface of the screen is painted black or dark brown, the heat absorption will be better.
Key Features and Benefits
Decorative screens have become a practical and elegant solution to the problem of how to hide bulky heating radiators. Such simple at first glance designs can perform more than one useful function:
- They protect radiators of complex shapes from the accumulation of debris and dust, greatly simplifying the cleaning process
- They provide an additional barrier for small children who could accidentally touch a hot radiator and get burned.
- Promotes better distribution of warm air flow throughout the room and more uniform heating
But the most important function of radiator grilles is decorative. With their help you can decorate and even complement the most sophisticated interiors. They ennoble and emphasize the stylistic direction.
Decorative grilles for heating radiators are divided according to the following criteria:
- Project characteristics
- Material of manufacture
Project characteristics
Depending on the design features, decorative screens are divided into a number of subtypes:
- Mounting box: completely hides heating equipment from view
- Hanging screens with a lid - designed for heating devices protruding from under the window sill
- Hanging screens without a cover - designed for heating devices that do not protrude from under the window sill
- Flat screens are an excellent solution for shielding a radiator installed in a niche
The front surface of the screens can be semi-open or completely closed.
Option #3: Cozy tree
The classic type of decorative screen for heating radiators is a natural wood grille. Its demand is not surprising, because it is elegant, durable, durable and quite easy to manufacture:
- Take measurements: determine the height, width and depth of the radiator, and then add an average of 7-8 cm to each parameter. Mark around the perimeter of the battery, taking into account the calculated dimensions, to install the box.
As you can see, decorative grilles are indispensable assistants in effectively disguising heating radiators. So, if you want to make your interior even more attractive, there are three ways to implement this task at your disposal: simple instructions for making screens from PVC, plasterboard and wood - all you have to do is stock up on materials and use your imagination.
Production material
The materials from which decorative screens for heating radiators are made are very diverse. The following products can be found on the market:
- Glass
- MDF screens
- Plastic
- Wood
- Metal
Glass
Decorative glass screens are among the most exotic. Such products are the most expensive, but at the same time they look really beautiful. They are widely used in offices and have an exquisite design, developed individually for the customer. Images and textures are applied to the surface in various ways (engraving, matting, etc.).
MDF screens
Decorative MDF screens for heating devices are considered one of the most affordable. They replaced more expensive natural wood products.
According to experts, the strength of MDF products is twice as high as that of wood. The material is environmentally friendly, it does not emit harmful substances that negatively affect the body.
Ease of processing is another feature that has led to the widespread use of MDF products in the market. Any shape can be easily given, a wide variety of patterns and images can be applied.
Plastic
Plastic products can be classified as classics. They are one of the most affordable on the market. Ease of maintenance and durability should be commended.
The market is rich in many models, which manufacturers give any shape and texture, using a wide variety of models. However, in addition to style, due attention must be paid to the quality of the material used. This directly affects the cost, but plastic that is too cheap can be toxic. During the heating process, substances harmful to health are released.
Wood
Decorative mesh for heating wooden radiators will never lose relevance and will not go out of fashion. However, their industrial production is practically not carried out; products have to be ordered from individual craftsmen.
Particular attention should be paid to the type of wood and its quality. Under the influence of temperatures, its internal structure begins to collapse, the screen begins to deform and shrink.
The undeniable advantages of decorative wooden screens are naturalness and respect for the environment. They are able to complement even the most sophisticated interior, giving warmth and comfort.
Screens are manufactured strictly according to the dimensions of the heating radiator. Given the low thermal conductivity of wood, most of the heat may not penetrate the room, remaining circulating inside. Wood products are contraindicated for converter heating systems.
Metal
Metal screens, which have an excellent balance of quality, performance and cost, will never lose their popularity. They do not affect the insulation, its durability and reliability.
The production of metal screens is carried out from thin steel with a high thermal conductivity coefficient. Even completely closed structures release all the heat into the environment.
Click to enlarge image
Thanks to the development of modern methods of processing and painting metals, they do not tarnish or corrode even after years. Constant temperature changes and aggressive environments do not in any way affect the quality and structure of products.
Metal mesh is relatively inexpensive and easy to install. The main thing is to choose the right size so that it matches the dimensions of the device being covered. For non-standard radiators, it is necessary to order the grille individually.
How to reduce heat loss
It is no secret to many that placing a heating radiator under a window sill reduces its efficiency by 4%. If placed in a niche, the efficiency may drop to 7-8%. Decorative heating screens have the same effect. Designs that cover the entire battery can reduce efficiency by 30%.
To reduce the amount of heat loss by installing decorative screens on the radiator, you should remember a few very useful rules:
- Ventilation screens should not be covered by a canopy
- The visor should direct hot air upward, rather than trap it underneath
- Interior surfaces are darkened so that infrared thermal radiation is directed into the room
- Reflective screens made of metal or foil are installed on the wall
And in order not to overpay for heat, we recommend installing thermostats on the batteries yourself
Water system
The most commonly used and therefore have the widest range of heating devices are water heating systems. This is explained by their good efficiency and optimal level of costs for acquisition, installation and maintenance.
Structurally, the devices are not too different from each other. Inside each there are channels for the flow of hot water, the heat from which is transferred to the surface of the device, and then, using convection, to the air of the room. For this reason they are called convection.
The following types of radiators can be used in water heating systems:
- cast iron;
- steel;
- aluminum;
- bimetallic.
All of these heating devices have their own characteristics, due to which they are selected for each specific case depending on the area of the room, the nuances of installation, the quality and type of coolant (which is sometimes antifreeze).
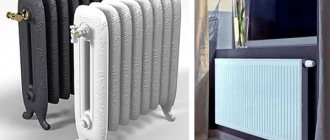
Cast iron batteries
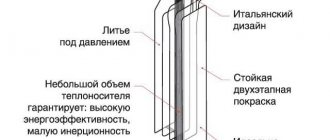
Cast iron was one of the most popular materials in domestic heating systems. His choice, as a rule, was due to the relatively low cost. Later, such devices began to be used less frequently, since they have a small heat transfer coefficient (only 40%), due to which the power of one section is approximately 130 W. Although they can still be found in old-style systems. In modern interiors, designer models of cast iron radiators are sometimes used.
The advantages of such devices are a large surface area that transfers heat to the room, and a long operating period (up to 50 years). Although there are still more disadvantages - these include the relatively large volume of coolant used (up to 1.4 liters), the difficulty of repair, and the inertia of heating, due to which the temperature of the device increases relatively slowly, and even the need for periodic (at least once every 3 year) cleaning. In addition, heavy sections are very difficult to install.
Aluminum radiators
The use of aluminum radiators allows us to ensure the maximum level of heat transfer - the power of the section can reach 200 W (which is enough to heat 1.5–2 sq. m).
Their cost is quite affordable, and their low weight allows you to install them yourself. True, the operation of the device is possible for only 20–25 years.
Bimetallic batteries
Their advantages include the presence in the design of convection panels that improve air circulation over the surface, ease of installation of devices for regulating the intensity of coolant flow, as well as ease of installation. The radiator section, with a power of up to 180 W, is capable of heating about 1.5 square meters. m area.
Despite the advantages that such heating devices have, there are also problems with their use. For example, for bimetallic radiators it is not recommended to dilute water with antifreeze, which, although they do not allow the system to freeze, negatively affects the internal surfaces of heating devices.
Metal grilles for heating radiators
The battery compartment grille can also be metal. This is quite a painstaking job, for which the following materials are needed:
- Expanded mesh;
- Aluminum corner;
- Grinding machines;
- Screws;
- Screwdrivers.
The corners are marked and trimmed. The components of the frame are fixed with self-tapping screws. The mesh is used to create a shield attached to the frame. Finally, the fasteners are installed to help secure the grille to the wall.
The battery is installed in a niche
One of the most common options for installing a heating device. A niche is a kind of cavity with one open side in which the battery is mounted. You can simply cover it with a screen.
In this case, the decorative panel is installed using visible or hidden fasteners.
Both conventional flat screens and products of a more complex design: with a rear flange and an overhead frame are mounted with visible fasteners. The installation process itself is very simple:
- Countersunk holes are made on the front panel of the screen.
- The product is applied to the niche, pressed tightly and securely fixed using self-tapping screws.
You should not think that by installing a decorative screen in this way, you will get an unaesthetic picture. The screw caps are finished in the same way as the front panel of the product. If you order an accessory made of bright polished brass, then the caps of the mounting elements will have the same texture. A similar rule applies to all screens produced by DecoGrille: made of stainless steel, brass or painted steel.
Flat screens are the most budget option. However, there is one caveat. If the product is wide, it will bend after installation. At the attachment points, the accessory will press tightly against the surface, and in the central part it will slightly retreat from it. To avoid this, the screen needs to be stiffened; the rear flange will do this perfectly.
Rear flange - plates installed on the back side of the front panel at a slight distance from the edges of the frame. A mesh backing and eyelets for hidden fastening are mounted on the flanging sheets.
Back flange screens are more rigid than conventional flat products. After installation, the front panel does not bend; the accessory is pressed tightly against the surface along the entire perimeter.
The process of installing screens using hidden fasteners is more complicated than using visible screws or self-tapping screws. It occurs in several stages:
- Special corners are mounted inside the niche (included with the product).
- The screen is inserted into a niche and is first fastened to the corners through the eyes.
- The product is leveled relative to the surface of a niche or wall and screwed tightly.
The last of the above steps is only possible with hidden fasteners. This is especially true in cases where the niche is curved. After installation, the screen will hide all the mistakes made by the builders.
Mounting features
Radiator grilles must be installed so that you can easily and quickly access heating appliances and pipes. From time to time, at least twice a year, the heating system elements need to be cleaned of dirt and dust, so access is necessary. In addition, emergencies arise from time to time. In this case, a quick reaction is required and there is no time to unscrew the fasteners. Therefore, try to find a mounting system that allows you to remove the screen in one motion.
Attached and mounted
The easiest way is with hanging or hinged screens. They take off/return in seconds. But the most problematic are flat radiators that cover niches, and box screens that are attached to the wall. But here, too, everything is resolved simply. You can attach the box to the wall using two strips: one on the box, the other on the wall. The whole secret is that the boards have a beveled top edge (this can be seen in the picture). The one that is nailed to the wall has a slope towards the wall, while the one on the box has a slope towards the grate. When the box is in place, it looks like a lock.
How to repair a screen box for a wall-mounted heating radiator
Another option is to attach metal plates to one of the strips and magnets to the other. Or attach to the wall not a wooden board, but a metal corner, for example.
In the case of flat screens, the solution may be the same: metal plates and magnets. Another option is hooks and rings. It's easy to implement, but not very convenient to use - you have to suffer if you get into loops. There is also a complex but convenient installation method - making a screen like a sliding door.
Sliding screens for heating radiators
You can take sold guides for furniture doors, install them, and insert the screens into the corresponding grooves. If you do not plan to actively use the niche near the battery, then roller mechanisms cannot be installed, but it will be difficult to move them away. This method, by the way, can be applied to a lattice box. Then it can be “tightly” nailed to the wall and the front wall can be made movable.
Sources
- https://stroychik.ru/otoplenie/ekrany-na-batarei
- https://stroy-podskazka.ru/otoplenie/radiatory/reshetki/
- https://simplestroy.ru/landshaft-i-dizayn/ekran-dlya-batarei/
- https://v-teplo.ru/dekorativnie-reshetki-na-radiatori.html
Basic grating designs
Available options:
- in the form of a box - these are closed screens, they have walls on different sides, which allows you to completely hide the radiator from prying eyes, this option is the most preferable in cases where you need to decorate the shortcomings of the heating device or supply lines;
- flat - such models do not have top and side shelves, they are made in the form of a frame that surrounds a lattice sheet; similar products are installed to cover the batteries located in the niche.
When you need to choose screens for batteries, it is recommended to study the photo before purchasing, since the outside of such products should fit well into the interior. Take into account shade and design
When manufacturing radiator grilles, various possibilities are taken into account:
- The heating system device is installed on a blank wall or under a window opening without a window sill;
- the battery is located under the windowsill.
Mounting features
The radiator grille cannot be installed firmly. The battery, like the entire heating system, must be maintained, and the presence of a stationary screen will make this task difficult. For this reason, such products are designed to be removable. Possible mounting options:
- using magnets: a metal plate is fixed on the wall in accordance with the dimensions of the radiator, and point magnets are fixed on the grille, as a result, the structure can be removed quite easily, and the use of tools is not required;
- locking connection: a plank made of any material is installed on the wall, it must have a bevel towards the vertical surface, and a similar structural element is fixed on the grille, but with a bevel in the opposite direction, which will allow you to fix the screen on the wall without using fasteners;
- sliding structures are installed on furniture rails, which must be hidden by a frame.
Attached and mounted
Both options can be used in different cases:
- the battery is located in a niche;
- The heating system device is installed near a blank wall;
- The radiator is located under the window sill near the window opening.
Attachments are not attached to the wall, so they can be dangerous for children. Such products are distinguished by significant weight and a certain monumentality, which makes them highly specialized. As a result, grilles of this type are often installed in offices, which are designed in a classic style, as well as in living rooms, if they match the interior. To reduce the risk of such screens falling, they are fixed to the floor. The advantage of such products is the ability to be installed at any distance from the battery.
What do you need to think about in advance?
If the decision to carry out this type of repair is made, you should find answers to a number of questions:
- When exactly and by whom will the work be carried out?
- What type of radiators should I use?
- Is it necessary to replace the pipes leading from the battery to the riser?
- How many sections will be needed for each room?
It is best to carry out such alterations in the summer, because before starting work you must obtain permission from the local housing office. In winter, officials are extremely reluctant to give such permissions, because they will have to shut off the common riser and leave other apartments without heating for some time.
But even outside the heating season, obtaining permission can be difficult. Those who have already solved similar problems talk about the need to wait several days, try to get an appointment with the right employees, etc. Some faced pressure: they were recommended to hire plumbers from the housing office to carry out all the work.
There are no restrictions in this matter. The main thing is that the replacement of heating batteries is carried out by an experienced plumber with appropriate qualifications. It is possible to identify all the flaws caused by inept installation only during operation.
It is best to go to the housing office in the summer, and not in the fall, when queues peak. At this point, all the necessary materials need to be purchased, pre-assembled radiators, prepared tools, agreed with the team, if necessary.
If the house is connected to a central heating system, you should contact the maintenance service to coordinate the alteration. Here they can perform the necessary calculations to accurately determine the number of radiator sections, as well as clarify other technical issues.
You can calculate the required number of heating radiators yourself. We described in detail how to do this in this article.
Lack of correct calculations can lead to imbalance of the home heating system.
For calculations, you will first need the information that is in the DEZ:
type of boiler room (it can be central or individual for a particular house);
parameters of existing supply pipes; coolant characteristics: temperature, pressure, pH, etc.
Most often, old batteries are replaced with new modern models, usually aluminum or bimetallic. Although cast iron, copper and steel products are also available for sale. The type of radiator is needed when performing calculations.
You will need such indicators as the pressure that the device can withstand, the maximum temperature of the coolant, heat transfer and other data. They can usually be found in the technical data sheet.
If not only the radiators are to be replaced, but also the pipes leading to them, you should choose a suitable material. This is usually steel, metal-plastic or polypropylene. Some craftsmen strongly recommend using only steel communications for centralized systems.
Depending on the type of pipes chosen, you will need appropriate equipment for welding them. MP and PP pipes are easier to install than steel. To work with metal, you need not only a welding machine, but also a device for cutting threads. Therefore, if the old pipes are clean enough, it is recommended to leave them and replace only the battery.
The weak point of metal-plastic structures is the connections. They must be performed very carefully; installation errors often lead to leaks. The popularity of MP pipes is explained by their relatively low price. Plastic is more expensive, but more reliable; if the welding is done correctly, the tightness of the joints will be very high.
You need to select suitable fasteners for the selected radiator. In this case, you need to take into account both the type of radiator and the material of the wall on which the installation will be carried out: brick, concrete, etc. Batteries are usually equipped with brackets of a suitable type.
To install one radiator, two brackets are usually used at the top and one at the bottom. Their position is carefully checked with a level to eliminate the possibility of misalignment during battery installation. However, some models are installed with a slight slope to ensure the removal of air trapped in the system. If the number of sections is more than twelve, another top bracket may be needed.