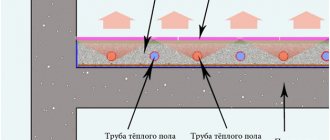
The main advantage of ceramic tiles is the possibility of laying them on any of the existing heating systems: water or electric, since they have high thermal conductivity.
If the question is which type of heated floor is best to choose for tiles, then our answer is electric , because it is easy to install and does not put pressure on the ceiling like a water heating system.
Let's take a closer look at all floor heating devices used under tiles to find out which is better in each specific case.
Choosing the best option
You can heat the floor covering using a heating cable or thermomat. Each option has its own advantages and disadvantages, which you should know about before going to the store.
Cable electric underfloor heating has a lower cost, but it is quite difficult to correctly calculate the cable length and install it. In addition, laying a cable heated floor under the tiles involves installing a thicker floor screed, which will lead to a decrease in the height of the room.
A heating mat is an improved version of a conductor and therefore has great advantages. Among the design features, we can highlight the placement of the cable on a special mesh made of fiberglass fabric with an even pitch between the turns.
One of the advantages of a thermomat is the simple calculation of the material; for this, it is enough to know the area of the room. Using this parameter, a roll of the required size is purchased in a specialized store.
Kinds
Modern models are represented by cable systems or mats. Infrared flooring is included in a separate category. It has several varieties - such systems can be film or rod.
Each of these types of floors has the following characteristics:
- a dry base is required for installation;
- The system must be grounded;
- equipped with temperature regulators;
- used as additional heating.
The differences include installation features, quality of heat generated, and requirements for the finishing coating.
Cable heated floor
Thanks to their reliability and safety, cable systems have become very popular. They have a simple device:
- the cable, distributed in sections, is mounted on a concrete screed under the finishing coating;
- a sensor that controls the temperature is also placed here;
- the ends of the temperature sensor and heating element are connected to the controller.
Such a system turns on only when necessary - when the temperature drops to a predetermined minimum.
Cable floors come in the following varieties:
- direct action systems - the cable is in a screed, located very close to the finishing coating;
- heated floors for wooden floors;
- heat storage system - used in rooms in which it is not prohibited to use electricity during low tariff periods.
Cable systems are installed separately for each room.
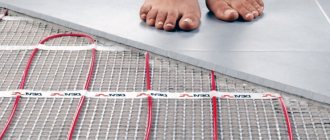
Thermomat
These floors consist of a thin heating cable attached to fiberglass. The heating core is surrounded by a screen and an insulating layer.
The mats are produced with single- and double-core cable. The latter option is more suitable for bedrooms and children's rooms. This is explained by the fact that two-core mats have a low level of electromagnetic radiation.
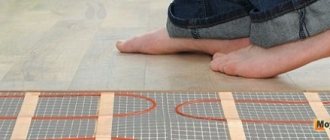
A thin cable floor is installed on top of the dried screed. Thermal mats are often installed under tiles. Penetrating through the mesh, the glue reliably secures the finishing coating.
Thermal mats do not affect the floor level, since they seem to “sink” into a layer of tile adhesive. The mesh becomes a kind of reinforcing frame. Another advantage of thermomats is ease of installation. They are laid when there is no desire to raise the floor.
Cable floor heating thermomats differ in that they are usually not used for main heating. In addition, if when making a cement screed the load on the floor will be quite large, it is better not to use cable systems. In this case, thermomats are used.
Infrared floors
Rod and film products are types of infrared heaters. When current passes through an element, electromagnetic waves begin to appear. Their range is 5-25 microns. They heat any objects located in the wave propagation zone. Conductive elements transfer heat to the overlying floor covering, furniture and walls, which heat the air.
Infrared floors are very energy efficient because they are able to convert about 95% of the emitted energy into heat. Heating of any surface occurs in a few minutes. If one segment is mechanically damaged, the rest continue to work.
Installation of heated electric floor
Laying cables and mats is carried out according to the same scheme, only the basic processes differ. At the same time, it is very important to understand how to properly install a heated floor under the tiles.
Surface preparation
To ensure high-quality installation work, you should pay careful attention to the surface preparation stage.
- The old coating is removed and the surface is cleaned of debris, dirt and dust.
- If there are unevennesses, make a rough floor screed. To do this, level the surface with a solution, the thickness of which can be about 7 cm.
Drawing up a laying scheme - how best to lay a heated floor
A wiring diagram for an electric heated floor is necessary for the correct placement of the heating mat or cable. It is drawn up before installing a warm floor under the tiles and calculating the required amount of materials.
When drawing up a diagram, you must adhere to the following recommendations:
- The distance from the walls to the contour of the heated floor should be at least 10 cm.
- Do not place the material under furniture without legs or household appliances. In this case, the heat given off will return back, which will cause the conductor to overheat and fail.
- Laying can be done not only in a straight line. Trimming individual sections of the grid allows you to direct the path in the desired direction. As a result, a certain area is heated, which helps reduce energy costs.
What type of heating should you choose?
Heating mats, water and electric water floors are best suited for tiles. The cable system option is worth considering if you have the skills to install such floors yourself or you can order such a service for a reasonable price. It is worth remembering that problems may arise with diagnosing and repairing breakdowns.
A water floor is a relatively cheap heating option. If it is possible to connect the heating circuit to a gas boiler, you can provide economical floor heating. If you have to use electricity, it is better to give preference to an electric-water system
Film infrared floors are considered the worst solution, despite their efficiency and cost-effectiveness. They are perfect for installation under laminate, but do not “get along” well with tiles. Experts advise choosing a different, more practical heating option.
Rules for performing calculations
Before laying an electric heated floor under the tiles with your own hands, you need to make the correct calculations:
- If the system is used as the main heating, then to heat an area of 1 sq. m. requires a heater with a power of 140-180 W.
- If the heated floor will be used for additional heating, then you can use a heater with a power of 80 W or more.
In both cases, the quality of the room's thermal insulation is taken into account.
When performing calculations, it is necessary to calculate the usable area of the room. To do this, multiply the length of the room by its width and subtract the area occupied by household appliances and furniture without legs. Then, in accordance with the obtained values, the total power of the heating element and its length are calculated. Depending on the manufacturer, the power of 1 meter of heating cable is 16-21 W.
The choice of heating mats follows a similar principle; the usable area of the room and the total power are also taken into account. To attach thermomats to a concrete screed, an additional purchase of a special mounting tape is required.
Selecting a heating element
The basis of a heated floor system are heating elements, presented in the form of mats, cable or infrared film.
Work on forming the floor must begin with the selection of a cable that will provide the highest quality heating.
Heating cable
Two types of cables are suitable for organizing a heated floor:
- Resistive.
They emit the same amount of heat along their entire length, but when overheated they create a risk of burnout. The most budget option is a single-wire resistive cable. Two-wire costs a little more, but is easier to install;
- Self-regulating.
Able to regulate the amount of heat generated depending on the temperature of its own heating. The price of such a cable is higher than that of a resistive cable, but it works more reliably.
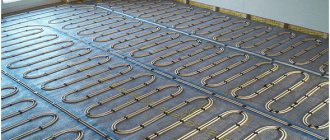
Both types of thermal cables are laid in two ways - snake and snail.
Important! Due to the risk of overheating, resistive cables are laid in such a way that they go around large appliances that generate heat.
Cable mats
The mats are the same heating cables, but already laid in a certain way on a reinforced plastic mesh. The installation of the mats is simplified as much as possible - they are laid out according to the developed pattern directly on the floor base, and the tiles are laid on top using glue.
The direction of laying is not of fundamental importance. Mats can be rolled out along both short and long walls.
The disadvantage of cable mats is their inertia - the floor warms up quickly, but cools down just as quickly. Therefore, thermomats are more suitable as an auxiliary rather than a main source of heat.
Carbon mats
The carbon system is based on the use of an infrared emitter with a heating element in the form of graphite-silver rods. They are connected to each other via a highly secure cable with a core of stranded copper wire.
The carbon rods are covered with a polyester or polyethylene shell on top, and carbon paste is located inside.
When the mat is powered from the mains, the paste heats up and begins to radiate heat.
Externally, carbon mats look the same as cable mats, but with fewer jumpers. The technology of their installation is no different. The advantage of the system is that the cables are connected to the conductor in a parallel circuit, so if one element fails, the rest continue to function.
But practice shows that infrared emitters quickly burn out at the joints, so many builders prefer not to use a carbon system for floor heating.
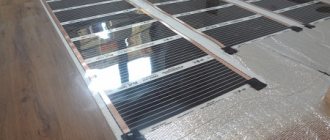
Infrared film
Another option for infrared heating is carbon film, the operating principle of which is similar to carbon mats. Thanks to its minimal thickness, the system saves space while providing high-quality heating.
Infrared film can be laid dry at any stage of repair work and turned on immediately after installation. But this type of heating element has a number of disadvantages. It separates the laid tiles from the adhesive base, which can lead to deformation of the cladding.
In addition, in situations where cement mortar is used for laying tiles, the film corrodes and becomes unusable.
Advice! Film flooring is more suitable for laying under linoleum, parquet or laminate. If you still need to lay the film under the tiles, it is better to choose perforated material.
Checking the electrical wiring
Before laying a heated floor under the tiles, you should check the functionality of the old electrical wiring. After all, to heat a large room, you need a powerful heater, which during operation will put a significant load on the wiring. Therefore, it is important to correctly determine the cable cross-section and find out whether it matches the new heating system.
If necessary, the electrical wiring in the room should be replaced with a more powerful version. In addition, appropriate RCDs and circuit breakers are additionally installed.
Features of underfloor heating
There are two types of heated floors:
- using water heating;
- electric.
In the first case, the solution is more economical in operation - after installing the heated floor, it can be connected to the existing heating system. However, installing such a heated floor is a more complex and expensive procedure compared to the second option.
Heating a tiled floor can be considered as an additional heating system in an apartment.
Laying a concrete screed Source narobraz.ru
How to properly lay insulation on the floor under tiles
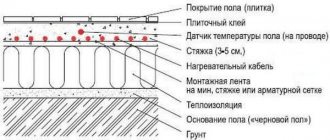
The first stage of direct installation of heating elements is floor insulation. The efficiency of the entire system and the cost-effectiveness of its use depend on the quality of the work performed. The most popular among thermal insulation materials used for underfloor heating systems is penofol. This roll insulation has a self-adhesive layer and a foil coating. For insulation, the material is rolled out and glued to the surface, the joints are taped with foil tape. To increase the thermal insulation characteristics of the room, foam foam is overlapped on the walls by several centimeters.
After laying the insulation in the lower part of the walls, a damper tape is glued around the perimeter of the room. It compensates for the expansion of the floor covering when heated.
A metal mesh is laid on top of the heat-insulating material to prevent the heating element from coming into contact with the insulation and to simplify the installation of the heated floor under the tiles.
Features of using tiles
Using tiles is very convenient, but for all its advantages it has several disadvantages:
- If moisture gets on the surface, the tiles can easily slip.
- The floor is cold and walking on it is then uncomfortable.
The latter circumstance is especially evident during the winter period.
The first of these disadvantages can be overcome by choosing tiles with a special surface. In the second case, the problem can be solved, but for this it will be necessary to install a warm floor.
Installation of control devices
Special devices help control the operation and manage the system: a thermostat and a temperature sensor. The thermostat can be mechanical or electronic; with its help, a certain temperature regime and the time for turning the system on and off are set. This device is placed in close proximity to sockets, mounted in the wall.
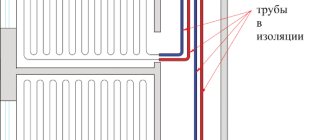
It is recommended to place temperature sensors on the floor. To install this device, a vertical hole is drilled in the wall from the thermostat to the temperature control point, into which a sensor is placed, previously placed in a corrugated insulating pipe. The control location must be chosen between the heater turns.
The use of corrugation avoids unexpected damage to the sensor. In addition, this design provides quick access in case of an emergency. One end of the corrugated pipe is located in the concrete screed, so there is a risk of solution getting inside. To avoid this, the end of the corrugation is filled with sealant.
Installation of thermostat and sensors
The controller, which regulates temperature indicators, is installed in a specially designated place. The cable connecting the thermostat and the system elements must be placed in a corrugation. The corrugation is located in the pipe. It must be carried out to the temperature sensor. It should be mounted at a distance of 30 cm from the wall. If this condition is not met, temperature measurement will be complicated.
The corrugation is laid in such a way that no kinks are formed. They happen especially often near the baseboard. The edge that abuts the system should be sealed with sealant. This will prevent concrete mixture from getting into it.
In addition, a temperature sensor is placed in the corrugation. This improves the maintainability of the device.
Fixing heating cables or mats
After complete preparation of the surface, you can begin laying and securing cables or heating mats and directly deciding how to lay a heated floor under the tiles.
The cable can be secured using mounting tape and special plastic clamps. The use of these elements makes it faster and easier to fix the heating cable. During the installation process, it is necessary to maintain the same distance between the turns, otherwise the floor will heat up unevenly.
In heating mats, a certain pitch is maintained between the turns, so their installation is much easier and faster. It is enough just to arrange the material according to the diagram and make the correct connection to the thermostat.
After fixing the heating element to the floor, it is necessary to test the operation of the system and measure the resistance using a multimeter. The readings obtained must correspond to those recorded before laying the material.
General step-by-step installation technology
To install a heated floor under ceramic tiles, you need to competently perform installation work in 10 stages.
Surface preparation
The area for laying mats or cables must be level and clean. For pronounced unevenness, cracks and protrusions, it is best to use a cement screed that will hide all the flaws. If the flaws are insignificant, it is enough to fill the cracks and sand the protruding areas.
Then the floor is cleared of debris, thoroughly swept and treated with a primer.
The next stage is started only when the primer is completely dry.
Create a schema
Regardless of the type of electric floor, preparation of the thermostat is necessary. It can be powered from an already installed outlet or directly from the network. As a rule, the connection diagram for the thermostat is indicated in the instructions. Also, two channels are grooved in the wall: one for the corrugation of the temperature sensor, the second for the power wires of the heating cable.
Important! The cable and mats should be laid in such a way that there is a distance of about 10 cm from the walls.
The easiest way to lay a cable is considered to be a snake. The mats are laid either straight or randomly in those areas where more intense heating is required. When laying the cable, both ends are led out to the thermostat, and the coupling is subsequently hidden under the tie.
Then a temperature sensor is mounted in a special plastic pipe and all the wires powering the heating system are connected.
Material calculation
The number of heating mats and linear meters of cable is calculated according to the diagram given above. In addition you will need:
- thermal insulation materials;
- damper tape;
- connecting wires;
- tile adhesive;
- tile;
- fasteners;
- thermostat and temperature sensor;
- grounding copper cable;
- RCD protection system.
The amount of tiles and thermal insulation is calculated based on the floor area with allowances for trimming. The amount of tile adhesive will depend on the curvature of the floor.
But you can rely on the instructions from the manufacturer of the product per square meter.
Checking old electrical wiring
The larger the area of the room intended for underfloor heating, the more powerful the wiring should be. Therefore, you must first calculate the cable cross-section in terms of power, current and length so that the core does not heat up and melt the insulation.
The calculation takes into account the rated power of the cable and electrical appliances that it must power.
If the core diameter is too small, the wiring will have to be replaced and adjusted to the new system.
Also, do not forget that the residual current device and the circuit breaker must correspond to the new electrical load.
Surface thermal insulation
The quality of heated floor installation will largely depend on the quality of the base insulation. A properly laid base will not only reduce heat loss, but also increase the efficiency of the electrical system.
Penofol is best suited for thermal insulation purposes. This is a modern multilayer material with a polyethylene base and a self-adhesive base. The outer part of the penofol is made of foil, which prevents heat from escaping from under the floor.
Penofol is glued to the floor, joint to joint, extending 3-5 cm onto the walls. The joints are sealed with foil tape, and damper tape is laid around the perimeter of the room, preventing direct contact with the heating elements.
Advice! For rooms with low ceilings, it is recommended to use polystyrene foam or polypropylene instead of penofol.
Installing a temperature sensor and thermostat
The thermostat is designed to turn the system on/off, as well as adjust the heating temperature. It is mounted on the wall near the outlet.
The temperature sensor is designed for independent operation of the heating system and its optimization without control by the owners. The sensor is mounted directly into the floor in a corrugated pipe laid in a groove.
It should be installed centrally between two turns of the cable. The inner end of the corrugation is insulated with sealant, the outer end is connected to the thermostat.
Control test
The cable or mats are checked before they are laid on the surface - for this purpose their resistance is measured with a multimeter. The resistance should not differ from the specified passport parameters by more than 10%.
If the indicators are within normal limits, you can begin installation.
Attaching the heating element
The easiest way to install thermomats is to spread them along the floor plane in the selected position and connect to the thermostat.
The cable is laid in a snail or snake pattern and secured with mounting tape. To make the work easier, you can use plastic clamps to secure the electric floor. It is very important to maintain the same distance between the turns of the cable, otherwise the site will heat up unevenly.
After laying out the material, it is necessary to check the resistance again - it should coincide with the data of the first measurement.
Filling the screed
The screed serves as the basis for the cladding and promotes better heat distribution across the floor. Traditionally, a cement-sand screed consisting of three parts sand and one part cement is used for pouring. Water is added to them until a viscous consistency is obtained and PVA glue is added to increase the viscosity of the solution.
To save cement, crushed stone is added to the solution - 5 parts to 1 part cement. The recommended pouring thickness is about 3-5 cm.
Important! You cannot add a large amount of water to the solution, otherwise cracks will appear in the screed as it hardens.
If mats are chosen as the heating element, no screed is required - tiles can be laid directly on the film.
Laying tiles
Laying a floor with a cement screed can only be done when the mortar has set. Complete drying may take a month, but you can start covering the surface 2-3 days after pouring the screed. Ceramic tiles are laid on a heated floor according to the same principle as on any other base.
It is better to place it on glue, which will not “steal” additional centimeters of height. The adhesive must be specially marked “warm floor” or indicate the permissible temperature range. The adhesive composition must be applied to the mat very carefully with a soft spatula so as not to damage the system.
When using a solution, you need to ensure that there are no voids in the layer, which could cause the cable to overheat.
Within a day you will be able to walk on the heated floor. It is recommended to fully start the system and grout the seams when the glue, mortar and cement base are completely dry.
Screed
One of the stages in solving the question of how to lay a warm floor under the tiles is pouring the screed. To prepare a concrete solution, you will need materials taken in the following ratio:
- Sand - 4 parts.
- Cement - 1 part.
- Crushed stone - part 5.
- Water – 0.6 parts.
In addition, it is necessary to add a special plasticizer, which will make the solution more elastic. The additive is taken in an amount of 1% by weight of cement.
The total thickness of the screed should be no less than 3 cm and no more than 5 cm. The poured solution is left until completely dry, which most often takes about a month. Premature activation of the system is not allowed.
It should be remembered that the screed is made only when using a heating cable. You can immediately apply tile adhesive to thermomats.
Floor tiling
Laying tiles can begin after the screed has set, usually 2-3 days are enough for this. However, the work must be carried out by a professional tiler, who will ensure that the tiles fit correctly and make the surface horizontal. To lay tiles on a warm electric floor, you must use a special glue.
At this point, the process of installing an electric heated floor under the tiles is considered complete. You can do all the work yourself if you follow the instructions on how to properly lay a heated floor under the tiles.