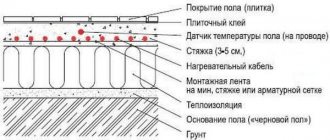
Electric and water underfloor heating systems are unable to independently maintain the set temperature in the premises of a private home. The owner adapts to adjust the power of the boiler or heating circuits manually, achieving a comfortable air temperature. To organize automatic microclimate control, you need thermostats for underfloor heating (TP), installed in each room. The purpose of the publication is to describe existing types of thermostats, installation methods and connection diagrams for control devices.
How does a thermostat work?
A remote underfloor heating thermostat is an automatic switch that opens or closes the electrical circuit after reaching the temperature set by the user. As a result, heating stops or resumes. According to the principle of operation, underfloor heating regulators are divided into 2 types:
- Mechanical with a temperature sensor in the form of a bimetallic plate. When heated, this element bends and at a certain moment breaks the circuit. The plate then cools, straightens and closes the contacts again.
- In electronic (relay) regulators, the temperature sensor is a thermistor that changes the resistance to the electric current depending on the heating. The controller microcircuit detects this change and issues a command to the relay, the winding opens the contacts, and the circuit is broken.
The device of the simplest thermostat with a bimetallic plate
Reference. Electronic devices are equipped with their own source (batteries) or are connected to the home network. The simplest mechanical thermostats operate without external power supply. This is not an advantage, since water transformers still require electricity to operate.
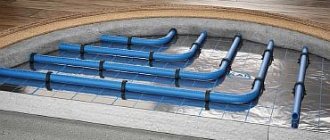
Now let us explain how automatic control of a heated floor is realized using room thermostats. Electric heating circuits (cable sections, infrared film) work like this:
- The thermostat installed in the room is connected to the main power supply line. While the room is cold, the circuit is closed.
- The homeowner sets the device to the desired temperature, and the heating turns on. When it reaches the required value, the temperature sensor is triggered, the circuit is opened, and the power line is de-energized.
- After cooling by 0.5–1 degree, the power supply is restored and heating continues. By the way, the difference between on/off temperatures is called hysteresis.
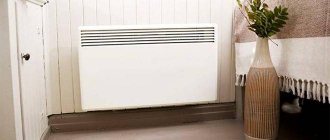
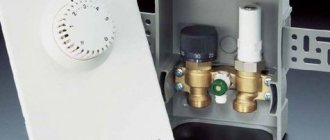
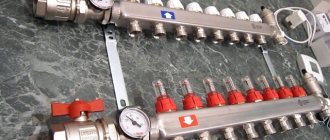
Thermoelectric actuators that work with room thermostats are screwed onto the valves of the distribution manifold.
The operating principle of the thermostat for water heated floors is the same. Only the relay opens the power supply circuit of the thermoelectric drive (otherwise known as the servo drive). It stands on the distribution manifold of the TP and closes/opens the coolant supply to the heating circuit.
Servo drives are placed on each loop and connected to separate regulators located in different rooms. How the automated water floor heating system works, look at the video:
Thermostats for electric and water transformer stations - what is the difference
In fact, there is no difference; in both cases, the thermostat performs one function - it turns the heating on or off, interrupting the supply of voltage to the actuator - the heating cable or servo drive. But not every device is suitable for working with electric floors; for example, a purely mechanical device cannot be used. Let's explain why:
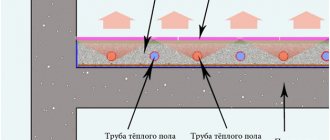
- The heating of the electrical transformer is controlled by a remote sensor located in the floor between the loops of the resistive cable. It allows you to limit the maximum temperature of the floor covering and protect the cable section from overheating.
- Mechanical thermostats contain a plate that responds to changes in air temperature. The device is not designed to connect an external temperature sensor, so it does not “see” the degree of heating of the floor screed.
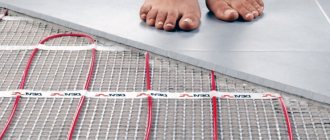
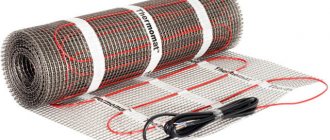
- Film heated floors work in a similar way. When it is necessary to regulate the air temperature, a relay thermostat is selected, equipped with an internal sensor and terminals for connecting an external one.
Electric heating transformers are always installed with a thermistor sensor that measures the floor temperature
Note. The thermostat controller simultaneously processes signals from the floor and built-in sensor. When 1 of the 2 thermistors indicates that the set temperature threshold has been reached, the electric heating is turned off.
To adjust the water heating circuits, an air-heated floor sensor is used; a remote meter is installed at will or if necessary. For example, to control edge zones that are very cold. The coolant temperature is limited by control valves on the manifold - RTL thermal heads or a mixing valve with a surface-mounted/submersible sensor.
Types of temperature sensors for underfloor heating systems
The operating mode of STP heating elements directly depends on the correct temperature measurement by temperature sensors. They can be built into the body of the control box or placed remotely.
Thermal sensors come in four types:
- To determine air temperature.
- Infrared, measuring the heating of the floor surface from a distance.
- To determine the temperature of the floor surface by contact method.
- Combined.
The air heating sensor is usually built into the thermostat or its mobile unit. It is used when the heated floor is the main heating system. The main requirement for its location is the presence of natural air circulation around the device.
The tips of temperature sensors should be made of materials that conduct heat well, then the speed of the thermostat's response to excess heat will be higher
Infrared floor temperature meters can be built into the thermostat housing or placed as a separate unit. The main requirement for their installation is that there are no obstacles between the sensor and the floor. The distance between the device and the surface to be analyzed must be at least 30 cm.
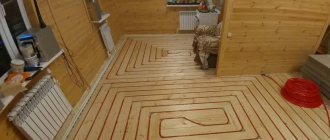
Contact-type temperature sensors look like a long wire with a thickening at the end. On the one hand, they are connected to the thermostat unit, and on the other, they are placed in a special long corrugated pipe under the floor. This installation feature makes it easy to replace a broken sensor with a new one.
The advantage of underground placement is the possibility of multi-zone control of floor temperature within one room. Typically, such sensors are installed when installing a heated floor as an additional heating system.
Several sensors can be connected to the thermostat, but this scheme is used mainly within the framework of an integral set of equipment.
Tips for choosing a device
We believe that installing mechanical thermostats on heated floors is pointless. These devices are somewhat outdated, the number of functions is limited, and the accuracy of the maintained temperature leaves much to be desired. The devices can be used in utility or technical rooms, where it is necessary to maintain +15...18 °C around the clock.
We select the type of microprocessor thermostat depending on the heating method, operating conditions and our own wishes:
- It is better to buy a regulator for an electric floor together with a heating cable (film) and sensors from one manufacturer. For example, Devi, Caleo and Teplolux companies sell their own control devices.
- If you have to buy a thermostat for electric TP separately, you should choose any two-pin device equipped with terminals for connecting an external sensor. Pay attention to the maximum power indicator that the regulator is capable of switching (usually within 2...4 kW).
An example of technical characteristics of Teplolux brand regulators - For water heated floors, it is better to take a universal (3-pin) thermostat, an external temperature sensor - if necessary. Switching power does not matter, since servos consume 1...3 W of electricity.
- The number of additional bells and whistles depends on your needs and wallet. But if you need real energy savings, consider programmable models that turn on heating on a schedule. During working hours or at night, the temperature in the house can be lowered to 18...20 °C.
Installation of thermostats is provided in each room. This means that you will have to pull the wires from there to the TP comb, where the servos of the water circuits are located. Such “electrification” is inappropriate in apartments with fresh designer renovations. Solution: install a switching unit with a receiver near the collector, and wireless battery-powered thermostats in the rooms.
Reference. Typically, switch units have 1–2 relay outputs for connecting a circulation pump or boiler burner. A Danfoss switching device costs about 100 euros, a TP5001A-RF wireless controller costs 82 €, an RX type receiver for 3 thermostats costs 95 €.
Additional recommendations
Before buying a thermostat, carefully read its characteristics and capabilities - this will allow you to purchase a device with the functions you really need at the best price:
- For small rooms, it is preferable to choose the simplest thermostats with internal temperature sensors; digital devices are suitable for large rooms.
- It is advisable to use devices with the ability to adjust the temperature in several rooms if all the residents of the house are absent during the day. Otherwise, you'll just pay for an unnecessary option.
- The thermostat should have a reserve of 15-20% of the power of all heating components connected to the device.
- In wooden houses or rooms with wooden interiors, use devices with open installation (overhead housing). Only overlay thermostat boxes.
If you follow these simple conditions, the purchased thermostat will accurately perform its functions, will last a long time and will not cause any problems.
Installation and connection of the thermostat
Before installation, carefully read the operating instructions for the device. Typically it contains the following installation instructions:
- thermostat height above floor level – 1.5…1.7 m;
- do not place the regulator with an air sensor near sources of heat or cold - heating radiators, air conditioners, ventilation openings;
- technological distance from window and door openings – 1 m (minimum);
- maintain the maximum distance between the thermostat and the distribution manifold of water transformer substations (the cable length is indicated in the instructions);
- the external sensor is located exactly in the middle between the underfloor heating loops at a distance of 500 mm from the wall;
- The floor temperature sensor is mounted inside the corrugated pipe; it should be easily pulled out after pouring the screed.
Surface-mounted devices are screwed directly to the wall, the wiring is laid in grooves. A recess is made under the built-in thermostats, and a regular socket box is installed.
Advice. To connect the regulator, use a two-core copper cable with a cross-section of 0.75 mm². The connection diagram for an electric heated floor circuit with an external sensor looks like this:
If the cable heating section consumes more power than the thermostat can switch, you need to use a modular contactor in the circuit. The specified actuator is mounted on a standard DIN rail.
Here the thermostat sends a control signal to the contactor, which opens the power line
Some versions of thermostats have a contact for connecting a timer. This solution allows you to reduce the temperature in the room by 5 degrees once a day without purchasing an expensive digital model of the device. The timer circuit is shown below.
The Latin letter L in the diagram indicates the phase wire, N - zero (neutral)
Let's move on to water heated floors. The simplest way is to connect the thermostat to the servo drive directly (in series). Just first find out the type of drive, “normally open” must be connected to the normally open contact of the device, “normally closed” - to the break contact. Often, manufacturers put the appropriate markings on the terminals - NO or NC. The COM contact is common.
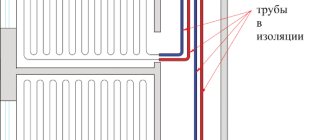
To implement multi-zone underfloor heating in a private home with wireless thermostats, use the following circuit diagram. Terminal numbers and other details are not indicated here, since equipment from different manufacturers has different markings.
Reference. Patch panels, receivers and wi-fi modules are produced by many well-known manufacturers - Legrand, Danfoss and others. How the thermostat-switching unit combination functions is described in the video.
Step-by-step installation instructions
For the thermostat to work and accurately determine the temperature, it is not enough to choose it correctly; it is also important to install the device correctly. Installation usually does not cause problems, but we decided to clearly explain this.
Regardless of which regulator you decide to install, you should start by choosing a location for it. It should be convenient to use. It is necessary to calculate so that the device is located close to the sockets and doors, the height from the floor is 1.5 meters. It cannot be mounted near a window.
Usually, the thermostat kit includes instructions that you need to read.
Sequencing:
- Before starting work, the installation site is de-energized;
- the wires from the heated floor must already be connected to the socket box;
- then the sensor is installed - it is placed in a corrugation, one end is brought out into the socket box, and the second is located between the heaters (cable or infrared film floor plates);
- insulation is removed from the floor wires - 6 cm;
- the cable screens are connected to the yellow-green wire, then everything is placed in the socket box;
- the top panel of the thermostat is removed - you need to insert a straight screwdriver into the groove from below, pressing the lid will snap off;
- the floor wires are connected to the required terminals of the regulator according to the diagram;
- the wires are carefully bent, the device is inserted into the socket;
- the frame is installed and the top panel is attached.
The floor heating thermostat is connected, all that remains is to check its operation.
Setting up the thermostat
All steps for setting up the thermostat are described in the operating manual. If the model is not programmable, then you just need to set the required heating level with a switch.
Setting up a programmable thermostat is more complicated and requires following a certain sequence:
- Sets the day of the week and current time.
- Checks which temperature sensor is turned on. Usually this is a floor sensor, but if there are several of them, it is recommended to turn on both.
- Selectable from the “menu”: “Morning”, “Night”, “At Home”, “Away from Home”. The time and temperature are adjusted, then the set values are confirmed.
You can program the controller so that the heated floor will heat up during the day and turn off at night.
It is clear that effective operation of a heated floor without a thermostat is not possible. It's up to you to decide which model to choose. However, you should take into account the characteristics of a heated floor so as not to purchase a fancy, expensive model for a heating system that will work well with a simple device.
Sources
- https://ProDatchik.ru/vidy/datchik-temperatury-teplogo-pola/
- https://savesys.ru/umnyiy-dom/datchiki/datchik-na-teplyj-pol.html
- https://TrubaNet.ru/teplyjj-pol/kakoy-termoregulyator-dlya-teplogo-pola-vybrat.html
- https://obzor-expert.com/termoregulyator-dlya-teplogo-pola-kakoj-luchshe-vybrat-top-11-luchshih-modelej/
What do you think of this article?
Finally, about setting the temperature
To set up each floor heating thermostat and check the performance of the system as a whole, you should turn on the heating and set all devices to the desired temperature. Please note that the house needs to be warmed up completely. The optimal boiler operating mode is 60 °C; if the heat generator starts to “clock” (frequently switch off and start), it is better to reduce the power.
The essence of the setting is to select a comfortable temperature in all living areas. The thermostat display readings do not always correspond to our feelings, so the settings will have to be adjusted during operation. A separate issue is programming heating according to a schedule; this procedure is described in the instructions for a specific device.
Alternative options
If the room area does not exceed 10 m2, then the temperature can be adjusted using simple valves. You only need two devices - for supply and return. If you need to increase the temperature, just unscrew the valve more, and vice versa, by tightening the tap, you can reduce the temperature of the coolant. However, unlike a thermostatic three-way mixing valve for underfloor heating, the valve must be closed manually. And it is quite difficult to obtain accurate data - everything is determined only experimentally.