A warm floor is a common heating element; its peculiarity lies in its placement. Like any heating device that must maintain a certain temperature of the air or some surface, a warm floor has a temperature regulator. It is called a thermostat or thermostat. The thermostat is designed to control the temperature of the heated floor so that it does not deviate from the set temperature value. Typically, all such thermostats for heated floors are packaged together with the heated floors themselves. But there are also universal thermostats that can control any heated floors. Moreover, the latter can be of any principle of operation and, in particular, can be connected to heating an infrared heated floor. For example, the Nobo company produces universal thermostats for controlling heated floors of any brand and for a system of any principle of operation, and control is possible even remotely, via the Internet.
Purpose and principle of operation
The main task of the thermostat is to control the operation of the heated floor system.
The operating principle depends on the type of heated floor:
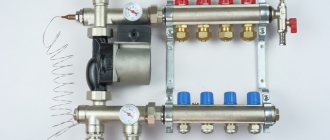
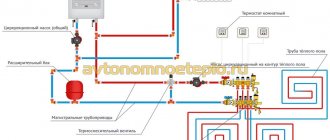
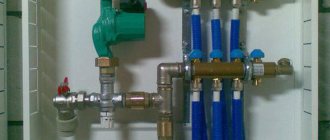
For a water floor - a decrease or increase in the volume of hot coolant coming from the heating system. In practice, it is a valve (thermal mixing valve) that increases and decreases the flow of hot and cooled coolant in the circuit.
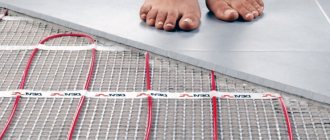
For electric - turning on and off heating elements or reducing or increasing the electric current passing through them.
The device provides comfortable conditions for living, economical consumption of fuel or electricity. The thermostat works in tandem with a temperature sensor, from which information is received.
Depending on the type of heating, the devices can adjust the following parameters:
- Floor temperature . Sensors are installed next to the heating circuit and indicate the degree of heating of the finished flooring. They are used in short-length circuits and low-power systems used as an additional heat source in conjunction with batteries.
- Air temperature . Sensors for these types are mounted directly in the housing. They are used on powerful systems in houses that have thermal insulation that meets the requirements of the standards. Otherwise, large coolant losses make operating the system unprofitable
- Combined . The most advanced type of thermostat. Heating parameters are controlled taking into account the readings of two sensors: in the room and next to the heating system. If desired, control can be carried out based on the readings of only one of the sensors installed in the room.
Classification
Electronic controllers also include a touch-sensitive and programmable temperature controller. Programming modes allows you to set an operating algorithm for a specific time of day or days of the week, which significantly reduces energy consumption.
As an example, we can cite products from brands such as Devireg, Din, I-warm, Eberle, Gira, RTC, etc. Many manufacturers produce models equipped with a remote control that allows you to control the device via infrared radiation (Energy, Roomstat, Oventrop, Unica, Rehau, etc.).
A two-zone (two-channel) temperature controller allows you to set the necessary floor heating parameters for two different rooms. Accordingly, two independent switching relays, triggered by two temperature sensors, are used for control.
This implementation scheme allows you to control the temperature in each room from one device (Jung, Ensto, Menred, Merten, Valena).
Depending on the installation method, devices are usually divided into overhead and built-in. The first are mounted directly on the wall, for the second you need to make a hole, similar to the one for built-in sockets.
Types of devices
Based on the type of installation, thermostats are divided into 3 categories:
- overhead – mounted directly on the wall;
- built-in - installed in standard socket boxes, which are used for mounting switches and sockets, or can be mounted on the wall using an overhead box;
- built into a frame , for example, Legrand - for best compliance with sockets and switches located nearby;
- with DIN rail mounting – installed in control cabinets (panels).
But the main classification is the method of adjusting (setting) devices. It can be carried out mechanically, manually or using automation.
Mechanical
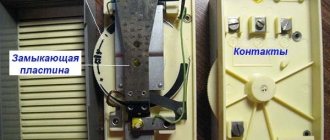
Devices in which adjustment is made manually. There are no electronic components in their design. The function of a temperature sensor in a mechanical device is performed by a bimetallic plate. When cold, it closes the contacts of the heating mats. As the temperature in the room increases, the electrical circuit bends and disconnects, as a result, the operation of the heating elements stops.
The device is adjusted by rotating the wheel, which is adjusted to a certain temperature.
A mechanical device has its advantages and disadvantages:
- low cost;
- ease of operation;
- ability to work at low temperatures;
- reliability;
- independence from voltage surges;
- long service life;
- automatic switching on after a power outage.
- minimal functionality;
- Lack of remote control capability;
- large error in settings;
- the presence of loud clicks when bending the bimetallic plate.
Despite their simplicity and the described disadvantages, mechanical thermostats have a strong hold on the consumer market due to their high reliability, simplicity and interchangeability.
Electronic
Outwardly similar to mechanical devices, but radically different in functionality.
They consist of the following components:
- frame;
- control microcircuit;
- built-in or external temperature sensor;
- electronic key for turning on and off the power supply to the heating mats.
Depending on the model, temperature adjustment in electronic thermostats can be done using a touch screen, buttons, an adjustment wheel, or a combination of these methods. Some models support multi-zone temperature control, in which several isolated heated floor zones with different sensors are independently connected to the control chip.
Pros and cons of electronic devices:
- the ability to install a remote temperature sensor in any location in the room;
- presence of a display showing the current and set temperature;
- possibility of multi-zone heating control;
- temperature sensor accuracy up to fractions of a degree;
- indication in case of error or breakdown;
- possibility of completing with an external remote control unit.
- dependence of the stability of the control microcircuit on voltage drops;
- failures in settings during a short-term power outage;
- higher price than mechanical devices.
Mechanical thermostats are not much cheaper than their electronic counterparts, therefore, in the absence of voltage drops in the network, the choice between these two types of devices is determined mainly by their appearance.
Programmable
This is an improved type of electronic thermostats. Unlike simple ones, programmable thermostats allow you to adjust the temperature of the heated floor at different periods of time, which significantly saves electrical energy and reduces bills. The cost of such devices directly depends on the quality of the display and the number of parameters they operate in their work.
Programmable thermostats can also provide a remote control function from a smartphone via Wi-Fi, which significantly expands the functionality. Manufacturers of such devices produce special applications for smartphones. Having installed them, you can configure the equipment from your gadget.
The disadvantages of programmable devices include the high cost and complexity of setup in the absence of skills in handling the equipment. Otherwise, the pros and cons of programmable thermostats are the same as conventional electronic ones.
In electronic and programmable thermostats, internal components can be divided into two blocks: main and mobile. Electrical cables are connected to the main box and wired temperature sensors are connected. It can be located in any remote location of the room, which facilitates installation work.
Existing types of underfloor heating temperature controllers
Despite the fact that currently there is a large selection of floor heating thermostats, all of them can be divided into three main groups:
Heated floor thermostats can be equipped with various temperature measurement sensors.
There are also built-in and overhead temperature controllers for heated floors. The first ones are built into the wall like, for example, a socket, and the second ones are mounted inside a special box.
Criterias of choice
When selecting a thermostat model, they are primarily guided by its compliance with the underfloor heating system with which it will work. Additionally, it is worth considering some more technical and external characteristics.
Power
Maximum load is the most important characteristic of a thermostat. For effective operation, it is necessary to select a device slightly larger than the expected load. The most popular are thermostats with maximum communication current:
3 A (660 W) – used to control electronic valves for water floors;
16 A (3.5 kW) – used to control electric heated floors (the area of the heating elements should not exceed 16 square meters with a power of 220 W/m2);
30 A (6.0 kW) – used to control electric heated floors and heating devices with electric power up to 6 kW;
If the load of the heating element is greater than these values, auxiliary devices, for example, magnetic starters, are used together with the thermostat.
Control method
According to this parameter, the choice will be purely subjective: someone likes simplicity and wants to turn the wheel, someone is used to pressing buttons, and someone is more accustomed to using a touch screen.
Design
The color and design of the thermostat is chosen to match the tone of the sockets next to which they are mounted. If the sockets are white, then the thermostat is chosen to be white. The most common colors are white, ivory, gray and black. When decorating a room, the design of the thermostat is of great importance. It’s one thing when it’s an ordinary plastic box and quite another when it’s a stylish black glass case.
Thermostat models are not tied to specific manufacturers. During installation, the devices can be combined with heating mats and sensors from various companies.
Review of prices in various CIS cities
If you need to buy a regulator to control your underfloor heating system, the information in the table on the average cost of the Teplolux TR-515 device in various cities of Russia and the CIS may be useful.
Considering the prevalence of this model and the manufacturer’s wide dealer network, the cost variation in different regions is insignificant.
Best models
It’s easy to get confused with the abundance of thermostat models on the modern market, so when choosing a device you should use reviews from customers and experts. Some models are especially popular because they have proven themselves to be reliable and durable devices.
Nest Learning Thermostat 3.0
Programmable thermostat with a large (3-inch) display with a resolution of 320X320 pixels. The device is equipped with modern functions: auto-schedule, auto-shutdown, control via Wi-Fi. Homeowners praise the ease of installation, intuitive menu, and large display of this thermostat.
Advantages and disadvantages of the model:
- high-quality, large display;
- rich functional content;
- remote control;
- ease of installation.
- high price
Caleo 520
Programmable model with touch-sensitive keyboard. The device is easy to set up and convenient to use. Experts note the low power of the device, the presence of backlighting and a keypad lock as the advantages of the device.
The operating temperature range of the device is from 0 to +40 degrees.
Advantages and disadvantages of the model:
- reasonable price;
- touch control;
- overhead mounting option;
- stylish design.
- loud relay clicks during operation
Electrolux ETT-16 TOUCH
Hidden type programmable device. It features convenient operation and a dust-repellent screen. The model was developed for Electrolux heated floors, which is important to consider when purchasing. Thanks to the programming function, you can set up to 6 temperature modes and configure the device for each day of the week. The touch screen displays air temperature, system status and current time.
Homeowners praise this device for its energy savings, touch controls, and beautiful appearance. One of the disadvantages is the absence of error codes and their descriptions in the instructions.
DEVI Touch
Programmable model with a microprocessor control unit and a large touch display. Operating temperature range from +5 to +45 degrees. Modern device options: frost protection, absence from the room, open window detection function.
Advantages and disadvantages of the model:
- bright screen;
- clear setup;
- long wires;
- rich equipment.
- uninformative instructions.
Thermo Thermoreg TI-200
An easy to set up and control mechanical thermostat made in Sweden. The operating mode of the included floor temperature sensor is + 5 - + 40 degrees.
Pros and cons of the model:
- high-quality assembly;
- body made of soft-touch white plastic;
- withstands high loads;
- reliability.
- no display;
- no programming function.
Connection
As a rule, each underfloor heating temperature controller comes with instructions, following which it won’t be difficult to make the connection yourself. Remember that the heating element control device is connected to the system last.
Actually, all that is needed for this is to correctly connect the power, sensor and heating cable (or heating panel).
As a rule, the terminal block has a corresponding signature, so there should be no problems with the connection. Devices are always equipped with a temperature sensor, therefore, the question of choosing one will also not worry you.
After installing a mechanical heat regulator, it is immediately ready for use. Installation of a programmable device does not mean it is ready for operation; it will need to be configured.
Before you test turn on the heated floor, make sure that the heat regulator is connected securely and correctly, otherwise the device may not function correctly or even fail.
Moreover, the warranty does not apply to this case.
Installation rules
The thermostat is connected at the last stage of installation of the heated floor system. Only this order will allow you to accurately calculate the length of the electrical cables running to the device from the temperature sensors and heating elements. To lay wires in the slab, appropriate grooves are made - grooves. In them, wires are laid to the electrical panel and to the floor.
If the equipment is installed in a room with high-quality interior finishing, then you can use overhead devices and run cables over the walls in boxes.
When installing thermostats, it is important to adhere to the following rules:
- It is better to place the adjusting device at a distance of 40 to 170 cm from the floor, unless otherwise provided in the instructions. If you have a mobile control panel, the main box can be installed in any convenient place. Thermostats with built-in sensors are installed at a height of 80 cm.
- In damp rooms, it is permissible to use thermostats with appropriate protection against water ingress.
- When the device is built into a wall, a mounting box made of non-combustible materials is used.
- Wires from the regulator to underfloor heating heaters with a power of more than 1 kW must be routed in hollow heat-resistant tubes.
- Wire connections to the thermostat terminals must be made exclusively according to the diagram specified in the manual.
- When turning on the device for the first time, it is necessary to take into account the minimum operating temperature specified in the instructions.
- When filling the floor with solution, it is necessary to well insulate the end of the tube with the temperature sensor.
- Before pouring the solution onto the floor, it is necessary to check the functionality of all elements of the system.
- Heating mats must be grounded, and an RCD is installed in front of the thermostat.
Compliance with these rules will protect residents from electric shock, the house from fire, and equipment from premature failure.
Choosing a location for installation
To install, you first need to determine where the thermostat will be installed. Most modern devices are designed for a standard wall box with a diameter of 65 mm. Whether they are installed in the socket frame or placed separately - this is not so important for installation.
It is advisable to power the thermostat from the electrical panel using an automatic protective shutdown system. But it is also possible to use connections to an outlet (AC mains 220 V, 50 Hz). The location of the temperature sensors is critical to proper operation. If the device has a remote air temperature sensor, it must be installed at a height of at least 1.5 m from the surface of the heated floor and away from heat sources (for example, a window or radiator).
Connecting the device
To connect the wires, remove the front panel from the thermostat, carefully disassemble the control mechanism; on simple models it is a wheel. To remove it, you need to pry the element off with a screwdriver. Do not put pressure on the body: it may crack.
Next steps:
- Remove the screw that secures the front panel to the mechanism itself. Many models have special plastic latches that hold the front panel in place. To remove it, just press the latches with a screwdriver and it will snap off.
- Next, from the indicated height, use a tape measure to measure the length from the thermostat to the sensor, which will be in the floor.
- Route the electrical wires to the wiring box. Use the indicator to identify the phase cable (black or brown), the cable with the working zero (blue), and the grounding wire. The voltage between zero and phase should be 220 V.
- Before installing a heated floor thermostat, you need to place a temperature sensor between it and the heating element and cover it with a corrugated pipe that protects it from mechanical stress. Pull the sensor wire to the thermostat housing. Experts strongly recommend following the instructions for the heated floor thermostat when connecting.
- After these manipulations, put the device cover back in place. Apply electric current to the device to check that it is installed correctly and is ready for use.
- Set the desired temperature parameters and run the system for a day in test mode. Only after making sure that there are no problems and that there is an uninterrupted supply of current to the device can you begin finishing.
Modern programmable thermostats are electronic devices with a complex structure, so it is advisable to entrust their installation and configuration to qualified specialists. Errors made during installation and incorrectly selected modes can lead to failure of the entire system and damage the floor surface.
Step-by-step installation instructions
For the thermostat to work and accurately determine the temperature, it is not enough to choose it correctly; it is also important to install the device correctly. Installation usually does not cause problems, but we decided to clearly explain this.
Regardless of which regulator you decide to install, you should start by choosing a location for it. It should be convenient to use. It is necessary to calculate so that the device is located close to the sockets and doors, the height from the floor is 1.5 meters. It cannot be mounted near a window.
Usually, the thermostat kit includes instructions that you need to read.
Sequencing:
- Before starting work, the installation site is de-energized;
- the wires from the heated floor must already be connected to the socket box;
- then the sensor is installed - it is placed in a corrugation, one end is brought out into the socket box, and the second is located between the heaters (cable or infrared film floor plates);
- insulation is removed from the floor wires - 6 cm;
- the cable screens are connected to the yellow-green wire, then everything is placed in the socket box;
- the top panel of the thermostat is removed - you need to insert a straight screwdriver into the groove from below, pressing the lid will snap off;
- the floor wires are connected to the required terminals of the regulator according to the diagram;
- the wires are carefully bent, the device is inserted into the socket;
- the frame is installed and the top panel is attached.
The floor heating thermostat is connected, all that remains is to check its operation.
FAQ
Is it possible to use one thermostat in several rooms at the same time?
Yes, the thermostat can be used in similar rooms, it can be a toilet and a bathroom, a corridor and a kitchen, a hallway and a corridor.
Is it possible to connect two independent underfloor heating circuits to one regulator? Are there such thermostats?
Yes, there is such a thermostat. For example, the I-Warm 730 model.
Is it possible to connect two different floors, cable and film, to one thermostat?
No. Cable and film flooring have different performance characteristics that require individual adjustment.
Is it possible to install the regulator in a standard socket box?
Yes, it is in a standard single box with a diameter of 68 mm that thermostats are installed, except for TR 730 - it is installed in a one-and-a-half box (oval shape).
How to find out how many heated floors can be connected to one thermostat?
To calculate, you need a current formula - I=P/U The current in the thermostat is 16 A, hence: P = I*U = 16 A * 220 V = 3520 W. To find out how many heated floors can be connected to the thermostat, just divide the power of the thermostat (3520 W) by the rated power of 1 sq./m of heated floor.
Are thermostat settings lost if there is a power outage?
It all depends on the model. For example, the TKV 60 thermostat, after turning off the power, resets the settings to factory settings and, after applying voltage, begins to heat the floor, and the E51, E91, E92 thermostats have a built-in battery and retain the settings even when the voltage is turned off.
What is hysteresis?
Hysteresis is the difference between the temperature at which the heater turns on and off. For example, the sensor is set to 25 degrees, and the floor turns on when it cools down to 23 degrees. The difference between these indicators is hysteresis.
The thermostat does not turn on the floor immediately, what is the reason?
Incorrect operation or incorrect installation of the temperature sensor.
How to properly connect a floor heating regulator
Connecting a heated floor temperature controller does not require special education or any special skills.
This can be done independently if you have a minimum of electrical knowledge and follow a certain sequence of actions. First of all, you need to choose and purchase the device itself. Then it must be prepared for connection.
First you need to inspect the device to visually exclude the possibility of breakdowns and damage.
Then, in accordance with the list provided by the manufacturer, it is necessary to check the presence of all the components listed in it. Then the reliability of the means for strengthening the apparatus and the correct connection of the thermocouple are checked. Only after this can you proceed directly to connecting the thermostat.
The connection diagram for the heated floor temperature controller is shown either in the operating instructions or on the body of the thermostat itself. After studying it, you can easily connect the device yourself. Any type of underfloor heating thermostat has special terminals for connecting wires, each of which performs specific functions:
IMPORTANT!!! All work on connecting and adjusting the heated floor thermostat must be done after first turning off the voltage.
The last step is to check whether the device is functioning correctly. To do this, you must adhere to the following sequence of actions:
If it is necessary to reduce the desired temperature, you need to turn the relay to the selected position and the power supply should stop, which indicates that the device is functioning correctly.
If, as the temperature increases, there is no voltage in contacts No. 3 and No. 4, then you need to check the operation of the heated floor temperature sensor. To do this, using a special device, you can measure the resistance in the wires and compare them with the passport data. If the parameters do not match, then you may need to replace the heated floor temperature sensor.
If you purchased a programmable sensor, a message about a possible malfunction will appear on its panel.
There is another method for checking the correct operation of the floor heating thermostat. To do this, you can connect the heating system directly. To do this, with the voltage turned off, you need to connect contact No. 4 to contact No. 1, and contact No. 3 to contact No. 2 and apply voltage to the network, wait about half an hour, try the floor, if it gets hot, then the cause of the defect is in the regulator itself warm floor temperature.
How to check a temperature sensor
To find out why the temperature sensor is not working, you can use a multimeter:
- The input line is being tested. You need to turn on the power and check if there is voltage in the wires.
- If no problems are found, the output line is tested. The heating cable is disconnected from the regulator and the power is turned on.
If there is no voltage at the output terminals, we can say that the thermal device has become unusable. It is removed and replaced with a new one.