Home/Types of heated floors/Water heated floor. Installation of a warm water floor./Optimal step for laying a heated floor: Types of pipes and calculations
Water-heated floors have been a leader in the consumer market for quite some time. It is quite reliable and economical to operate, has high-quality heating of the building and is convenient to use. But all these qualities directly depend on the correct calculation of the working material, which is influenced by the pitch of laying the water-heated floor pipes.
What is a heated floor?
This is one of the most popular heating systems in the world today. It has earned its popularity thanks to:
- Rational use of energy resources
- Uniform heating of the entire room
- Comfortable microclimate created during operation
- Durability and unpretentiousness
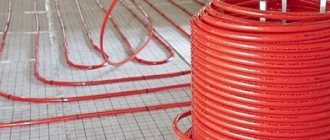
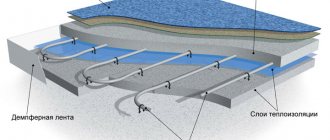
The system appeared relatively recently and has won the sympathy of many developers. It consists of pipes laid in a special way in a screed through which the heated coolant passes. This heat is then distributed throughout the entire room.
Choosing the optimal installation method
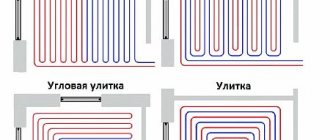
In large rooms (halls, living rooms), the ideal option for laying the pipeline is a “snail”; it is capable of uniformly heating an area of any size. Snake laying is possible, but the floor in one area will be hotter than in another.
For small rooms, a “snake” is quite suitable, because on a small surface the temperature difference will be erased and will not be noticeable. This method is also great for rooms with complex layouts. In addition, the location of the “snake” contour along the outer walls will cut off the cold coming from the street.
This option is ideal for rooms with different zones. In each zone, you can lay the circuit according to the most suitable pattern to create an optimal microclimate.
The “corner snake” does not warm up the room well, it is recommended to use it with a combined method; it will ideally heat corners.
Comparison of heated floors with radiators
If we compare the already familiar radiator heating system with a heated floor, then in the case of the first, hot air flows first rush upward when heated, and then only fall down. Therefore, with radiators, we quite often feel a cold floor.
The installed heated floor works on a different principle. The underfloor heating pipes first heat the screed, then the screed radiates heat evenly from bottom to top. The higher, the less intense heating.
Therefore, in terms of heat distribution, heated floors look much more advantageous. As for efficiency, both systems are the same, plus or minus.
They often like to mention that heated floors are more economical than other systems. This is a big misconception. The task of any heating system is to compensate for heat loss in the home. And heat loss is always constant. Therefore, resources must be spent equally. Warm floors can actually be much more economical. If you use advanced solutions for low-temperature systems.
Parameters affecting the distance between pipes
There are several main points that should be taken into account when determining the distance between the pipes of a water-heated floor; let’s consider them in more detail.
Watch the video
The most effective step in installing underfloor heating! How not to make a mistake
Type of pipes and diameter
The material of the pipes and their diameter are one of the main indicators; they directly affect the laying step of the water floor. That is:
- The interpipe distance of a warm water floor depends on the material from which the pipe product is made, or rather not on it, but on the degree of its thermal conductivity.
According to the level of decreasing thermal conductivity, the first place is given to copper pipes and corrugated stainless steel products. Then there are pipes made of metal-plastic, polyethylene and polypropylene.
- Copper - have excellent thermal conductivity, a service life of more than 10 years, but they are expensive and installation is quite complicated;
- metal-plastic - have good heat transfer and performance characteristics, are easy to install, and are inexpensive;
- polyethylene - they transmit heat well, are wear-resistant, the price is low, but they have insufficient ductility, which requires rigid fixation;
- polypropylene - have the lowest heat transfer rate, they are the ones least likely to be installed in water-heated floors.
That is, the higher the thermal conductivity of the material, the more the gaps between the loops increase, and vice versa, if this indicator is not high, then the step decreases.
- From the diameter of the pipeline - the larger it is, the wider the laying step, and accordingly, the smaller, the interval between turns of the warm water floor decreases. Since a product with a large cross-section occupies a large area, it is natural that such a coil will give off more heat. A thin pipe has increased hydraulic resistance.
Visually, the dependence of the step when laying the contour of a water floor on the cross-section of the pipes looks like this:
- step 10 - 15 cm, with a diameter from 20 to 36 mm - the amount of pipe material that is needed per 1 m2 is 7 - 10 linear meters, respectively;
- 20 - 25 cm, diameter 20 - 36 mm - required pipe size 4 - 5 meters;
- 30 cm, diameter 20 - 36 mm - quantity from 3.5 to 4 linear meters.
Room area
To calculate the pipe laying pitch, you must first calculate the area of the heated room itself. This can be done using a simple geometric formula:
S=A*B
Where:
- S—area;
- A is the length of the room;
- B - width.
For your information! From the resulting indicator, you need to exclude areas where you plan to install large-sized furniture.
There is no point in laying a water floor under it; this will only lead to additional costs for the purchase of material.
Taking into account the obtained result, the optimal distance between the floor turns is determined. For large rooms it is recommended to make the laying step smaller, but if there is a small one, on the contrary, the distance increases.
Coefficient of thermal conductivity
The heat transfer of a structure is affected not only by the level of thermal conductivity of the pipeline, but also of all materials in the “pie”. More often, the contour is placed in the screed, and if the mortar layer is more than 70 mm, then this must be taken into account when developing the laying scheme.
Different types of flooring also conduct heat differently. The best option for water heated floors is laying tiles, linoleum or laminate.
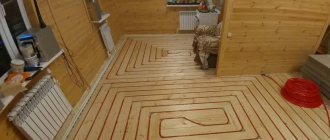
When installing heating in a building with wooden floors, and when using aluminum plates, the level of heat transfer is almost the same as with a screed.
Coolant - type and temperature
The distance between the turns is affected by the coolant - its type and degree of heating.
Liquid circulates in the floor water line, most often it is water or antifreeze. Water heats up well and retains heat, but antifreeze warms up faster and cools down longer, so its heat transfer coefficient is higher. Therefore, when using it, the turns can be made further apart from each other.
If the coolant heats up to 31 - 32 degrees, then the recommended laying step is 10 cm. At 33 - 35 degrees, the permissible distance is 15 cm, from 20 - 25 cm an interval is made when heating from 36 to 40. If the degree rises above 40, then a loop should be installed in 30 cm increments.
To determine the average temperature of the coolant for a warm water floor, you need to add up the temperatures of the supply and return circuits and divide in half.
For your information! When making calculations, you need to focus on the most ideal and suitable temperature for a person - 27 degrees.
Heat loss and location
Heat loss from windows, doors and external walls also affects the determination of the pipe-to-pipe distance in warm water floor structures. In addition, the location of the house is taken into account.
For example, in the northern regions, where there are elevated sub-zero temperatures outside and the building is warm, the presence of these differences leads to increased heat loss through window and door openings, and walls.
To compensate for these losses, it is necessary to increase the length of the pipeline and reduce the distance between the pipes.
For each loop connected to the collector assembly, the heat flow calculation should be done separately.
Optimal room temperature
The level of optimal room temperature is influenced by its purpose. In auxiliary ones it is less, in residential ones it is more. Approximate temperature recommendations:
- living rooms - from 18 to 25 degrees;
- kitchen, toilet and bath - from 18 to 26;
- corridor - from 16 to 22;
- pantry - from 12 to 22.
It is worth noting that each person has their own comfortable temperature, so you should select the temperature level for yourself.
Features of heated floors
Unlike other heating systems, underfloor heating has a number of its own features:
- This is a low temperature heating system. The serving temperature usually does not exceed 45-50 degrees
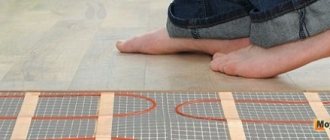
- The correct heated floor is not felt by your feet, since the surface temperature is only 28 degrees.
- Warm floors require a height of 14 cm (minimum with a finished coating). This must be taken into account when designing a house.
- The underfloor heating pipes are not leaking. Unless, of course, you deliberately buy cheap material or constantly apply high temperature and high pressure to the pipes
Optimal distance between pipe turns in different laying forms and calculation rules
After choosing the type of pipes and the method of their installation, you should make a calculation - what distance between the contours of the water floor will be optimal for your design?
As mentioned above, if you place a contour with a large cross-section close, the floor surface will overheat. Conversely, a sparse arrangement of small underfloor heating pipes will lead to thermal voids.
There are several points that must be taken into account when determining the correct hinge pitch for water floors, because this affects the uniform distribution of heat:
- The gap between the loops ranges from 50 to 450 mm, and depends on the diameter of the pipes. To simplify the calculation process, a number divisible by 50 is more often used. And for a private building - 100, 150, 200, etc.
- The pitch is influenced by the level of thermal load. With an average load of 50-80 W/sq.m, the recommended interval is 100 - 200 mm.
- The distance from the walls to the first turn should be at least 20 cm.
Experienced craftsmen often use the variable-pipe laying technique. In areas under a window or near a door, the pipe is placed more often.
It is important to determine the optimal spacing between branches, since the liquid in the pipes affects the flooring, and the correct choice of spacing will ensure the effective distribution of water flows.
Let's take a closer look at each scheme.
Snake
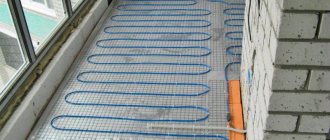
“Snake” is a simple method of calculation and installation, so this scheme is quite common. The heating element must first be installed in the coldest areas of the room - near the outside walls, balconies and windows. After that, the entire area is traversed in loops parallel to the wall, and the circuit returns to the heating device.
However, laying in a “snake” pattern does not allow the surface to be heated evenly. More often, this scheme is used when there is another heating source, or for small rooms. With a “snake”, the laying step should be as minimal as possible - 100 mm.
Corner snake
The outline is placed along the outer corner, and the next loop is placed parallel. This method ideally warms up corners. If there are three external walls, it is recommended to use the “double corner snake” option.
Double snake
The principle of installation is the same as with a “snake”. The difference is that the return pipe runs parallel to the straight line. With this option, the gap between the loops can be increased from 150 to 250 mm.
Snail
The pipes are located around the perimeter of the room, and then spiral towards the middle. The return branches go between the loops with hot water. This is the most optimal scheme; the floor is heated evenly, but this method is more labor-intensive.
The “snail” method makes it possible to place pipes with a maximum distance from each other, since heat loss is not significant. In addition, when using this scheme, pipeline consumption is reduced.
Laying TP with a snail, features of the scheme, pros and cons, calculation of the pitch and length of contours, norms and SNIPs.
Combined method
For a large room, you can use a combined scheme. The recommended option is two snail loops, and 3 - 4 snake loops. The operation of a water heated floor will be more efficient if the pipeline is laid along the edges in a “snake” pattern, and along the .
For your information! With any scheme, you can place pipes with both the same and different spacing between them.
Eventually
In conclusion, we can say that every technical nuance and parameter is important for the accuracy of calculations. Before you start purchasing equipment and consumables, make some simple calculations. This can be done manually, on your own, or using an electronic calculator.
It is important for yourself to learn a simple truth: what kind of heated floor do you need, as the main heating system or as an auxiliary means of heating
Take into account the power of the heat source, the area of the premises, and the required temperature parameters. All of the above data and other technological parameters will help you obtain ready-made calculation data with high accuracy, which you can rely on when installing heated floors at home.
Can the outline be of different lengths?
The branch of a warm water floor should not exceed 120 meters. Otherwise, you should make several separate loops. Ideally, they should all be approximately the same length. Then there will be no need for additional work on balancing and setting up the system.
If we consider an apartment with three rooms, one of which is a bathroom, then it is natural that the length of the pipeline in this room is much shorter than in the rest. The question arises: is it necessary to divide the coil in other rooms into parts so that it is equal to the size of the pipes in the bathroom?
This is not necessary; there is an acceptable discrepancy along the length of the pipeline of up to 30 to 40%, in rooms of different sizes. In addition, by using different pipe diameters and varying this by changing the laying step, you can reduce the area of a large room.
For your information! Do not forget to exclude from the area of the largest room the places where large-sized furniture will be installed.
Regardless of the chosen scheme, you should first prepare a drawing for laying the pipeline, taking into account the size of the contours and the intervals between the branches of the warm water floor.
Combined heating
Each heating method has its own advantages and disadvantages. The use of radiators is more effective in places where cold air traditionally circulates (for example, under windows). In this case, they create a thermal curtain, but provided that a distance of 10 cm is maintained between them and the window sill, and the height of the radiator above the floor is 12 cm.
Location of heating radiators
It is more advisable to use alternative heating in places where, for some reason, installing radiators is impossible. Such premises include utility rooms, toilets and bathrooms, as well as halls and corridors.
If a warm water floor system is planned to be used as an additional heat source, during its installation it is necessary to take into account some features related to the operation of radiators.
Water heated floor: characteristic features and installation
Installation of a warm water floor is most often done by pouring a concrete screed, which increases the thickness of the ceiling by several centimeters. To ensure that the height of the radiators from the level of the final coating is the optimal parameter, their contours should be installed after the installation of underfloor heating has been carried out.
Calculate the length of the contour
When making calculations to determine the number of pipes for laying a structure - a water-heated floor, the following points should be taken into account:
- the total area of all premises;
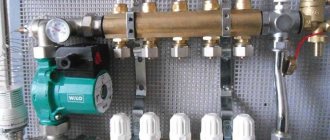
- number of collectors;
- room layout;
- the size of window openings and doors through which heat can escape;
- wall thickness;
- placement of furniture;
- air humidity;
- purpose of the rooms;
- presence of other heating systems.
Based on the average, 1 m2 will require 5 linear meters of pipe, with a laying step of 20 cm.
To most accurately calculate the size of the pipeline, the following formula is suitable:
L = S/N x 1.1
Where:
- S is the area of the room;
- N—laying step;
- 1.1 - reserve for making turns.
To the data obtained, you should add the number of meters from the floor to the manifold cabinet and back.
For clarity, let's look at the calculation process using an example:
- room area - 15 meters;
- the maximum distance to the manifold cabinet from the floor is 4 meters;
- distance between pipes - 0.15 mm;
15: 0.15 x 1.1 + (4 x 2) = 118 meters
Another way to calculate the amount of pipeline is to reflect the laying diagram on graph paper. At the same time, it is necessary to observe the scale and take into account the size of the room.
After reflecting the entire system on paper, you need to measure the length of all the coils in the drawing using a ruler, and multiply this result by the appropriate scale.