Tile is a popular floor covering, it is practical and beautiful. Most often installed in the bathroom or kitchen.
However, tile is a cold material, this becomes especially noticeable in winter. Therefore, if you want to use this coating, the best option for installing under the tiles would be a water-heated floor - we suggest you learn how to install it yourself.
Pros and cons of tiled flooring for heated floors
The combination of tiles and a warm water floor has a number of advantages:
- heated floors make the tiled surface comfortable to walk on with bare feet;
- water dries quickly on the surface, which is especially important for a kitchen, swimming pool or bathroom - step-by-step instructions for installing a hydrofloor in the bathroom;
- mold and microorganisms harmful to human health do not form on the heated tiled floor;
- installation of heating pipes under tiles does not require additional costs;
- tiled heated floors can be equipped with other types of heating;
- this combination creates conditions in the room (bath, pool) that meet sanitary standards.
It is worth separately noting the high thermal conductivity of the tiles, that is, the heat from the heating elements will pass unhindered into the room. Therefore, it is considered the most suitable coating for heated floors. In addition, tiles have the following advantages - durability, resistance to temperature changes, and strength.
The ideal option is to lay the ceramic product on a concrete screed, which is used to fill the contour of the heated floor. However, if a leak occurs, you will have to dismantle not only the concrete base, but also the tiles.
The process of laying a warm water circuit under the tiles is not complicated, but it is labor-intensive; it is important to strictly follow the technology. In addition, installing a tiled water floor is not possible in all rooms. It is recommended to install such a device in private homes. But in apartments, in order to equip a heating structure, permission is required to connect it to the general heating system.
Another disadvantage of such devices is the impressive thickness of the “pie,” so if you have low ceilings, this option is not suitable.
Important points
It is important to correctly calculate the number of pipes at the stage of designing a heated floor. This is a complex process, so beginners often entrust all calculations to specialists. This way you can save your money on buying extra material. Also, before starting work, you need to figure out exactly where in the room large furniture will be located, for example, a closet or built-in furniture. In these places, the presence of a heated floor is not necessary, because laying pipes in such cases does not make sense. It is also not necessary to lay pipes for heated floors in the space under the bathroom.
Features of laying heated floors on tiles
The combination of water heated floors and ceramic tiles is an excellent solution that can justify all kinds of costs in the shortest possible time. But this is only possible if you follow the installation instructions and correctly calculate the materials.
Do-it-yourself water heated floor under tiles
Preparatory activities
Before you begin installing a warm water floor under the tiles, you need to prepare the material, tools and design of the future structure.
Watch the video
3 How to make a layout diagram for a heated floor contour
Tools and materials
To install the heating structure, you need to prepare the following tools: a screwdriver, a tape measure, an open-end wrench, a hammer drill and a rule for leveling the screed.
In addition, you should purchase the following materials:
- pipes and elements for their fixation;
- pump and valves;
- reinforcing mesh;
- hydro and heat insulating material;
- construction livestock;
- fasteners.
Pipes for water heated floors are made from various materials; they differ in price, technical characteristics and operating conditions. Common types of pipes include:
- Polypropylene - this material bends and expands poorly when heated, so it is recommended to lay the product with reinforced fiber additives.
- Polyethylene ones are slightly more expensive than polypropylene ones, but they bend better, are stronger, can withstand high temperatures and do not expand when heated. The main disadvantage is that they tend to straighten out, so reliable fixation is required.
- Metal-plastic is a durable contour that has long been used in the installation of heated floors.
- Copper ones are a great option, they are flexible and durable. Their main disadvantage is that they are more expensive than others.
- Steel is a high-quality and durable product. But over the years, it can corrode.
Each type of pipe has its pros and cons. Therefore, when choosing, you should take into account not only the characteristics of the product and the room in which they will be installed, but also your requirements and financial capabilities.
Calculation of required material
To calculate the length of the pipeline, the characteristics of the pipe product and the features of the heating system should be taken into account. To make calculations easier, you can use an online calculator.
The program produces averaged data, so a correction factor is used for adjustment, which is influenced by a number of parameters. You will need to enter the size (diameter) of the pipes, laying step, information about the material of the circuit, finishing coating and screed.
To calculate the size of the pipeline, you can use the following formula:
L=S/n*1,1+k,
wherein:
- L is the length of the heating circuit;
- S is the area of the room;
- n—laying step;
- 1.1 - average safety factor for bending;
- k is the distance of the collector from the floor.
There is a simpler formula - each of the two adjacent sides of the room is multiplied by the laying step and the results are summed up. This is the length of the circuit, you just need to add the distance to the collector.
Project preparation
To make a project, you can use a piece of paper from a regular notebook in a square. You should strictly adhere to the scale of the room in which installation is planned.
You need to start the drawing by drawing the general outlines of the room, marking the areas where the doors, windows and outer wall are located. If the room area is large, it is necessary to install decompression joints, which are also reflected in the plan. Heated floor pipes should not be placed at these seams. But if the contour crosses them, then it is protected by a corrugated pipe.
Then, the diagram marks the areas where it is planned to install furniture that will fit tightly to the floor. There is no point in installing heating elements here. The installation location of the manifold cabinet is determined. After that, the laying diagram of the pipes is reflected on the plan.
Two main schemes that are used for installation:
- “snake” - the pipeline is laid along the wall with a certain pitch, that is, in one half of the room the pipes will be hotter than in the other, this method is recommended for small rooms;
- “snail” - pipes with hot coolant are placed parallel to those through which cooled water circulates, so the heating of the surface is more uniform.
When drawing up a diagram, you must adhere to a number of rules:
- the length of one circuit is no more than 120 meters;
- all highways should be approximately the same - the difference is no more than 15 meters;
- standard pitch is 150 mm, in harsh climates it can be slightly reduced;
- the heating element must be laid at a distance of 150 - 300 mm from the walls;
- the outline must be solid.
If you are not sure that you can do the design and material calculations correctly, then it is better to use the services of professionals.
Thermal comfort
The goal of any heating, including underfloor heating, is to achieve thermal comfort in the environment. This means achieving the right combination of air temperature and surface temperature in a certain room when performing certain activities and maintaining this state without significant fluctuations for the required time.
The indoor air temperature according to sanitary standards is recommended: in living rooms and living rooms 20 ° C, in bathrooms 24 ° C.
For surfaces that are in direct contact with people, the maximum permissible floor surface temperature in the living area is 29 ° C, in bathrooms 33 ° C and in marginal areas 35 ° C must be observed for medical and physiological reasons.
These requirements can be met without problems with low-temperature floor heating in houses built in accordance with current building codes.
- In older, more energy-hungry homes this can be a problem, but can be solved by combining it with another heat source such as radiators.
- In rooms where people do not wear shoes (swimming pools, gyms, bathrooms), its composition is decisive when choosing a floor.
- Based on the theory of heat distribution and thermal comfort, the optimal surface temperature for different types of floors can be determined.
- Floors that are predominantly walked on with shoes do not affect the local thermal comfort of a person in terms of the flooring material.
In this case, the recommended optimal floor temperature is 25 ° C for long-term sitting and 23 ° C for standing and moving people.
Installing a water floor under tiles
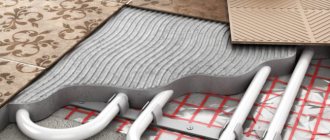
A water-heated floor under tiles consists of several layers. The “pie” looks like this:
- Waterproofing layer - it is selected depending on the installation method. If on the ground - polyethylene or roofing felt. The screed is covered with a special material with a membrane layer.
- Thermal insulation - dense polystyrene foam is recommended.
- The reflector is a foil layer; instead, you can use metal plates with channels for the contour.
For your information! If you install insulation with a foil surface, then this layer is not needed.
- Pipes are the main part of the structure. The heated coolant moves through them.
- Base - according to technology, laying tiles (see step-by-step instructions on how to lay tiles) requires a continuous surface. The best option is a concrete screed. If installation is carried out using a “dry” method, then the following can be used as flooring under the tiles: wood, plywood or plasterboard.
- The final covering is tiles.
In addition, the device is equipped with a boiler for heating water, a distribution unit and a pump.
The choice of material for each layer of underfloor heating should be approached seriously, because this affects the thickness of the “pie”.
Main components and principle of operation of the system
The water heated floor consists of the following components:
Heated floor hinges
Collector
Circulation pump
Mixing unit
Boiler
The functioning of the water heated floor system occurs as follows:
- the coolant is heated in the heating boiler and discharged into a direct supply line;
- enters the mixing unit, where in a given proportion it is combined with a colder return flow, obtaining the required temperature (usually 40-45 ° C);
- From the mixing unit, the coolant passes into the collector (usually, to save thermal energy, they are connected into a single unit) and disperses through the loops. If for some reason some loops are not needed (for example, massive furniture is installed in a given corner of the room), they can be turned off using their own shut-off valves;
- passing along the entire length of the loops, the coolant arrives at the return line manifold, from which it is sent back to the boiler for heating.
One coolant circulation cycle is described. Analyzing the operating principle of a water heated floor, it becomes obvious that its effectiveness depends on the density of contact with the surface of the finishing coating. As a rule, water systems are poured into the screed, which acts as a heat accumulator.
The only type of flooring that can conduct thermal energy is floor tiles.
Its surface provides optimal heat transfer, comfort for users and savings in resources required for heating the coolant.
Do-it-yourself methods for laying floors under tiles
There are several technologies for laying warm water floors, and before choosing any option, you need to take into account the characteristics of the room and ceilings, and familiarize yourself with all the methods in more detail.
With screed
This method is the most popular; the point is that the laid warm system is filled with cement-concrete mortar. The concrete surface must be smooth, without voids, otherwise it may cause deformation of the structure. Ceramic tiles are laid on the dried mortar.
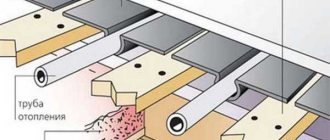
With lags
This method is used more often in wooden houses in which the floors cannot withstand the weight of the concrete screed. Wooden logs are installed, between which insulation is laid - polystyrene foam boards or mineral wool. Laying is carried out using two methods - chipboard modules, in which grooves are made for the contour, and rack-mounted, pipes are mounted in plates placed between the slats.
After installing the contour, a gypsum fiber flooring is laid over it, and tiles are attached to it.
Laying method
For laying pipes, polystyrene foam plates with bosses are used. The advantage of this method is simple installation. Recommended for rooms with low ceilings or if installation with a screed is not possible due to the weight of the structure. A moisture-resistant material, gypsum fiber, is used as a substrate for ceramics.
For your information! One m2 of concrete screed with a contour weighs 200 - 300 kg. Stone buildings with concrete floors can withstand such a load, but wooden ones cannot.
To summarize, we can say that a water-heated floor with screed is the most suitable option for tiles, if the technical characteristics of the room allow. Since it is easier to hide the contour in a screed than in a thin layer of tile adhesive. In addition, installation of ceramics on this surface is simple, because the surface is flat. But with wooden structures it is difficult to obtain a perfectly smooth coating.
How to carry out thermal calculations?
The optimal coolant temperature that should be in the premises is considered to range from 45 to 50 degrees. If the coating is tiled, then it is enough to have 45 degrees for a comfortable feeling.
We recommend: How to make a warm floor?
However, if you have laminate as a floor covering, the temperature should vary from 50 to 55 degrees, because... A fairly large amount of heat is absorbed by wood.
The basis of the calculation is the owner’s desire, i.e. it all depends on what heating intensity the home owner chooses. However, the system is quite flexible, because if desires do not coincide with reality, it can be easily adjusted.
For those who could not decide, there is a deduced norm: on the surface the temperature should be 29 - 35 degrees.
The method of laying pipes also plays a big role. In turn, it depends on which areas of the territory the owner wants to warm up and on the temperature in certain places. To distribute heat evenly, a styling called “Snail” is used.
The principle of its operation is to alternate the return with the primary. This allows you not to feel temperature changes.
Laying a “pie” of a tiled water floor in a screed and connecting the system
There is no fundamental difference in installing heated water floors under tiles from installing this heating system under another floor covering. The contour is placed in the traditional way with a set step.
When laying a tiled water floor, the main thing is to maintain the maturation time of the screed and glue, and not take too big a step. If the distance between the circuits is large, then the floor heating will not be uniform - see how to calculate the ideal inter-pipe distance.
Subfloor
Installation of a warm water structure is carried out on a flat surface; if there are differences, pipes may bend. Therefore, it is necessary to fill all the irregularities and holes on the concrete surface with a special mixture.
If the coating is old and cannot be reconstructed, then it is better to fill in a thin layer of rough screed.
Waterproofing
Waterproofing material is laid on this surface. It is overlapped and the joints are taped. In order to save money, we will allow the installation of ordinary polyethylene film.
Damper tape
Damper tape is pasted around the perimeter of the room. It is necessary to compensate for the thermal expansion of concrete. The tape should fit snugly against the wall; it can be secured with self-tapping screws.
Thermal insulation and reflector
The next stage is to install insulation. More often, sheets of polystyrene foam and polystyrene foam mats, plain or with bosses, are used for this purpose. The standard thermal insulation layer is 30 mm, but when installing water-based heating floors on the first floors, according to the instructions, an insulation thickness of 100 mm is recommended. Thermal insulation material helps retain heat, which reduces operating costs.
For your information! If the heat-insulating product does not have a foil reflective surface, then additional reflective material should be spread. It is better if the film is equipped with markings for the location of heating elements.
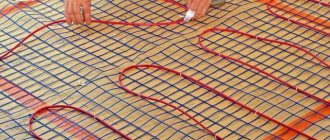
Reinforcement
The reinforcing mesh is placed on top of the thermal insulation, and the heating elements of the water floor will be attached to it. It is recommended to use a product with a rod thickness of 4 - 5 mm, and cells of 10 by 10, or 15 by 15 cm.
If polystyrene foam mats with bosses are used as thermal insulation, then there is no need for a mesh.
In this case, to add strength to the structure, the reinforcement is placed on top of the laid pipes.
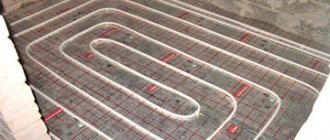
Circuit installation
You need to start installation work by unwinding part of the circuit from the coil; it is better to do this not with your hands, but using special equipment. Do not unwind a pipe that is too long; the product may break.
The contour is laid according to the planned pattern. You should start from the manifold cabinet, the second end should also return to the manifold. The loop must be solid, without joints or connections, otherwise there is a risk of leaks.
If the heating element is installed on a reinforcing mesh, then it can be attached to it with plastic clamps. When installing pipes on mats with projections, additional fixation is not required. This option is simpler and more convenient, since the contour will fit into the grooves of the slabs.
For your information! Pipes expand under the influence of hot coolant, so they should not be fastened tightly to the rods; they may become deformed.
Installation of the compressor cabinet and connection of the system
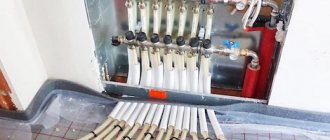
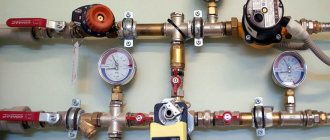
A water floor is a complex device whose operation needs to be controlled. The distribution unit is designed for this.
For your information! The boiler can produce a coolant that has a higher temperature than necessary for heated floors (30 degrees). And in the mixing unit, the water will be diluted from cooled to the desired temperature.
The location for the collector is selected so that the distance from it to all circuits is the same. An opening 12 cm deep is made in the planned section of the wall. A compressor box is installed in it, in which the distribution unit is located. Pipes from the boiler or heating system are supplied to the collector. A return line is installed at the other end, which will collect waste coolant.
It is important to know! It is recommended to purchase a manifold with a water flow regulator; it promotes uniform distribution of coolant throughout all circuits.
A pump is mounted to the collector unit. To prevent the pump from running constantly, a thermostat with a timer is installed to maintain the required temperature. Often the boiler already has a built-in pump, which is enough to heat an area of 150 m2. If the room is larger, then installation of an additional pump is required.
All dirty work on installing the manifold cabinet should be done before laying the “pie” of the water heated floor, so that you do not have to clean the surface of debris again.
Then the water floor pipes are connected to the distribution unit. One end to the inlet valve and the other to the outlet valve. The circuit is connected to the manifold using compression fittings.
Crimping
After the pipes are laid and connected to the collector, it is necessary to carry out pressure testing, that is, check the device for operability. Since after pouring the screed, if problems or leaks arise, it will be difficult to eliminate them.
To do this, the system is filled with water and the pressure is set for 15 minutes at 1.5 times the working pressure. Then the working pressure is set to 5 - 6 bar for a day. If after this time no leaks or expansions are detected in the line, then the screed can be poured.
Pouring concrete screed
It is permissible to use purchased ready-made mixtures as a pouring mortar, or you can prepare the mortar yourself from cement and sand, with the addition of plasticizers.
The room is flooded at once; it cannot be done in parts. The height of the concrete layer is adjusted using beacons that are installed in advance. You should start from the far corner of the room, in stripes, and end at the door. Each strip must be immediately aligned using a rule.
The recommended thickness of the water heated floor screed is 5 - 6 cm, the layer of mortar above the pipeline should be 2 - 3 cm.
Important! The screed is poured when the system is full and there is pressure in the pipes.
When the screed has set a little, grouting is carried out. This process is necessary to obtain a smooth surface. After which, the floor is left until the concrete solution has completely hardened, this will take about 25 days.
System installation steps
Typically, work on laying water heated floors is carried out in the following order:
- Removing old flooring.
- Cleaning and leveling the base.
- Installation of damper tape.
- Laying thermal insulation.
- Installation of reflective film.
- Laying pipes in accordance with the previously drawn up diagram.
- Pouring concrete screed.
- Laying flooring.
It is not difficult to prepare the base for installing water floors under tiles. It is necessary to remove all unnecessary layers if we are talking about dismantling the old floor. After this, the surface must be leveled, for example, the depressions and cracks must be sealed with repair mortar. After this, dust and other contaminants are removed: stains of grease, paint, etc.
Of course, the results of the work will not be visible after installing the heated floor system, but still the preparation of the base should be leveled as best as possible. Unevenness and dirt can impair the quality of subsequent installation.
A special damper tape is laid along the walls. Some inexperienced craftsmen simply lean the material against the wall, hoping that subsequent pouring will firmly press it to the surface.
Disadvantages when installing a water heated floor: the film is cut flush with the wall, and not tucked under the thermal insulation, the damper tape simply lies along the walls, it is not secured
This tactic does not justify itself; voids form between the tape and the wall and the material becomes deformed. The tape should be attached to the wall with self-tapping screws so that it fits tightly and maintains the correct position. Extruded polystyrene foam is often used as a thermal insulation material.
This is a reliable material that comes in the form of slabs with convenient joints. If the base on which the slabs are laid is level, they will not wobble after laying. A reflective film is placed on top. It is very convenient if it is equipped with markings that will make laying out the pipes easier.
Image gallery
Photo from
Laying the coil on a lined substrate
Clamps for fixing pipes to the subfloor
Fastening pipes to metal mesh
Polymer backing with guide bosses
You can use more modern insulation options designed specifically for laying heated floors. On the surface of such materials there are special recesses that significantly facilitate the laying of pipes. No film is required for such insulation.
An example of the correct installation of film and damper tape under a water-heated floor: the film is securely tucked under the insulation, the tape fits tightly to the wall
Do not cut the film flush with the wall. The material is tucked under a layer of thermal insulation material so that it is slightly stretched and does not move. You need to lay a mounting grid on the film, after which you can begin laying the pipes.
Most often, metal-plastic pipes are used for heated floors, as they are the most reliable and relatively inexpensive. Pipes made of cross-linked polyethylene and copper soft tubes are also actively used in the construction of floor heating systems.
The pipes are laid on the grid in accordance with the previously drawn up project and fixed with ordinary plastic clamps in increments of about one meter. Do not secure the pipes to the mesh too tightly. When exposed to heat, they can expand slightly, and when cooled, they can contract. You need to leave a little space for this process.
This photo shows the correct laying of water heated floor pipes: the distance between them is maintained exactly, the structures are neatly bent at the correct angle
When laying coils, you must carefully observe the distance between the pipes and the distance from the wall. If these distances “walk”, then in the future the floor will be heated unevenly. Overloads will soon lead to system breakdowns, and repairs will be quite expensive.
This is an example of careless installation of water heated floor pipes: the bends are unclear, the distance between the pipes in certain areas fluctuates noticeably
Now you need to install the collector and connect the heated floor circuit to it. You can assemble this device yourself, but it will be easier and cheaper to buy a ready-made model. The manifold mixing unit looks like a neat cabinet; inside there are controls for the underfloor heating system and connectors for connecting pipes.
This diagram shows the place of the collector and water heated floor in the autonomous heating system of a private house or cottage
Each circuit is connected to the manifold twice: to the hole through which hot water will flow, and to the output connector designed to return the cooled coolant to the boiler heat exchanger. The pipes are secured with special clamping nuts, which are supplied with the manifold.
Of course, the collector should be connected to the heating boiler in accordance with the manufacturer's instructions. Before pouring, you should check the operation of the new heated floor system, i.e. perform pressure testing.
To do this, turn on the boiler and supply hot water to the system under pressure, which is 50% higher than the working norm. The system should be left in this state for approximately two hours.
At this time, it is necessary to inspect the pipes and identify shortcomings, for example:
- places where the pipe is clamped with a fixing clamp;
- the presence of leaks at the junction of the pipe with other elements of the system;
- violation of the integrity of the heating circuit.
If deficiencies are found, they must be eliminated and then the system must be pressure tested again. After this, you can start pouring the screed. During the process, the laid pipes should be handled very carefully so as not to accidentally move or damage them.
After the water heated floor pipes are secured, they should be covered with some kind of protective material to prevent accidental damage
To prepare the solution, you should use special dry construction mixtures that are intended for installing heated floors. Such compositions are designed for a constant heating process of structures laid in the thickness of the screed. The packaging of the CCC usually indicates the method of its preparation, which should be followed.
An important point is the shelf life of the finished composition. This time period should be taken into account when performing work. Before pouring, the pipes are filled with cold water to compensate for the pressure of the composition and prevent deformation.
The thickness of the screed above the pipes should be about three centimeters. Now you need to wait until the screed has completely dried, and only then begin laying the flooring.
To prepare the solution, use special SSS intended for installation of water heated floors. The screed layer above the pipes must be at least three centimeters
Selection of tiles and adhesive
When choosing tiles, in addition to your taste preferences and interior features, you need to consider the following points:
- If the product is too thick, it will affect the thermal resistance;
- Tiles made of marble or porcelain stoneware have reduced thermal conductivity, so if you choose these types, you should increase the diameter of the pipes to increase heat transfer.
The simplest is considered to be PVC tiles equipped with an adhesive layer on the bottom.
For water floor structures, it is recommended to take a product that has a rough surface. Especially, you need to pay attention to the degree of abrasion of the material. It would be better if this figure were higher.
Important! When purchasing, be sure to pay attention to the pariah number. All tiles must be from the same batch. One product, but from different batches the color may vary slightly.
In addition to the tiles, you need to choose the right adhesive. Since expansion joints should be made when laying tiles on a warm surface, it is recommended to use two adhesives. One part of the tile should be lubricated with ordinary tile adhesive, and the second with elastic sealant.
Note! Adhesive for water-heated floors must be moisture-resistant and non-toxic.
Tile masonry
For work, you can choose any tile at your discretion. One of the possible options is PVC tiles, the back of which already has an adhesive layer. It is important to select moisture-resistant glue that does not release toxic impurities when heated.
Classic tiles can be used very successfully, striking the imagination with their varied decor and types.
The direction of the tile laying is also an independent parameter, which is determined by the owner himself. A mandatory element of the masonry are expansion joints, which consist of an elastic sealant.
Marking the room
To facilitate the process of laying tiles, you need to mark the room. The easiest way to do this is with a laser level. Although it is possible to use the old, proven method - a lace with dye powder.
The process looks like this:
- A line is drawn in the center of the room parallel to the longest wall:
- the second line is located perpendicular to the first, also in the center;
- A block of wood is installed in the doorway; it will serve as a limiter.
Functionality check
A test run of the warm floor covering system is carried out after installing the heating elements. If you do this at the last stages of the work, when the structure has already been filled with screed, it will be difficult to detect errors in the installation of communications, which means that the leak will remain invisible. To avoid flooding of the room, it is recommended to perform a test run. To do this, the warm floor covering system is turned on and the condition of the pipes is monitored for several hours, gradually increasing the heating temperature and pressure.
Laying tiles
To lay the tiles you will need a notched trowel, plastic stops, primer and grout.
The tiles should be laid on a flat and clean surface. You need to start from the middle of the room, moving away in different directions. The position of each tile is controlled using a level.
Using a notched trowel, apply adhesive to most of the tiles and sealant to the other. They are distributed in an even layer over the surface of the product. The sealant should be applied in two layers. After this, the tiles are placed on the base and pressed tightly. You need to add a little sealant to the gap between the floor and the tiles, and remove any excess with a rag. This action is repeated until the entire room is covered.
For your information! It is possible to use another method, when the adhesive composition is applied not to the tiles, but to the concrete base.
After laying each row, it is necessary to check the evenness of the laid tiles with a level. Cross-shaped stops are installed between the tiles; they will help to make joints of the same size.
When the entire area of the room is laid, you need to let the glue dry. This will take at least 12 hours.
Types of pipes for heated floors
- Made from cross-linked polyethylene. The advantages include heat resistance, high strength and preservation of properties when the coolant liquid freezes. Fittings that form permanent connections by crimping are also reliable. The disadvantage is that it straightens when heated. Pipes must be securely fastened during installation.
- Metal-plastic. The properties are not inferior to polymer products. When heated, they retain their shape and structure, and are also durable. High technical characteristics are ensured by the presence of a layer of aluminum foil located inside two layers of cross-linked polyethylene and connected to them with an adhesive. The pipes have an affordable price, and the system has high efficiency, which makes their application the most effective.
- Copper (pic. below). The material has high thermal conductivity, but is rarely used due to its high cost. In addition, pipes must be protected from contact with the screed, since they do not tolerate the effects of alkalis.
- Polypropylene pipes. The characteristics are high, but are rarely used due to the large bending radius. For this reason, the distance between the turns when laying exceeds 320 mm, but this is not enough for uniform heating.
Metal pipes for heated floors
Seam processing
After the glue has dried, it should be carefully removed from the seams with a spatula, and the separators should also be removed. Now you can start cleaning the seams.
Using a rubber spatula, apply a little mixture to the seams using cross-shaped movements. Excess is immediately removed from the tiles with a rag.
The mixture should be allowed to harden slightly and the quality of filling the joints should be checked. In places where there is not enough grout material, you should add a solution. Photo - Grouting joints
For your information! The grout mixture protects the seams from mold and dirt accumulation.
Turning on a water heated floor laid under the tiles is allowed only 20 - 25 days after the installation of the tiles. This time is necessary for the screed to completely harden and the tile adhesive to dry.
A warm water floor plus tiles is an ideal option that allows you to justify your financial investment in a short period of time. In addition, this design will provide comfort in your home for many years.
Types of equipment
The main element of the system is communications. Recommended diameter is 20 mm. This is enough for normal coolant circulation in a private home. In addition, due to the small size of the pipes, the overall thickness of the screed over the underfloor heating system will be minimal. It is recommended to use polyethylene (made of cross-linked material) or reinforced multilayer communications.
The second important element of a warm floor covering system is the collector. This is a universal unit that performs the function of a distributor, and additionally, with its help, the heating of the system circuits is adjusted. The manifold often contains thermostats, pumps, and pressure stabilizers. In order for this unit to function efficiently and without failures, it is recommended to determine a suitable location for its installation.
The manifold is often offered assembled, with all components combined in a cabinet. It is recommended to choose this option when installing a warm floor covering if you plan to carry out the work yourself. It is advisable to install the most economical boiler, since the costs of operating the heating circuits will increase. It is allowed to use gas, electric, solid fuel and diesel boiler equipment.
What you should know about warm field
Water and electric, varied in modes of action and energy consumption, heated floors require special handling during installation, laying finishing materials on it, such as tiles or laminate, as well as its subsequent operation
Failure to comply with safety precautions and installation technology will entail not only destruction of the surface, be it a loose tile or a cracked self-leveling coating, such as expensive 3D, but also the absolute inoperability of the heating elements
However, having familiarized yourself with all the rules for installing equipment and its subsequent finishing, you can do without outside help and do everything yourself.
The most common areas for installing heated floors are the bathroom and kitchen. Tile is most often used for finishing here; it does not absorb moisture and is easy to clean; in addition, laminate and parquet are less susceptible to mechanical damage. Also popular areas for installation are swimming pools, garages and private parking lots. Using a water floor for the latter eliminates ice and snow drifts in winter, which means it significantly saves the time and effort of the owner of the premises.
Floor insulation
The foundation preparation technology includes, in addition to dismantling and leveling, hydro- and thermal insulation:
- fixing damper tape around the perimeter of the room;
- laying waterproofing materials;
- installation of damper tape between several circuits;
- Foil materials and foamed polyethylene, as well as polystyrene foam boards, are used as heat insulators.
A very convenient, but rather expensive method of thermal insulation is the use of special insulation materials that have channels for laying the pipe system.
On the lower floors, bulk insulation, represented by expanded clay and expanded polystyrene materials, is highly effective.
Surface preparation
At the preparatory work stage, the following activities are mandatory:
- removal of old flooring;
- dismantling the old screed;
- leveling the plane of the prepared surface horizontally.
The base and pie of a warm water floor
When preparing the surface, during the leveling process, a minimum difference in height is allowed.