FORUMHOUSE has already repeatedly talked about the basic principles of design and construction of an autonomous country house. The essence of all materials comes down to the following - each has its own “autonomy”. Before buying a plot where there is no or is not expected to be at least a centralized power supply, you need to think 100 times whether it is needed. Because material investments in the construction of a completely autonomous house, provided that these are not southern regions, may exceed all reasonable limits.
The purpose of this article is practical recommendations on how to independently install a water-heated floor as one of the engineering elements of a real, and not a mythical, autonomous house.
So we'll tell you:
- What prevents you from building a completely autonomous house in Russia.
- What are the features of calculating a heated floor?
- Can a heated floor be the only heating system for a country house?
- What nuances need to be taken into account when installing a heated floor yourself?
Water heated floor system - general description
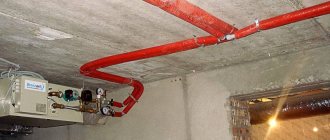
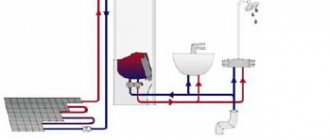
Floor heating is carried out by coolant. From the name of the system it is clear that the coolant of a water heated floor is water circulating through the pipes. Temperature regulation and circulation control take place in a specially mounted manifold cabinet. The pipes are laid in loops on the base floor and connected to the manifold cabinet.
As you can see in the photo, a manifold cabinet is a heated floor unit in which heated floor pipes are assembled and the flow of coolant is regulated by manifolds with control valves. By the way, not a single construction site, no industrial or residential buildings can do without utilities in the form of pipelines. A simple, ubiquitous water supply and a common gas pipeline are familiar to any resident of the city or countryside. Pipelines for steam and petroleum products are familiar to employees of specialized enterprises.
If there is a pipeline, then you cannot do without special equipment that blocks, regulates flows and distributes the moving flows. This type of equipment is called pipeline fittings. The operation of all pipeline systems depends on its quality. read more about pipeline fittings for various purposes on the website.
The loops of the water heated floor are laid according to two schemes:
1-Bifilar laying system. Otherwise known as “double helix” or “snail”;
2,3-Meander system. In other words, “zigzag” or “snake”.
The most effective laying system is where loops of warm water alternate with cooled water (1.3 in the figure)
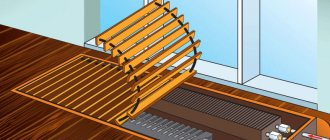
Depending on the type of coating covering the pipeline, water heated floors are divided into concrete heated floors, as well as polystyrene systems and wooden floor heating systems. In a concrete heated floor, the system pipeline is closed with a “wet” screed.
Water heated floors are not a universal floor heating system and have some limitations when used.
Operating principle of film heaters
The design of these heaters consists of a pair of conductive bars placed parallel to each other, between which there are carbon strips that emit thermal energy.
The principle of heating film heated floors
Despite its small thickness, this infrared system is capable of effectively heating a room. Film heaters are sold in rolls, the width of which varies from 50 cm to 1 meter, and the length – up to 50 meters.
For ease of installation, there are markings on the film every 25 cm, along which it can be cut.
This system is laid directly under the finishing coating and does not require pouring a concrete screed. Most often, electric film heated floors are used to heat laminate, parquet and linoleum floors.
Limitations when using water heated floors
- In city apartments with centralized heating, the installation of water heated floors is prohibited.
- This is due to an increase in the hydraulic resistance of the system and a high probability of damage to the heating pipes after water hammer in the centralized heating system. However, in some series of modern new buildings a separate main pipeline has been designed for the installation of water heated floors.
- First of all, heating a room using water heated floors is used for private houses with an individual water supply system. But here, too, a water-heated floor can be used either for comfortable or general heating.
The order of necessary work
In high-rise buildings and private houses, concrete floor slabs act as the foundation. In one-story buildings and structures, instead of a slab, there is soil. In this case, the order of work should be as follows:
- sand;
- small crushed stone;
- waterproofing layer;
- screed using reinforcing mesh.
All this falls into the category of rough foundation. Here are the materials you will need:
- waterproofing material;
- metal or plastic pipes;
- damper tape;
- set of fasteners;
- reinforcing mesh.
Screed using reinforced mesh
First of all, you need to deal with the waterproofing layer. To create it, you can use any material, but often it is ordinary polyethylene film, the thickness of which is at least 100 microns. It overlaps over the entire surface of the base. Existing joints are taped with construction tape. Now it’s the turn of the damper tape. Its use is mandatory, since its base will compensate for temperature changes that will occur in the future. To attach it, it is recommended to use a self-adhesive base (can be double-sided).
Damper tape is applied
“Comfortable” and “heating” water heated floor
A “comfortable” water heated floor heats the floor and is used as an additional room heating system. The main heating is provided by heating radiators. For a comfortable heated floor, the water temperature in the system must be maintained constant. This type of water temperature control is called “thermostatic”.
The “heating” water heated floor has the function of complete and only heating of the room. With such a system, the temperature of the coolant (water) should vary depending on the ambient temperature. This type of adjustment is called “weather-dependent”.
Types and possible places of purchase in Moscow
First, let's look at the list of types of heating, and then, based on it, we will analyze each item in detail.
- Cable-based electric floors are:
- with single-core wires;
- with two-core cables;
- with self-regulating cables;
- Heating resistive mats;
- Infrared sheets are:
- in the form of a film;
- in the form of infrared rod mats;
These were electric types of heating systems, but there are also designs based on the circulation of hot water:
- Water heating systems.
All of the above types can be purchased without problems in stores and online stores in Moscow. The same can be said regarding installation.
So, if you do not have installation skills, then the city is full of services and specialists who will install any type of system for you for a fee. This will significantly save your money and time.
General principle of operation of water heated floors
Water heated floors are low-temperature floor heating systems. The temperature of the coolant (water) should be 35-45°C.
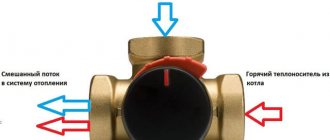
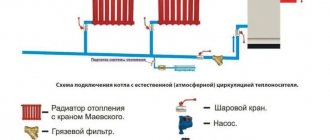
The water in the water heated floor system moves along a closed circuit, gradually cooling in the floor loops. Water comes from the main at a temperature of 80-85°C. In the manifold cabinet of the heated floor, the hot coolant is mixed with cooled water returning from the system loops.
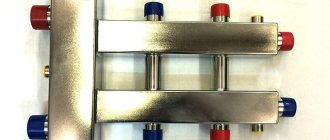
A pumping and mixing unit (1) is used to mix hot and cold coolant. To shut off the water circulation, a collector block (3) is used, with rows of cold and “hot” shut-off valves (bypasses).
A balancing valve (2) is used to regulate the heat output. To maintain the set temperature, a thermal head (4) is used, which receives temperature data from a temperature sensor.
To automatically control the system, you can install servo drives and room thermostats. Servo drives and thermostats work in pairs.
When the water supply from the main stops, the circulation of the coolant continues thanks to the opening of the bypass valve. The coolant circulates in “cold mode” through the free bypass (shut-off valve) of the collector block.
More details about the operation of the manifold cabinet, installation technology and the design of the “pie” of a concrete water heated floor in the following articles in the “Water Heated Floor” series.
©opolax.ru
Other articles in this section
- What is a low voltage indicator and why is it needed?
- Electric heated floor under tiles
- Warm floor laying system: features of device and application
- Resistive heating cable: what is it, why is it needed?
- Infrared floor heating
Popular component manufacturers
When installing a water-heated floor, choosing the necessary components is not difficult, since most manufacturers of such systems also produce components for them. In addition, some manufacturers have begun to produce mixing units, which eliminates the need for users to install a separate circulation pump.
The most trusted manufacturers that produce polymer pipes with a service life of more than 50 years include:
- "Valtec"
- "De Dietrich";
- "Acv";
- "Ctc";
- "Buderus".
In addition, these companies produce control panels, which allows you to monitor the operation of the system anywhere in the house.
In conclusion, we can say that in terms of efficiency, water-heated floors are superior to other types of heating devices. After all, the resource is not wasted on heating the air under the ceiling.
When you decide to install heated floors, carefully study all possible installation schemes for these systems, as well as how water heated floors work in an apartment or house, in order to choose the best option for yourself.
Installation methods
Before starting work related to cable laying and the formation of the electric floor system as a whole, it is necessary to select the place where the thermostat will be installed. This device is a box in which sockets and switches are mounted. The optimal height for placing the thermostat above the floor is 50-100 cm.
It is necessary to connect a phase, ground and zero from the distribution box to the thermostat installation location. Next, a groove is punched into the wall using a chisel and a hammer to lay two plastic tubes. One of them is intended for installing power wires and its length should be equal to the distance from the thermostat installation location to the floor surface. The other tube will be used to connect the floor temperature sensor. Its length should be increased by approximately a meter, so the tube will pass along the floor surface. This is necessary so that if the floor temperature sensor fails during operation, it can be easily replaced by pulling the device through the thermostat box.
After completing the work on preparing the wiring for connection, you can begin installing a warm electric floor.
Operations are carried out in the following sequence:
- The surface of the subfloor is cleaned and leveled;
- Damper tape is glued along the perimeter of the wall;
- A layer of thermal insulation at least a couple of centimeters thick is laid.
Next, having chosen a specific installation scheme, you need to place a mounting tape on the thermal insulation layer to secure the cable. It is important to remember that before laying the cable, the power wires should be pulled to the thermostat box, and the coupling must be in the tie. The most convenient way to lay a heating cable is to place it in a “snake” pattern on a heat-insulating layer. As a rule, the laying step is chosen to be 5 cm. When laying the cable on the mounting tape, it is necessary to avoid the intersection of individual lines.
After the heating cable is laid on the thermal insulation layer, a floor temperature sensor is mounted in a special plastic tube. To do this, a plastic tube is inserted into a groove previously knocked out in the wall, which is pulled between the lines of the laid cable at a distance of approximately 50-100 cm from the wall. In order to prevent the solution from getting inside the tube, it is necessary to close its end with a plug.
After completing all operations, you should ensure the quality of their execution. To do this, use a tester to measure the cable resistance. Its value should approximately coincide with the nameplate resistance value specified by the manufacturer. Deviation of no more than 10% is allowed.
At the final stage, the screed is poured. Its thickness without a heat-insulating layer should be at least 3 cm, and if it is present, at least 5 cm.
The cable connection is made after the screed has hardened. To do this, connect the power wires of the cable, the temperature sensor, as well as the power supply wiring to the screw terminals located inside the thermostat box. If you doubt that you can make all the connections correctly, it is best to seek help from a qualified electrician.
Operating principle of rod infrared mats
In this case, floor heating is carried out using radiator rods placed between two conductors located parallel to each other.
This system is sold in rolls 83 cm wide. The length of the mats can reach 20 meters. And the rods in them are located in increments of 9 or 10 cm. The convenience of laying such mats is achieved due to the ability to cut one of the conductors in the center between the rods. The specific power of such mats is 130 W/m² and 160 W/m².
Installation of a rod infrared heated floor
Another distinctive feature of this system is the self-regulation of heating temperature. When the floor surface heats up to the required temperature, the rods stop radiating heat.
The main requirement when using mats is to place them in a concrete screed 3 cm thick. Otherwise, they lose the ability to heat with independent temperature control. And any materials can be used as a finishing floor covering.