Despite the huge number of heating devices on the market, a popular option is a long-burning solid fuel boiler.
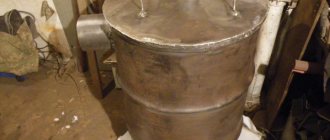
Homemade TT long-burning boiler
This unit can be used as the main source of heating in remote areas where gasification and electrification are not provided. Reliable, efficient and economical, it is an excellent solution for heating a country house, a cottage in the city or a summer cottage.
Unlike a conventional boiler, where the main heat comes from the flame itself, a long-burning TT boiler works on a completely different principle. This article will talk about how to properly make a long-burning solid fuel boiler with your own hands, and the drawings and installation diagram will help you not make mistakes and do everything technologically correctly!
Advantages of a home-made heating boiler
A do-it-yourself water boiler is simply indispensable for a country home, where heating costs are often too high.
A DIY wood-fired water boiler for the stove is an excellent alternative to gas. and it will also significantly save hot water. When it comes to a country house, not all houses are connected to gas heating, and connecting it is also not a cheap pleasure. Of course, the problem can be solved in another way by purchasing an electric model for heating in the store, but it is also very expensive, and the cost of electricity will also increase if it is installed.
A model created with one’s own hands may not be inferior to factory models in terms of power and efficiency, and sometimes even surpasses them many times over. If you work strictly according to the instructions and make all the calculations correctly, then you will definitely not be disappointed with the result.
When starting work, do not forget about the correct calculation of temperature, and also choose not too thin sheets of metal so that it does not burn out. In addition, as a material for work, you can take old used boilers or based on a finished wood-burning stove.
Key advantages of a hand-made water boiler for heating a furnace:
- environmental friendliness;
- good efficiency indicator;
- low cost of materials and fuel;
- safety;
- acceptable working conditions;
- standalone installation.
Pyrolysis boiler with lower chamber
The design of a long-burning pyrolysis boiler with a lower combustion chamber for wood gas is somewhat more complicated and its manufacture will require a little more cost and effort.
First of all, you need to understand that boilers of this type also come in two types: with supercharging and with a smoke exhauster. Without going into the details of physics and thermal engineering, we will outline the fundamental difference.
In the first case, secondary air is forced into the afterburning chamber using a fan. This creates excess pressure (above atmospheric pressure) in the chamber. The advantages of this design include the fact that any fan will suit you, even a computer cooler, and you can combine the firebox with an afterburner chamber, since with the help of supercharging you can provide a sufficiently large volume of excess air. However, this “advantage” can also be considered as a disadvantage, since it does not allow raising the boiler efficiency above 80–82%. Under pressure, some of the air simply does not enter the middle of the combustion process, so the fuel does not burn completely. Plus, due to excess pressure, some of the pyrogen gases simply do not have time to burn and fly away into the chimney in their pure form, so it is almost impossible to ensure an efficiency of 90%. And most importantly, if the pressure is too strong, the boiler may explode.
Pyrolysis boiler with forced air
In the second case, with the help of an exhaust fan, insufficient pressure is created (below atmospheric pressure), so the outside air, obeying the Coriolis force, gets right where it needs to be, screwed into the very center of combustion. The gases burn completely, the boiler operates at full capacity and is capable of delivering an efficiency of 90%, and sometimes even more.
Boilers with a lower combustion chamber are much more complex in design. One of them, which was made by a master welder with his own hands, is demonstrated in the video.
Build process
The process of creating a boiler includes several stages. When manufacturing each element, it is worth taking into account the special operating conditions of the product being manufactured.
Air supply device
We cut a section from a thick-walled pipe with a diameter of 100 mm, the length of which will be equal to the height of the firebox. We weld a bolt to the bottom. From a steel sheet we cut out a circle with the same diameter as the pipe or larger. We drill a hole in the circle large enough to pass the bolt welded to the pipe. We connect the circle and the air duct pipe by tightening the nut onto the bolt.
As a result, we will get an air supply pipe, the lower part of which can be closed by a freely moving metal circle. During operation, this will allow you to regulate the intensity of firewood combustion and, consequently, the temperature in the room.
Using a grinder and a metal disc, we make vertical slits approximately 10 mm thick in the pipe. Through them, air will flow into the combustion chamber.
Housing (firebox)
The body will require a cylinder with a sealed bottom with a diameter of 400 mm and a length of 1000 mm. The dimensions may be different, depending on the available free space, but sufficient for laying firewood. You can use a ready-made barrel or weld the bottom to a thick-walled steel cylinder.
Sometimes heating boilers are made from gas cylinders for a longer service life.
In the upper part of the body we form a hole for the removal of gases. Its diameter must be at least 100 mm. We weld a pipe to the hole through which the exhaust gases will be removed.
The length of the pipe is selected depending on design considerations.
Connecting the housing and the air supply device
We cut a hole in the bottom of the housing with a diameter equal to the diameter of the air supply pipe. We insert the pipe inside the body so that the air vent extends beyond the bottom.
The air supply pipe should end a few centimeters before the start of the chimney.
Heat Dissipation Disc
We cut out a circle from a metal sheet 10 mm thick, the size of which is slightly smaller than the diameter of the body. We weld a handle made of reinforcement or steel wire to it.
This will greatly simplify the subsequent operation of the boiler.
Convection hood
We make a cylinder from sheet steel or cut a piece of pipe, the diameter of which is several centimeters larger than the outer diameter of the firebox (body). You can use a pipe with a diameter of 500 mm. We connect the convection casing and firebox together.
This can be done using metal jumpers welded to the inner surface of the casing and the outer surface of the firebox, if the gap is large enough. With a smaller gap, you can weld the casing to the firebox around the entire perimeter.
From a steel sheet we cut out a circle with the same diameter as the firebox or a little larger. We weld the handles to it using electrodes, wire or other available means.
Considering that the handles can become very hot during operation of the boiler, it is worth providing special protection made of material with low thermal conductivity.
To ensure long burning, we weld the legs to the bottom. Their height should be sufficient to raise the wood-burning boiler at least 25 cm above the floor level. To do this, you can use various rolled products (channels, angles).
Congratulations, you have made your own wood-burning boiler. You can start heating your home. To do this, just load the wood and light it by opening the lid and heat dissipation disk.
Preparing material and tools
When starting to make a wood-burning boiler with your own hands and trying to complete everything in the shortest possible time, you should take care of the availability of:
- diagrams of the future boiler;
- steel pipes of various lengths, diameters (400, 500, 100 and 150 mm);
- steel sheet with a thickness of at least 4 mm;
- rolled products for making legs;
- two hundred liter barrel;
- heat-resistant mixture used for laying stoves and fireplaces;
- welding machine;
- electrodes of a suitable brand and size. As a rule, electrodes with a diameter of 3–4 mm are used to perform welding work;
- Bulgarians.
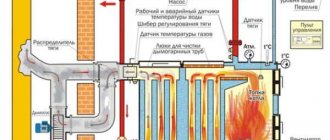
What does a boiler consist of and how does it work?
The fuel in such boilers burns much longer than in conventional units. This is due to their operating principle, which involves burning wood in the firebox from top to bottom. The combustion chamber is cylindrical in shape and is completely loaded with wood through a door at the top of the housing. Ignition is carried out through the same door; the design of long-burning solid fuel boilers is such that air is also supplied to the combustion zone from above through a vertical pipe. A flat round weight made of thick metal (10-15 mm) is attached to the end of this pipe; arc-shaped air distributors made of strip metal are welded to it from below. A similar design can also be used to make a sawdust boiler.
Weight for a homemade boiler
The size of the load is 5 mm smaller than the internal diameter of the firebox cylinder, which allows the structure to move up and down. The other end of the pipe passes through the upper wall of the boiler; a damper is installed on it, with which the amount of air can be adjusted manually. The length of the pipe is 15-20 cm greater than the height of the combustion chamber. The latter can be arbitrary; home-made long-burning units work the longer, the larger the diameter and height of the firebox. At the same time, the volume of the unit’s water jacket and its thermal power increase.
Long burning boiler design
After ignition, the pipe with a load is lowered, pressing down the array of firewood. The air enters directly into the combustion zone; the design of the long-burning boiler provides for operation on natural draft created by a chimney of the required diameter and height. The generated heat heats the water in the jacket of the installation; it begins to flow into the heating system through the upper pipe. The principle of convection works here; the use of a circulation pump is not necessary. The water jacket in a homemade apparatus is located not only around the side walls of the firebox, but also in its top cover.
The grate of a homemade long-burning wood-burning boiler does not perform its usual function; air does not pass through it into the work area. The grate only serves as a support for the fuel mass, and through its cells, ash and ash fall into the lower section, from which they are freely removed with an iron scoop. As the fuel burns in the chamber, the load lowers and you can determine how much firewood is left at the upper end of the pipe. After the process is completed, the door of the ash compartment opens, combustion products are cleaned out of it, the load along with the pipe is raised and fixed in this position. You can make the next download.
Homemade long-burning wood-burning boiler
Drawing of a homemade solid fuel boiler
If you choose the best option for heating a house with solid fuel, then for a homemade boiler the best solution would be long-burning systems, shaft or bunker type.
Advantages of shaft type boilers:
- the homemade body has a minimum number of welds. Essentially, these are two alloy steel pipes nested inside one another. Therefore, mine systems are considered one of the most reliable and safest to operate;
- the shaft can operate even with moderate draft in the chimney;
- high efficiency of the solid fuel combustion process.
In homemade boilers, firewood and briquettes burn to ash in two days. In industrially manufactured models, one tab can burn in economical mode for up to five days.
Below is a drawing of a mine boiler with a power of up to 10 kW.
The main difficulties in making a homemade mine are related to the selection of materials. For the inner casing, a thin-walled alloy steel pipe with a wall thickness of 2 mm is used. In addition, a ring adapter for the chimney, two rectangular boxes for loading fuel, and cleaning the ash pan will need to be welded into the hot housing using argon welding.
If you are not confident in the quality of welding work, then it is better to choose a bunker-type solid fuel boiler.
The design of a homemade boiler consists of two buildings. The first is a bunker with a grate on which solid fuel is burned. At the bottom there is a collection of ash and soot. Secondary air is supplied through it for afterburning combustion products in a tubular heat exchanger.
The pipe section in the second building can be dispensed with. Instead of a tubular heat exchanger, it is enough to make a water jacket around the heat-resistant inner casing. As practice shows, this scheme is more technologically advanced and convenient to manufacture for homemade boilers. Additionally, top fuel loading can be replaced with a more traditional side window stowage method.
Advantages of using a water boiler in a brick stove
One of the key advantages is efficient heat dissipation. It is also an important fact that the pipes can be connected to all rooms from the pipe.
A water-based boiler can be perfectly combined with different heat generators. When using antifreeze, the system will not defrost when the oven is turned off. Among other things, a water boiler in a brick stove can operate both in the presence of central heating and in autonomous mode.
It should also be noted that a water boiler in a brick is very reliable. like the brick oven itself, traditionally considered a reliable heat source. And when such a stove is combined with a water-based boiler, their mutual efficiency becomes many times stronger, and additional heat transfer appears. Together they are able to heat a room of up to one hundred square meters, without forcing you to spend a lot of money on such heating.
For a typical Russian winter, only two fireboxes per day will be enough to create a comfortable temperature in the room. In addition, the temperature can be regulated using modern automated systems.
Water heating with wood
This more complexly organized system is a pyrolysis boiler. consisting of two sections. In the lower one, wood is burned, and in the upper one, the gas generated due to combustion circulates. Thanks to the scheme in which gas does not immediately enter the chimney. its efficiency increases, and longer burning requires less wood.
Around the boiler there are thick pipes through which water flows, heated from it. Keep in mind that only dry firewood is suitable for a boiler of this type, so you should always have a good supply of it at home.
There are also systems that use hot air instead of water for heating. It passes through the circuit and is transmitted into the airspace of the house. The cold air, falling down, again enters the boiler for further heating.
Long burning wood boiler
First step
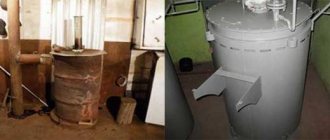
Boiler container
Prepare the body. It is most convenient to use a metal barrel. Cut off the top of the barrel. In the future, you will place a lid with a pipe with a diameter of 100 mm on top. Air will flow into the boiler through the pipe. Install a valve on the pipe.
Second step
Attach an inclined flue pipe to the boiler body. The optimal diameter is 150 mm, length is from 400 cm, the mounting location is on the side of the body, closer to the top of the unit.
Chimney pipe
A boiler with double walls, between which the coolant will circulate
Third step
Cut a hole at the bottom of the body to clean the boiler from wood combustion products.
There is a hole cut out at the bottom for cleaning ash.
Fourth step
Prepare special cargo. It will ensure more efficient and longer combustion of fuel. This load is made in the form of a metal disk and is equipped with blades. Cut a hole with a diameter of 20 mm in the load to allow air to enter.
Making the load
Making the load
Making the load
Making the load
At this point the boiler is ready. Using it is extremely simple: you load firewood, place a metal weight (disk) on top, install a lid with a blower pipe and light the fuel.
For greater stability, equip the boiler with metal legs made from scraps of fittings.
Making a lid to put on the pipe
Boiler
Loading
Peculiarities
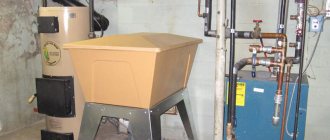
Today, heating boilers have sufficient power to heat rooms for various purposes. They are economical. Their continuous operation time is almost the entire heating season.
These devices can operate on wood, coal, pellets (wood waste compressed and processed into granules), briquettes, peat, and wood gas.
Boiler types
Depending on the type of solid fuel, they are divided into the following types:
- wood-burning (heated not only with wood, but also with pellets);
- universal (they use different types of fuel and their combinations for work);
- gas generator boilers (they have increased efficiency and operate on wood and wood gas).
Models of the latter type are more convenient to use, since soot does not accumulate inside them, and a minimum of ash remains.
There are models of long-burning boilers, dependent on the electrical energy carrier and independent.
Such heating equipment operates on the principle of top combustion (the hearth burns from top to bottom). The combustion chamber, located at the top of the structure, is filled with fuel. The fan forces air through the duct, and the heat generated by combustion is sent to the heat exchanger. The volume of the combustion chamber is about 500 dm3, so such a heating device can operate without interruption for several days.
Advantages
Long-burning designs are heating devices that are very popular among the population. This is explained by their many advantages: not only the use of various types of fuel, but also their long combustion time, as well as the simplicity and environmental safety of their use.
A boiler of this type in its modern variation is a design equipped with automation and a fan to increase the pressure in the system. With a small amount of fuel consumed, such devices can maintain the temperature in large rooms.
The big disadvantage of the design is the high cost, more than 1000 USD. e.
Security measures!
In order for such a boiler to truly be an effective and economical heating option, to serve for a long time and not cause burns or accidents in the house, take into account the main points of fire safety.
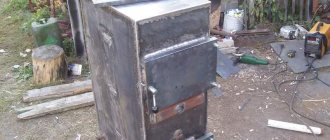
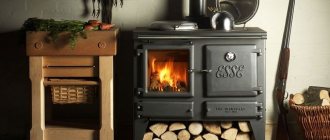
TT boiler
- It is necessary to monitor the temperature in the system and prevent it from overheating.
- Do not install a shut-off valve on the pipeline.
- Do not keep flammable objects near the boiler.
- It is necessary to monitor the ventilation in the room.
- A separate room must be equipped for the boiler.
At the preparatory stage, consider the place where the boiler will be installed.
Ideally, of course, to equip a separate boiler room, because the operation of a long-burning TT boiler is somewhat different from the usual wood-burning brick stove. And externally, this unit will not be pleasing to the eye or serve as a decoration for the house.
Considering that solid fuel does create a certain amount of dirt, it is better to install a long-burning TT boiler in a non-residential area.
But if its power is small (does not exceed 30-35 kW), then you can simply separate (zone) the main room from the “boiler room” using a brick wall.
Be sure to provide a ventilation system in the room where this boiler will be used. Oxygen must be supplied from the street on a constant basis.
What is pyrolysis combustion
As you know, it is not very convenient to heat a particular room with firewood, since this fuel burns quickly without releasing the required amount of energy. However, if the oxygen content in the firebox is low, the material will be consumed much more slowly. This is precisely what the principle of pyrolysis combustion is based on, due to which significantly less fuel is required and efficiency increases. The main products obtained in this case are coke, ash, and flammable gas, which also releases a large amount of heat.
This means that when constructing a homemade long-burning boiler, you need to take into account the following points:
- Initially, wood burning with a limited supply of oxygen releases flammable gas;
- then the resulting mixture is burned, in turn releasing heat.
Many home-made boilers operate on this principle, but it is important to remember that the equipment must be adjusted so that its operation does not damage the overall system for providing heat to the home
Types of sauna heaters
Depending on the type of fuel used, equipment is divided into several types.
Gas
The coolant heats up when the gas mixture burns. The devices are compact and economical. Frequent cleaning is not required and is easy to maintain. They operate on main gas, in which case a connection is required, or on liquefied gas. The last option is the most expensive. However, gas is considered a potentially dangerous substance, so devices must be certified and installed only by specialists. Homemade variations can be very dangerous.
Electrical
The most environmentally friendly option. Heating is carried out by converting electrical energy into thermal energy. In this case, combustion does not occur, so ventilation and smoke removal are not needed. The equipment is compact and easy to install. It is difficult to make it yourself. The disadvantages include the need for uninterrupted power supply and a fairly high price, which is constantly increasing.
Solid fuel
Works on different types of solid fuel: coal, peat, firewood, briquettes, etc. There are varieties of “long burning”. A standard solid fuel stove heats up quickly and retains heat well. The main disadvantage is the need to constantly load new batches of fuel. You also have to clean it regularly to remove ash. We will look at the instructions for making this type of boiler.
Instagram dom56ru
Instagram dom56ru
Useful additions
A home-made long-burning boiler assembled at home must be equipped with monitoring devices - a pressure gauge and a thermometer. If you decide to install an automation kit and a blower fan on your unit, then you will need to make a seat for it. The fan is placed in the top cover of the housing; it is better to make the electronic control unit remote by mounting it on the nearest wall inside the furnace room. Temperature and pressure sensors are embedded in the water jacket body. In this case, conventional indicating devices should not be ignored, because they will be able to operate when the power is turned off. Therefore, it is also better to install them, since not every electronic display displays coolant pressure.
After assembly, wood heating boilers must be checked for permeability of welds. Using a compressor, this is easy to do: fill the jacket of the device with water and create an excess pressure of 3 bar in it. Before testing, the seams must be cleaned of slag. Sinks and uncooked areas will make themselves known by leaking. When there is no compressor on the premises, the heating installation will need to be ignited and heated outside until a critical pressure of 3 bar is created in the jacket. Water pressure and temperature can be monitored using a thermometer and pressure gauge.
It is recommended to cover the casing of the water jacket and the inside of all doors of a home-made unit with heat-insulating material. As the latter, asbestos sheets and basalt wool are used, which are not afraid of high temperatures. For external cladding of insulation, you can use thin metal 0.3-0.5 mm with a polymer coating of the desired color.
Basic requirements for the design of a homemade heater
In its classic form, the heating unit from which home heating will operate consists of the following elements:
- combustion chamber (bunker) for burning wood, coal, fuel briquettes;
- grate bars through which air mass is supplied to the combustion chamber;
- tubular-type heat exchanger or storage tank for boiler water;
- chimney for removing fuel combustion products to the outside;
- draft regulator
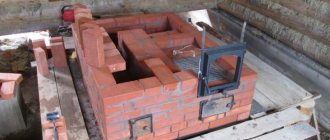
An important requirement that will have to be taken into account at the boiler design stage is the size of the combustion chamber. The firebox of an autonomous solid fuel boiler should be spacious and roomy. The design of the combustion chamber is calculated in such a way that the fuel placed in it burns completely without additional mixing. Brick boilers are preferable in this regard, since brick has lower thermal conductivity, which ensures a higher combustion temperature in a ceramic firebox than in a metal unit.
The combustion chamber must be designed in such a way as to maximize the concentration of thermal energy on heating the heat exchanger.
Solid fuel boiler steel firebox
The next, no less important aspect when designing heating equipment is the heat exchanger of a solid fuel boiler. The efficiency of boiler equipment depends on the design of this element, the quality of the material and the execution. The name of the heat exchanger is determined by the material of its manufacture - cast iron or steel. The heat exchange coils of these units are tubular structures with vertical or horizontal pipes in common usage, often called water jackets.
We will not consider cast iron heat exchangers, since this is a cast structure, the manufacture of which is impossible at home. However, you can use ready-made cast iron components removed from old units that were dismantled for some reason. Such a replacement is common when a solid fuel boiler is being modernized or repaired.
To make a steel heat exchanger, thick-walled pipes are used. The pipe is given the desired configuration by bending it under heat or using bends or half-bends of the appropriate diameter, connected to the coil fragments by electric welding.
The coil installation diagram for a traditional solid fuel unit will give a complete idea of what the heat exchanger should look like and in what position it is best to install it.
Sketch of one of the options for placing a tube heat exchanger in the housing: side views
Advantages of double-circuit heating
Double-circuit heating is the type of heating in which water is heated using a boiler specifically for use in the home and for heating the entire room. Thus, the entire need for hot water is provided by one double-circuit boiler. There are other reasons why it is gaining more and more popularity:
- Makes it possible not to depend on utilities and allows you to regulate the heating yourself, thereby creating comfort at home
- Possibility of installation in any part of the house. since no additional exhaust system is required, ventilation is also not required
- Apart from the boiler itself, you will not need anything, because everything necessary for heating and supplying the house with hot water for a long time will already be built in
- Favorable and affordable price
How a wood-burning stove with a water circuit works. Choosing fireplace stoves for a summer residence with a water circuit and a heat exchanger. Brick stove with a water circuit. A stove with a water circuit in development - how to do it yourself.
Pros and cons of wood-burning home heating
The use of solid fuel units is a common way of arranging autonomous heating for private buildings, cottages, garages, as well as industrial facilities.
It is quite possible to construct a wood-burning boiler with your own hands if you understand the operating principles of this equipment, follow the manufacturing technology and at the same time take into account fire safety requirements.
Wood-burning units have the following advantages compared to boilers operating on other types of fuel:
- Wood used for heating is affordable and does not require large energy costs.
- Firewood is an environmentally friendly material that does not cause allergies or other diseases.
- The device is easy to use.
- The room warms up very quickly - after starting the boiler, heat begins to flow into the room immediately.
- Wood-burning equipment is energy independent.
- The appliances can provide hot water at no additional cost. The boiler heats a boiler with liquid, which acts as a water heating radiator.
Wood-burning units have fewer disadvantages:
- The metal body is susceptible to corrosion.
- The equipment requires regular cleaning of ash collected during fuel combustion.
- A single load of fuel is enough for a short time.
Making a water circuit
You yourself can easily install and make a water boiler on a ready-made long-burning water stove, and if you don’t have one, then it won’t be too difficult to lay it out of brick yourself. For heating water. You can make a water circuit from old cast iron heating radiators, which you can easily find.
Their capacity is on average one and a half liters. You can connect several of these together and get a heater with a volume of 15 liters at the output, but due to its large dimensions it may not be suitable for use in all rooms. The most acceptable option is a Russian bathhouse.
First, disassemble it yourself. clean and rinse them with hydrochloric acid, or rather its solution. Before installing the entire structure, the gaskets separating the sections should be changed, since initially they are not adapted to high temperature changes. which can reach more than five hundred degrees. Since the old separator will not hold up and the radiator may leak, use impregnated asbestos cord for installation. After this you can start assembling. It must be assembled in such a way that the exit pipe is located above the entire structure, and the entrance pipe is located under it.
Place the circuit ready for use in the chimney as close to the firebox as possible. The hot air coming from there will heat the circuit and, accordingly, the water, making it suitable for heating the house. Subsequently, you will connect the entire water circuit system to the radiators that heat your home
Be sure to first check the entire system for any leaks, paying particular attention to the circuit. which you assembled with your own hands
If you have not found old cast iron batteries for its manufacture, then you can use ordinary pipes for the circuit, but with fairly thick walls.
The water circuit can be applied to absolutely any long-burning stove: from a fireplace to a potbelly stove. You can also make a boiler from fairly thick metal and place it directly under the firebox, which will make it heat up much faster.
Step-by-step boiler installation instructions
The selection and arrangement of equipment is not yet a guarantee of trouble-free operation of the system, because its elements still need to be installed correctly. And you should start with arranging the boiler room, in which all this should be located
A small instruction in pictures will tell you what you need to pay special attention to
Table 2. Correct step-by-step installation.
Steps, photo Description
Step 1. Arrangement of the boiler room
The boiler is installed after repairs have been completed in the room where it will be installed.
It is important that: non-combustible materials are used in the finishing; the foundation for the boiler was prepared; there must be an air flow in the room; An exit for the chimney pipe must be provided in advance in the wall or ceiling.
Step 2. Choosing a location for the boiler
When choosing a place for installation, you need to keep in mind that there must be a minimum of 700 mm between the walls and the rear and side surfaces of the boiler body
On the front side, this distance must be at least 1250 mm (if the unit is top-loading). If loading is done from the front, you must also add the width of the door to this distance.
Step 3. Aligning the body position
It is very important that the position of the boiler does not deviate from the vertical, so during installation you need to use a level. Place it on the firebox with the lid folded back.
Step 4. Preparing components
According to the boiler passport, check its equipment, which may vary depending on the manufacturer. Purchase all other elements necessary for installation in advance in accordance with the selected scheme.
Step 5. Preparing tools
Naturally, you will need tools: adjustable, gas, socket and open-end wrenches, as well as screwdrivers of different sizes, a square and an angle grinder.
Step 6. Installing the combustion regulator
FUM tape is wound onto the regulator rod, and it is installed in its regular place. Tighten the nut, set the desired temperature and fix it in this position with a screw.
Step 7. Installation of the heating element thermostat
A little further than the combustion regulator there is a hole for installing the heating element regulator. If you don’t plan to install it, then simply screw a plug in there.
Step 8. Installation of the heating element
Next, the heating element itself is mounted - or a plug instead.
Step 9. Install the faucet
For ease of operation or routine maintenance of the system, taps are installed at the inlet and outlet of the coolant from the boiler.
Step 10. Assembling the security group
You assemble a pressure gauge, an air valve and a safety valve into one unit, which ensure the safe operation of the boiler and come with it. The group is placed in front of the shut-off valves.
Step 11. Pipeline connection to the boiler
To connect the supply and discharge pipelines to the boiler, you need to make rotary pipes. It is better if the connections are welded rather than detachable.
Step 12. Sealing the chimney landing site
To ensure that the chimney pipe fits tightly and does not allow combustion products to enter the room, its landing site and all other connections are treated with sealant.
Step 13. Water connection
Install a flexible tube onto the faucet installed at the very beginning, through which the hydraulic part of the boiler will be filled with water. Open all taps, raise the pressure to 1.3 atm, and check the tightness of the system. There shouldn't be any leaks anywhere.
Step 14. Heat the boiler
Now, in accordance with the instructions, you can load the firebox with wood and light it.
The installation process is presented only in general terms, since each boiler model has its own nuances, and the connection diagram may be different.
Some tips for proper boiler operation
In order for your boiler to be as efficient as possible, it must be operated correctly
Here are the points you need to pay attention to so that the firewood burns longer:
- When igniting the fuel, the damper on the boiler must be completely open;
- The long burning mode is set only after heating to +600 degrees;
- The coolant at the outlet must have a temperature of 65 degrees or more;
- If the boiler design does not provide for the laying of raw firewood, its humidity should not exceed 20%;
Dependence of heat production on wood type
- To avoid resin settling on the walls of the firebox and chimney, heat the boiler with hardwood firewood - acacia, birch, alder, aspen. And, by the way, the breed has a great influence on the amount of heat received;
- Do not chop the firewood - the larger the pieces, and the closer to each other they are laid in the firebox, the longer they will burn;
- To prevent logs from hanging, they should not be too long. The ideal size is the length of the combustion chamber minus 5 cm.
Two examples of wood heating boilers
Self-production
It is quite difficult to construct a heating boiler with your own hands. The slightest inaccuracy and it will not work correctly, which can lead to tragedy. Therefore, it is necessary to carefully study the technology of their manufacture and carry out all activities very efficiently.
Shaft-type heating devices
You can create a mine or pyrolysis boiler yourself. The first operates not only on wood, but also on coal, peat or sawdust. You can immediately load up to 50 kg of firewood into its chamber.
When the chamber is fully loaded with fuel and high power, such a device will work continuously for up to 5 hours, at the lowest power (15-20 kW) - up to a day. Its efficiency is 75%. The power of such models can be adjusted automatically.
Pyrolysis model
Yellow or colorless wood gas, released under high temperature, is the heat source in the pyrolysis boiler. For such a heating device, you can only use completely dried firewood, otherwise it will not start. The pyrolysis design can also operate on pellets. Their automatic feeding into the furnace (using special augers) will be an additional advantage of the boiler. The operating time of a model of this type when fully loaded is 12 hours.
Disadvantages - high cost (you can reduce it if you make it yourself), energy dependence (the fan runs using electricity), large size. To make such a device you need:
- pipe and sheet of steel 4 mm thick;
- professional pipes, metal rods with a cross-section of 2 cm;
- electrodes;
- fan;
- fire bricks;
- automatic temperature controller;
- fasteners.
They first draw up a diagram of the future boiler with all the calculations. The most successful design of a homemade boiler in this regard, developed by engineer Belyaev, is taken as a basis. Adjustments are made to it according to the wishes of the home owner. For example, heating can be made more efficient by increasing the volume of the heat exchanger jacket.
Homemade pyrolysis devices must be installed on fireclay brick platforms specially equipped for them. After this, they are connected to the water circuit.
During the first test switch-on, they find out whether there were any errors in the boiler design. If everything was done correctly, the device can quickly switch to gas generator mode. The room will become much warmer within half an hour.
Tools and materials
A wood heating device is the safest design. Its autonomy, ease of operation, minimal risk of explosion, and the possibility of self-production are its main advantages. Its disadvantage is the regularity of adding fuel.
Homemade wood-burning boiler models can be made from the following materials and parts:
- metal barrel (volume – 200 l);
- steel sheet 3-5 mm thick (to create a firebox);
- metal pipe with a diameter of 20 mm and a wall thickness of 3 mm;
- L-shaped pipe (diameter – 20 mm);
- grate;
- doors for the vent and firebox.
Homemade models of wood-burning boilers are made using gas welding equipment and an angle grinder.
Sequence of work
Before starting work, you must carefully consider the design of the device, purchase all the necessary materials and tools.
Cut 3 circles (diameter of each 57 cm): this is the bottom, the top cover and the partition between the ash pit and the firebox. Make a hole with a diameter of 20 mm in two of them.
A strip 400 mm wide and 3600 mm long was cut from a sheet of steel, holes were cut in it for the firebox door, and below it for the ash pan. Weld the sheet together into a circle.
Weld a circle with a hole on top and without one on the bottom. Install a partition with a grate between them.
Weld the pipe and the barrel together according to the “one inside the other” principle. Install a firebox with a blower underneath. Connect all elements by welding.
Attach an L-shaped piece of pipe to the top of the barrel: it will connect the heating container and the chimney. When water heats up in a barrel, it forms steam, which will freely escape into the chimney, thereby preventing the pressure in the boiler from increasing.
Install pipes at the top and bottom for cold water inlet and hot water outlet.
Hang the doors on the firebox and vent.
Install the structure on a foundation made of refractory bricks.
Such a device heats using firewood, pellets or peat, tightly packed inside the firebox.
Even the simplest model of a wood-burning boiler requires care and attention when making it yourself
Installing a gas burner in a solid fuel boiler
After sound reflection and a real assessment of their capabilities, most home craftsmen still give preference to the modernization of solid fuel boilers that previously processed firewood or coal. A factory-made gas burner is simply placed in their firebox.
To equip your country property, you can purchase a solid fuel unit, which can be converted into a gas one. For example, a Teplodar stove in which a gas burner is mounted
Let's consider the stages of installing a Teplodar AGG burner device:
- Dismantling the firebox door, the ashpan damper (or the ashpan itself, if it is made in the form of a drawer with a solid door), the bumper and the grate. In short, you need to remove all structural parts located within the firebox and ash pan.
- Fixing the burner device. A burner block is mounted in the firebox channel freed from the above elements. If the Teplodar stove is designed for changing fuel, then the burner module is fixed in the channel through standard ears with screws and nuts threaded into them.
- Connecting automation to the remote control. The devices included in the design of the burner block that ensure automatic operation of the boiler are connected to the control panel.
- Thermostat sensor mount. It is installed on the supply pipe, wrapped in insulation to protect against external mechanical and temperature influences, and on top with ties.
- Putting it into operation. It is carried out after checking the draft and burst ventilation of the room with a modernized boiler. Using a simple handle, you select the most suitable mode.
We remind you that in accordance with the requirements outlined in the “Safety Rules for Gas Distribution and Gas Consumption Systems”, all work on installing equipment, replacing burners, servicing equipment and connecting to the network supplying blue fuel must be carried out by gas workers.
The technical documentation attached to the Teplodar stove contains a detailed description of the process of installing a gas burner for converting a solid fuel unit into a gas one
In accordance with federal regulations and standards, it is necessary to conclude an agreement with representatives of gas services for the supply of gas and related services. It is clear that not all remote settlements will be able to be served by employees of gas organizations. However, it is advisable to adhere to the requirements in order to avoid catastrophic consequences.
When it decreases and suddenly goes out, the current coming from the electrical element is weakened, as a result of which the gas supply channel is blocked. Overheating of water in the boiler is detected by a temperature sensor, which transmits a signal to open the contact pair blocking the burner
Should you take risks or value and protect your health with the well-being of your loved ones? It's up to you to decide. It is wiser to refuse threatening measures, but knowing about the process of their implementation is very useful in order to monitor how efficiently and honestly the gas workers work.