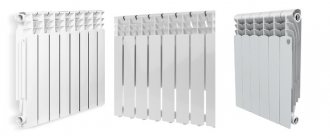
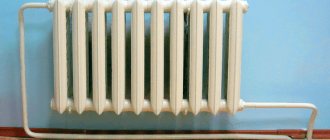
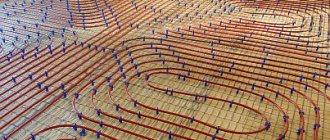
Batteries are the main part of the heating system. The heat supply, service life and costs of heating the room depend on the material of manufacture and proper installation. Today you can find radiators made of different materials: aluminum, steel, bimetal. When installing heating systems, cast iron radiators are still used. How to install cast iron heating radiators yourself, if you have the skills to use working tools.
DIY installation of cast iron heating radiators
Peculiarities
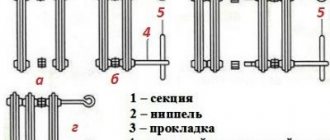
The devices are simple. At the core is a section created using casting. Differ by:
- channel profile;
- number of channels.
The sections are connected, you can assemble a structure of any size.
Pros:
- Versatility. Resistant to:
- aggressive environment, unlike structures made of steel and aluminum;
- corrosion;
- damage by the smallest fractions present in the coolant;
- pressure surges in the system.
- Long-term operation.
- Maintainability. It is impossible to build up steel structures or replace faulty parts. With cast iron, adding/removing sections is quick and easy.
- Availability. Resistant to damage, repairable, purchase is compensated.
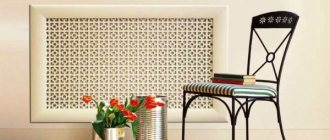
- A large assortment. There is no need to confuse old cast iron structures with modern ones. They are made of better quality and do not require frequent painting. Powder coating is used for exterior decoration. So that they do not spoil the overall appearance of the room, it is rational to use:
- decorative fencing;
- designs with “artistic casting”.
Flaws:
- Inertia. The phenomenon is caused by a low heat transfer coefficient. Opponents of cast iron radiators claim that they “swing” for a long time before normal operation. They take longer to cool down if the boiler turns off.
- Low heat transfer.
- Heavy weight. Complicates transportation and installation. The cast iron battery must be mounted on a solid base. If the wall is made of cellular concrete, then it is more rational to replace traditional hooks with a load-bearing metal frame.
Assembling a heating radiator with your own hands: connecting sections and fastening
The need to assemble and disassemble a heating structure arises when one of the sections leaks, even if you want to save on assembling the entire complex, and if necessary, expand sections, since you initially “missed” in counting them. As you can see, there are many reasons, they are less important than the process to which our instructions are dedicated.
The ultimate goal is warm batteries.
There are many batteries, but one assembly method
We would like to remind you that batteries can be of several types based on materials:
- Cast iron;
- Bimetallic;
- Aluminum;
- Steel.
And several types of designs:
For your information! The secret is simple: the method of assembling different radiators is the same + the method of tying the radiators is also the same.
Therefore, today's material is universal for all types of batteries.
Let's start with sections
Let's carry out the assembly using sectional batteries as an example. In order to somehow supplement the information, we will analyze the points of piping radiators, especially since they are of the same type for both sectional and panel heaters.
Let's put everything in its place.
The binding begins with the distribution of roles:
- Each radiator, regardless of type, has four threaded inlets. Our task is to determine the coolant input-output circuit for the correct placement of plugs and proper connection of the element to the network;
Assembly diagram.
Advice! If you are making a regular radiator replacement, then you don’t need to invent anything. You do everything in the same way as the previous radiator. Upper inlet, lower outlet. The opposite upper threaded hole is a pass-through plug with a Mayevsky tap.
The opposite lower threaded outlet is a blind plug.
- The roles are distributed. We assemble:
- The beginning is the connection of the Mayevsky tap and the blind plug. For these purposes, flax fiber and a special paste for sealing threaded connections are suitable;
- The fiber is wound in even strands without lumps or ridges in the direction opposite to the direction of the thread of the plugs;
For additional sealing of parts we use fiber.
- The paste then fixes this fiber in place;
- Using a wrench, the plugs are installed in place.
An adjustable wrench is a great helper.
Advice! There are special wrenches on sale with shaped recesses for the main parameters of the installation kit. An adjustable wrench is quite enough for tying the radiator, although its capabilities will not be enough for plugs for cast iron radiators.
Then you will still need a gas wrench.
- It’s a little more complicated with water inlet and drainage. Today, taps called American valves are installed in batteries; these connections with a union nut provide the most reliable connection. Their installation proceeds as follows:
- The threaded part entering the radiator is made in the same way as already described - with fiber and paste;
Recommendations! Flax and paste can be replaced with FUM tape, as many advise. Indeed, it is possible, but this must be done correctly. Such a replacement is possible in houses and apartments where there is an autonomous heating system, where the coolant pressure in the network is quite low - the circuit is closed. FUM tape in such conditions it feels very comfortable. With pressure surges, frequent guests of the general heat supply system, the tape can be destroyed.
The result is clear - leak.
- The American one is tightened not with an ordinary gas wrench, but with a hexagon.
Is replacement possible?
Advice! In many video materials you can see how an American woman is twisted with a chisel, a square pin, and even one grip from a pliers.
We won’t judge how justified this is, but the native key is still better.
Connecting sections
To do this, we will need nipples - special section connectors with a rubber sealing ring, as well as keys for tightening the nipples.
Our help! A nipple is a type of connection represented by a piece of pipe with a central transverse groove for a rubber seal. Threaded ridges extend from the groove for the right and left sides.
This design allows you to screw the connector into threaded sockets while simultaneously bringing the radiator fins closer to each other.
How to assemble sections of a heating radiator?
The assembly algorithm is simple:
- Assembling sections of aluminum radiators, as well as assembling bimetallic heating radiators with your own hands, begins with “making” nipples in threaded holes;
Photo of a nipple with a seal.
Advice! If you are connecting two sections, then the connecting windows should have: one - right-hand thread, the other - left-hand thread.
- The assembly of aluminum heating radiators, as well as the assembly of cast iron heating radiators with your own hands, occurs by uniformly tightening the threaded connections of the nipple and sections using special keys;
Keys for assembling ribs.
Observation! It is better to carry out battery installation work together.
This is both easier and the connection is easier to control.
- After joining the required number of sections, the assembly of the aluminum radiator, like any other, is carried out according to the wiring diagram, which has already been described.
Preparatory stage
Before starting installation, you need to prepare tools and equipment. Parts are selected taking into account the heating distribution system.
The installation site needs to be cleaned and prepared. If the wall is uneven and not perpendicular to the floor, level it. Free the heating system from water.
Assembly
It is necessary to determine the number of sections required to heat the room. When calculating sections, you need to take into account the area of the room and the size of the windows. Group sections with several radiator keys. The battery parts must be securely attached with a machine, a device that prevents the sections from turning when the nipple is turned.
Lubricate the nipples with olive oil and put on gaskets.
Turn the keys in the opposite direction from the thread, screw in the nipple a maximum of 2 turns. When the radiator has been assembled, check the tightness, conduct a hydraulic test (you will need a hydraulic stand and a pressure gauge). The pressure in the heating device should not drop. If this happens, tighten the nipples and check the sections for defects.
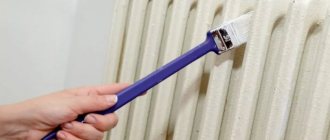
Coloring
To preserve the appearance of the devices, paint twice. After each coat, let the paint dry completely - this will prevent cracking and discoloration.
The paint must meet the following criteria:
- withstand heating up to +80°;
- do not contain harmful compounds that evaporate when exposed to high temperatures;
- should not have a soft structure.
Masters advise using alkyd and acrylic paints. The first is environmentally friendly, affordable, the second is durable and does not lose its appearance.
Coloring
Determining the installation location
Devices need to be installed:
- vertical;
- at a distance of 3-5 cm from the wall;
- 6 cm above the floor;
- 5-10 cm below the window sill.
Compliance with standards will ensure good ventilation and air heating.
It is allowed to place pipes at a slight slope in the direction of liquid movement - this will prevent airing of the heating system.
Make sure that cast iron radiators are not distorted, otherwise the coolant circulation will be affected. The center of the battery and the middle of the window opening must coincide within 2 cm.
Installation Standards
Placement of heating devices
It is of great importance not only how to connect heating radiators to each other, but also their correct location in relation to building structures. Traditionally, heating devices are installed along the walls of rooms and locally under windows to reduce the penetration of cold air flows in the most vulnerable place.
There are clear instructions for this in SNiP for installing heating equipment:
- The gap between the floor and the bottom of the battery should not be less than 120 mm. When the distance from the device to the floor decreases, the distribution of heat flow will be uneven;
- The distance from the back surface to the wall on which the radiator is mounted should be from 30 to 50 mm, otherwise its heat transfer will be impaired;
- The gap from the top edge of the heating device to the window sill is maintained within 100-120 mm (no less). Otherwise, the movement of thermal masses may be hampered, which will weaken the heating of the room.
Bimetallic heating devices
To understand how to connect bimetallic radiators to each other, you need to know that almost all of them are suitable for any type of connection:
- They have four possible connection points - two upper and two lower;
- Equipped with plugs and a Mayevsky valve, through which you can bleed the air collected in the heating system;
A diagonal connection is considered the most effective for bimetallic batteries, especially if we are talking about a large number of sections in the device. Although it is not advisable to use very wide batteries equipped with ten or more sections.
Advice! It is better to think about the question of how to properly connect two heating radiators of 7-8 sections instead of one device of 14 or 16 sections. It will be much easier to install and more convenient to maintain.
Another question - how to connect sections of a bimetallic radiator may arise when rearranging sections of a heating device in various situations:
The place where you plan to install the heating device is also important.
- In the process of creating new heating networks;
- If it is necessary to replace a failed radiator with a new one - bimetallic;
- In case of underheating, you can expand the battery by connecting additional sections.
Aluminum batteries
Interesting! By and large, it should be noted that a diagonal connection is an excellent option for any type of battery. You don’t know how to connect aluminum radiators to each other. connect diagonally, you won’t go wrong!
For closed-type heating networks in private homes, it is advisable to install aluminum batteries, since it is easier to ensure proper water treatment before filling the system. And their cost is much lower than that of bimetallic devices.
Of course, over time, moving through the radiators, the coolant cools
Of course, you will have to try hard before connecting the sections of the aluminum radiator for regrouping.
Advice! Do not rush to remove the factory packaging (film) from installed heating devices until finishing work in the room is completed. This will protect the radiator coating from damage and contamination.
The work process itself does not take much time, you do not need any special skills or expensive equipment, you can purchase all the necessary tools at any hardware store. And don’t forget, the connection will serve you for a long time and without hassle only if you used high-quality materials in your work and followed all the rules for installing the heating system.
We are talking about exactly what is indicated in this figure.
In the video presented in this article you will find additional information on this topic.
Self-installation of radiators
Installing batteries is not complicated; it requires a minimum of tools and basic construction skills. Since cast iron radiators are heavy, it is better to install them with two or three people. The quality of installation affects heating.
Installation of brackets
Before installation, mark the wall and determine the locations for the brackets. If the wall is reinforced concrete, drill holes 12 cm deep and insert dowels or wooden plugs.
Attach the brackets to the prepared holes, secure with cement mortar and plugs.
Before hanging a cast iron radiator on the brackets, check the reliability of the fastenings.
If the walls cannot withstand the weight, it is rational to use floor-type brackets. They are not inferior to wall ones and will protect the walls from serious loads.
Bracket installation
How to install a cast iron battery?
In addition to radiators, the heating system involves the installation of components that ensure easy maintenance of batteries, reducing the likelihood of emergency situations. Step-by-step description of installation work:
- Installation at the point of the upper manifold, at the point where the supply pipe is connected, of a manual or automatic air vent.
- Installation of plugs on free collectors. If the diameter does not match the pipes, use the adapters included with the radiators.
- Installation of shut-off and control valves. Ball valves installed at the outlet and inlet of the battery allow you to dismantle the radiator without stopping the operation of the heating system.
- Connecting equipment to the heating system. Can be connected according to 4 schemes. The connection is determined by the selected fittings and pipes.
Crimping
Pressure testing is the final stage of installation. You will need equipment; if you don’t have it, you can actually do the work yourself. Fill the batteries with water slowly to prevent water hammer, damage to fittings and heating systems.
How to choose the right bracket
The main rule when buying a retainer: it must withstand the weight placed on it. The maximum load is usually indicated in the included instructions. It is easiest to choose a bracket for an aluminum radiator, since it weighs little and any type is suitable for it.
For very powerful batteries, use floor stands. But if the covering in the house is wooden, then you need to make sure that the clamps are equipped with additional fasteners to the wall. This is necessary in order to reduce the load on the boards. For light heating elements that will be located in a deep niche under the window, it is better to buy a long bracket.
For cast iron radiators, it is recommended to use holders with the ability to slightly change the height, otherwise installation difficulties may arise. The price of an adjustable bracket is not so high as to give up installation convenience.
It is important that the alloy contains no toxic substances released when heated. You should not buy parts secondhand, especially without the appropriate accompanying documents.
Please note that the lightest one - the corner bracket - is intended only for aluminum and copper radiators
Decorative design of structures
The appliances can be designed so that they do not stand out from the interior and emphasize individuality.
Openwork screens can hide heating elements and give the room elegance. Batteries are often stained.
"Artistic modeling" on radiators
Screen
Interior
Armature
What fittings can be used in radiator piping?
| Fittings kit | Functions |
| Two ball valves | They make it possible to completely shut off the device for repair, replacement, or during a long thaw. |
| Ball valve and throttle | In addition to stopping, it is possible to manually adjust the heat output |
| Two chokes | Allows for basic balancing of two-pipe heating and subsequent adjustment of heat transfer |
| Throttle and thermal head | Makes room temperature adjustment fully automatic |
An important point: there must be a bypass in front of the throttling and shut-off devices in any heating system. Otherwise, valves and chokes will regulate the flow of the entire circuit.
The jumper in the photo allows the coolant to circulate in the riser when the valves are closed.
Reviews
We bought a new house with new aluminum panel radiators. A year later they started leaking. I invited the technician to determine the cause. It turns out that everything is due to bad water. I changed them to cast iron. Everything works, the house is warm and dry. 3 years have passed since the replacement. I advise you to use only them.
Radion
Many said that self-installation of cast iron heating radiators is a difficult task. I admit, I started to doubt it, but decided to try it. I watched several training videos, read forums, consulted with a familiar master, and gradually did it. I asked a specialist to check the work, he said that everything was fine. We've been using it for 2 years, everything is fine.
Gregory
I opened a small photo studio and was strict about renovation and design. When the question arose about installing heating, the master advised installing cast iron radiators. I was against it because they were associated with the Soviet era. I was surprised when I saw the models. As a result, I received aesthetic, durable heating.
Svetlana
I think it’s better to pay once, but “for a long time,” so I spent a long time choosing heating radiators. A friend recommended cast iron: cheap and cheerful. I calculated, weighed, agreed. We have been using it for 5 years without any problems or complaints.
Igor
Connection diagrams
The most fault-tolerant scheme for connecting heating radiators in a private house with a bottling and boiler is a single-pipe Leningradka. Heating appliances are connected parallel to the bottling line, which is laid around the perimeter of the room.
Somewhat cheaper to install, but noticeably more problematic to operate, is a circuit that uses a series connection of batteries. Suffice it to say that their independent adjustment in this case is impossible.
A variant of a single-pipe circuit with a serial connection.
Finally, a two-pipe system involves connecting each radiator as a jumper between the supply and return lines. It is inconvenient in that it requires the already mentioned balancing - limiting the passage of the heating devices closest to the boiler.
What are the possible diagrams for connecting heating radiators to the supply line?
- One-sided. The connections are connected to the upper and lower radiator plugs on the right or left. It is compact, but makes the heating of the device uneven: the last sections will always be colder than the first.
- From bottom to bottom. In this case, the battery must be equipped with an air vent. The advantages of the solution are that the radiator with this connection does not require flushing and always heats along its entire length.
- Diagonal. Heating of sections is even more uniform; however, the lower corner of the device with a blind plug will gradually silt up.
Connection options for liners.
Bottom line
Assembling and installing cast iron batteries is not difficult. No special skills, tools, or knowledge are needed. Installation affects the durability and efficiency of the system.
Having pre-thought out the assembly down to the smallest detail, you will make the atmosphere in the room comfortable. If you doubt your abilities, it’s better not to take risks and turn to a specialist. Of course, this will require additional costs, but the result will be of high quality, and you will not worry that the heating system may fail.
Average score of ratings is more than 0
Share link
Comments There are no comments yet, but you could be the first...
Single pipe system
Its operation is based on a one-time supply of coolant to the entire building: the cooled liquid flows down inside the pipes from top to bottom. Most often, apartment buildings are equipped in this way.
The disadvantages of a single-pipe scheme include the following factors:
- There is no way to regulate the temperature of heating devices.
- Different apartments are heated unevenly. The upper floors receive the hottest coolant, which gradually cools as it flows down.
- To disconnect from central heating and switch to autonomous heating, you have to overcome a lot of difficulties.
Where will we place it?
Typically, radiators are placed where the greatest heat loss in the apartment is expected. As a rule, this is the area under the window or on the side of the corner wall of the house. Even if the apartment is located in a well-insulated building and is equipped with double-glazed windows, the window is the place where the air temperature will be the lowest during the cold season.
Choosing the optimal location for the radiator
If you do not place a radiator under the window, then the cold air entering from outside will gradually fall down and spread across the floor. From physics lessons we know that warm air moves upward. This means that, moving away from the battery and rising to the ceiling, it will create a kind of barrier to the cold flow from the street. According to SNiP recommendations, the size of the battery should occupy at least 70% of the window, otherwise the warm air will not create the necessary barrier.
If the batteries are too short, a situation may occur where cold zones form on the sides. As a result, the room temperature will be low even with a powerful radiator. As you can see, it is not always only the battery power that provides a comfortable microclimate in the apartment.
Counter-lattice for metal tile roofs
This roof structure is quite simple and quick to install.
For metal tiles, you should use bars that have a length of 1350 to 1370 millimeters and a standard cross-section of 30x50 millimeters. Fastening must be done using galvanized nails with a pitch of 300 millimeters.
In the process of installing counter-lattens for a metal tile roof, you will need to connect the upper ends of the bars from opposite slopes by sawing. The result should be a strong connection. Subsequently, this may make it possible to carry out more accurate calculations of the sheathing for a given roofing material and construct the correct ridge.
In addition to the fact that the counter-lattice structure for metal tiles is used on roofs, it is also used on vertical surfaces while the process of external wall insulation is being carried out. This will create an air space between the insulation and the facing material.
Condensation will not fall on the inside of the cladding onto the surface of the insulating material. If the house is planned to be covered with wooden panels, this will have to be done in order to keep the house cladding intact for a long time.
Such a roofing pie will make it possible to solve problems such as:
- more reliable fastening of the membrane on a metal roof;
- arrangement of a reliable frame for the sheathing;
- obtaining an air gap for proper ventilation.
Advantages of cast iron batteries
Among the obvious advantages of this type of radiator are the following:
- the minimum service life is 50 years, which is due to the high resistance of the equipment to corrosion plaque;
- cast iron batteries are reliable;
- the ability to accumulate a very large amount of heat due to the presence of thick walls;
- poor quality of the circulating coolant will not affect the operation of the equipment;
- unlike steel products, cast iron heating devices are not prone to leakage;
- The installation of cast iron batteries can easily be done with your own hands, that is, without the help of professional craftsmen. To facilitate installation, you can study various photo and video materials that can simplify the installation process.
Heating uniformity
In one heating radiator, different sections heat up differently and unevenly. However, the temperature difference between the upper and lower parts is normally barely noticeable. If you are not an expert in installing a heating system, then it will be difficult to determine whether the batteries are working correctly.
If you compare two heating devices - cast iron and aluminum, you should remember that cast iron products have lower heat transfer than aluminum ones. Accordingly, they will heat up more evenly. But in aluminum appliances, the top heats up faster than the bottom. But that doesn't mean they don't work correctly. It just takes a little time for the coolant to completely fill the radiator. And only after this can the quality of his work be determined.
There is another reason why devices may not work correctly. This is dirt that accumulates in the lower part over several years of use. This is why it is recommended to rinse and clean old batteries before installation. Moreover, cast iron products are best washed. Often they are simply disassembled, washed, new cuffs are installed and reassembled. The “new” connection of the cast iron radiator guarantees high quality of its operation.
Electricity consumption
This indicator should be considered in two groups. The power of liquid heating devices does not exceed 1 kW. Most often, manufacturers offer radiators of 500-800 W. This means that such a device will consume 20 kW of electricity per day. But if you configure it correctly, you can get a reduction of up to 12 kW.
With liquid-free ones it’s a little more difficult. Here the consumption per section is taken into account, which means that everything will depend on the number of sections present in the battery. Based on the fact that each section consumes 150-200 W, you can calculate the consumption of the radiator. Again, with the right setup, you can achieve a 40% reduction in consumption.