Advantages of cast iron batteries
For some reason, when it is necessary to replace old cast iron radiators, most consumers look for an alternative made from other types of metal. This happens for the simple reason that they do not know what modern models of cast iron batteries look like. They not only have a smooth, beautiful surface that looks stylish in almost any interior, but also new technical parameters that are significantly better than their Soviet counterparts.
Installing new generation cast iron heating radiators allows you to save money, both on products and their connection. They do not have to be adjusted to fit the existing heating system or purchase additional adapters. With all this, they have a number of advantages over old cast iron batteries:
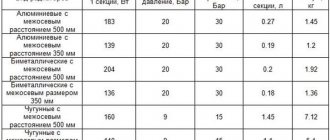
- The weight of the new models has become two times less. If earlier the radiator section weighed about 8 kg, now it is 3.5-4 kg.
- Since their outer surface is no longer “ribbed”, but has acquired a smooth, even surface, the heat transfer of the new devices has become higher. In old models it was 110 W, and in new ones it was about 130-140 W.
- Their resistance to the quality of the coolant remains the same, and since the channels are quite wide, they will have to be cleaned much less often than the same bimetallic or aluminum sections.
- Knowing how to properly connect a cast iron battery, you can forget about the cold in your apartment for the next 20-30 years. This is exactly the warranty period that manufacturers give for their products, although the average service life is 50-60 years.
- The working pressure in new cast iron radiators is still 9-12 atmospheres (working) with a test pressure of 15 atmospheres. They are ideal for apartment buildings no higher than 6 floors.
With all their new advantages, these devices have the same disadvantages as the old “accordions”. First of all, this is their fragility. They cannot be hit, much less dropped, but connecting cast iron heating radiators of a new generation allows you to do this, if not individually, then at least without a team of builders. This did not work out with the old samples, given that the weight of one section was 7-8 kg, and there could be 12 or more of them in the battery.
Since the price of new cast iron structures is low, the heat transfer rates are higher, and the appearance is more stylish, you should pay attention to them, especially since their outdated analogues have served people well for decades.
Correct selection of fastening systems is the key to heating reliability
Installation of heating systems is usually carried out once every 20-30 years . Such a long service life requires the use of high-quality materials and reliable fastening of system elements. Fasteners of different types will perfectly cope with the task and add individuality to the interior.
For high-quality operation of the radiator, you need to choose the right brackets. There are many fasteners. They all differ in type of design, installation method, and functionality. Some are made specifically for a specific design.
Compliance with installation standards
Even knowing how to install a cast iron battery, you should remember why you need to adhere to the standards approved by SNiP. Maybe someone will consider this unnecessary, and will be wrong, since any deviations from the parameters are not just a violation of safety rules, but also a decrease in the efficiency of the system itself.
General rules for installing radiators include:
- The position of the device relative to the vertical axis of the window. The middle of the battery should coincide with it. The permissible deviation should not exceed 2 cm.
- The battery must have such a number of sections that when assembled it occupies 75% of the width of the window opening.
- SNiP indicates how to secure a cast iron battery to the wall. So the distance between it and the floor according to the standards is 60 mm, under the window sill 50 mm, and from the wall - 25 mm.
Since the distance between the radiator and the wall is so small, before connecting cast iron batteries, it is worth attaching a heat-reflecting film or metal plate to it. Such an easy procedure will significantly increase the heat transfer of the radiator, since the heat will not go into the wall, but will be reflected into the room.
When the location has been chosen and all calculations have been made, you can begin installing cast iron heating radiators with your own hands. To do this you will need tools and the necessary fasteners.
Conclusion
Fastening heating radiators to the wall is not difficult at all - to do this, you need to install brackets at the same level, in accordance with the requirements of SNiP. If the battery cannot be mounted on the wall, you can use floor stands. Particular attention must be paid to connecting heating devices.
You can find additional useful information on this topic from the video in this article.
Did you like the article? Subscribe to our Yandex.Zen channel
Fastening methods and number of elements
Attaching cast iron radiators to the wall is the first stage of installation, the quality of which determines the further connection and quality of operation of the entire system. Although newer cast iron batteries weigh half as much as their older counterparts, weak brackets or improper fastening can cause a serious accident over time. Therefore, you should perform this part of the work very carefully, using one of two installation methods:
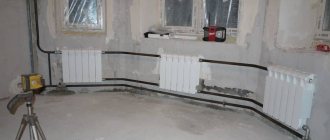
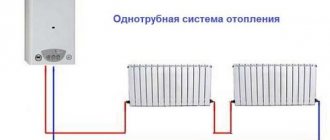
- Wall mount for cast iron batteries is the most common. As a rule, they are mounted under windows not because it is prettier or easier, but to prevent the glass from fogging up. Warm air rising from the structure creates a kind of curtain that prevents cold currents emanating from the window from entering the room. The main types of fasteners with this fastening method are:
- Brackets are made of cast iron, which are made in the same way as radiators, by casting.
- Steel fasteners located on a strip of the same metal.
- Steel pin fasteners up to 30 cm long. They are suitable for particularly heavy structures.
- The most convenient are adjustable steel clamps. They allow you to select the optimal position for the battery and change it if necessary.
If the wall is brick or reinforced concrete, then there will be no problems with fastening. It is enough to make holes in the places where the brackets will hang, insert dowels there and secure everything with cement mortar. But how to hang a cast iron battery on a wooden wall or plasterboard? This will require floor stands, which will take on most of the weight of the structure.
- Floor mounting is used precisely in cases where the wall is not reliable enough to support the weight of a cast iron device for a long time. In this case, special floor brackets are mounted into the floor, and wall mounts are needed only to hold the radiator in the required vertical position.
Having chosen one of the mounting methods, you can proceed directly to installing the battery.
Attaching heating radiators to the wall - step-by-step instructions
During the construction and preparation for operation of any building intended for people to live and work in it, attaching heating radiators to the wall becomes one of the most important stages. To do the job correctly, the master must not only know how to mount a heating radiator, but also understand the types of batteries, mounting options, types of fasteners, pipeline connecting elements and other intricacies of this procedure.
What are heating radiators?
The main indicator of the quality of radiators is their heat transfer rate. It depends entirely on the material from which the heating device is made. The most popular are:
- Cast iron batteries. Advantages: huge service life due to the very thick walls of the product, high resistance to corrosion, heat transfer for some time even after the heating is turned off. Disadvantages: heavy weight and associated installation difficulties, unaesthetic appearance;
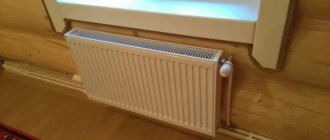
- Aluminum batteries. Advantages: the highest heat transfer coefficient, low weight, very quick installation, high permissible pressure - up to 20 bar, the ability to combine an unlimited number of sections, elegant appearance. Disadvantages: low anti-corrosion performance and rapid deterioration of aluminum in places of contact with other metals;
- Steel batteries. Advantages: relatively light weight, heat transfer begins after switching on in a very short time. Disadvantages: weak resistance to pneumatic and hydraulic shocks, low heating temperature, rapid cooling, maximum pressure - 10 bar, low service life;
- Bimetallic radiators. The most versatile variety, combining the advantages of all the above-mentioned types of batteries. The inner layer is made of steel, which protects the radiator from corrosion and increases operating pressure. The outer part - the casing - is made of aluminum, characterized by the highest heat transfer. Bimetallic radiators can easily withstand strong pressure changes and are very easy to install. A classic example of such a product is the global style plus 500 heating radiators, reviews of which are purely positive.
Radiator installation
Those who are wondering how to hang a heating radiator without the help of professional plumbers need to know what steps this process involves. So, you need:
- prepare equipment and materials;
- calculate location;
- install brackets;
- hang the radiator;
- seal or solder the joints;
- check the entire system for functionality.
We purchase the necessary materials and equipment
To begin with, it should be noted that it is not recommended to install radiators in winter. And even if you decide to install heating yourself, in any case you need to call a plumber who will disconnect your apartment from the riser. To fix the radiator on the wall, you will need such components for heating radiators as: corners, bushings, nipples, brackets, brackets, couplings, adapters, tow, valves, keys.
If you plan to install cast iron batteries, you also need to purchase Mayevsky taps, designed to bleed air from the heating system and prevent airing. Aluminum and bimetallic radiators are equipped with them initially.
Calculating the location
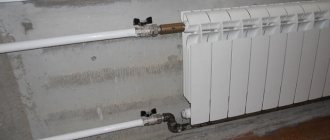
This stage is important to ensure that the heating device works at full capacity and does not collect air. To do this, sections of underwater pipes should be installed at a slight slope relative to the floor. The minimum slope is 0.5 cm. Here are the optimal battery location parameters:
- 3-5 centimeters from the wall;
- 10 centimeters from the floor;
- 5-10 centimeters from the windowsill.
If the selected type of battery does not have high heat dissipation, you can also install a heat-reflecting tap on the wall behind the battery. It is usually made of insulating material or a special heat-reflecting substance that is applied to the wall.
Installing brackets
Brackets are mounts for heating radiators in the form of durable metal hooks installed inside the wall. It is easy to calculate the number of brackets: 1 piece per 1 m2 of battery. Of course, even if the entire battery area does not exceed 1 square meter, you will still need two brackets, since fixing the structure on one will be very unreliable.
Now you need to mark their location: we use a tape measure and a level for this.
Then we drill holes in the wall, install special dowels in them, tighten the fasteners for the heating radiators and use our hands to make sure that the brackets sit tightly and do not wobble. If the choice fell on cast iron radiators, you may need a special mount for cast iron heating radiators - floor support elements in the form of legs. They will help distribute the weight evenly across all fastenings.
Installing the radiator
The last stage of radiator installation. We hang the battery and check how tightly it fits, whether the weight of the structure is distributed equally across all fastenings. Try to shake the radiator a little: if the fixation is strong enough, you can move on to the next step.
Connection and assembly of connections
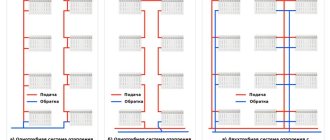
There are three different radiator connection schemes:
- lateral one-sided. The most popular option. The inlet pipe is connected to the upper pipe, and the outlet pipe is connected to the lower pipe on the same side;
- diagonal connection. More suitable for long radiators in large rooms and ensures uniform heating of the entire battery. The inlet pipe in this scheme is connected to the upper pipe on one side, and the outlet pipe to the lower pipe on the other;
- bottom connection. It is used in cases where the heating system is hidden in the floor. Both inlet and outlet pipes are connected to the lower pipes from different sides. Heat transfer with a bottom connection is approximately 10% less than with a side connection.
Let's start assembling the connections. Regardless of which heating radiator fittings you purchase, you must carefully seal each connection.
Any leak can literally and figuratively result in additional repair costs.
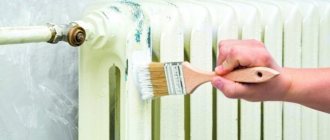
Special tapes, silicone, sealant or good old tow are used as seals. If the purchased battery is protected with a special film, it is better to remove it only after thoroughly crimping each connection.
Now all that remains is to return the water supply to the heating system and carefully check all connections for leaks.
spetsotoplenie.ru
Connection sequence
The most crucial moment in installing batteries is connecting them to the heating circuit and then checking them. In order for all work to be carried out efficiently, you must follow the installation sequence of the cast iron radiator.
- The heating circuit is first turned off, the supply of coolant to the apartment is stopped, and then drained from the pipes using a circulation pump.
- The battery is hung on brackets and its horizontal and vertical position is checked with a building level.
- The plugs are unscrewed from the device.
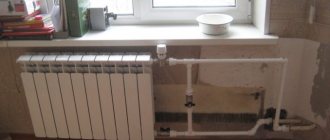
- In the event that the side connection diagram for cast iron heating radiators is “introduced” into a single-pipe circuit, then you must first install and connect a bypass with a valve. If the system is two-pipe, then flow pipes with taps are used.
Before installing cast iron batteries, it is recommended to check the assembly quality of the sections and adjust each nipple. After this, the sections are brought together, and the structure is subjected to crimp testing to check the quality of the connections. If there is no leak, then you can proceed directly to connecting the battery to the circuit.
- At the last stage, the Mayevsky tap is installed on cast iron radiators.
After connecting all the heating elements, a test check of the quality of work is carried out. It will show how securely the system is installed. To do this, water is introduced into it under pressure. If there are no leaks or strange noises or knocks, then all elements of the circuit are connected correctly.
How to attach an expansion tank
The installation location and method of fastening the expansion tank depends on the type of heating system, which can be open or closed. Although open heating systems have now ceased to be used almost everywhere, they still remain in some places in old buildings.
In outdated systems, the open heating expansion tank was mounted in the attic. From the highest point of the pipeline system, a pipe was taken out through the ceiling and connected to the bottom of the tank. The expansion tank was installed vertically and attached to the ceiling in any available way.
In a closed heating system, the fastening of the membrane expansion tank is done differently. The main rule here is that during installation you need to orient the tank so that the coolant enters it from above. But in practice, depending on the volume of the tank and its design features, mounting methods can be different: vertically or horizontally, directly on the heating pipe, on the wall or on the floor.
It is most advisable to install an expansion tank in front of the circulation pump, on a straight section of the pipeline on the side where the coolant returns to the boiler.
Marking tips
The most correct way would be to place the radiator in the center of the window opening. You need to calculate the middle and mark the vertical in this place with a level. Subsequent marking will depend on the wiring. Namely:
For lower wiring, it is necessary to mark the upper limit of the installation of the heating device (a horizontal line that is parallel to the floor surface). With a lateral connection, the location where the supply pipe is located (often the top one) plays a big role. Therefore, we mark the horizontal line along the axis of the supply pipe. You need to measure the gap between the attachment points on the battery and transfer it to the marked horizontal lines.
For correct and high-quality installation of the heating device, you need to select the necessary bracket.