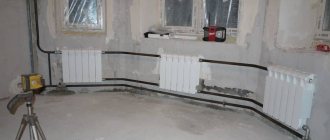
Installing a heating radiator under a window is the most popular option. This is dictated not by fashion, but by considerations of expediency.
And what is not unimportant, it is necessary to make the correct installation of heating radiators under the windows .
Indeed, most of the heat from a house or apartment escapes through the windows.
The air near the glass is cooled and distributed into the room.
To prevent this, it is necessary to create a thermal curtain. The best way is to install a heating radiator under the window.
How to place batteries
First of all, recommendations concern the installation location.
Most often, heating devices are installed where heat loss is the most significant. And first of all these are windows. Even with modern energy-saving double-glazed windows, it is in these places that the most heat is lost. What can we say about old wooden frames? It is important to place the radiator correctly and not make a mistake in choosing its size: not only power is important
If there is no radiator under the window, then the cold air descends along the wall and spreads along the floor. The situation is changed by installing a battery: warm air, rising upward, prevents cold air from “draining” onto the floor. It must be remembered that in order for such protection to be effective, the radiator must occupy at least 70% of the width of the window. This norm is prescribed in SNiP. Therefore, when choosing radiators, keep in mind that a small radiator under the window will not provide the required level of comfort. In this case, there will be zones on the sides where the cold air will go down, and there will be cold zones on the floor. In this case, the window may often “sweat”, condensation will form on the walls in the place where warm and cold air collide, and dampness will appear.
For this reason, do not try to find the model with the highest heat output. This is justified only for regions with a very harsh climate. But in the north, even the most powerful sections have large radiators. For central Russia, average heat transfer is required, for southern regions, low radiators are generally needed (with a small center distance). This is the only way you can fulfill the key rule for installing batteries: blocking most of the window opening.
A battery installed near the doors will work effectively
In cold climates, it makes sense to install a thermal curtain near the front door. This is the second problem area, but it is more typical for private houses. This problem may occur in ground floor apartments. The rules here are simple: you need to place the radiator as close to the door as possible. Choose a location depending on the layout, also taking into account the possibilities of piping.
Where is it better to place a radiator with panoramic glazing?
Panoramic windows make the room more spacious, lighter, and add more comfort. Therefore, even at the design stage, many people prefer this type of glazing. But floor-to-ceiling windows create additional problems when designing a heating system.
The larger the window area, the greater the heat loss.
Solutions for heating a house with panoramic windows are as follows:
- low radiators (floor radiators - their height is 13-30 cm);
- built-in convectors (installed in the floor and covered with decorative grilles);
- vertical radiators - mounted on the wall next to the panoramic window.
Convectors with fans are not recommended for installation in bedrooms - they are quite noisy.
Bottom liner options
There are only two of these, let’s get acquainted with the features of each of them.
Table. Bottom pipe options.
| Name, photo | Short description |
| One-sided | In this case, both pipes are connected on one side. The hot coolant enters through the top plug, and the cooled coolant is discharged through the bottom. |
| Versatile | The entrance and exit, as you might guess from the name, are on different sides. This connection option is ideal for individual heating systems. The good thing about this option is that hot water can flow in any direction, plus the length of supply and return is shorter here. |
Methods for decorating heating radiators
There are a great many ways to close a heating radiator. Choosing the best option, although not easy, is quite possible. Let's start with the simplest and most accessible methods.
Option #1 – budget painting
From a designer's point of view, color combination is very important. Most often, a heating radiator is painted white, so it will be practically invisible on light-colored walls.
If the walls have a solid dark color, then there will be no problems here either. It will be enough to select heat-resistant paint of the desired color and paint the radiator. If you fail to perfectly match the tone, then there will be nothing to worry about; a difference of several tones against the general background seems almost unnoticeable.
If the wallpaper on the walls has a pattern, then the radiator needs to be made to match it. Most often, one or two walls have an ornament, and the rest are finished with wallpaper of various textures in the same tone.
Installation of aluminum heating radiators
Assembling and adjusting a heating system is a responsible task, and it is best handled by professionals. But if you wish, you can install aluminum radiators yourself.
First you need to assemble the device:
- Screw in the supplied plugs and plugs.
- Assemble thermostats and connect shut-off valves at the inlet and outlet of the device.
- Check the nipples and secure the air valves.
A diagram for assembling and disassembling the device is included in the kit. It is better if the assembly is carried out by a specialist, then there will be a guarantee that all the taps are installed correctly. It is not allowed to clean aluminum with abrasives when installing adapters or extending sections - coolant may leak.
Attention! The air valves must be screwed in such a way that at the end of the process their outlet heads point upward. Having marked the installation location of the battery under the window in accordance with the indicated indentations, brackets are attached to the wall
To do this, you need to drill holes with a hammer drill and insert plastic dowels, and screw the brackets into them. When screwing in the fasteners, from time to time you need to hang the radiator on them to maintain a distance of 5 cm from the wall
Having marked the installation location of the battery under the window in accordance with the indicated indentations, brackets are attached to the wall. To do this, you need to drill holes with a hammer drill and insert plastic dowels, and screw the brackets into them. When screwing in the fasteners, from time to time you need to hang the radiator on them to maintain a distance of 5 cm from the wall.
Battery connection diagrams
The device can be connected in several ways:
Diagonal. Experts consider it the most energy efficient. The supply pipe is connected to the upper pipe, and the outlet pipe to the lower pipe, but on the opposite side of the radiator. With this scheme, the battery releases into space the maximum thermal energy received from hot water. The disadvantage of this method is that the pipes running on top do not fit well into the design of the room.
Side. The pipe supplying the coolant is connected to the side fitting (right or left), the return – to the parallel bottom one. If the pipes are installed in the reverse order, the heat output of the device will drop by 50%. This scheme for connecting aluminum heating radiators does not work effectively if the sections have a non-standard size or their number exceeds 15.
From a design point of view, aluminum radiators with bottom connections win. With such a layout, the pipes are not visible; they are hidden in the floor or wall. The batteries are connected to the system through pipes located at the bottom of the devices. Typically, bottom-connected radiators are installed on floor brackets. The battery is attached to the wall with one hook, only to maintain balance.
Connection diagrams for heating radiators made of aluminum
Important! Aluminum batteries have standard parameters for the pipes, so there is no need to buy any additional adapters from the radiator to the pipes. The device is also supplied with a Mayevsky valve designed for bleeding air
Connection and commissioning
Before installing aluminum appliances, the autonomous system is washed with water. Alkaline solutions cannot be used.
Important! Aluminum is easily dented and scratched by tools, so it is better to mount the battery in the original plastic packaging. Once connected, the polyethylene can be removed
In an effort to connect aluminum heating radiators without high costs, some homeowners use blind, non-separable connections between pipes and radiators. But heating a home in the northern hemisphere is not something you skimp on. It would be wiser to install “American” ones - quick-release threaded units, when the pipes are connected and disconnected using one union nut.
The procedure for connecting radiators to the heating system:
- Make sure that there is no water in the system or that it is shut off at the installation points.
- Hang the radiator and connect it to the pipeline using fittings.
- Seal all threaded connections using plumber's tape. 4-5 turns in the thread direction are enough.
- Carry out a pressure test of the system.
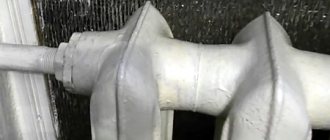
Aluminum battery connected to the heating system
You can install an aluminum heating radiator yourself, but it would be wiser to entrust the job to specialists who have all the necessary permits to carry out such work. The slightest inaccuracy in installation can lead to leaks and inefficient functioning of the heating system.
Work order
To properly replace heating radiators in an apartment, you must:
- Coordinate the modification with the operation service.
- Purchase the necessary materials.
- Perform preliminary assembly of components.
- Prepare tools.
- Agree with the team (if you do not plan to do the work yourself).
- Register the alteration with the Housing Office and decide on the date for the work.
- Remove old radiators.
- Install brackets.
- Hang new batteries.
- Make connections to heating pipes.
- Check the system operation.
During the preliminary assembly of the units, all the necessary elements are installed: plugs, gaskets, Mayevsky taps, etc. In addition, you can mark in advance the places where the pipes will be cut. In this case, you should use a plumb line and level to ensure that the new radiator is level.
If the supply pipes also require replacement, it is necessary to prepare these elements: cut pieces of suitable length, attach tees, etc. All this is done in order to quickly complete the installation after draining the water from the heating system. This measure will be more than relevant if the need to replace old batteries arises during the heating season.
Welding is used to replace metal pipes. The edges of the structures will need to be threaded to securely connect them to the radiator
The procedure for removing old batteries depends on whether the pipes also need to be replaced. If the supply lines need to be preserved, you will have to carefully unscrew the old battery
At the same time, it is important to maintain the squeegee - a sufficiently long thread on the edge of the pipe. The radiator is fixed with a nut and coupling, which will have to be unscrewed
The procedure can be quite complicated. If the parts do not budge, you can try to loosen the connection using anti-corrosion compounds. In the most extreme case, the radiator is simply cut off with a grinder. There should be at least 10mm of thread left. Burrs should be removed from it.
If you decide to leave the old steel pipes, then dismantling the radiator must be carried out carefully so that the threads on the pipes remain intact
If it was not possible to maintain the flow, you will have to extend the pipes and also cut new threads. The removed locknuts can later be reused when installing a new radiator. It is much easier to dismantle the radiator if the pipes are also replaced. In this case, they are simply cut off in a suitable place. This is usually where the system turns toward its neighbors above and below.
Now you need to install the brackets and then hang the new radiator on them. At this stage, it is sometimes necessary to adjust the length of the supply pipe. All that remains is to restore the threaded connection
It is very important to perform the compaction correctly. For this, flax or plumbing thread is usually used.
Some craftsmen do not recommend using FUM tape on such connections. The seal is wound clockwise so that it forms a cone growing from the edge of the thread. Then screw on the connecting nut. If some of the seal remains outside, this is normal. But its layer should not be too thick.
Such work generates a lot of waste. They are best done during major renovations, after the windows are installed.
To achieve maximum tightness, sometimes the seal is impregnated with paint, after which the lock nut is screwed on. Then the protruding insulation is also impregnated with paint. A water-based composition is not suitable for these purposes. Once the paint has dried, it is very difficult to unscrew the connection.
Once the connection is complete, remove the protective film from the radiator. It is also necessary to check the position of the air vent. Its hole should be directed upwards. To check the quality of work, you need to ask plumbers to pump water into the heating circuit under pressure.
It is better to remove the film in which the new radiator is packaged after it is installed, so as not to accidentally damage the coating
This will allow leaks to be identified and repaired immediately. During operation, it does not hurt to observe the radiator for the first time, and also check the condition of the connections to make sure that they are not leaking.
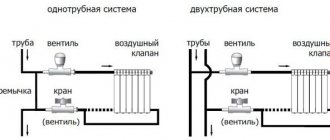
Pipe layout diagrams
Single-pipe and two-pipe wiring is typical for private houses. What is their difference?
Single-pipe wiring
It is the most economical option. Thanks to the diagram, you should get the following:
- A pipe runs along the bottom of the floor from the heating boiler, passing through the entire room and returning back to the boiler.
- Radiators are installed on top of the pipe, and the connection is made through the lower pipes. At the same time, hot water flows from the pipe into the heating device, which completely fills it. The part of the coolant that has given up heat begins to fall down and exits through the second pipe, again entering the pipe.
As a result, there is a step-by-step connection of radiators with the bottom connection of batteries
In this case, it is worth paying attention to one negative point that affects the efficiency of heat transfer. As a result of this sequential connection of single-pipe wiring, a gradual decrease in the temperature of the coolant occurs in each subsequent heating element. Because of this, the last room will be the coldest
Because of this, the last room will be the coldest.
This problem can be solved in two ways:
- a circulation pump is connected to the system, which evenly distributes hot water to all heating devices;
- in the last room you can increase the radiators, as a result the heat output area will increase.
This scheme has the following advantages:
- ease of connection;
- high hydrodynamic stability;
- low costs for equipment and materials;
- You can use different types of coolant.
Two-pipe wiring
For a private home, this heating scheme is considered the most effective. However, it is worth considering the fact that the costs will be considerable at first, because you will need to install two pipes to supply and remove hot water. But still, such a scheme has certain advantages over a single-pipe one:
- the coolant is evenly distributed throughout the room;
- you can control and regulate a certain temperature mode in each room;
- repair of any element of the heating system is possible without turning it off;
- very little fuel is consumed.
Is it worth using a one-pipe heating system?
When laying pipes, a 2-pipe heating system is often used. Schematically, it can be represented in the form of 2 circuits, one is responsible for supplying hot water to the radiators, and the second is responsible for removing the cooled coolant and supplying it to the boiler. This approach allows you to organize the circulation of water of the same temperature in all batteries.
A significant disadvantage of this method of organizing heating is the financial cost of pipes (the price of installing such heating will be approximately 1.5-2 times more than single-pipe heating), and the labor intensity increases. In addition, the pipes will be more difficult to disguise.
The single-pipe scheme does not imply the presence of a separate riser for the removal of cooled coolant, that is, approximately half as many pipes will be required. Schematically, it can be represented as a closed loop, and the connection of radiators with a single-pipe heating system is made in series.
Comparison of one- and two-pipe heating systems
Such a system began to be widely used during the construction boom during the USSR, and then its significant shortcomings were discovered:
the main thing can be considered that the last batteries in the circuit receive a coolant with a temperature approximately 30-50% lower than those closest to the boiler, this leads to the fact that the rooms are heated extremely unevenly;
Note! This drawback can be easily solved by increasing the number of sections of the latest radiators. But when constructing a large number of objects, this will lead to an increase in calculations, which is not very convenient
- You will need a fairly powerful pump; it will not be possible to organize the movement of coolant by gravity;
- it is characterized by large heat losses;
- startup of the system takes longer than in the case of a two-pipe system;
- When doing work with your own hands, the risk of air locks occurring during operation is especially high. It’s just that quite often it is not possible to maintain the required slopes along the entire length of the pipes.
The listed list of disadvantages is typical for a conventional one-pipe heating system. Nowadays, most of the listed shortcomings are successfully eliminated by installing simple devices. For example, it is already possible to regulate the temperature in individual batteries, and installing balancing valves will make it possible to achieve almost identical operating conditions for all batteries in the circuit.
Considering the significant savings on materials, such a heating system design definitely deserves attention.
Decorative screen
If radiators look unaesthetic, violate symmetry, or interfere with the intended composition, decorative grilles come to the rescue.
It is better, of course, that it is not a cheap screen cover from a store, but a box made according to individual parameters in accordance with the features of a particular interior. By “juggling” sizes and colors, you can achieve the best result: create symmetry, balance an area, veil a structure or, conversely, make it a focal point.
For example, here we created symmetry using the screen. The decorative box turned into an element of the TV wall.
If you independently determine the design of the structure, it will best suit the interior. You can make it classic or modern-minimalist, give it industrial style features or endow it with some ethnic motifs. In general, the screen can be very successfully integrated into the interior - so that it looks not like a necessary measure, but like a carefully selected part of the decor.
Use the niche for storing vegetables and canning
To avoid loading the refrigerator with vegetables in the winter, you can use this niche as a cold pantry. If necessary, insulate the wall a little so that during severe frosts the vegetables do not freeze. Replace shelves and front doors with more modern and practical ones. You can even use glass ones, the only condition is that there must be order so as not to spoil the aesthetic appearance of the interior.
Incorrect connection methods
Radiators are usually installed without problems, but the same cannot be said about some system components.
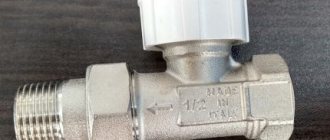
Thermostat head
Errors during installation of the device lead to a decrease in operating efficiency. The most common problems are caused by:
The head is placed vertically so that it does not stick out to the side, interfering with walking or cleaning. This leads to heating of the bellows as the coolant rises upward from the valve. To correct it, you must stop operation, dismantle the device, then install it again, positioning it horizontally.
Photo 3. Incorrect vertical connection of the thermal head to the battery (left), correct horizontal placement (right).
- Placing the thermal head in a niche or similar confined spaces. This leads to a decrease in convection: heat settles in a closed volume, accumulates and is incorrectly reflected from the surrounding walls. This reduces the heating efficiency.
- Installing curtains so that they cover the thermal head. This factor leads to the device incorrectly determining the room temperature. The bellows stops working when necessary. The solution to this problem is to move the sensor to a wall that is not covered by unnecessary objects. Most thermal heads are allowed to be mounted at a distance of up to two meters from the pipes.
- High-quality setup of the device also plays an important role. It is recommended to invite a specialist to check the correct operation and, if necessary, change the characteristics.
Bypass
Problems with the device usually arise when radiators are replaced by an unqualified person. This is especially true in cases in which cast iron is replaced with another material.
The two most common mistakes are:
- Installation of a ball valve on the bypass supply pipe, designed to let water into the system. The entire coolant should not pass through the device: only a small part, which is enough for operation.
- The bypass is connected to the piping through a mixer with a three-way valve. Theoretically, this allows you to regulate the heat transfer of the boiler, but in practice it leads to damage to the device.
Both errors can be easily corrected by changing the principle of connecting the bypass. There are also a few rules to note:
- It is prohibited to install a bypass on a free pipe in apartment buildings.
- The installation of shut-off fittings and valves is prohibited.
- It is allowed to reduce pipes by one typical size.
- A non-volatile gravity system requires a pump, and it is connected exclusively to the bypass.
Attention! The problems mentioned concern exclusively apartment buildings, in which they lead to an imbalance in the entire system. The consequence of such errors is a decrease in the amount of heat that neighbors along the highway receive
The types of installation described above are undesirable, but rarely lead to accidents in private buildings. This is due to the absence of other users who may have a different system configuration that cannot be combined with the others.
Niche under the window sill in Khrushchev: using space wisely
“Each family has a separate apartment” - this was the slogan of the 50-60s of the last century. It was this time that was marked by the massive construction of small apartments, the so-called “Khrushchevkas”. This is how the issue of resettling the old barracks and cramped communal apartments was resolved. The apartments were small, but comfortable and with all amenities. And in the kitchen, under the window sill, there was a seasonal refrigerator, in which it was convenient to store food in the winter, like in a cellar. Sometimes a niche under the windowsill, this refrigerator replaced a regular refrigerator, because not all families could afford such luxury. But times passed and this niche under the window sill in the Khrushchev-era building began to be used less and less. It is much more convenient to store food in a regular refrigerator, and it is better to use the niche for other tasks. In Khrushchev-era kitchens there is a small area and you want to organize any space in the most practical way. But how to do that? For you, a small selection of ideas on how you can use the niche under the windowsill.
The niche under the window sill in the Khrushchev-era building turns into a cabinet.
The wall in the niche is quite thin and there is a through hole, so in winter you can store food there without fear that it will spoil. But, if you insulate the niche, you will get a quite spacious kitchen cabinet.
To make a convenient cabinet out of a useless niche, first the through hole must be sealed, preferably with brickwork. Then plaster the walls, paint and make shelves. Now here you can place dishes or things you need in the kitchen.
Pay special attention to the doors of the “Khrushchev” refrigerator. During the construction period, it was necessary to quickly rent out the apartment with minimal finishing, without any frills. Therefore, the doors were made of rough work, covered with paint the same color as the kitchen walls. Now much more attention is paid to design. And the doors of a seasonal refrigerator should be in harmony with the overall style of the room.
The niche doors under the window sill can be made wooden yourself or to order, or plastic to match the window. Facades in the style of a kitchen unit will look especially good. When ordering a kitchen, you should take this fact into account and not ignore the niche under the window sill.
Organize an additional radiator
The kitchen is usually quite warm, because something is being cooked and fried here. But for those for whom that temperature is not enough, you can install an additional heating radiator. A niche under the window sill is very suitable for him. Again, it needs to be covered with brickwork and plastered. Then entrust the installation of the battery to specialists.
The niche under the window sill will become a sink.
More non-standard ways of using the “Khrushchev” refrigerator are arranging a sink there or installing a washing machine. First, insulate the niche, then, with the help of a plumbing specialist, lay the necessary communications. Here you will need water supply and drainage pipes. They must be sealed to avoid water leakage and flooding of neighbors below. This will use a free niche in a small kitchen.
The most original solution is to turn a niche into a window.
Do you want more daylight in your kitchen? Make the window height from the floor. You will have to lose your window sill, but this sacrifice will be justified. The space will become lighter and more spacious.
The kitchen in the Khrushchev building is small but cozy. A positive outlook and rational approach will turn it into a comfortable corner of a stylish home!
Did you like the article? Subscribe to the channel to stay up to date with the most interesting materials
Wall mounting methods
The above rules are important to take into account when installing fasteners. To fix the hook in the wall, you need to drill a hole, insert a plastic dowel into it and screw the fastener into it. This device allows you to easily adjust the distance from the radiator to the wall; you just need to screw in or unscrew the hook.
This device allows you to easily adjust the distance from the radiator to the wall; you just need to screw in or unscrew the hook.
When installing heating radiators in an apartment with your own hands, it is important to understand how the load from the radiator is distributed on the hooks. The weight of the device is mainly supported by the upper fasteners, the lower hook only fixes the device in the desired position
To ensure that nothing interferes with hanging the radiator, the lower fasteners are placed at a distance of 1-1.5 cm from the level of the lower outlet of the heating device.
The radiator bracket is installed according to a different scheme. Before installing the heating radiator, it is applied to the wall. Then mark the places where the brackets are planned to be installed. Putting the radiator aside, attach the bracket to the wall and mark its attachment points. Holes are made in the marked places, dowels are inserted into them, and the bracket is fixed to the wall using screws. After installing all the fasteners, the radiator is installed in place.
An expert answers your questions
What is the best way to install batteries in a niche or on a wall?
If you want to hide the radiator, it is better to install it in a niche. But keep in mind that it must be made according to the rules; it is best to install a heat-reflecting screen in it.
When you make a niche in an exterior wall, you will reduce its thickness. If a house or apartment is poorly insulated from the outside, this will lead to heat loss. In addition, a thin wall will not support a heavy battery.
Do you need a niche for heating radiators? Do you need a niche for the battery?
There is no need for a niche as such. With its help you can hide the radiator and put a decorative grille on top.
Where to put the batteries if the house has large windows?
If you mean windows that start from the floor, then you need to place it directly in front of the window (see photo). If the windows are of normal height, but wide, panoramic, you need to install radiators under them. There will simply be more of them. Calculate so that there is one radiator for every 2 linear meters of window.
How to properly position heating radiators in a private house?
The installation rules are the same for both a private house and an apartment. The only difference is the large number of external walls. Try to make the wiring so that all the batteries stand along them.
Most heat loss occurs in the corners where two exterior walls meet. You should definitely install a radiator there. It may be small, 3-4 sections, but it is necessary.
Why do they put batteries in the corner?
This is done only in those corners where two outer walls meet. It turns out that in a small area there is a large area of walls through which heat escapes. And these losses need to be compensated somehow.
How to properly install batteries under plastic windows?
It makes no difference whether you place them under plastic or wooden windows. You just need to correctly calculate the number of sections. The smaller the window area and the greater the number of chambers, the less heat escapes through it.
Do heating radiators need to be placed flush with the edge of the window sill?
If your window sill does not extend beyond the edge of the wall, this can be done. But imagine how ugly such an arrangement will look? In addition, the lower the radiator is located, the more evenly the room warms up.
If you want to ask your question, do so in the comments.
Battery near the wall: what to do with it?
Let's start with the important things. Maybe this will even be news to some
In general, the fact is that nowadays it is not customary to be shy about radiators. In many modern design projects, batteries are displayed in prominent places. Often they are even emphasized. They are turned into a decorative object or a style-forming element.
So if this is unimportant, if the battery is located in a corner and does not bother anyone, you can simply buy a new beautiful radiator and not try to disguise it.
The second thing I would like to remind you of. Do not close the radiator tightly. It must perform its main function - heating. If you hide the battery in a cabinet behind solid doors, its heating efficiency will significantly decrease. It is necessary to leave at least the top and bottom of the structure or the entire facade free for air movement (by making it perforated).
Well, now to other solutions.
Common types of low batteries
Radiators differ in the type of housing and the size of the fins.
The design of low batteries is determined by the materials:
The batteries are sections obtained by casting. For heat exchange, each section contains a number of ribs determined by the design.
Cast iron is fragile, so the water pressure inside such a radiator should be less than 9-11 atmospheres. Since the surface of cast iron after casting is rough and uneven, debris settles on it inside the radiator over time and creates a layer that weakens the transfer of heat from the water to the cast iron of the radiator. A cast iron radiator retains heat well and is not subject to destruction from prolonged contact with water.
How to install correctly
Now about how to hang the radiator. It is very desirable that the wall behind the radiator is level - this makes it easier to work. Mark the middle of the opening on the wall, draw a horizontal line 10-12 cm below the window sill line. This is the line along which the top edge of the heating device is leveled. The brackets must be installed so that the top edge coincides with the drawn line, that is, it is horizontal.
Correct installation of heating radiators
Wall mount
This must be taken into account when installing hooks or brackets for heating radiators. Hooks are installed like dowels - a hole of a suitable diameter is drilled in the wall, a plastic dowel is installed in it, and the hook is screwed into it. The distance from the wall to the heating device is easily adjusted by screwing in and unscrewing the hook body.
https://www.youtube.com/watch?v=sfkFcArxvXk
Hooks for cast iron batteries are thicker. This is a fastener for aluminum and bimetallic
When installing hooks under heating radiators, keep in mind that the main load falls on the upper fasteners. The lower one serves only to fix it in a given position relative to the wall and is installed 1-1.5 cm lower than the lower collector. Otherwise, you simply will not be able to hang the radiator.
When installing the brackets, they are applied to the wall in the place where they will be mounted. To do this, first attach the battery to the installation location, see where the bracket “fits,” and mark the location on the wall. After placing the battery, you can attach the bracket to the wall and mark the location of the fasteners on it. In these places, holes are drilled, dowels are inserted, and the bracket is screwed. Having installed all the fasteners, hang the heating device on them.
Floor fixing
Not all walls can support even lightweight aluminum batteries. If the walls are made of lightweight concrete or covered with plasterboard, floor installation is required. Some types of cast iron and steel radiators come directly with legs, but not everyone is satisfied with their appearance or characteristics.
Legs for installing aluminum and bimetallic radiators on the floor
The installation of each type of battery has its own nuances.
Cast iron
The difference from the standard scheme is that for batteries of this type, sections are initially formed using a radiator key.
The nipples are impregnated with drying oil and fixed manually onto 2 threads. In this case, a gasket must be used. Then the radiator keys are inserted into the nipple holes and tightened.
Important! The sections must be assembled with an assistant, since simultaneous rotation of the nipples can lead to misalignment
Aluminum
It goes according to the standard scheme of one of three connection options.
The only caveat is that aluminum batteries are fixed both on the wall and on the floor. For the latter option, special clamping rings on the legs are used.
By adjusting the distances of the radiator from the wall, floor and window sill, you can increase or decrease the level of heat transfer from the battery.
When installing aluminum heating sources, follow the included instructions. If the recommendations indicate the use of coolant, then you should use it exclusively.
Such batteries are suitable for installation in private houses with autonomous heating.
Steel
An important point in connection is checking that the battery is horizontal. Any deviation will reduce work efficiency.
Read more: Best plastic windows manufacturer ratings 2019
In addition to wall brackets, floor stands are used for additional fixation.
Otherwise, standard connection diagrams are used.
Bimetallic
In such batteries, it is allowed to build up or remove excess sections. They are already painted. The sections are pulled together in stages from below and from above, without distortions.
Attention! The area where the sealing gasket is located under the nipple must not be cleaned with sandpaper or a file.
Installation of skirting boards
Any repair will be incomplete if joints and sharp transitions from one coating to another are left uncovered. The use of skirting boards has a positive visual effect and significantly improves any finish. Removing old cement aprons, half-decayed wooden baseboards and replacing them with new plastic ones is an important component in upgrading heating niches.
It is preferable to use plastic rather than wooden skirting boards; they have many advantages:
- low price;
- great elasticity, which allows you to go around all the irregularities on the walls;
- availability of cable channels;
- very easy to install;
- easy to join in corners.
Three methods have been developed to secure skirting board elements:
- using glue;
- using fastening fasteners;
- using hardware.
The adhesive option is the fastest and easiest, but the requirements for the wall increase - it must be perfectly flat. If you use oil tape to protect against accidental contact with glue, the appearance of the finish and the baseboard itself will not be affected at all. The main disadvantage of this method of fixation is the impossibility of reusing skirting boards.
It is better to use fastening brackets in conjunction with perfectly flat floors and walls, since the baseboards will not be fixed tightly and there is a risk of large gaps forming. In addition, it is very difficult to repeatedly remove and reinstall elements on such fasteners.
The most inexpensive way to fix skirting boards is to use hardware and dowels. The fastening is rigid and quickly removable. This option is good if there are cable channels, when the caps of the fastening elements will be hidden under the latch.
Installation of the plinth should begin from the inner corner of the niche, having previously installed the connecting corner element. It is better to make holes in the plastic strip in advance using a hot nail. The wall is marked along these holes, and then sockets for hardware are drilled using an impact drill.
It is more convenient to screw in the self-tapping screws last, having previously cut the plinth to the size of the niche and joined it in the corner fasteners. After completing all these operations, the covers of the cable channels are inserted and latched.
Recommendations
To achieve maximum results, you must follow these rules:
1) supply pipelines must have a slope towards the radiator from 0.5 to 1 cm per meter of length;
2) for return pipelines the numerical values should be similar, only in this case the slope should be away from the battery;
3) for good air circulation through the heat-emitting walls of the battery, its lower part must be located at a height of at least 60 mm from the floor;
4) the distance from the top of the radiator to the bottom of the window sill should be in the range from 50 to 100 mm;
5) and from the battery to the wall - approximately 30–50 mm.
In order for the heating device to be able to transfer maximum thermal energy to the air in the room, before installing it, it is necessary to cover the adjacent section of the wall with foil insulation (this is a heat-reflecting roll-type material). The area of this material must match the dimensions of the radiator. If you install without foil insulation, part of the heat will go to heating the wall and the efficiency of the heating battery will decrease.
Algorithm of actions when installing the box
- Measurements are being taken. When calculating a box for a plasterboard battery, you need to make an allowance on the front and sides of about 2 cm so that its walls do not come into contact with the radiator.
- Load-bearing frame elements made of 27x28 profile are installed. Before fastening the level, their verticality/horizontalness is checked, after which it is fixed with dowels to all adjacent ones (window sill, floor, wall). A shock-absorbing tape is laid between the profile and the surfaces.
- After installing the frame skeleton, jumpers from the 60x27 profile are mounted.
Amendments to calculations and advice
The methods discussed above for calculating the number of radiator sections are perfect for rooms whose height reaches 3 meters. If this figure is greater, it is necessary to increase the thermal power in direct proportion to the increase in height.
If the entire house is equipped with modern plastic windows, in which the heat loss coefficient is as low as possible, it becomes possible to save money and reduce the result by up to 20%.
It is believed that the standard temperature of the coolant circulating through the heating system is 70 degrees. If it is below this value, it is necessary to increase the result by 15% for every 10 degrees. If it is higher, on the contrary, reduce it.
Premises with an area of more than 25 square meters. m. heating with one radiator, even consisting of two dozen sections, will be extremely problematic. To solve this problem, it is necessary to divide the calculated number of sections into two equal parts and install two batteries. In this case, the heat will spread throughout the room more evenly.
If there are two window openings in the room, heating radiators should be placed under each of them. They must be 1.7 times more powerful than the rated power determined in the calculations.
Having purchased stamped radiators where sections cannot be divided, it is necessary to take into account the total power of the product. If it is not enough, you should consider buying a second battery of the same type or one with a slightly lower heat capacity.
Many factors can influence the final result. Let's consider in what situations it is necessary to make correction factors:
- Windows with regular glazing – magnifying factor 1.27
- Insufficient thermal insulation of walls - increasing factor 1.27
- More than two window openings per room – magnifying factor 1.75
- Manifolds with bottom wiring – magnifying factor 1.2
- Reserve in case of unforeseen situations – increasing factor 1.2
- Use of improved thermal insulation materials – reduction factor 0.85
- Installation of high-quality thermal insulating double-glazed windows – reduction factor 0.85
The number of amendments made to the calculation can be huge and depends on each specific situation. However, it should be remembered that it is much easier to reduce the heat output of a heating radiator than to increase it. Therefore, all roundings are made upward.
If you need to make the most accurate calculation of the number of radiator sections in a complex room, do not be afraid to turn to specialists. The most accurate methods, which are described in specialized literature, take into account not only the volume or area of the room, but also the temperature outside and inside, the thermal conductivity of the various materials from which the frame of the house is built, and many other factors.
Of course, you can not be afraid and add several edges to the result. But an excessive increase in all indicators can lead to unjustified expenses, which are not immediately, sometimes and not always, able to be recouped.
Install the battery in the niche
This niche can be used as a place for a radiator, having previously insulated the wall with heat-insulating materials. If you place it in the depths of the free space, you can not only solve the problem of heating the apartment, but also significantly save space.
Useful tips
Many people believe that the radiator connection option is not that important when it comes to heat dissipation. After all, much will depend on the type of heat source chosen. For example, bimetallic heating radiators have higher heat transfer than cast iron ones. But imagine that cast iron devices are installed according to the diagonal principle of coolant movement, and bimetallic ones are installed along the bottom. In the first case, heat loss is 2%, and in the second - 12%. The difference in losses is as much as 10%. For a heating system, this is a fairly high indicator, which will affect not only the indoor temperature, but also the amount of fuel consumed
This is very important for private houses
Today, experts give recommendations regarding increasing the heat transfer of devices. To do this, you can install a reflective panel on the wall behind the radiator, for example, a regular piece of fiberboard trimmed with aluminum foil. But keep in mind that the distance from the wall to the radiator in this case should be at least 1.5 cm.
How to calculate the thermal power of a radiator?
It is best to involve specialists to perform such calculations - for a person far from the intricacies of designing heating systems, it will not be easy to understand all the parameters and criteria that need to be taken into account. But you can navigate the heating appliance market.
It is believed that the optimal thermal power is 100 W per square meter of room area. Based on this, we can conclude that for approximate calculations it is enough to find the product of the area and the specified thermal power.
In professional calculations, the formula takes into account:
- number of external walls;
- orientation of the room relative to the cardinal directions;
- degree of wall insulation;
- features of climatic indicators in a particular region;
- ceiling height;
- type of room (basement, attic, floor number);
- type of windows (different double-glazed windows have different heat loss rates);
- dimensions of the glazed area;
- type of radiator connection.
We recommend the product
Heating radiator Korado 11-VK 500×700 (11050070-60-0010)
In stock
Height, mm: 500 | Width, mm: 700 | Connection: bottom | Warranty, months: 120 | Radiator type: panel | Radiator material: steel |
Radiator connection options
To know how to properly connect a heating battery, you need to take into account that in addition to the types of pipeline wiring, there are several schemes for connecting batteries to the heating system. These include the following options for connecting heating radiators in a private home:
In this case, the connection of the outlet and supply pipes is made on one side of the radiator. This connection method allows you to achieve uniform heating of each section with minimal costs for equipment and a small volume of coolant. Most often used in multi-storey buildings, with a large number of radiators.
Useful information: If a battery connected to the heating system in a one-way circuit has a large number of sections, the efficiency of its heat transfer will significantly decrease due to weak heating of its remote sections. It is better to ensure that the number of sections does not exceed 12 pieces. or use another connection method.
Used when connecting heating devices with a large number of sections to a system. In this case, the supply pipe, just like in the previous connection option, is located at the top, and the return pipe is at the bottom, but they are located on opposite sides of the radiator. Thus, heating the maximum area of the battery is achieved, which increases heat transfer and improves the efficiency of heating the room.
This connection diagram, otherwise called “Leningrad”, is used in systems with a hidden pipeline laid under the floor. In this case, the connection of the inlet and outlet pipes is made to the lower branch pipes of the sections located at opposite ends of the battery.
The disadvantage of this scheme is heat loss, reaching 12-14%, which can be compensated by installing air valves designed to remove air from the system and increase battery power.
Heat loss depends on the choice of radiator connection method
For quick dismantling and repair of the radiator, its outlet and inlet pipes are equipped with special taps. To regulate power, it is equipped with a temperature control device, which is installed on the supply pipe.
What technical characteristics do aluminum heating radiators have? you can find out in a separate article. In it you will also find a list of popular manufacturing companies.
And about what an expansion tank for closed heating is. read in another article. Volume calculation, installation.
Tips for choosing an instantaneous water heater for your tap can be found here. Device, popular models.
As a rule, installation of the heating system and installation of heating radiators is carried out by invited specialists. However, using the listed methods for connecting heating radiators in a private house, this can be done independently, strictly observing the technological sequence of this process.
If you carry out this work accurately and competently, ensuring the tightness of all connections in the system, there will be no problems with it during operation, and installation costs will be minimal.
The photo shows an example of a diagonal method of installing a radiator in a country house
The procedure will be as follows:
- We dismantle the old radiator (if necessary), after first closing the heating line.
- We mark the installation site. Radiators are fixed to brackets that need to be attached to the walls, taking into account the regulatory requirements described earlier. This must be taken into account when marking.
- We attach the brackets.
- Assembling the battery. To do this, we install adapters on the mounting holes available in it (included with the device).
Attention: Usually two adapters have a left-hand thread, and two - a right-hand thread!
- To plug unused collectors we use Mayevsky taps and stop caps. To seal the connections, we use plumbing flax, winding it counterclockwise around the left thread and clockwise around the right thread.
- We screw the ball valves to the connection points with the pipeline.
- We hang the radiator in place and connect it to the pipeline with mandatory sealing of the connections.
- We carry out pressure testing and test run of water.
Thus, before connecting a heating battery in a private house, you need to decide on the type of wiring in the system and its connection diagram. In this case, installation work can be performed independently, taking into account established standards and process technology.
The video will clearly show you how to install heating radiators in a private home.
Types of heating batteries
The efficiency of heating a room will depend not only on how far from the floor the radiator or radiator is hung, but also on their connection diagram, the material and design of the heating devices themselves. The following models are available on the market today:
- Cast iron batteries. The adult generation probably knows them firsthand. During the Soviet Union, only these models were used in heating systems. Today they have a more presentable appearance. They are characterized by a high level of heat capacity, long-term heat transfer, absence of consequences from water hammer, and they also have an increased service life.
- Steel radiators. They have low heat transfer rates - heating occurs quickly, but they cool down no less quickly. The welded structure is sensitive to hydraulic shock. There is no way to add sections yourself. At the same time, the weight of the product and ease of installation attract many homeowners. Products of the German brand “Kermi” are in particular demand.
- Aluminum radiators. They are characterized by low weight, beautiful shape, and increased thermal output. They are presented on the market in two versions, where in the first the design consists of one monoblock, with a volume that provides different powers, in the second - a stacked sectional one.
- Bimetallic batteries. The innovative design of the placement of heating collectors made it possible to achieve the level of heat transfer of aluminum models, as well as the strength and reliability of their cast iron counterparts.
Minimum clearances
The radiators purchased must meet GOST standards. They check compliance by reading the documents for the goods in the store. Their absence may serve as a reason for refusing to purchase a product at this outlet.
Closet
Yes, this is possible. Of course, this piece of furniture is made to order. The doors of the lower part of the cabinet are made perforated so that the facades do not interfere with circulation. Books, magazines, souvenirs, etc. are stored on the shelves above.
If the radiator is located in a corridor or hallway, the cabinet can be made solid, closed. But its doors should still be holey. The function of a cabinet can be utility (for storing, for example, towels, cleaning products, etc.) or clothing.
Replace the window sill with a work area with a sink
Instead of a window sill, you can install a sink or equip a work surface.
Unusual design of the sink, which is installed instead of a window sill.
A lot can fit on these shelves.
Instead of a window sill, you can even install a hob and work area.
If you can move the communications, then instead of the window sill, install a countertop with a sink. Such a solution will be rational and convenient; not only will more space immediately appear, but the work area itself under the window will be well lit, and the interior will be transformed - it will become more fashionable and stylish.
If you decide on this kind of redevelopment, you need to take into account some nuances. For example, the width of the slopes, so as not to place the sink too close to the window, in order to avoid increased humidity and the appearance of mold. In no case should such innovation interfere with the opening and closing of the window.
conclusions
Finishing the walls behind the radiators was much easier if it was done simultaneously with other repair work. But if this was not possible, then you can always correct the situation by using modern building materials and tools. You need to choose a finishing method based on the size of the space behind the radiator, heat loss from the wall itself, the result you want to achieve from the cladding and the cost of materials and your own skills. Then such repair work will be carried out with the least amount of money and time.