Floors on the ground are laid on top of rough layers laid directly on the soil. This method is applicable for utility rooms, old-type private houses that do not have a basement.
There are several ways to create a floor on the ground, differing in the materials used and the method of laying them. Let's figure out what the difference between them is, in what cases one or another method is applicable, and show how to create the right floor pie.
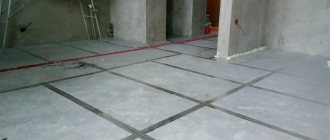
Construction of the floor begins with backfill. Source k-dom74.ru
What are ground floors?
It is necessary to explain the essence of the technology itself. Floors on the ground can be used in houses where the foundation is a strip and there is no basement. When the foundation has reached its original strength, backfilling is carried out.
Backfilling of foundation sinuses is a complex construction topic that requires a separate analysis; read about the most common mistakes in this work in a separate section https://www.sdvor.com/articles/11-oshibok-pri-stroitelstve-fundamenta/
The next stage involves installing a foundation under the floor of the first floor; the foundation can be floors that rest on a foundation strip or floors on the ground. Such floors do not rest on a foundation, but lie on a cushion of crushed stone and sand. This often causes skepticism about this technology.
Several frequently asked questions about rough screed
Inexperienced builders often try, in order to save money or improve performance characteristics, to replace the recommended materials for backfilling the rough screed with others.
Filling with expanded clay instead of crushed stone
Don't use broken bricks
Example of floor waterproofing
In the photo, crushed stone is spilled with cement laitance
Expanded clay spilled with cement
Now that we have dealt with most of the questions regarding the features of the technology for constructing a rough screed, we can give step-by-step instructions for pouring it.
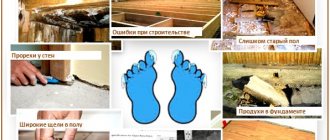
Improper preparation of the base
This mistake is associated with the main fear that the floor will sag along the ground. To prevent this from happening, a dense cushion must be formed under the floor. Sand is best suited as a base, as it is easier to compact. Let's look at the main mistakes at this stage.
- The entire layer of sand is compacted at once - high-quality compaction can only be achieved with layer-by-layer compaction. The thickness of the layers depends on the equipment used for compaction.
In most cases, a vibrating plate or vibrating leg is used; with a vibrating plate, the thickness of the compacted layer depends on the weight of the device. It is usually recommended to rent equipment that is capable of compacting layers of 15–30 cm. Read more about mistakes when compacting soil in the article on the website.
- Chernozem under the floor - in some cases, when installing a strip foundation, they are limited to a trench; soil with organic matter is not removed from under the floor. Such soil is not suitable as a base for floors, as it contains organic inclusions. Rotting of organic matter leads to subsidence.
Principle of calculation
It would be a big mistake to believe that you can insulate any building structure, as they say, “by eye.” It’s good if you’re lucky and guess right, but the likelihood of such luck is small, you can make a mistake in one direction or the other. Both are bad. The consequences of insufficient thermal insulation have already been discussed above. And its redundancy leads to completely unnecessary waste of materials or complication of the design.
Everything must be based on calculations. Yes, many readers are frightened in advance by the prospect of carrying out any calculations. Let us hasten to reassure them - nothing supernaturally difficult awaits them. Moreover, we will “arm” them with an understanding of the calculation principle and a convenient calculator, in which they just need to indicate some initial data.
We will not talk directly about the technology for performing thermal insulation work when insulating the floor - this is the subject of a special publication on our website. Let us dwell only on those nuances that directly affect the dimensions of the thermal insulation layer.
How is floor insulation done in a private house?
The task is not easy, but you can cope with it yourself, without resorting to the services of hired specialists. Let the reader be helped by a special publication on our portal, dedicated specifically to insulating floors in a private house with your own hands .
So, for insulation to be considered complete, the total heat transfer resistance of a building structure (it is often called thermal resistance) must not be lower than the established standardized value. This indicator is measured in m² × °C / W, and is calculated for each region, taking into account the specific climatic conditions. The specific value can be found in the SNiP tables, checked with a local construction organization, or simply taken from the proposed schematic map of the territory of Russia.
It is important that different structures have their own standardized values. Since we are dealing with floors, we are interested in the meaning “for floors”. To make it easier to navigate on the diagram, these indicators are highlighted in blue numbers.
Normalized values of thermal resistance for building structures of residential buildings by regions of Russia
Now - a small formula that will be required to carry out the calculations.
The thermal resistance of a homogeneous layer of a building structure is equal to:
R = h/λ
h – thickness of this layer (important – expressed in meters )
λ is the thermal conductivity coefficient of the material from which this layer is made (measured in W/m×°C).
Thermal conductivity coefficients are tabular values, the meaning of which can be easily found on reference Internet resources. And for insulating materials, in addition, they are usually indicated by the manufacturer in the passport data.
The total thermal resistance of a building structure consisting of several layers, including an insulation layer, will be equal to:
Rc = R₁ + R₂ +…+ Rt = h₁ / λ₁ + h₂ / λ₂ + …+ ht / λt
The symbol “t” in this case indicates that these are indicators of the thermal insulation layer.
So, if the value of the normalized thermal resistance is known, if you have an idea of the structure of the floor structure being created, then it is not at all difficult to determine the thickness of the insulating material that will provide the required level of thermal insulation.
ht = (Rc – h₁ / λ₁ – h₂ / λ₂ – …) × λt
Knowing the thermal conductivity coefficient of the selected thermal insulation material, we obtain its required thickness.
You may be interested in information on how to install film heated floors under laminate
Polyethylene film instead of vapor barrier
The waterproofing layer serves to protect the screed from moisture suction from the soil, but waterproofing alone is not enough. When the temperature in the house is above zero, moisture from the soil begins to evaporate, turning into steam. As the steam rises up the structure, it condenses inside the floor “pie,” which can lead to the destruction of the reinforcing elements. For this purpose, steam-waterproofing is used. Sometimes polyethylene film is used as a cheaper alternative.
Another task of vapor barrier in ground floors is to protect against radon entering the lower floors of the building. It is a radioactive gas that is released when uranium and thorium decay. The spread of radon is typical for individual regions; we discussed the radon problem in more detail in a separate section https://www.sdvor.com/articles/ugroza-radona-na-polakh-po-gruntu-pravda-ili-mif/
Such a film is often used in screeds that are made on floors, and in this case such a vapor barrier is sufficient, but not in the case of floors on the ground. The main disadvantages of the film are that it does not fit tightly enough to the base, folds and air bubbles form on its surface, and it is difficult to achieve uniform installation. In addition, the film is easily damaged during the installation of subsequent layers, as a result of which the tightness of the insulating layer will be compromised.
Advantages and disadvantages
Arranging the base in this way has its pros and cons. Among the positive properties, the following can be noted:
- A wide range of insulation materials helps prevent heat loss from the structure.
- The temperature of the soil located under the multi-layer floor structure never drops below zero.
- The load is distributed on the soil base - there is no need to make complex calculations.
- No dampness or mold.
- The resulting subfloor can be covered with any flooring material.
- Excellent sound insulation properties.
- Fast and uniform heating of the room when water or electric coolants are installed inside the screed.
There are also disadvantages:
- Dismantling a structure for the purpose of repair, especially when underfloor heating pipes are damaged, is a labor-intensive and materially costly process.
- It is impossible to install such a floor when groundwater flows close to the surface of the earth and soil is loose in composition.
- The construction of such a structure is expensive and takes a lot of time and effort.
- Significant reduction in the height of the room.
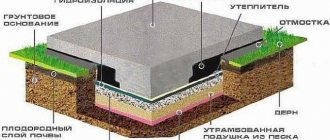
Layers of construction
Lack of concrete (sub-concrete) preparation
The so-called footing is a layer of lean concrete (grade B3.5 - B10), which serves to create a flat plane for further construction. The footing can be done with or without crushed stone. It is easier to lay waterproofing on a concrete layer by preparation, since this base has a flat and durable surface on which you can walk without hindrance. On a sandy or crushed stone base it is quite difficult to achieve a tight fit of the rolled material.
Which construction technology is best to choose?
The choice of technology is a matter of preference and capabilities of the home owner. Concrete screed allows you to get a durable and strong floor, but its maintainability will be extremely low . Failure of, for example, a heated floor system will create a serious problem with a very complex and costly solution.
Dry screed is much simpler and allows repairs to be made without much expense or problems, but this option is only suitable for people who are not afraid of repair work.
NOTE!
A wooden floor is a traditional solution, but the specifics of wood as a material have too many undesirable aspects, so this option is increasingly being abandoned in favor of other methods.
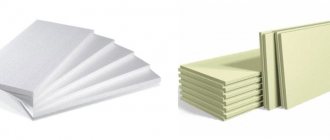
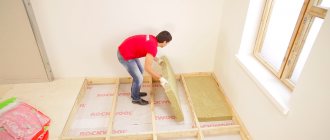
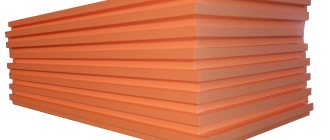
The insulation has insufficient density
After the waterproofing layer, insulation is used in the floors along the ground; it should prevent the outflow of heat from the premises of the first floor. Insulation also helps protect the soil under the floor from freezing. Typically, expanded polystyrene (EPS) or extruded polystyrene foam (EPS) is used for insulation; sometimes mineral wool is used. The density of the material must provide the necessary compressive strength so that the weight of the floor does not push through the heat insulator.
Difficulties arise due to the fact that the compressive strength differs between different insulation materials, therefore the density required is different. For example, for expanded polystyrene 35 kg/m3 will be sufficient, for mineral wool – 160–175 kg/m3.
Basic mistakes
Base insulation with polystyrene foam
The most common mistakes when creating a floor screed include:
- Laying floors with high groundwater levels or soils with high levels of freezing. In this case, you should choose a different type of base
- Using wooden blocks that are susceptible to rotting as leveling beacons and leaving them in the screed. When wood is damaged or deformed, concrete may sag
- Small layer of footing and lack of reinforcement with increased load on floors over 200 kg/sq.m. m
- Lack of damper tape around the perimeter of the foundation, which can lead to cracking of concrete due to temperature changes
- Laying insulation below the zero level, which is fraught with freezing of the floors
- Lack of thermal insulation of the base and blind area
How to make flower pots with your own hands: outdoor, for home, hanging | Step-by-step schemes (120+ Original Photo Ideas & Videos)
Replacing fiber reinforcement
Recently, fiber has become widespread - these are small polymer fibers (12 - 18 mm), which are added to the solution to reduce cracking. It may seem that reinforcement performs the same function, but this is misleading. The reinforcement combines the entire screed into a single monolithic slab. Thanks to this, the floor absorbs loads over the entire area. Fiber reduces local cracking, that is, in fact, the fibers prevent small shrinkage cracks from opening too much.
Deformations of the insulation under the screed are small, but they still occur; reinforcement helps reduce the negative effect of these deformations.
If the screed on the floors between floors in most cases does not experience strong temperature deformations, so you can limit yourself to fiber, then in the case of floors on the ground, reinforcement is mandatory, while adding fiber to the solution is also desirable.
Wall insulation with polystyrene foam
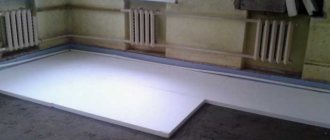
The thermal insulation layer is 50 mm of expanded polystyrene, simply laid and there is no need to additionally fasten or glue it, and absolutely not. The fact is that when the screed is made on top, about 5 cm, its weight will be about 400 kg per square meter. So nothing can happen. Expanded polystyrene foam will not fall lower than the vapor barrier. The tie presses it so tightly that any additional fastenings are simply not needed.
Laying insulation on the wall is not always required. Usually, external insulation of the base is sufficient. But in some cases, it is possible to lay polystyrene foam not only on the floor surface, but also to the level of the screed. This will extend the path of cold air along the wall. Accordingly, it will have more time to warm up. Its use depends solely on the project and external insulation. If it does not provide for this, then there is no need to use polystyrene foam.
But it’s worth laying damper tape along the edges. Moreover, even before laying polystyrene foam. It will compensate for deformation of the screed due to temperature differences. This is especially important when laying heated floors. They heat up to 25 degrees, accordingly the screed will increase in size. The damper tape compensates for these changes, but polystyrene foam does not fully compensate. It may shrink, but it will no longer be able to regain its previous volume. Foamed polyethylene or damper tape is able to restore its volume. This is important so that no debris gets between it and the concrete.
Therefore, you should definitely check the project to check whether additional insulation is required. If yes, then it’s better to lay polystyrene foam, if not, then you can do without it.
Mesh with large cells in cement-sand screed
In some screeds on ground floors, a cement-sand mixture is used instead of concrete. This in itself is not a mistake, because the use of concrete in some cases is pointless (for example, on thin screeds). The mistake is to use grids with large cells.
Concrete and cement are susceptible to cracking to varying degrees, therefore, for cement, the maximum cell size of the reinforcing mesh for DSP should be no more than 100x100 mm.