It’s hard to imagine, but ground floor insulation is often the only possible solution for small buildings on a strip foundation. The scheme is widely used mainly for frame structures of small number of floors, without a basement.
Foam insulation is best done from several layers of material
Is it necessary to insulate floors on the ground?
Until recently, the space above the ground surface was left without insulation. A foundation was erected, the basement of the walls, and a section of soil inside the perimeter of the walls were covered with a mixture of sand and limestone, or primitive insulation was used with a layer of grated dry clay.
This is not to say that this was an ideal solution; the cold from the ground, especially in winter, was so strong that water froze on the floorboards in severe frost. But laying the floor without insulating the soil has certain advantages.
The most important advantages of a floor plan without insulation:
- There was never any condensation under the wooden floorboards. The moisture condensed and was absorbed by the backfill on the ground;
- The lack of insulation ensured a flow of heat from the building, which warmed the inside of the foundation strip. As a result, the risk of soil heaving adjacent to the foundation on the outside of the box was reduced.
In addition, the cold underground, if there was one, was often used as a place to store household provisions.
Important! It is clear that such a scheme could be used in private homes only if there was constant heating. The option without soil insulation can also be used in bathhouses or in light temporary sheds.
In a private house, they resort to full insulation of the floor on the ground due to huge heat losses through the foundation. It turned out that it is much easier and cheaper to insulate the foundation along the outer surface, especially since modern materials make it possible to insulate the foundation in the ground without any problems.
How to insulate a basement from excess moisture
The basement should be dry. If moisture seeps through the walls, all insulation efforts will not bring results. Another problem is condensation. Moisture, unable to find a way out of the basement, condenses on the walls and ceiling. Mold or mildew may appear.
In a humid environment, many insulating materials lose their characteristics and become useless. For example, wet mineral wool does not prevent cool air from entering the room.
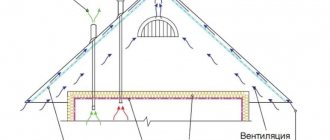
How to properly insulate the foundation and basement to avoid excess moisture? It is very important to provide ventilation holes in the basement. When there is an influx of fresh air, moisture will be able to leave the basement
If there is high humidity in the basement, you can insulate its walls with insulation that does not react to moisture. You can use special equipment to cover the entire basement with a thin layer of insulating foam. This material instantly swells and forms a smooth surface that does not allow moisture to pass through.
Which insulation is better to choose
Cold floors laid directly on the ground are today perceived as a relic of the past; no one likes to walk in warm shoes, even if it is just a country house or a country cottage. The problem of preserving wooden floorboards remained relevant only for the bathhouse, and food supplies have long since moved to the modern refrigerator.
It is necessary to insulate the soil base, even if it is an auxiliary room, such as a garage or an attached summer kitchen. An insulated concrete floor on the ground is guaranteed to reduce heat loss and prevent the appearance of condensation on the concrete.
For your information! How important it is to use insulation, for example, in a garage with a car, is evidenced by the fact that on a floor screed insulated over the ground, cars rust 60-70% less than on concrete poured directly onto a sand bed. And all because the heat accumulated by the engine and exhaust system is enough to heat the air in the room and make the garage ventilation system work normally.
At the same time, there is no need to invent or invent any special schemes for laying insulation; the structural units of insulated floors on the ground are widely known and have long been tested in practice. You just need to choose the right material that best suits the specific type of room.
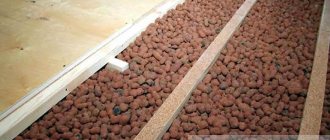
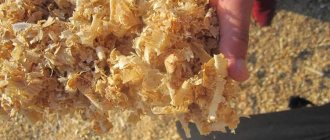
Expanded clay
The cheapest material for installing a floor on the ground with insulation. The advantages include high durability, environmental friendliness, resistance to high and low temperatures, and open flame. Expanded clay is easy to install and does not require special preparation. You can equally quickly fill a screed or lay wooden floors. Most importantly, high-quality expanded clay is absolutely safe in terms of fire protection. Therefore, it is often used to insulate the floor of a bathhouse on the ground, especially if the steam room has a massive brick stove on its own foundation.
You will need to make reinforcement on top of the expanded clay, install beacons and fill the finished floor with concrete
The huge advantage of expanded clay is its good adaptation to any soil surface. Even if it is an uneven rocky area, the insulation will adhere tightly to its surface.
The disadvantages include the following:
- The thermal conductivity coefficient of expanded clay insulation is almost two times higher than that of its closest competitors - foam plastic and penoplex. Therefore, the thickness of the layer turns out to be quite large, and so that the mass of pellets does not move around to the sides, wooden boxes are installed on the ground;
- Expanded clay cannot be directly laid behind the floors, directly on the ground; at a minimum, you will need to make a layer of waterproofing, otherwise the pellet will pick up moisture and water vapor and partially lose its heat-insulating qualities. It is almost impossible to dry such insulation.
Advice! When purchasing material, pay attention to the condition of the pellet surface. New expanded clay is always slightly dusty, but with a smooth, undamaged surface.
Such material can withstand contact with water without loss of quality. The presence of chips, cracks, stains and traces of the cement-sand mixture indicates that expanded clay has already been used and, when insulating a floor on the ground, can only be used to add the top layer.
Styrofoam
Foamed polystyrene is often used to insulate floors on the ground under a concrete screed. Foam plastic has some of the best thermal insulation properties, so the thickness of the floor insulation is relatively small. Even if sheets of foamed polystyrene are poured over the ground with a leveling cement-sand screed, the insulating effect will still be great enough not to lose heat through the floor.
If for expanded clay the layer on the ground can reach 30 cm, then for foam plastic the floor insulation coating rarely exceeds 10 cm.
The disadvantages of polystyrene foam include the low strength of the material, the ability to conduct water vapor and poor working conditions. In the process of cutting insulation sheets, a lot of foam sawdust and dust are formed, which are quite difficult to get rid of.
In addition, laying polystyrene foam under future floors requires the most level surface possible, so you have to spend quite a lot of effort preparing and filling the soil.
Extruded polystyrene foam
The only polymer insulation that fully complies with all the requirements of modern floor insulation on the ground. Penoplex does not conduct or absorb water vapor, has high strength and one of the lowest thermal conductivity coefficients.
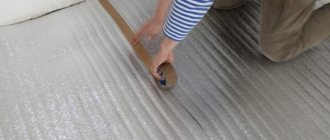
On dry soils, you can insulate the floor by laying EPS directly on the sand, but with the obligatory sealing of the seams
EPPS sheets are made with tongue-and-groove end locks, which greatly simplifies the installation of thermal insulation on the ground. If the floors are planned to be made without further filling with screed or leveling material, then the locks are glued with polyurethane foam during installation.
A huge advantage of penoplex is its high strength; insulation can be laid directly on the ground, even on clay, without fear that the floors will be dented or covered with cracks.
Clay-sawdust mixture
It is possible to insulate floors on the ground using simpler and cheaper materials. For example, use an adobe mixture of rye straw, sawdust and fatty clay with a small addition of PVA. The mixture is kneaded in an open area, rolled out in an even layer 20-25 cm thick, cut into blocks and dried in the sun.
After the blocks have acquired sufficient strength, they are transferred indoors, laid on the ground and trimmed in height so that the subfloor is as smooth and flat as possible. The joints between the blocks are rubbed with molding mixture or covered with sawdust. After the insulation has completely dried, you can lay wooden slats, secure them around the perimeter and lay the flooring - boards or laminate.
The floor is warm enough provided that the soil under the building does not get wet during the rainy season or the spring rise in the level of high groundwater. You can protect floors from rodents and moles using a steel mesh laid in the ground around the perimeter of the room.
What tools and materials will be needed
First of all, you will need fine gravel screenings, sand and an entrenching tool, with which you can backfill the base on the ground, level it and compact it. To do this, you can use ordinary shovels, a garden wheelbarrow and a hand tamper. If possible, it is best to work with a motorized rammer. The process of preparing the soil for the floor will require a lot of physical strength, so there is no need to skimp.
On dry soils, you can insulate the floor by laying EPS directly on the sand, but with the obligatory sealing of the seams
We purchase the rest according to the list:
- The road surface is high-density agrotextile, polyethylene film 0.5 mm thick;
- Perforated polyethylene pipes with a diameter of 50 mm;
- Insulation in slabs;
- Polyurethane foam;
- Cement-sand mortar.
If the floor insulation is planned to be laid on a pre-filled leveling screed, then the amount of solution will need to be increased by 2.5 times and an additional reinforcing mesh will need to be purchased. To insulate with backfill materials, you will need a set of leveling slats made of galvanized profile.
In addition, you will need to stock up on measuring tools - a building level, preferably a two-beam laser, a tape measure, a meter ruler and a carpenter's square.
What about a wooden house?
Most often, the foundations for wooden houses are insulated with expanded clay or polystyrene foam. We pour expanded clay into a special formwork, mixing it with concrete. Foam boards can simply be glued to the foundation walls, providing waterproofing.
The simplest and most effective method of insulating the foundation of a wooden house is to spray polyurethane foam. No additional work or separate waterproofing is required. Using a special gun, we spray insulation onto all surfaces. Polyurethane foam dries instantly. It forms a smooth surface impenetrable to cold and moisture.
If polyurethane foam was applied to the outside of the building, it should be covered with other materials. The insulation is afraid of direct sunlight. We glue a mounting mesh onto the layer of polyurethane foam, onto which leveling plaster can be applied.
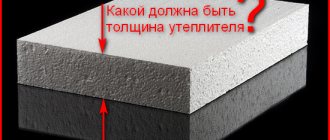
Calculation of floor insulation on the ground
The most difficult part of the process of arranging thermal insulation is calculating the thickness of the insulating layer. To simplify the determination of the thickness of floor insulation on the ground, experts recommend using the thermal insulation parameters on the walls of the house. For example, the insulation capacity for ground surfaces is 40-60% greater than the thickness of wall insulation.
You can calculate the thickness of the insulation according to GOST 26263–84 or SNiP 2.02.04-88. To determine the thickness of insulation for the walls of a house, it is enough to know the thermal conductivity coefficient of thermal insulation and the thermal resistance of wall masonry recommended by SNiP for the climate in a given area. The method for calculating insulation for a floor on the ground is much more complicated. The reason is that the characteristics of air, namely the heat transfer and thermal conductivity coefficients, remain practically constant. For soil, characteristics vary depending on the composition, density and moisture content of the soil.
Technology of floor insulation on the ground in a private house
If you choose a material for thermal insulation of the base under a living space, then the best solution would be expanded clay backfill. True, the thickness of the insulation will be at least 25 cm, and this is in addition to the pillow on the ground and the decorative screed on the floor.
The remaining rooms of a private house can be insulated with foam plastic or penoplex. Both materials are quite capricious to install, so it is better to connect individual slabs with polyurethane foam.
Preparing the base
Now a few words about the thickness of the insulating pie on the ground. For thermal insulation with expanded clay, a backfill layer of at least 25 cm will be required. For a sand and gravel cushion, at least 20 cm will be required and 5 cm for floor screed with concrete pouring. In total, it turns out that the pit for floor insulation on the ground must be at least 50 cm. For polystyrene foam and EPS, the depth can be reduced to 30 cm.
You need to lay clay under the insulation, literally hammer it into the ground until it becomes a solid mass.
Preparing the soil surface is carried out in the following sequence:
- We dig with a shovel and remove the soil to the required depth. Carefully trim the sides and level the bottom of the pit;
- Add a layer of pre-wet clay. The material should be flexible enough to form a lump, but not stick to your hands;
- In two passes, pour out a layer of clay and compact it with a hand tamper. The material must be literally driven into the ground so that the clay backfill is uniformly compacted to the condition of a dry country road;
- We cover the soil with plastic film, tuck the edges into the overlap of the walls so that the edges are above the floor level. They will need to be soldered to the waterproofing of the wall base.
During periods of cold weather and frost, condensation will form on the film, there will be little of it, and most of the water will go through the walls of the brick foundation and basement. If the foundation strip is poured from concrete with coating waterproofing, and in addition to everything, surface water appears in the autumn-spring period, then the clay “lens” will need to be made with a slope to drain moisture into the drainage.
Making a pillow for insulation
Filling the base for insulation is done only for polystyrene foam and EPS. Expanded clay can be simply sprinkled onto the waterproofing film.
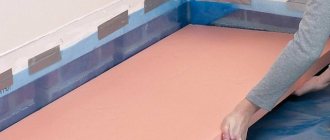
To insulate the floor with extruded polystyrene foam, we first fill it with coarse coarse crushed stone, then a layer with a fraction of 10-15 mm, the last layer is filled with screenings. Next, we lay the agro-textile, pour in sand and immediately level the surface of the filling with the rule. The thickness of the sand layer for floor insulation should be within 5-10 cm.
Laying insulation
Installation of thermal insulation can be done directly over the film using polyurethane foam or glue. If the load on the floor is large enough, you will first need to make a leveling screed.
Polyurethane foam is applied only to the joints of the slabs, and a sheet of polystyrene foam or EPS is immediately laid on the floor. Foam is not applied to the back supporting part of the insulation panel, otherwise it will lift the sheet when it expands. After installation, a slab with a foamed joint must be leveled and lightly pressed with pressure. Some of the foam will come down through the joints and fix the thermal insulation layer.
Screed on the floor surface
The thickness of the leveling layer must be at least 40 mm, otherwise the floors may peel off. First of all, we cut off the remaining glue and polyurethane foam and rub the joints manually with a cement-sand mixture with the addition of PVA. If reinforcing mesh is not placed in the screed, then it is better to additionally seal the seams at the joints with sickle tape.
Preparing to pour concrete
Next, we treat the floor surface with a deep penetration primer and after 2-3 hours fill in either a layer of concrete or a self-leveling mixture. If reinforcing elements are used in the screed, then the mesh will need to be raised on plastic holders, and the level of poured concrete will need to be controlled by beacon slats or by stretched paint cords.
Video description
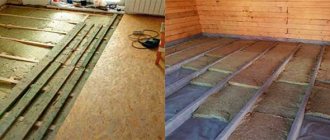
The sequence of installing a subfloor made of planks in the video:
The plank floor is mounted on a support system of longitudinal beams and transverse beams. Inside the room, columns are laid out along the walls of bricks. All free space between the supports is covered with expanded clay. For ventilation, leave 10-15 cm between the backfill and the plank floor.
A lag system is installed on the posts. The height of the supports is leveled. A plank subfloor is laid on top of the bars. The boards are laid:
- waterproofing film;
- insulating substrate;
- finishing material (laminated coating, linoleum, carpet).
There are several options for creating a floor pie along the wooden beams of the first floor. In the old days, logs were built from thick straight logs.
The building material was treated with resin. This impregnation provided protection from soil moisture, insects, and putrefactive bacteria.
Floor on joists Source lestnitsygid.ru
This design option consists of:
- from a clay pillow;
- waterproofing fabric, film;
- brick support pillars;
- beams and beams connected to each other by corners or any other types of fasteners;
- insulating material.
Recommendations and common mistakes
If you are lucky with the soil, and the soil in the area under the house does not swell with water, and the freezing depth is relatively small, then the insulation cake can be laid according to a simplified scheme on a sand cushion under a film with further filling with expanded clay. Such a floor can be covered with boards or even a plywood base can be made for laying linoleum or laminate.
The greatest number of errors is made when forming a sole or clay lens. If the soil is wet, or it may be that under two neighboring houses the level of watering and the depth of water layers differ several times, then drainage cannot be avoided.
Polystyrene foam and EPS should always be hidden under the screed; for a bathhouse, insulating the floor with polystyrene foam is not the best option
No matter how effective the waterproofing is, after 3-4 years water vapor will pass through the protective film or roofing felt and will accumulate under the insulation. Therefore, on poor soils, it is necessary to lay at least two drainage pipes in the clay, one of which should be laid in the center, the second should be mounted along the foundation at the lowest point of the site. The first pipe will collect moisture in winter, since the center is the warmest place in winter, the second drainage will work in spring and autumn. It is clear that both pipes under the insulation need to be wrapped with agrotextiles and covered with crushed stone.