The emergence of frame technology for the construction of private houses has made it possible to increase the speed of construction several times and reduce financial costs. This is especially true for situations where a pile foundation is used as the foundation for a building. Its arrangement does not require labor-intensive earthworks. There is also a downside to this technology. Since the foundation is not solid and is raised above the ground, the floor of a frame house on screw piles is completely open from below. If you do not take additional measures to insulate it, this will inevitably lead to serious heat losses. In the future, they have to be compensated by increased costs for additional heating of the house.
A house on screw stilts seems to hang in the air, and there can often be a draft underneath it Source kak-sdelat-fundament.ru
Features of houses made of timber with foundations on stilts
A pile-screw foundation is most often used in the following cases:
- When building on loose, heaving, swampy soils.
- When a house is built on a site that has differences in height.
- Due to financial savings.
- Urgency of construction of a wooden house. When there is no time to pour a strip foundation or grillage on a pile field.
- If there is an excess amount of moisture in the soil on the site.
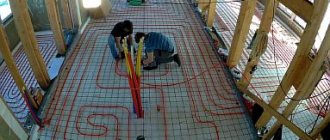
The basis of a pile-screw foundation is metal pipes with a special tip, which are screwed into the ground using specialized equipment or manually. As the pile rotates, it digs deeper and deeper into the soil; as it rotates, the soil is compacted to increase the stability of the piles.
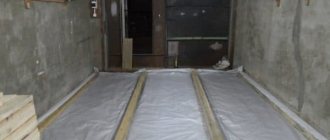
After installing the piles, their tops are cut to the same level and the caps are installed, which allows you to evenly distribute the loads from the house. The next step will be laying waterproofing, which will protect the walls of the house, trim and floors from moisture. Next, strapping boards are laid (usually timber with a large cross-section), which combine all the supports into one load-bearing structure. It is these boards that serve as the basis for laying the floor and erecting walls.
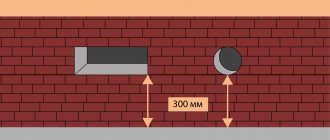
Installation of vents
Vents are openings through which ventilation passes. This allows moisture in the floor structure to evaporate and also extends its service life. The holes can be square, round or other shape. Usually we calculate their number as follows: 1 hole for every 2 meters. Their optimal size is 10 or 15 cm in diameter.
If we make a fence from brick, then we leave free space between the bricks at the required height. In the case of a wooden fence, we cut out such holes.
If we fill a monolithic tape, then all actions will be as follows:
- We install a pipe with sand inside at the required height. Its diameter should be equal to the diameter of the vent.
- After this, fill in the tape, remove the formwork and remove the sand.
- We attach gratings to the foundation where the holes are made. They prevent birds or animals from getting inside.
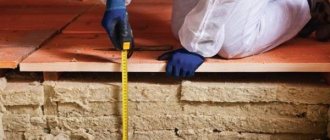
How to make the floor of a frame house on screw supports
The material for the frame structure is selected based on its technical parameters and the weight of the finished flooring. The base is point-based, a large load cannot be placed on it, and the house with decoration, furniture, and connecting grillage are also taken into account in the total pressure.
It is better to use light, dry boards; wet wood weighs much more. To make a warm floor, it is better to choose oak, aspen or coniferous species.
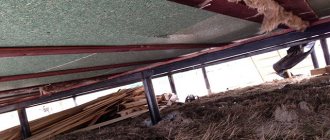
View of the floor covering from below
It is necessary that the material has no visible damage - you cannot use broken, cracked boards for covering.
First, they build a foundation, then they erect a grillage, preferably made of wood. The next step is to assemble a frame with stiffening ribs from 10*10 cm timber. If the distance between the piles exceeds 3 m, additional intermediate supports will need to be installed.
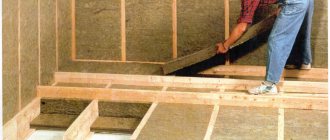
The logs are installed every 55-60 cm, with a cross-section of 10*25 cm. The insulation is 25 cm thick.
If you need to cover several small spans, it is enough to take several smaller beams 5*25 cm.
Strapping elements are mounted under the beams for the installation of logs: the crossbars are inserted into pre-prepared cuts, fixed with self-tapping screws and nails.
Wooden elements must be treated with an antiseptic impregnation to avoid damage by insects or mold formation.
How to work with wooden floors?
When wooden beams act as a grillage, they must first be treated with an antiseptic compound, and then with a water-repellent solution. To protect the seams of the structure, any waterproofing material is placed between them.
Next, they begin to build the basement structure. It has the form of a frame or a solid thin brick wall is built. Another option is to dig a trench between the driven piles.
Afterwards, a reinforced concrete foundation is poured into it. When it reaches the required strength, a brick base is laid on top of it. When it is built, guides made of a metal profile are mounted on the brick, with foam sheets secured between them.
Frame house floor composition
Bottom view of the floor of a house on stilts
To build a ceiling over a ventilated space, you will need to lay the layers in the following order:
- load-bearing wooden frame (with a subfloor that “bears” insulation);
- a layer of vapor-permeable wind protection (to protect the insulation from “weathering”);
- thermal insulation material;
- steam and waterproofing;
- finished floor construction (board + finished floor).
Floor insulation scheme for a house on stilts
All materials for a building on screw foundations must be laid in this order. Some sources indicate the erroneous installation of vapor barrier on the cold air side, but this makes no sense. Steam forms in a warm room and settles on colder surfaces, thus forming condensation. To prevent condensation from penetrating into the thermal insulation layer and reducing the degree of protection of the building from the cold, a vapor barrier is provided.
What should be the vapor barrier?
The suspended floor, which is the option on stilts, is somewhat different from both interfloor ceilings and multi-layer walls. It is impossible to arrange ventilated gaps in it, through which steam trapped inside the structure could freely escape. Which means he shouldn’t get into it.
Therefore, on top of any insulation, even one that is not afraid of moisture, it is necessary to lay a continuous vapor barrier, covering, among other things, wooden structures. Moreover, it must be a completely impermeable membrane or polyethylene film 0.15 mm thick, laid in two layers.
The vapor barrier must cover the entire structure
Communication passages must also be sealed using elastic gaskets and hardening mastics.
Why is insulation necessary?
The need for thermal insulation material is not always clear to a person far from construction. From the point of view of the future owner of the house, it is much easier to start from the load-bearing capacity of the structure.
Neglect of thermal insulation standards can lead to the following problems during the operation of the building:
- condensation on the surface of the floor in the technical underground;
- decreased building energy efficiency and increased heating costs;
- High humidity leads to wood rotting, mold and mildew, as a result of which wooden structures quickly fail and require expensive repairs.
Insulating the floor in a frame house allows you to avoid these troubles and ensure a long service life of the building and all its individual structures.
Advantages of a pile foundation
Such a technological solution has a number of advantages:
- minimum draft level;
- Possibility of use on any type of soil;
- quick installation of the foundation;
- lack of a large amount of excavation work;
- high level of structural stability;
- slight susceptibility to aggressive environmental factors.
An important point is that with the help of a foundation on screw piles, it is possible to build frame houses in areas with a significant difference in height: on cliffs, slopes of lowlands or ravines, artificial embankments.
Note: The weaknesses of the described technological solution include the inability to equip a basement and the difficulty of insulating the floor in a frame house on stilts.
Insulation installation technology
In its structure, the floor of a wooden structure on a pile foundation is similar to the false version. Installation takes place in several stages:
- fix logs (load-bearing beams) on supports;
- cranial bars are attached to them on both sides;
- create flooring from sheet products (plywood, OSB, fiberboard) or boards;
- a windscreen permeable to steam is placed on top of it;
- install a heat insulator;
- a plastic film or other waterproofing material is laid on top of it;
- lay the finishing coating.
Installation of mineral wool, wind protection and waterproofing.
The technology considered shows how to insulate the floor in a frame house on stilts, how to protect yourself from dampness and create comfortable living conditions.
The technology for creating warm floors in housing on stilts is simple, but labor-intensive. It is quite possible to do all the work yourself without the help of specialists. In addition to gaining skills and knowledge, this will save money.
Selection of thermal insulation material
To make a high-quality insulated flooring in a house on screw piles, it is necessary to choose the right working materials: heat insulator, hydro- and vapor barrier, and windproof coating. In practice, various products are used for these purposes. The most suitable thermal insulation materials with their brief characteristics are presented below in the table.
Mineral woolFoam plastic, penoplex (extruded polystyrene foam) Expanded clay
| has excellent thermal insulation properties | have good heat-protective characteristics, affordable price | the cheapest option of all considered |
| non-flammable, biologically and chemically inert material | polystyrene foam burns and is destroyed when exposed to moisture and freezing temperatures, so it requires increased protection from water | these are round-shaped particles made from thermally treated clay |
| loses performance when wet | penoplex is devoid of the above disadvantages | its thermal insulation properties are inferior to the above analogues |
| has a higher price compared to analogues | extruded polystyrene foam has increased strength compared to polystyrene foam | does not burn |
We recommend: Grounding a gas boiler in a private house: detailed instructions for creating and installing a circuit, connecting the boiler to it, obtaining an inspection certificate for the grounding structure, the cost of the work of craftsmen
. The following types of mineral wool are used as insulation:
- slag;
- glass;
- stone.
These products are distributed in rolls and slabs. Due to the increased rigidity, it is recommended to give preference to the latter release form.
Laying penoplex
For wind protection and moisture insulation, you can use both different materials and modern products that combine both of these functions at the same time. Vapor permeable membranes are an example of such multifunctional products. Thanks to their use, savings in working time on laying coatings are achieved.
As a vapor barrier, a polyethylene film is used to cover the insulation.
To prevent the occurrence of putrefactive processes and the formation of fungus, all wooden elements of the house on stilts are coated with antiseptic agents. This treatment also prevents insects from destroying the wood.
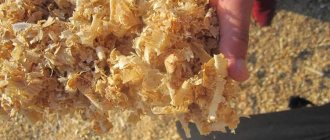
If you are insulating the floor in a house with a pile foundation, designed for permanent residence, then it is better to use penoplex or mineral wool as a thermal insulator. Cheaper expanded clay is well suited for a summer house.
What to choose?
The brick wall turns out to be low, but massive. Therefore, a thin strip foundation of concrete is poured under it. The thickness is within 10 cm. It must be taken into account that the brick plinth will be finished on the outside with some kind of material, for example, ordinary plaster. And this will also increase the thickness of the wall, but also the thermal insulation characteristics of the basement part of the foundation.
On moving soils, the brick plinth is subjected to heavy loads, especially during frost heaving. Hence the constantly appearing cracks, which reduce the decorative qualities of the front surface.
It is difficult to deal with this problem, so most developers prefer the second option. Thus, brick insulation of the base for a pile-screw foundation is not advisable.
The modern building materials market offers a wide selection of different types of insulation. For the base of a pile-screw foundation, it is better to use slab foundations. They are more reliable, and for such a base this is an important factor.
This thermal insulation option requires a frame structure to which the insulation will be attached. For the frame, either profile pipes or profiles for fastening drywall are used. You can use wooden blocks or boards, but this option has a low service life.
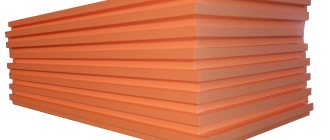
Of all the proposed thermal insulation materials, the best option is polystyrene foam (foam) boards and extruded polystyrene foam. A prominent representative of the latter is the Penoplex brand. Here are its characteristics:
| Characteristics | Unit change | Meaning |
| Thermal conductivity | W/m K | 0,03 |
| Water absorption | % | 0,5 |
| Density | kg/m | 25-32 |
| Compressive strength | MPa | 0,2 |
| Fire resistance | Class | G3 |
| Operating temperature | °C | -50…+75 |
For example, we can compare it with the thermal conductivity of brick, which is 0.4 W/m K. That is, the thermal insulation qualities of Penoplex are 10 times higher. Therefore, this material, laid with a thickness of only 50 mm, guarantees complete insulation from the cold.
Another commonly used thermal insulation material is basalt wool in mats. Here are its characteristics:
| Characteristics | Unit change | Meaning |
| Thermal conductivity | W/m K | 0,04 |
| Water absorption | % | 1 |
| Density | kg/m³ | 55-75 |
| Flammability | Class | NG |
| Operating temperature | °C | -50…+50 |
| Compressive strength | MPa | 0,05-0,8 |
Mineral wool is inferior in thermal conductivity, but it all depends on the density of the product. The denser the material, the higher the thermal insulation properties. But the price also increases. A big plus is that this material is non-flammable.
There is a wide range of basalt wool mats on the market. There are for walls, for foundations, for roofs, for floor bases, for chimneys. It is clear that in our case we need to purchase for foundations.
You can simply choose from the two proposed insulation materials. The first is usually used for external insulation, the second for internal. To make it clear what we are talking about, let’s consider the two thermal insulation processes separately.
Step-by-step algorithm of actions for self-insulation
Wood beams are stuffed on top of the assembled frame, boards are sewn on, forming a flat base. Each tier of wood is immediately impregnated with antiseptics.
When using polystyrene foam or penoplex, you need to lay a rough mesh with a sufficient margin of strength, otherwise the insulation will damage it with its own weight.
Then, they begin to waterproof the grillage with plastic film, roofing felt or membrane fabric. The material is laid overlapping, positioned so that the fabric sag slightly between the joists and is not stretched. Construction tape is used to seal the joints.
Information on proper thermal insulation of the floor of a wooden structure is shown in the following video:
Thermal insulation of the first floor floor
If you decide to build a house on screw piles with your own hands, then special attention should be paid to insulating the floor of the first floor. The structural design of a wooden floor on the second floor does not require such careful thermal insulation.
As a rule, the construction of houses on stilts is carried out using beams. To do this, we lay OSB boards or plywood along the slats attached to the bottom of the joists. The design in cross section will resemble the letter W.
Layout of a wooden floor on joists with insulation
Now you can begin installing hydro- and vapor barriers. To do this we do the following:
- We spread the waterproofing film over the joists so that it sag into the gaps between the joists. You can use membrane waterproofing or regular film.
- We place thermal insulation material in the spaces between the joists (on top of the film). Mineral wool is suitable for these purposes. If you want to properly insulate your house on stilts, then it is better to use basalt wool.
- The waterproofing film on the joists must be secured with a stapler.
- The structural design of the first floor floor in a house on stilts must include a vapor barrier. If you are building with your own hands, then do not forget that the vapor barrier material is laid with an overlap of 150 mm. The joints must be taped.
Using the method described above, the construction of the ground floor floor is carried out in any room, be it a bathroom, kitchen or living room. As for the structural pie of the second floor floor, it can be done without heat and waterproofing material. But in the bathroom and other places with wet processes, it is worth laying a waterproofing layer into the floor structure. In the video below you can learn in more detail about the construction of the floor of a house on stilts with your own hands.
Flooring installation
The next layer of the structural pie is made with a board 3 cm thick. When laying the boards with your own hands, keep a step of 40-50 cm. This sheathing along the joists will allow you to get a ventilation gap. You can attach the boards to the joists with self-tapping screws.
We then proceed with the construction of the floor in the house in this order:
- We lay the subfloor on the sheathing of boards. It can be a tongue-and-groove board or a regular board. We fasten it to the sheathing with self-tapping screws.
- You can lay purchased flooring on the boards with your own hands.
Since the front layer of the floor in the bathroom and toilet will be tiles, it is better to lay plywood or OSB on the rough boards to level the surface. At the same time, the structural pie in such rooms must include additional waterproofing, which is laid over plywood.
Warm floor of a frame house
You can make a warm floor in a house on stilts with your own hands. This is not shown in the video below, but the process is simple and takes place in the following sequence:
- A structural heated floor pie includes the same load-bearing wooden frame as for a non-heated floor, with the only difference being that the plywood sheets are not laid on backing boards, but on cranial blocks attached to the joists with self-tapping screws on the sides. You can use a cranial block with a cross-section of 30x30 mm and fasten it in increments of 15-20 cm.
- After laying the plywood on the beams and performing waterproofing, we lay expanded polystyrene in the gap between the joists. The top surface of the polystyrene foam boards should be flush with the top of the joists.
- Next, you need to lay a layer of vapor barrier film, placing it on the walls above the expected level of the finished floor.
- We lay a reinforcing mesh over the film and fill it with a thin layer of cement mortar.
- Then we lay the heating mats of the underfloor heating system on the reflective layer of foil insulation. We perform concrete screed.
- We install flooring. If the floor is in the bathroom or kitchen, then you can use tiles.
The floor of a frame house on stilts, structure and structure of the structure. The floor of a frame house on stilts. Materials for constructing a floor structure. Step-by-step guide to installing a thermally insulated floor pie and the device.
We recommend: Connecting two heating boilers into one system: piping diagram, requirements
External insulation
Finishing the floor from the outside
If the house on stilts has already been built, then you will have to perform external thermal insulation of the space under the floor.
The layers are laid in this order:
- A vapor barrier film is attached to the joists, with an overlap of at least 10 cm. The easiest way to secure it is with a construction stapler; you can glue it.
- A layer of insulation is installed. It is attached with self-tapping screws to a wooden base.
- It is important to protect the insulation ball with a layer of wind membrane; it allows air and drops of moisture to pass through only in one direction (from the insulating material to the outside).
For greater protection, the outside of the floor should be covered with boards and a decorative base should be erected. Insulation of the floor in a house on high stilts will play the role of a ceiling when constructing a basement or arranging a basement.
Basement as an additional type of insulation
The space located between the floor surface and the ground surface in pile buildings is recommended to be finished with a plinth. The work is carried out quickly, and is more financially profitable than installing full thermal insulation of floors. This finish can also be used as an auxiliary barrier against the penetration of cold. In a building standing on screw piles, there is no need to equip a real basement. It is quite possible to get by with installing an imitation called a pick-up. This is a decorative element that serves both to decorate the house and to increase its thermal insulation. The underground space will not be subject to snow drifts, winds and drafts will also not be terrible. Using a fence allows you to save on insulation material, since the required layer will be smaller.
The design of the decorative base is carried out in one of the following ways:
- Frame mounting. Such a pick-up can be installed as quickly and simply as possible. A frame consisting of metal or wooden beams is attached to the piles. The surface is waterproofed with roofing felt, and plastic sheets, which are produced with a variety of patterns, are mounted on top of it. The plastic can be secured with self-tapping screws (on a metal frame) or nails (on a wooden sheathing).
- Creation of brickwork. It is necessary to build a so-called “false base”, with walls half a brick thick. Before laying it, a “cushion” is created from well-compacted sand. The masonry is waterproofed with roofing felt. Instead of bricks, you can lay gas or foam blocks, which have a high level of thermal insulation. The block base must be plastered so that the building material does not deteriorate from precipitation and time.
When installing the intake, it is important to remember that the underground space requires mandatory ventilation. Without taking this factor into account, mold will quickly appear there. For ventilation in opposite corners of a frame house, it is necessary to provide special openings responsible for air circulation under the floor.
Installation of insulation to the base
The basement can be insulated using three methods: from the outside, from the inside, or floor insulation.
For external insulation of the space, Penoplex or expanded polystyrene slabs are used.
Internal insulation can be made from sprayed thermal insulation, applying the material along the inner surface of the sheathing. Such protection does not form joints, quickly increases in size, and creates a sufficiently dense layer to prevent heat loss.
It is better to do the insulation of the floor right away, otherwise it is impossible to be at home without warm shoes. At the same time, the cost of heating the home increases significantly, and the risk of constant colds is higher. A reliable heated floor is the key to health and partial safety of the family budget. For example, when heating with gas, the cost of thermal insulation of housing pays off in 2-3 winters, provided that such a thermal barrier lasts longer.
If it is difficult to choose on your own, or you need additional information, you can seek the advice of a specialist.
The principle of insulating the base of a wooden building is shown in detail in the following video:
Step-by-step instructions for insulating your floor yourself
- First of all, start installing the subfloor. For this purpose, wooden beams are placed on the logs to form the base. Then the installation of wooden flooring from boards takes place. All wooden elements must be impregnated with antibacterial liquid.
- If penoplex or polystyrene foam serves as insulation, you can install a mesh subfloor. The mesh must have a significant margin of strength so that the mass of the insulation does not damage it.
Attention! If in the future it is planned to install a heated concrete floor, it is better to provide for the presence of jumpers running across the structure.
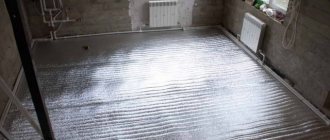
- The next stage is to protect the grillage material from moisture penetration. For this purpose, a waterproofing material is laid - it can be a film of polyethylene or membrane material, or roofing felt. It must be positioned in such a way as to form overlaps without gaps. Between the beams, the lag material should sag freely, without tension. The joints must be sealed with construction tape. An insulating layer is laid on top of the waterproofing, which must be arranged in such a way as to avoid the formation of gaps between fragments of insulation.
- Another film layer is laid on the laid thermal insulation material. This time it will play the role of protection against steam, as well as water and drops of condensation, which will inevitably come from the residential premises of the building. It is also laid with an overlap. Fixation can be done using a construction stapler.
- When the insulation “pie” is completely laid, you can begin installing the finished floors. You can use plywood sheets, floorboards or chipboard.
One of the inexpensive materials is pine. Aspen and oak will cost slightly more. Boards made from these types of wood have a long service life, they are reliable and strong. When purchasing, you need to pay special attention to the wood moisture content; it should not exceed 20%. Otherwise, the floor covering will begin to develop cracks as it dries out. For decorative purposes, as well as for more effective heat retention, the floor can be finished with insulated linoleum, carpet, or a cork backing can be installed, and a laminate can be laid on top of it. In bathrooms, tiles are used for flooring.
It is possible to install a “warm floor” system throughout the house.
Picking up a screw foundation
When a building is supported on piles, in this case screw piles, there is no structural element - a plinth. In some cases, the underground level is decorated with a fence - an imitation of a plinth that does not bear the load from the building's load-bearing frame. The structure must be supplemented with a blind area along the cut-off waterproofing.
Main mistakes when designing a fence
Most individual developers believe that if the false base is insulated, the temperature in the underground will increase. This is fundamentally wrong - the heat insulator only retains heat, and does not produce it independently. In the absence of a heating source between the floor/ground, a layer of insulation is a waste of money.
Important: With any method of decorating the underground, it is necessary to leave ventilation ducts. In the absence of a building's ring drainage, the soil under the base of the cottage releases a lot of moisture. Which must be diverted by a natural ventilation system. The joists and subfloor must be treated with an antiseptic and waterproofing impregnation.
Depending on the tasks being solved, the base on screw piles can be decorated and protected from blowing. There are several technical solutions:
- the fence is completely absent - the cottage is on a hill, the height difference under the base of the house exceeds 1.5 m, large-format triangles in the basement will spoil the appearance;
- insulated frame system - the underground is planned to be used for storage, so heaters are installed in it;
- cladding without insulation - the height of the underground is insignificant, the false base will be an excellent addition to the facade exteriors, a heat insulator is not needed here.
In the lower part of the cladding, the fence is in contact with the ground, inside of which heaving forces may be present in winter. Therefore, it is better to replace the fertile layer (0.4 - 0.6 m) with sand, in which these forces cannot occur. To do this, it is enough to dig a trench the width of a bayonet and fill it with non-metallic material.
Cladding with sheet materials
Technologies of wooden architecture include log houses made of logs, beams, cylinders, panel houses, panel houses, “framework” and half-timbered houses. Only log houses and half-timbers do not require façade cladding; external walls of all other types are decorated with siding, clapboard, block house, and panels.
For most of these options, a stone imitation of the basement level in the house is preferable.
The manufacturing technology is as follows:
- installation of the frame - two horizontal belts are attached to the pipes of the screw piles; the thickness of the timber is used to level the cladding plane, taking into account all layers;
- fastening the base - the best option is flat slate or DSP;
- waterproofing - produced by rolled material, which passes under the blind area slab, is folded onto a sheet of fiberboard to the very top;
- cladding - the resulting base is covered with rubble stone, clinker, porcelain stoneware;
- blind area - standard paving slabs, paving stones, rubber modules, concrete over cut-off waterproofing.
Scheme of picking up screw piles with sheet material.
The technology is cheaper than natural masonry, but more expensive than a frame system (analogous to a ventilated façade).
Brick, rubble masonry
The most expensive option for building a house on screw piles is traditional masonry. The technology is an imitation of a plinth, since the grillage of a wooden cottage in this case does not receive support from the masonry. To save materials, the tape is made in half a brick; it cannot be insulated. The first row is laid on a compacted sand cushion, which replaces the fertile layer. Waterproofing takes the form of a roofing felt tape laid both under the masonry and under the blind area.
Picking up with rubble stone.
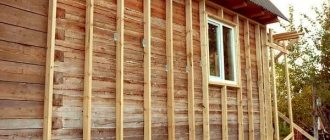
Frame fence
When choosing a foundation on screw piles, they are usually guided by budgetary considerations. The most economical option for simulating a base is traditionally frame technology. This is an analogue of a ventilated facade, in which the lathing made of timber or galvanized profile is attached not to the walls, but to the body of the piles. The technology looks like:
- frame along pile pipes - two horizontal belts around the perimeter;
- waterproofing - roofing material vertically fixed to the sheathing, bent horizontally at the ground over the entire width of the blind area;
- basement siding - PVC sheets with imitation stone and brickwork are fixed with clamps, self-tapping screws to a metal profile or nails to a wooden beam;
- blind area - any material used to decorate sidewalks.
Frame mounting of a screw foundation.
Trays and stormwater inlets can be immediately built into the blind area, draining the runoff into an underground reservoir.
The removal will allow you to reduce the thickness of the heat insulation in the floors and increase the operating comfort of the premises in the house. No insulation is used in the false base pie; communication pipes are wrapped with heat insulation in the underground, to the freezing depth in the ground underneath.
Thus, following the advice given by experts, you can insulate the floors along the joists, protect the underground from blowing, while maintaining the natural ventilation of the lower space.
Approximate cost of insulating a pile-screw foundation
| Name of works | Unit change | Price |
| Installation of insulation with glue, doweling | m2 | 500 rub. |
| Installation of a reinforcing layer on insulation | m2 | 400 rub. |
| Installation of artificial stone and grouting | m2 | 950 rub. |
| Total cost of work | m2 | 1,850 rub. |