Greetings to all readers!
My wife's sister bought herself a two-room apartment in a new building with a balcony. And since now the balconies are flimsy and drafty, I decided to insulate it so that I could go out barefoot in winter. And of course there are plans to connect it with the kitchen. So, we started to think about how best to insulate. Of course there are a lot of options. Both in price and in efficiency. We thought and decided more than one evening. We dug through a bunch of information on the Internet. The result is a note that will be useful to you, dear readers!
What is the best way to insulate the floor on a balcony?
Do-it-yourself insulation of the floor on the balcony is gaining momentum. And this is logical, because every corner of a city high-rise building is incredibly valuable. And your corner needs to be refined to the maximum.
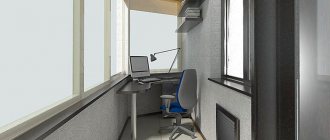
A good owner can equip a small office, playroom or recreation area there. It’s not surprising that search queries are full of questions like “how to make a warm floor on a balcony” and “how to properly insulate a floor on a balcony.” Let us find the answers to them and find out how best to insulate the floor both on the balcony and on the loggia.
How to insulate the floor on the balcony? The choice of materials is rich, but it is best to insulate the floors on the balcony using one of the materials listed below, which have been tested by many families. You can use them both separately and together. Moreover, the latter is preferable. After all, this is both general savings and all the best that each of these materials can provide.
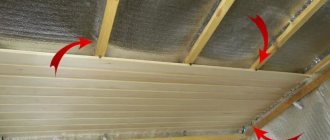
Penofol
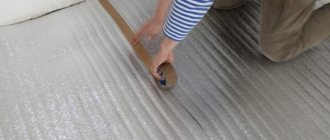
This material is considered the best for insulating the floor on a balcony with your own hands. In fact, it is a tandem of aluminum foil and foamed polyethylene. In addition to the fact that it has excellent thermal insulation, it perfectly blocks sounds and protects the house from moisture.
It is produced both single-sided and double-sided. Insulating a balcony with it is a pleasure, because the material is supplied in rolls with a thickness of 3 to 10 mm. This allows you to insulate the floor on the loggia with your own hands without losing useful space. It is also easy to install, because the joints are simply glued with aluminum tape.
Styrofoam
Do-it-yourself insulation of the floor on a loggia is most often done with polystyrene foam, because it not only provides the desired effect, but is also cheap.
Installing a heated floor on your balcony will be incredibly simple; just lay down sheets of foam plastic, which come in a wide range of thicknesses from 20 to 100 mm.
The sheets are laid in the space between the joists on the floor. All cracks are sealed with polyurethane foam and the main flooring is laid. To distribute the load from the logs, this insulation must be placed under laying pieces of plywood.
Penoplex
This is what foamed polystyrene foam is called. It has excellent thermal insulation properties. It is recognized as a chemically inert material that is easy and simple to install. Sheet thickness is from 20 to 50 mm. It’s easy to make a heated floor on the balcony with your own hands, but quite expensive, because the price of the material is quite high.
But experts recommend using it in combination with other materials. This will allow you to get excellent insulation at relatively low costs. For example, for the primary layer of insulation you can use polystyrene foam or mineral wool, and finish the work with penoplex.
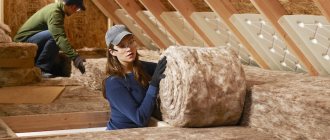
Mineral wool
This insulation is similar in structure to ordinary cotton wool, but basalt and glass fiber are used for its production. They are melted, drawn hot, cooled and crushed. Insulating the loggia floor with it is complicated by the fact that you cannot take it with your bare hands, you can prick your hands.
But otherwise there are no difficulties. It fits perfectly anywhere and covers any gap. Namely, the dense installation of insulation allows you to achieve maximum temperature indicators in the room and reduce heat loss. The room becomes warm and moisture resistant. It is produced both in rolls and in sheets.
Source: vbalkone.ru/uteplenie/kak-uteplit-pol-na-balkone.html
More on the topic What you need to know before insulating a loggia and balcony with your own hands
We select thermal insulation materials wisely
The building materials market is replete with a variety of insulation materials, advertising of which claims that each of them is the best.
How not to get confused in this diversity, and what is the best way to insulate a balcony? The main thermal insulation materials that are worth paying attention to are the following:
- Styrofoam;
- expanded polystyrene;
- extruded polystyrene foam;
- mineral wool.
Styrofoam
A class of polymer materials with gas-filled granules, 2-5 mm in diameter, widely used for packaging various products and insulation. The granules sintered during steaming form a single structure, the strength of the interconnections of which determines the density of the material.
The main advantages of polystyrene foam:
- Lightness - the material is extremely light in weight (15-35k g/m3), it is easy to fasten, process with a hacksaw or paint knife.
- Affordable price.
- Low thermal conductivity and water absorption - foam plastics occupy one of the leading positions in thermal insulation characteristics, which allows them to be widely used in construction.
- High sound insulation characteristics (over 53 dB).
Disadvantages: high flammability class, destruction under the influence of ultraviolet radiation, chemical vapors of acetone, benzene, toxicity dangerous to humans when burning.
Expanded polystyrene
This is a type of foam, the most common on the building materials market, obtained from styrene copolymers. By steaming the raw material into its finished form, the gas-filled granules are firmly sintered together to form a durable shape, which is then cut into slabs of various thicknesses, usually 20-100 mm.
The density of expanded polystyrene for construction work usually varies between 15-50 kg/m3. With its positive characteristics of low thermal conductivity and water absorption, this material, like most in its group, has a low bending strength - an average of 0.25 MPa. Its flammability class is also high - G3-G4.
Expanded polystyrene is a more advanced version of polystyrene foam
Expanded polystyrene crumb, which is a porous filler in polystyrene concrete, is also used in construction. The resulting material belongs to the class of lightweight concrete, its density is 150-600 kg/m3, thermal conductivity is 0.055-0.145 W/(m*K). At the same time, a screed made of such material can withstand a sufficient load to be used for surface screeds in the floors of houses, attics, balconies and loggias. Polystyrene concrete is non-toxic, flammability class - G1 (low flammability).
Extruded polystyrene foam, penoplex
If you don’t know how to insulate a balcony, this material is without a doubt one of the best! Its main advantage is its extremely dense cellular structure, consisting of granules measuring about 0.1-0.2 mm. The high tensile strength during static bending of this material makes it almost universal in insulating any possible surfaces. The water absorption of XPS is 10 times less than that of expanded polystyrene - only 0.2-0.4%! The disadvantages include low vapor permeability and high flammability class G3-G4.
Penoplex is a modern and easy-to-install insulation
Minvata
A traditional material, the ancestor of which (glass wool) was widely used in the construction of the last century. Stone mineral wool today is also popular in insulating roofs, canopies, ceilings, partitions, etc. Its main advantage is resistance to high temperatures and chemicals.
Thermal conductivity is close to some foam plastics, but due to the fibrous structure, its moisture absorption and vapor permeability are quite high. During installation, it must be protected with moisture and vapor barrier membranes. There are sheet and roll samples of mineral wool on the market with an average density of 60-120 kg/m3.
Mineral wool is an inexpensive, fire-resistant material
How to insulate a balcony floor with mineral wool
Many homeowners consider insulating the floor on a balcony or loggia of an apartment building to be a waste of money, although this procedure is of great importance in the chain of work on arranging and finishing this room.
If you decide to make this room warm, you will first have to insulate the walls, ceiling and floor on the balcony.
Having a balcony in your apartment will sooner or later oblige you to take care of its improvement. Much of what will have to be done during the work directly depends on the final purpose of these square meters. Be it extra living space, a relaxation area or simply a cold storage room.
There are many materials for carrying out such work; this is discussed in the website article “The best way to insulate a balcony.” Now we would like to present to your attention step-by-step instructions on insulating floors with mineral wool.
Methods for laying floor insulation again depend on the finishing floor covering, its installation and fastening.
In this publication we will look at laying insulation between the joists on which solid boards, sheets of chipboard, plywood or OSB are mounted.
Step 1. Preparing the base of the floor
The surface on which it is planned to install the flooring, together with insulation, must be dry, clean and, if possible, without damage. We mean cracks and chips. They must be covered with cement-sand mixture (CSM) or alabaster.
Cover the gaps in the interpanel space with mounting foam or the same DSP.
Step 2. Waterproofing the subfloor
Perform this operation using roofing felt, for example. Lay it out along the length of the room, overlapping each other by 150-200 mm. Bend the edges of the material 100-150 mm along the walls of the room. To be sure, tape the joints with tape.
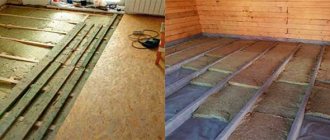
Step 3. Installation of logs
To install these flooring elements, use wooden slats that have been pre-impregnated with an antifungicide and dried for at least two days.
The dimensional indicators of the thickness of the slats or even timber may vary, depending on the need to raise the floor level relative to the existing base.
Fastening the timber to the floor can have two options:
- Directly to the concrete base, using shims to level the floor.
- To straight hangers or corners mounted on the floor base.
You can read about these operations in detail in the article “Wooden floor on the balcony”.
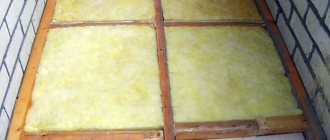
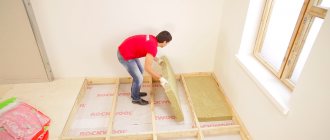
Step 4. laying insulation
The sheathing is ready, and you can begin insulating the balcony floor. Cut the mineral wool sheet to the size needed to cover a specific area. At the same time, make adjustments to the markings - add 50-70 mm to the required size, so that the edges of the canvas fit very tightly to the joists.
Insert material into the space between the slats. Fill all areas of the sheathing with insulation. Close the gaps resulting from installing the timber near the wall with polyurethane foam.
High-quality floor insulation on a balcony requires a thickness of mineral or stone wool of at least 50 mm.
To obtain a thicker layer, place one sheet on top of another, but we do not recommend pressing down the mineral wool too much, as the air, which acts as a heat insulator, will be forced out of the space between the fibers and the thermal insulation qualities will deteriorate.
When completing the insulation of the floor on a loggia or balcony, cover the structure with plastic film or other material that does not allow moisture to pass through. Attach the film to the wood using a furniture stapler.
Now you can start laying solid boards, chipboard sheets, OSB or plywood on the joists to complete the process of producing an insulated coating.
The warm floor on the balcony is ready for temperature changes outside the window and will serve faithfully for a long time, keeping your home warm.
Source: overhear22.ru/uteplenie-i-gsht-otoplenie/uteplenie-pola-na-balkone-mineralnoj-vatoj/
https://www.youtube.com/watch?v=4C-kMLll6Is
How to insulate a balcony floor with penoplex
Extruded polystyrene foam, produced under the Penoplex brand, is a modern insulation material that has many advantages and is in demand among consumers.
Let's look in this article at the technology of floor insulation with Penoplex with our own hands and the necessary requirements for proper installation.
Advantages of insulation
- Low thermal conductivity. This is the main indicator that you should pay attention to when choosing insulation. It is thermal conductivity that determines the amount of material required to maintain the desired temperature level in the room, and, consequently, the amount of costs for repair work.
- Moisture resistance. When moisture penetrates into the insulation, the thermal insulation properties of the latter are significantly reduced. The material is absolutely impervious to moisture and steam, excluding the formation of condensation.
- High compressive strength. For insulation laid on the floor, this indicator is especially important, because the floor covering is constantly under pressure.
- Durability. Service life – up to 50 years! During this period, the material does not lose its properties and does not deform.
- Environmental friendliness. The material does not contain formaldehyde, slag, soot, dust and small fibers; Freon is not used in its production.
- Easy to install. You can lay the insulation yourself, saving the budget for other stages of repair, for example, for finishing work.
The disadvantage of Penoplex is usually called its flammability, but when the insulation is located, for example, under a screed, this feature of the material can be ignored.
Requirements for laying Penoplex
It is recommended to work with the material within the temperature range from +5 to +25 degrees. Installation can be carried out in any weather conditions, despite precipitation.
The material does not like the sun's rays, therefore, when insulating buildings externally, Penoplex is always sheathed with plasterboard or hidden under other finishing materials.
For floor insulation, a sheet with a thickness of 40 mm is usually used; for regions with a particularly cold climate, material with a thickness of about 70 mm is used.
If you carry out the installation yourself, pay attention to Penoplex slabs with a tongue-and-groove system - it is much more convenient to work with them. To improve the adhesion of the insulation to the floor surface, the insulation boards are treated with emery.
The use of polyurethane foam containing toluene or glue with an organic solvent is not allowed. These substances can damage the insulation.
Where to begin
You need to start mastering any balcony with an objective assessment of its condition
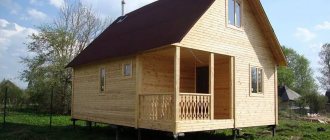
If the apartment is located in a new building that has recently been handed over to residents, then you need to pay attention to the material from which the balcony structure is made. Also in new houses it is necessary to pay attention to what the neighbors’ balcony is decorated with.
Often in such houses neighbors try to adhere to the same style.
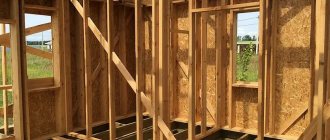
We make masonry from foam blocks
But if the balcony is in an apartment that is not new and has always been used as an open space, then work will have to begin with strengthening the balcony. Strengthening includes both the reconstruction of the concrete balcony platform and the strengthening of the metal handrail. Also, this process may include such an event as strengthening the lower part of the upper balcony; this must also be taken into account. After solving all these issues and choosing the material for the outer cladding of the loggia (balcony), you can move on to the interior decoration. To simplify this stage, you can lay a wall of bricks or foam blocks up to half of the balcony, directly to the double-glazed windows. This will save on insulation.
Warming procedure
The process of floor insulation with Penoplex will vary depending on the type of base.
Room without basement
If we undertake to insulate the floor of the first floor, under which there is no basement (for example, in a country house), then first we cover the soil base with a 40 cm layer of gravel or crushed stone.
Then we lay a sand cushion 10 cm thick, compacting it thoroughly. After this, we install Penoplex slabs and protect the insulation with a layer of waterproofing.
Next, screed and installation of the selected floor covering is performed.
- Another way is to cover the soil base with a reinforced concrete screed.
- Then a layer of waterproofing is laid and insulation is laid.
- The insulation is covered with another screed (not concrete, but made from special mixtures), on which the floor covering is mounted.
- This option takes longer, since the concrete screed dries for about two weeks.
Concrete floor
We bring to your attention an interesting video that shows how a concrete floor is insulated using Penoplex.
If it is necessary to insulate a reinforced concrete floor, then a leveling screed is made over it, on top of which Penoplex slabs are laid.
The insulation is covered with a layer of waterproofing (a special membrane or polyethylene film), then another screed is made and the floor covering is installed.
The screed under the floor covering, depending on its type, can be replaced with two layers of gypsum fiber sheets.
Insulation under the screed
- The insulation sheets are laid end to end, the joints are taped with tape or foil tape.
- This will protect the seams from moisture when pouring the screed.
- Next, additional insulation protection is laid: polyethylene, roofing felt, waterproofing membrane.
- Before pouring the screed, you should take care of the temperature gap for expansion.
- The gap is made with polyethylene foam and should be 1 cm along all walls.
Balcony
The floor on the balcony is covered with logs, the work is carried out using a building level. Penoplex sheets are laid between the slats and fixed at the edges with polyurethane foam.
A coating of chipboard or plywood with a thickness of at least 2 cm is mounted on top, and decorative finishing can be applied to it - linoleum, carpet.
Loggia
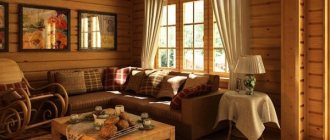
- The design of the loggia allows you to turn this room into a full-fledged living room.
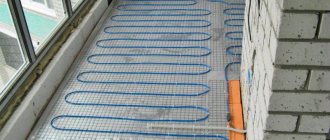
- A water heated floor cannot be installed on a loggia, so an electric heating system is used.
- First, a leveling screed is poured, on top of which Penoplex is mounted.
- Next, a reinforced mesh is laid, and then the heating cable is laid.
- Then the cement-sand screed is poured and the finishing coating is applied.
Possible mistakes
Problems can be caused by poor glazing. If there are gaps in it, no amount of insulation will protect sufficiently. And also misses are:
- using gypsum putty on the seams instead of polyurethane foam (putty contributes to the appearance of cold bridges and condensation);
- refusal to use vapor barriers;
- insulation of only external surfaces while ignoring internal walls;
- insulation work without permission and drawing up adjusted plans;
- performing work in winter (only very few top-level professionals can do this correctly);
- excessive thinning of the insulating layer;
- removal of the battery.
Tips for installing Penoplex
- If installation of insulation in two layers is required, then the slabs are arranged in a checkerboard pattern;
- recommended screed thickness is at least 4 cm;
- if the screed is reinforced, then the distance from the insulation to the reinforced fabric should be at least 1-1.5 cm.
Using Penoplex, you will reduce heat loss in the room, a significant part of which occurs on the floor.
And with a “warm floor” system, the material will not allow the loss of precious heat, heating the ceiling to the neighbor below.
Installation of Penoplex is easy, and the result will please you for many years.
Source: floordigest.ru/ustroystvo-montazh/uteplenie/uteplenie-pola-penopleksom.html
How to insulate a balcony floor with expanded clay
The issue of floor insulation has always been relevant, especially for your own home.
There are many ways to increase the thermal insulation of a room using modern and effective thermal insulation materials.
We will tell you how to do this using expanded clay - a classic material that has been tested for decades.
Advantages of expanded clay for floor insulation
Expanded clay has enough positive properties due to which insulation does not cause harm:
- structure - the density of expanded clay allows it to be used as drainage for highways;
- non-flammability - expanded clay is a non-flammable material, used for fire protection;
- frost resistance - withstands freezing cycles well;
- environmentally friendly - clay processing methods make expanded clay safe for health;
- sound insulation - perfectly absorbs sound waves;
- indifference - expanded clay is resistant to acidic environments.
Floor insulation with expanded clay is safe for people and animals. Made from natural raw materials without impurities, it is used all over the world.
Features of expanded clay as insulation:
- low weight for materials of similar strength;
- flowability, allows you to fill hard-to-reach and narrow areas;
- low cost.
Choosing the type of insulation
The building materials market is very huge and diverse; choosing high-quality insulation is sometimes very difficult. Knowing what exactly you need to pay attention to will help make the task easier:
- Technical condition - reliability, integrity and strength
- Climatic features – dampness, condensation
- Characteristics of the balcony floor - solid monolithic slab and angle of inclination
- Is there a need to raise the floor or use a decorative covering?
The key operational parameter is the heat transfer coefficient, and for any heat insulator - the lower its value, the better the material.
| Thermal insulator | Heat transfer coefficient (W/m×K°) |
| Ecowool | 0,037~0,046 |
| Minvata | 0,046~0,08 |
| Expanded polystyrene and polystyrene foam | 0,030~0,040 |
| Glass wool | 0,034~0,06 |
| Expanded clay concrete | ~ 0,31 |
| Expanded clay | ~ 0,16 |
| Polyethylene (penoflex) | 0,131~0,037 |
Which expanded clay to choose for floor insulation
Expanded clay is considered not only as insulation, it can be used to level surfaces. For example, with expanded clay you can make a warm and smooth screed for the floor in an apartment.
What expanded clay is most suitable for the floor? Based on fraction size, it is divided into three types:
- sand,
- granules,
- gravel.
Each type of material is used in construction work.
Expanded clay sand is the finest of all the listed types, its size is from 0 to 5 mm. Used for thin floor screed.
Expanded clay crushed stone has a size of 10 to 20 mm. Used in the manufacture of expanded clay concrete screeds from 5 cm. Also for insulating floors using the backfill method.
Expanded clay gravel is a porous material with dimensions up to 40 mm. The most popular and used for bulk filling of wooden floors (rough). Ideal for insulating the space between the foundation and the floor.
The use of expanded clay as a heat insulator
The process of insulating a floor with expanded clay is simple; anyone can do it, even without the skills and experience in construction. The main thing is to follow the recommendations for a specific case.
It is possible to insulate floors in various ways. This can be a concrete screed or plank flooring on the ground. Expanded clay can be poured dry or mixed with cement.
Expanded clay insulates apartments on the first floor, under which there are basements, especially well. In addition, the material is used to insulate balconies using the dry method or air-concrete screed.
Insulating the balcony floor with expanded clay
Arranging a balcony or loggia is easy to do by using expanded clay backfill. The main technological measures are similar to the insulation of floors in an apartment. But there are small nuances. The balcony slab initially has a slope to drain melt and rain water, so before insulating the floor with expanded clay, it is very important to straighten the surface with a concrete screed.
To insulate wooden floors, a dry screed is suitable; you just throw in expanded clay. In this case, unevenness and differences in the plane are removed in advance. If cement mortar is used, it will eliminate all defects and unevenness of the floor.
Placing beacons when insulating a balcony is often used. Metal structures are fixed along or across the balcony and divide it into separate zones, which are subsequently covered with expanded clay.
The main filling of the material is a simple step. The main thing is to make sure that the layer does not reach the height of the beacons. If you plan to use a wooden floor, you need to make a sheathing with cells that are filled with expanded clay.
In the case of a concrete floor, after backfilling, cement laitance is prepared and poured over the insulation.
The final stage of insulating the floor with expanded clay on the balcony is a high-quality concrete screed. It is this that serves as the arrangement of the surface plane. The layer thickness must be at least 5 cm.
If all activities are carried out correctly, you can immediately feel a positive result. The floor will become warm and will delight its owners!
Source: skb21.ru/lenta/articles/uteplenie-pola-keramzitom/
Insulation of balcony floors under tiles
Ceramic tiles can hardly be called the undisputed leader in the arrangement of floors on the balcony - they are demanding in terms of the quality of installation, slippery when exposed to water and quite expensive, they give way to more affordable and easy-to-use materials.
However, there are customers who do not even want to consider other options and immediately point to tiles as the only possible way to finish the floor in an open space.
If the balcony, moreover, is in disrepair, the craftsmen will have to work hard to ensure that the finished result is pleasing to the eye and demonstrates exceptional durability.
Leveling and insulating the balcony floor under the tiles: raising the floor level
In some apartments, the balcony is located significantly below floor level, which poses a number of inconveniences. Given the increased sliding ability of the tiles, this can be dangerous - it only takes a few drops of water on the floor to slip and fall, risking breaking an arm or leg.
Therefore, when insulating a balcony floor under tiles, before laying the floor covering, craftsmen are often forced to raise the floor level, while simultaneously solving the problem of its thermal insulation. Among the most popular methods are:
- Traditional concrete screed is not always convenient due to the need for a long wait for the concrete mixture to harden. Otherwise, laying tiles on a surface that is not completely hardened will lead to unevenness and damage to the finishing material. In addition, the concrete screed has a significant mass, which may be unacceptable for balconies designed for low loads;
- Dry screed is a more convenient and quicker method to implement. Allows you to simultaneously raise and insulate the floor using lathing with wooden logs and laying Penoplex slabs. Waterproofing is carried out using film or membrane vapor barrier materials.
- The internal “filling”, with the help of which the floor was raised and insulated under the tiles, is hidden under plywood or drywall. You can safely lay “ceramics” on them, securing it with a special adhesive composition.
So, with the help of these measures, we solved three problems at once: we raised the floor level, insulated it and made it aesthetically pleasing, using floor tiles.
Source: loggias.ru/uteplenie-pola-balkona-pod-plitku